If you have landed on this page through search engine then you already know what Google Analytics is? Because this is what you were searching for and you came to this page. If you are new to Internet then maybe you don’t know about Google Analytics. Let me tell you what is Google Analytics, It is a tracking tool which tracks your website, it tells you about your sites traffic and all. Google Analytics is really important in order to track results of your website or blog. If you use WordPress then I am going to tell you how to set up Google Analytics in your website.
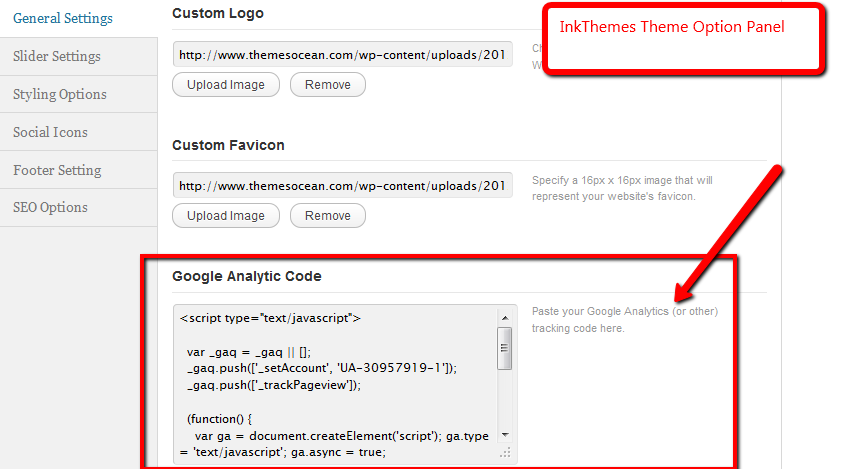
All premium themes from InkThemes Offers you direct option to put your tracking code in your website:
First of all I would love to tell you if you use Premium WordPress theme from InkThemes for your WordPress site then you do not have to do anything for installing Google Analytics code into your site. All you need to do is create your Google analytics account, get analytics code from there and paste it in your website from Theme’s option panel.

But if you already use any other theme which does not support this awesome feature then you do not need to get worried about it. I’ll explain you how you can do that. After installing Google Analytics you will be able to feel the power of tracking your website and knowing your audience. It will directly result in your progress. Lets see how you can setup your own tracking code in your WordPress website directly:
1#. Create your Google Analytics account:
If you have not registered for Google Analytics yet then you should signup at https://www.google.com/analytics/#?modal_active=none. Once you signup for Analytics get your javascript tracking code by adding your website in your account and other necessary information. You need to copy that javascript code. That JS code looks like this:

2#. Now Add that Javascript code to your wordpress theme:
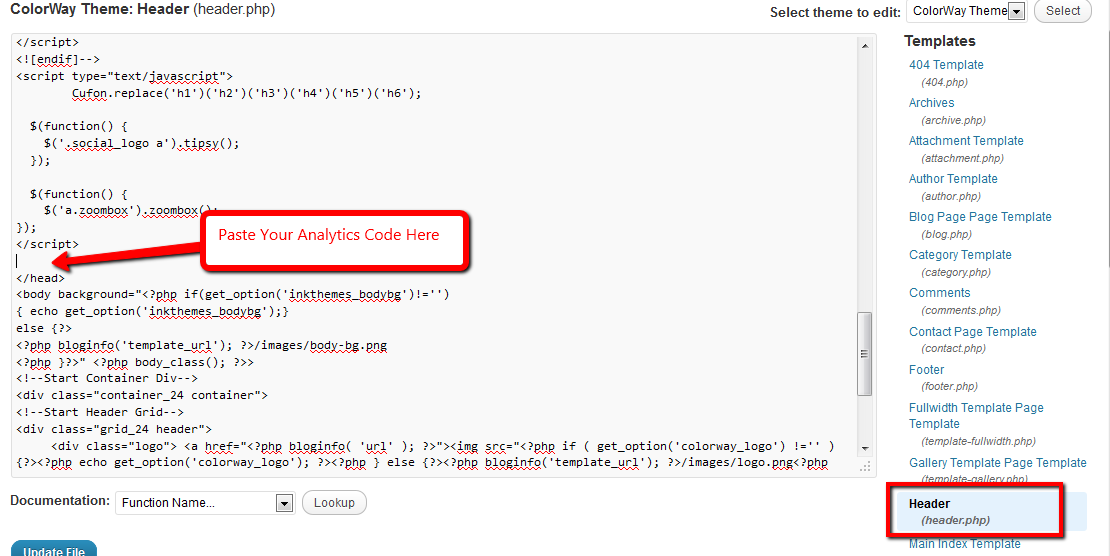
Go to your wordpress admin panel, then go to “Appearance” option and then click on Editor. You will get the code of your theme’s file there. Now find and open “footer.php” file. Now click on header.php it will open up in an editor. Now you have to paste your analytics code just above the closing </head> tag. And you are almost done. Now simply save the file.

Well I must tell you that putting Analytics code in the <head> part of your website is recommended because this asynchronous tracking code tracks more accurately when placed in header. As your code wont be waiting for server’s reply so you can put the code in <head> part. Now Google Analytics will track every page of your website and you can login into your Google Analytics account to see the stats.
3#. Check if your Tracking is working or not:
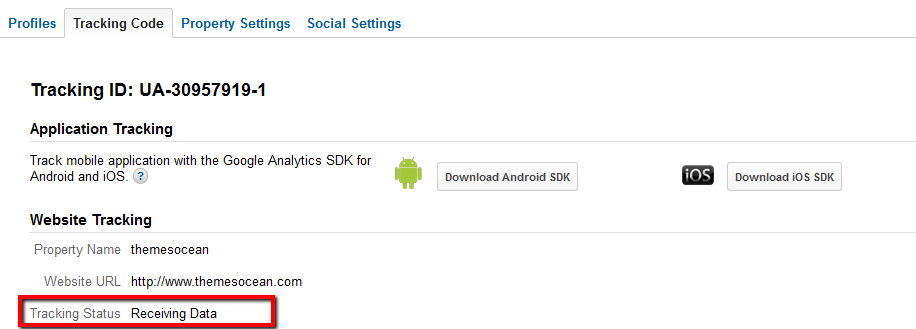
Have you installed that tracking script correctly? Lets check it. Login into your Google Analytics account, click Admin panel in the top right corner. Open your website account and then click on “tracking code” panel. If the tracking status is “Receiving data” then you have done it correctly.

If you do not get the same status then there is some problem and you should refer official Google Analytics help in their website.
Conclusion: Since tracking is really very important in order to know where your website is going so that you can improve it. If you do not want to install your tracking code this way then you can simply find a suitable plugin for the same from wordpress plugin directory. You can also enable jetpack to track your stats but Google Analytics offers you more detail so I prefer that. Jetpack comes by default with wordpress installation, in order to activate jetpack you need to connect your website with wordpress.com account. Choice is yours, so pick the best one for you.


