Are you planning to launch a responsive video-based online website and finding the easiest way to do so?
Then, VideoMember WordPress theme is the perfect one-time solution for you.
This template is a blend of latest technology and number of additional amenities like responsive design, advertisements section to display adds, separate subscription area to show memberships and much more.
These high-end features will help you Create A Video Membership Website to share video subscriptions and earn revenue by selling online video memberships.
So, go on opt for the right and premium option by choosing VideoMember WordPress Theme.
Click HERE to see how your video sharing website will look like.
Also check out our another article on:-
- Video WordPress Themes
- How to create a video selling WordPress website
- How to create a video sharing WordPress website
1. Beginning (Installing the theme)
To be able to use VideoMember WordPress Theme, you need to install WordPress on your server. If you don’t know how to do it, please visit: https://codex.wordpress.org/Installing_WordPress
To install the VideoMember theme, just put the theme folder “VideoMember theme” in themes directory under wpcontent and activate it from the WordPress admin. As soon as you do that, your website would get ready.
 Next, click on Begin installing Plugin to activate the InkMember Pro Plugin that is required with this theme. After the installation, click on Activate to activate the plugin. Now ready to go.
Once the plugin is activated, the InkMember option will be displayed on your dashboard and now you can configure it.
Creating the Pages
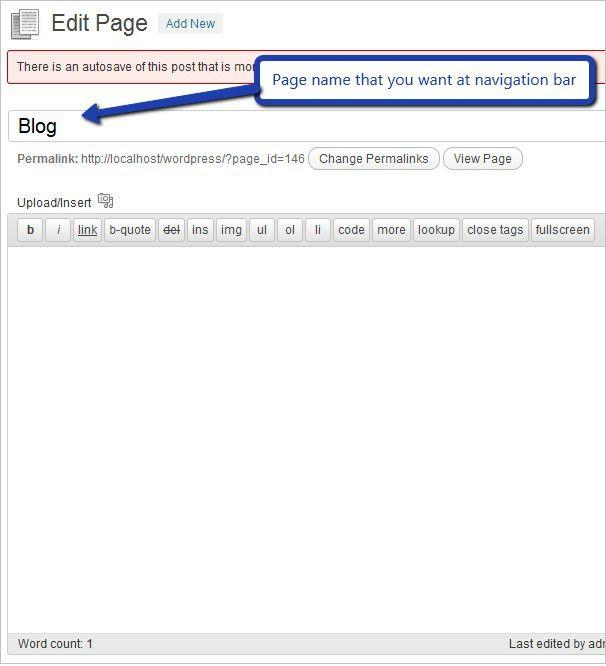
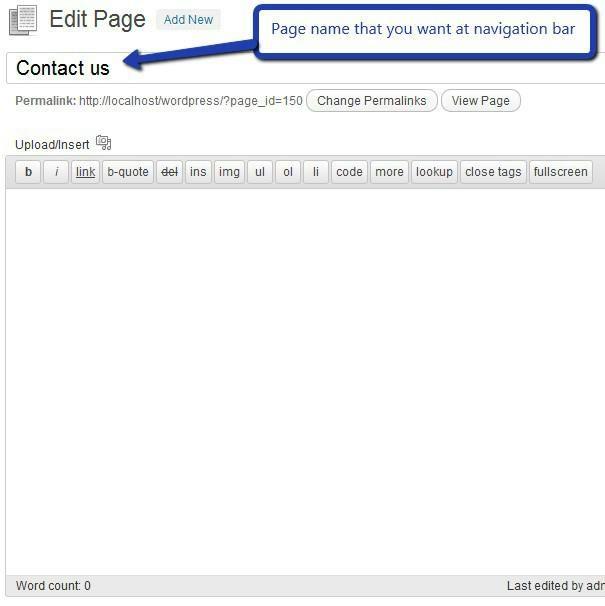
You would need to build new pages from Add Page menu and select the Appropriate Template for each page.
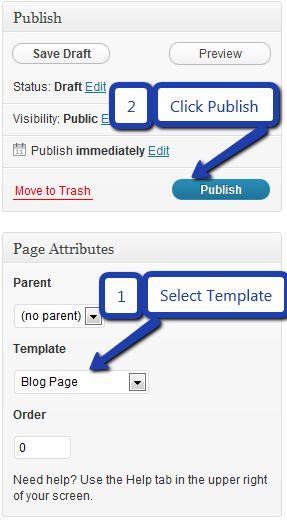
- For “Blog” Choose the “Blog Template” from Page Attributes.
- For “Contact Page” Choose the “Contact Us Template” from Page Attributes.
- To show all the video choose the “Video listing Template” from page attribute.
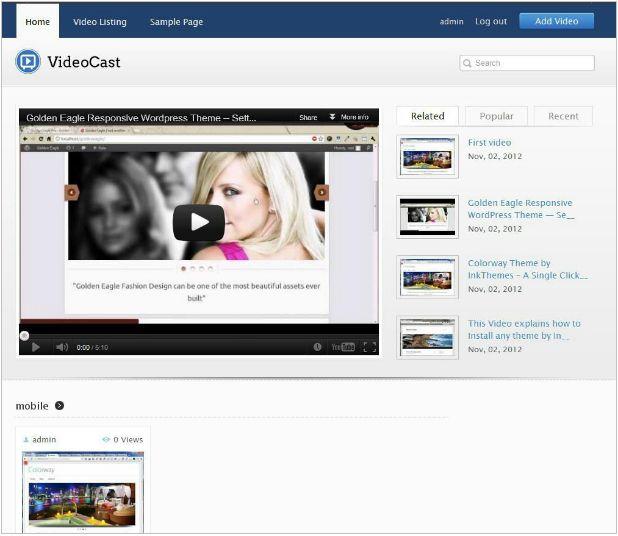
2. Final Homepage.
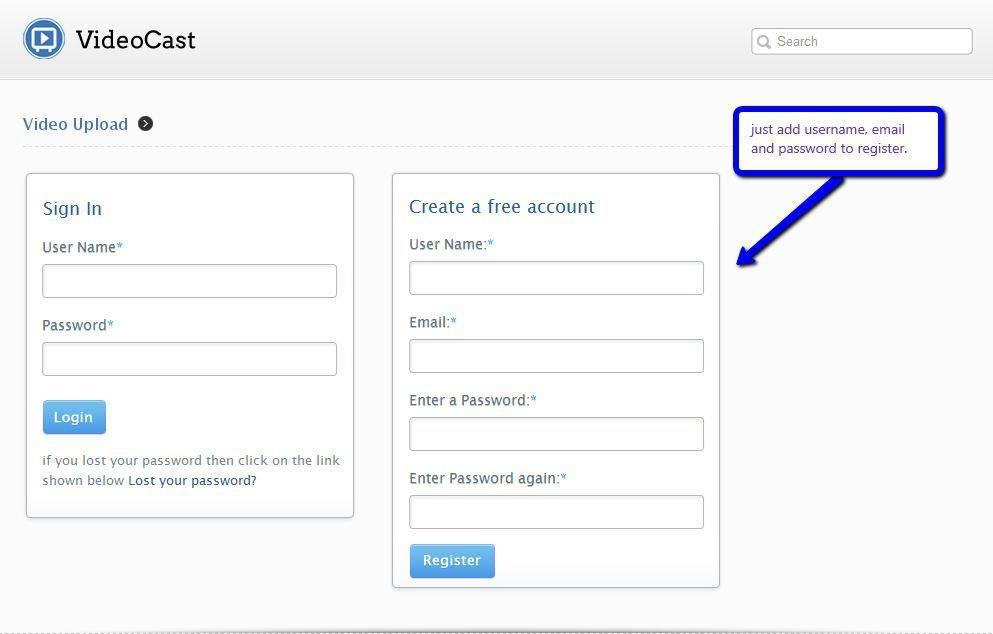
3. How To Register.
To register you have to fill the form in which you have to write the username email and password to your account. After registration, you can add your video.
4. How Admin Can Add Video Clips
An admin can add the video directly from the Video tag in the dashboard. Go to Video > Add New Video Here an editor will come where you can add the link to the video or you can directly add the video from your PC.
You can add the direct video link to the following “Youtube, Vimeo, Metacafe, a daily motion”. You have to just put the address on the link. Also, a user can add its image to the video before it started playing. This is the backend process. However, an admin can also add the video from the frontend, which is shown in the next section.
5. How A User Can Add Video.
A user can directly add the video from the front end, here is the image shows that how a user can add the video.
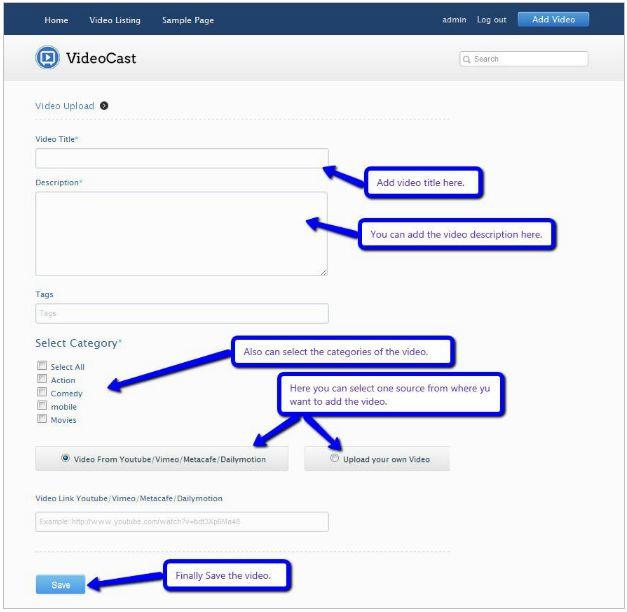 Format of the video that should be added are:
A user can add its own video in the following format “.flv .mov .mp4”.
6. Configuring Homepage
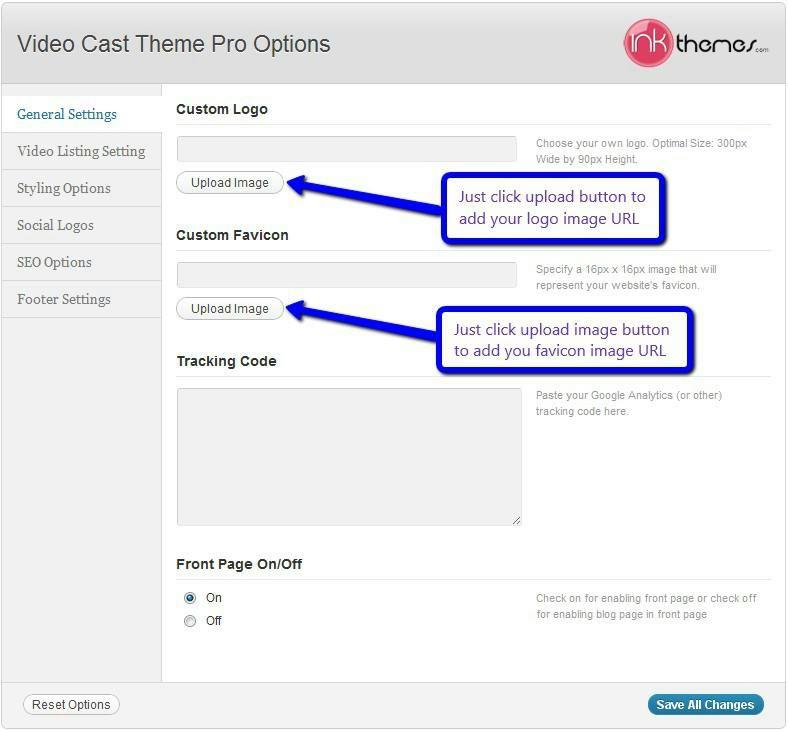
Specifying Logo & Favicon
Please go to “Appearance > Theme Options” in WordPress admin and enter the URL paths of your logo and favicon into the appropriate fields under “General Settings”.
7. Video Listing Settings
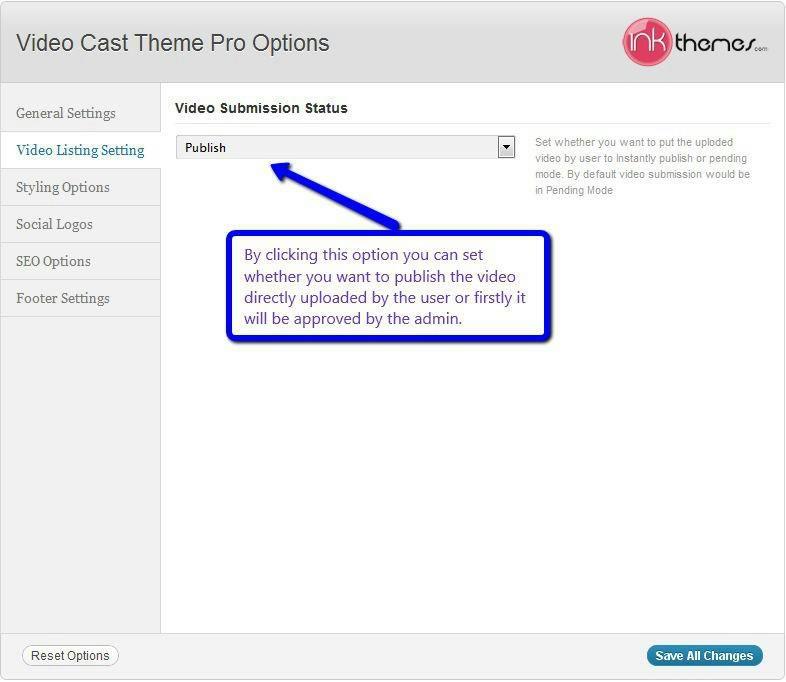
In this section, you will get two options from which you can select whether to publish the video directly or it should be published with the permission of the admin.
8. Styling Options
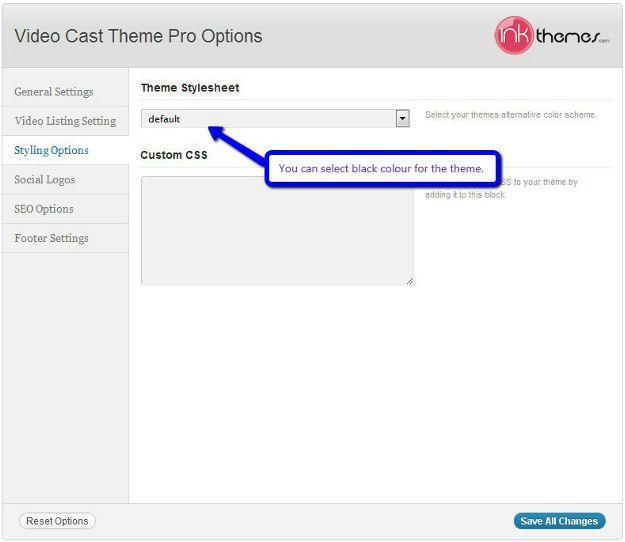
Modifications can be made easily by adding the CSS code in custom CSS section. We have provided a black color option with the theme you can use it.
9. Social Logos
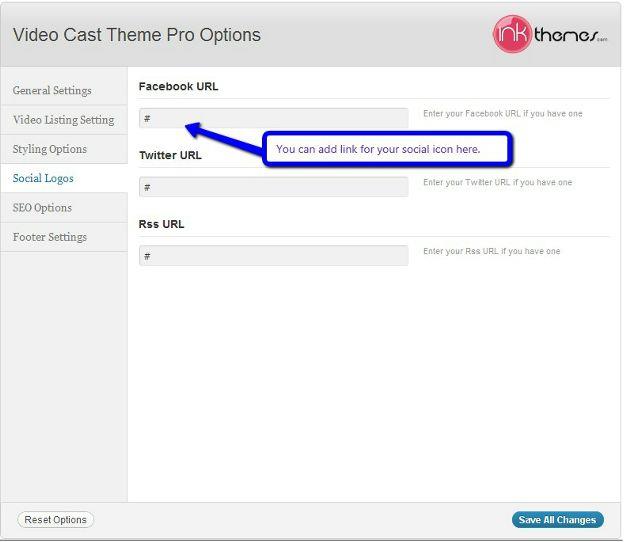
From this option you can add social logos to your website, You have to just add the link to your social icon
10. Footer Settings
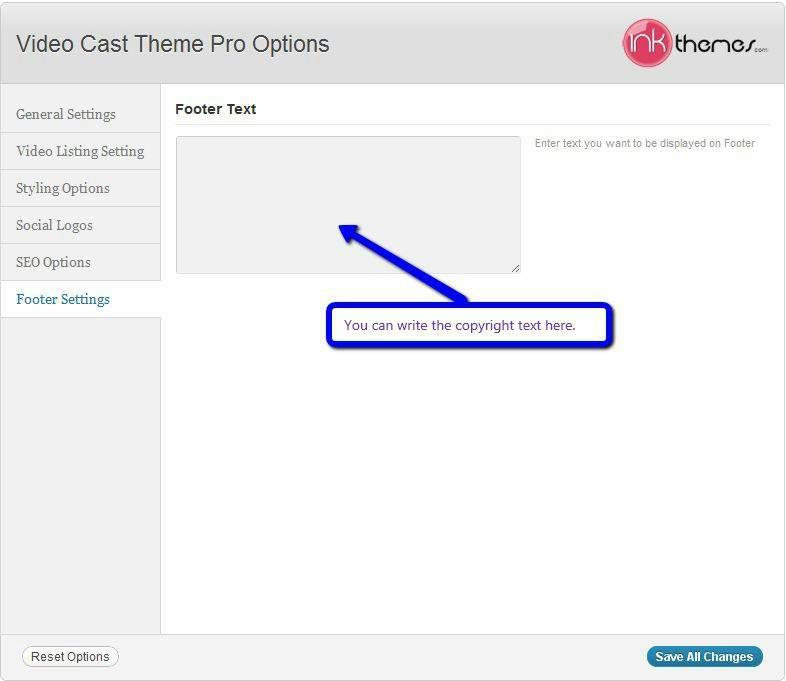
Here you can write the footer copyright text.
11. Creating Category
To create categories go to Video > Video Categories
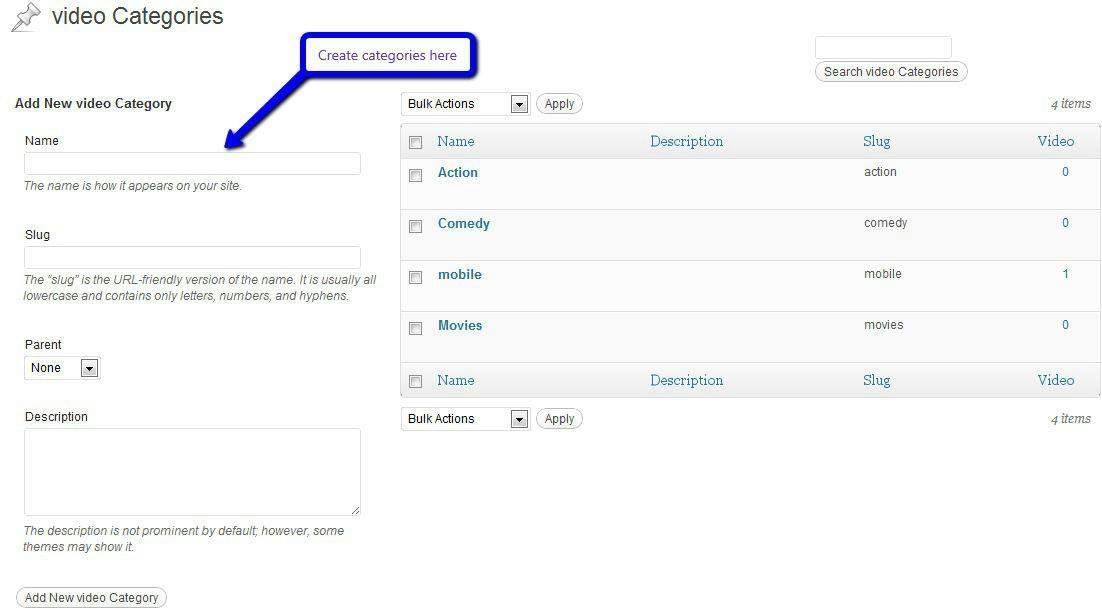
Also, some categories are already made as an example.
12. Building Blog
Blog Layout
Similar to the Gallery Page, To create a blog page all you have to do is select the appropriate Blog Template from the Page Attributes. All your blog posts will be displayed on the Blog Page. You can change the page in which you want to show the posts by altering the posts page in the Reading section.
13. Adding Post
You can add images to the post and select the size of the image which will be displayed on the blog page of the theme. Below the image is shown where you can select the size of the image while adding it in the post. If you want to show the image in vertical then you have to select the “Vertical Photo” checkbox, and also you can select the position of the page i.e. if you want to show it in
If you want to show the image in vertical then you have to select the “Vertical Photo” checkbox, and also you can select the position of the page i.e. if you want to show it in the left side or in the right side.
14. Contact Page
Contact Layout
To create a Contact page all you have to do is select the appropriate Contact Template from the Page Attributes.
15. Video Listing Page
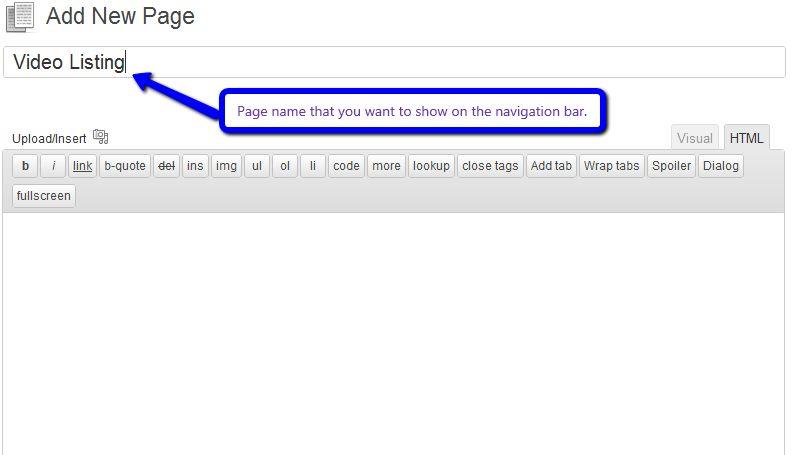
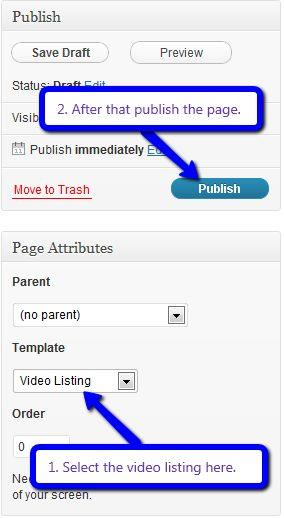
Video listing page shows all the videos which are added to the website. To create a Video listing page all you have to do is select the appropriate Video Listing Template from the Page Attributes.
16. Building Menus
Menu with Menu Manager
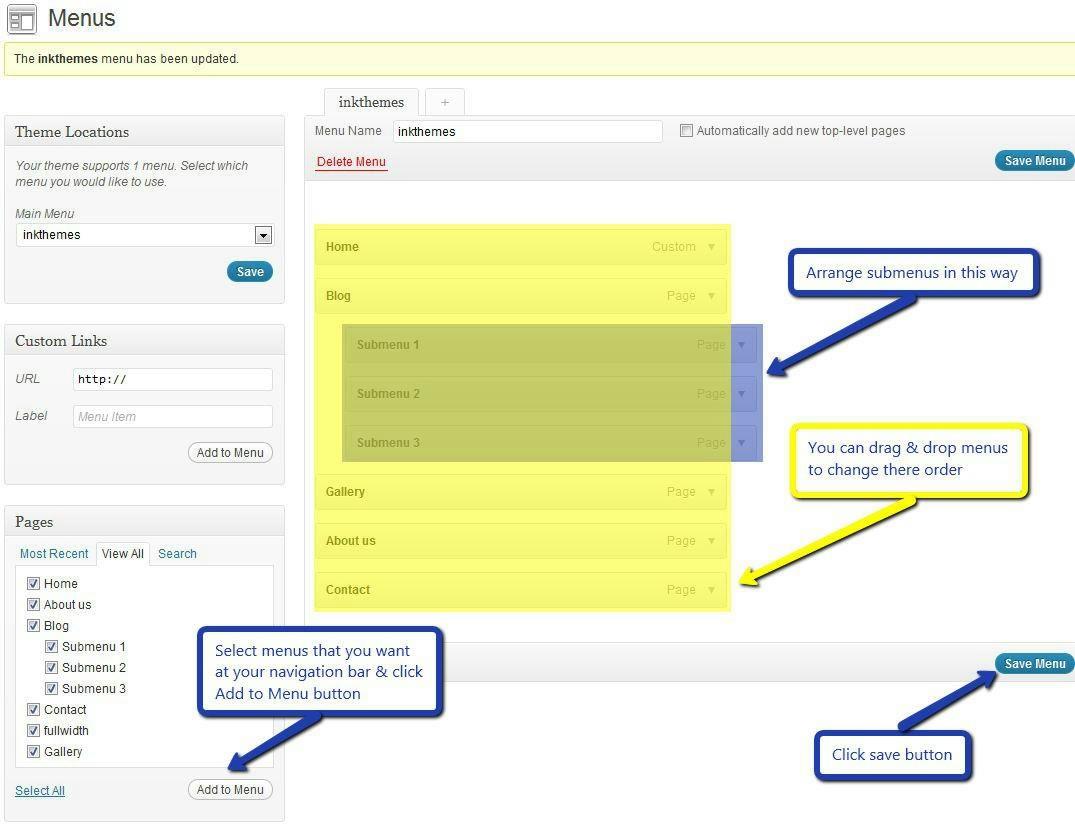
VideoMember Theme had a prebuilt feature of displaying all the pages and subpages in the menu. However, you can also build a custom menu using the Menus option under the “Appearance” Section.
You can also change the order of the menu according to your requirement by simply drag and drop the menu items.
17. Building Dropdown Menus
For making drop-down menus all you have to do is add new page
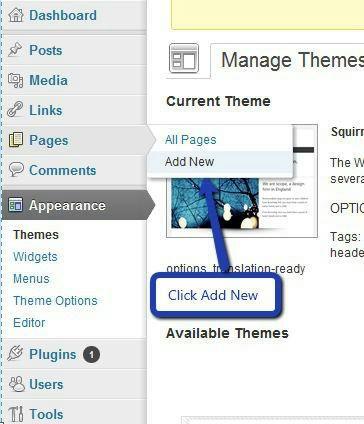 Then name it for eg. Submenu 1 and set any of your pre-developed pages as a parent page for which you want to create drop-down, after that select template & click publish button.
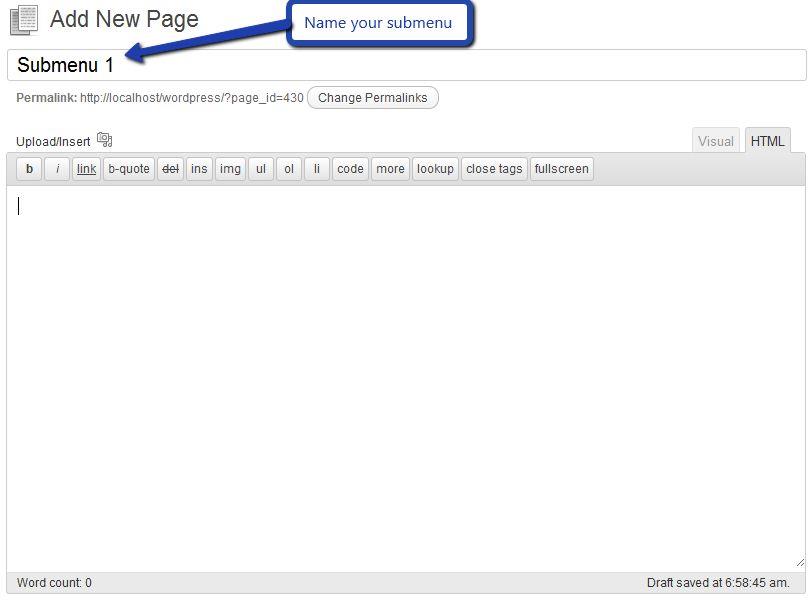
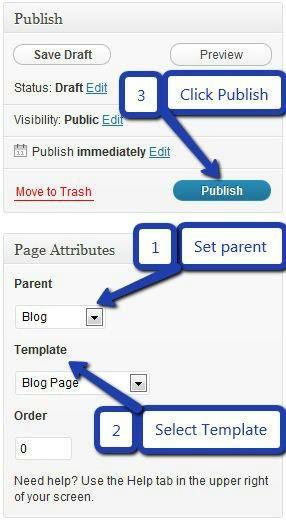 A similar process you can follow making multiple Submenus
18. How to add Widgets
Widgets in Sidebar
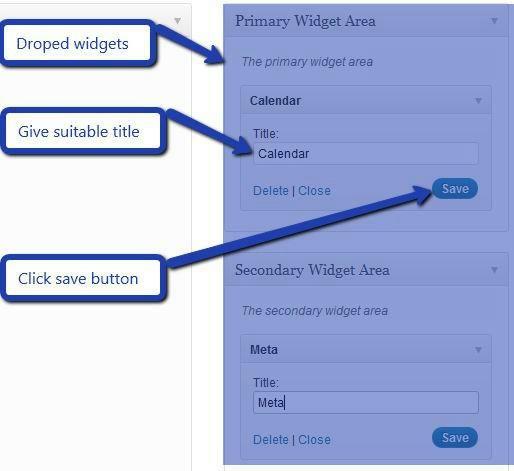
For adding widgets in the sidebar all you have to do is select Widgets option from Appearance panel, then drag widget of your need & drop it in primary widgets area or in secondary widgets area according to your requirement, at the end click save button and your widgets are ready to use.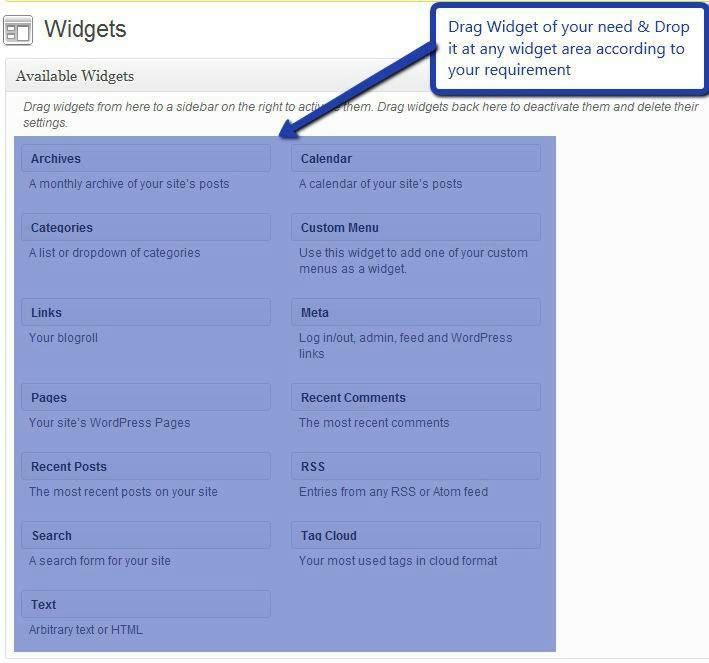
Widgets in Footer
For adding widgets in Footer same as sidebar widgets all you have to do is select Widgets option from Appearance panel , then drag widget of your need & drop it in „First footer widget area, second footer widget area‟ according to your requirement, at the end click save button and your widgets are ready to use.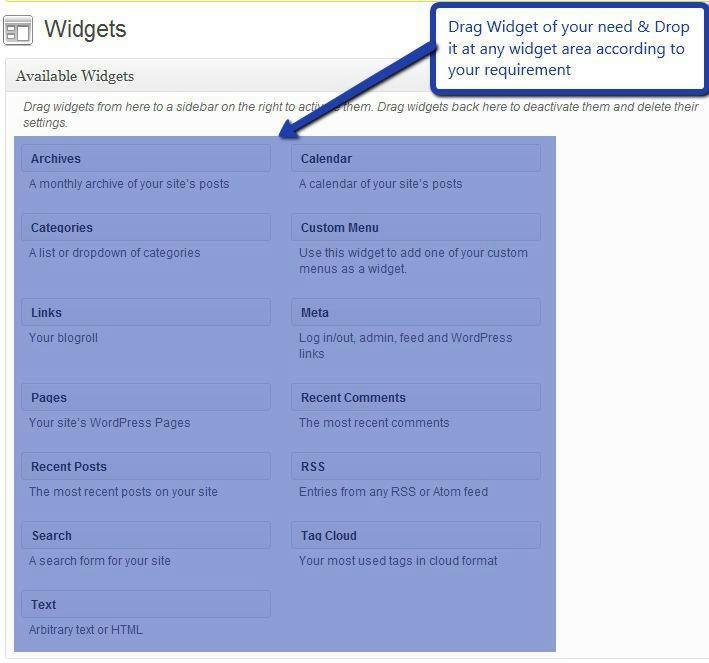
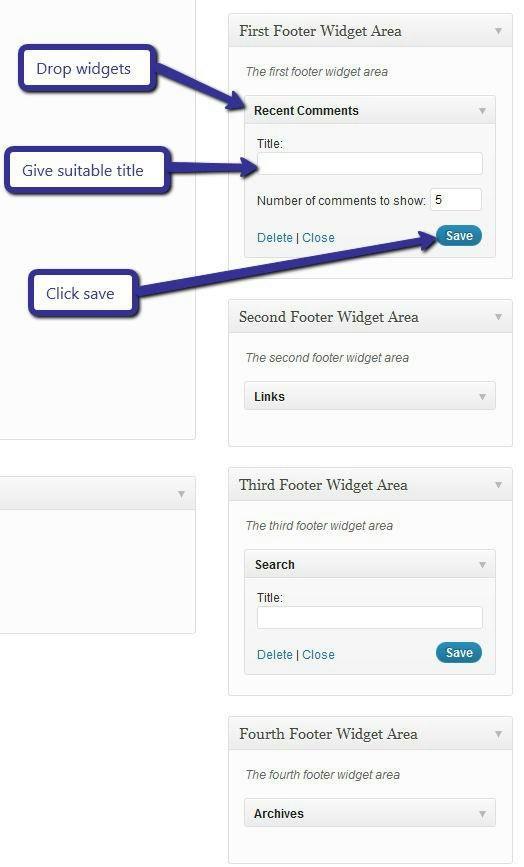
For example, your footer looks like
19. Different Widget In Different Page.
Here we have given facility to add different widgets in different pages, suppose user want to add different widgets in different pages then he/she can drag and drop the widgets to it desired location. It will come on the selective page.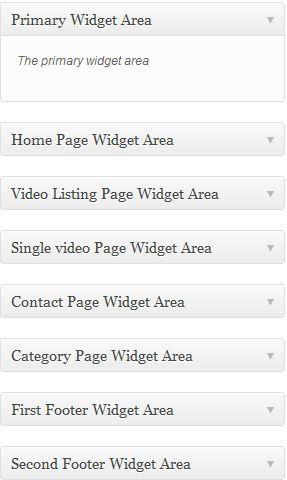
How to use InkMember?
Step#1. Under your Dashboard go to InkMember option and then select InkMember from sub-options.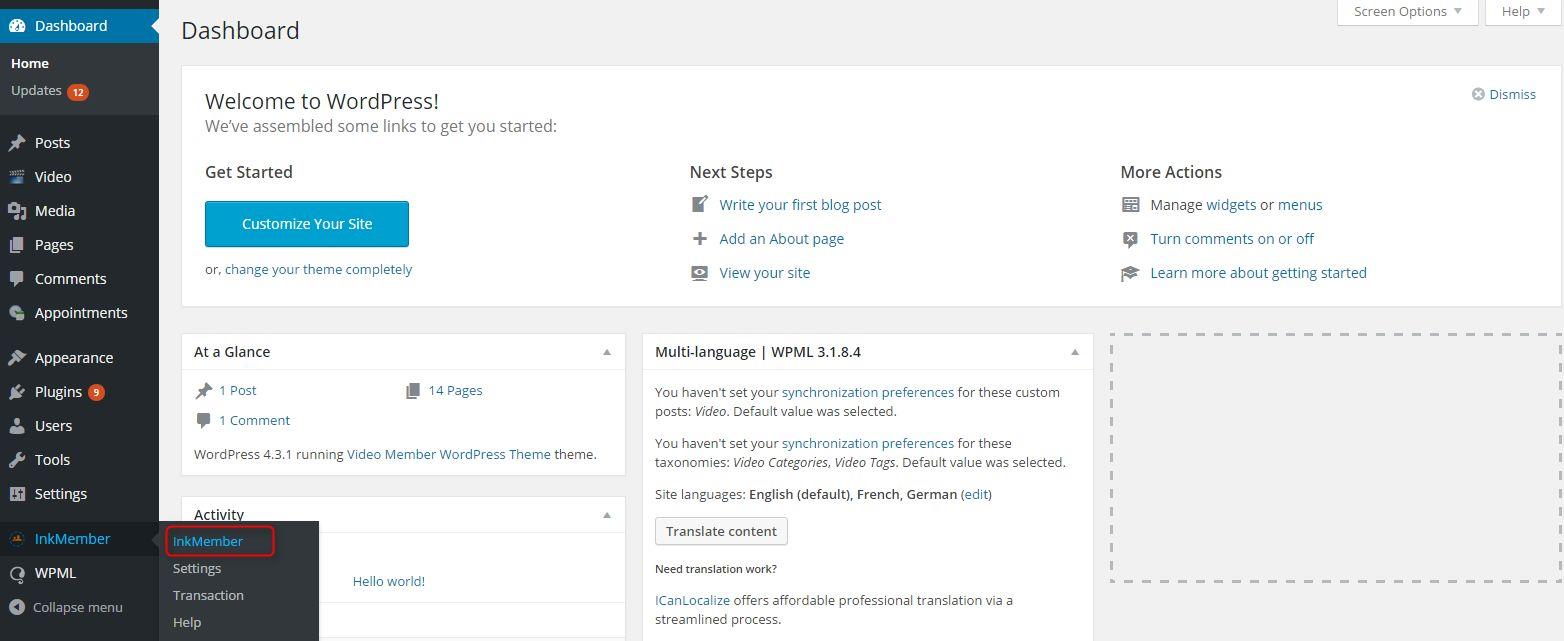
Step#2. To add a new product click on the Add Product option positioned at the top-left side of the window.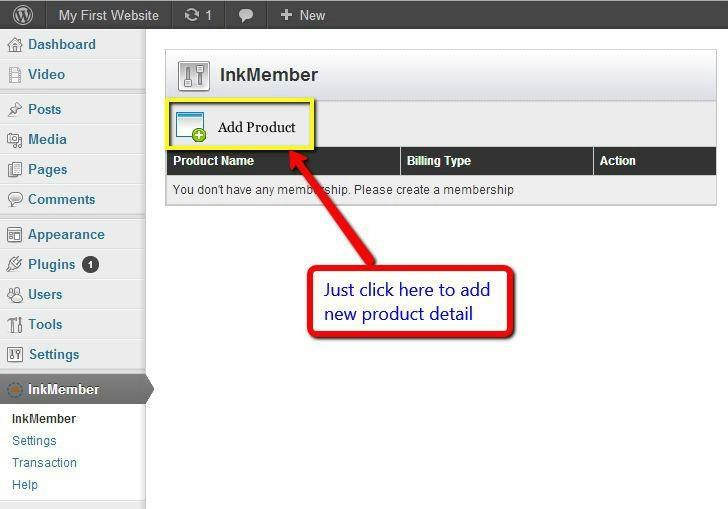
Step#3. Enter your product details in the respective fields like Product Name, Billing Option, Currency, Product Price, Subscription and then click on Add Product button.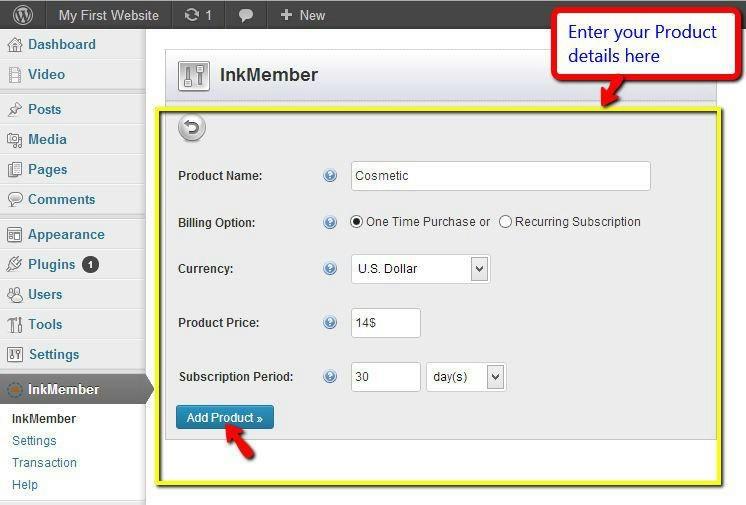
You can also change the mode of Billing Option and set the subscription details according to your choice.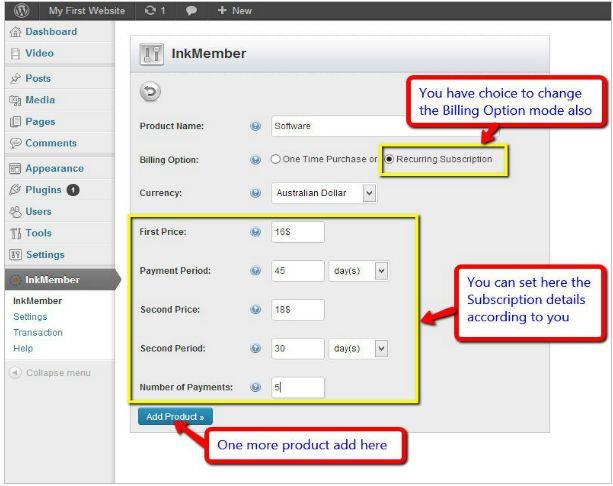
Step#4. Now, this is your product list and you can edit/delete your product any time with given option.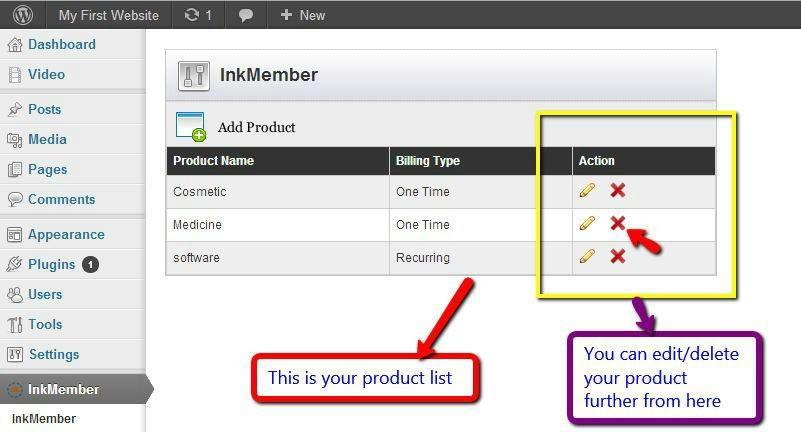
Step#5. Go to the Settings option to set your PayPal Email and by default, the Sandbox Mode is set to No. The Sandbox mode is given so that you can test whether the online transaction is working with PayPal or not. In order to test this, you can set the Sandbox mode to Yes.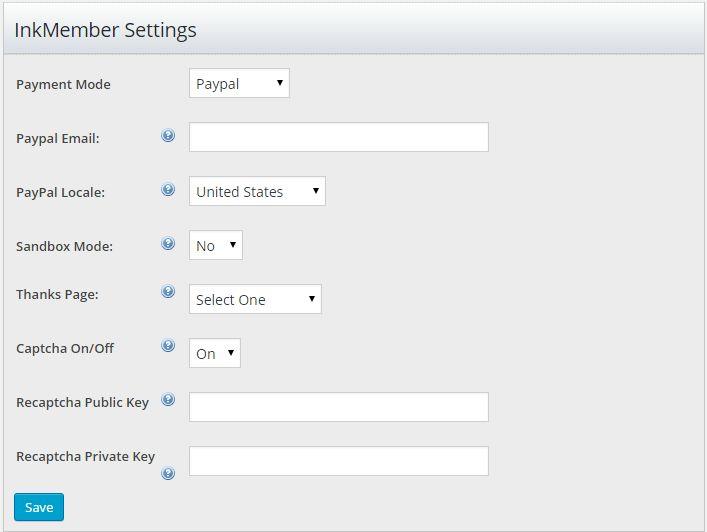
Step#6. Go to Transaction option to view all the transaction details of your users.
You can see here an example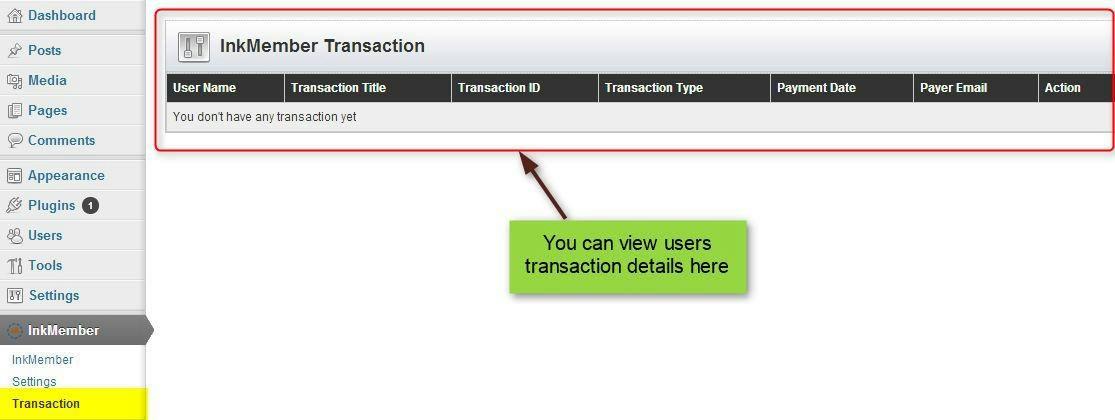

Step#7. You can use the following shortcode in your content which provided under the Help option.
Step#8. You can insert shortcode on your page/posts by just click on icon appears in the image given below.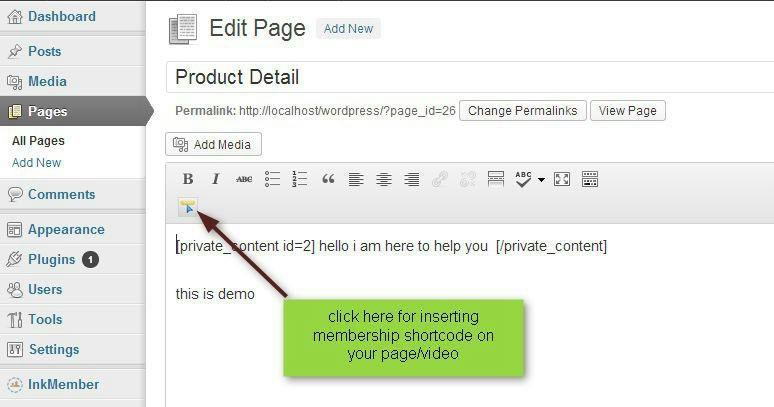
Enter your product id in the Enter Membership Id to protect your content and then click on 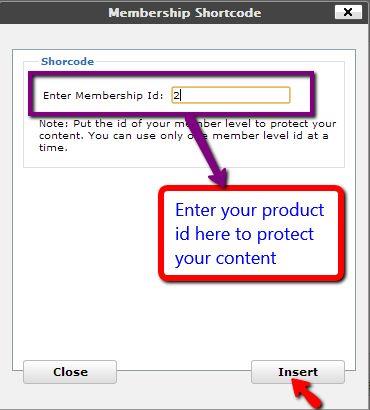 Insert.
Step#9. Check on those products that you want to include in your page/videos.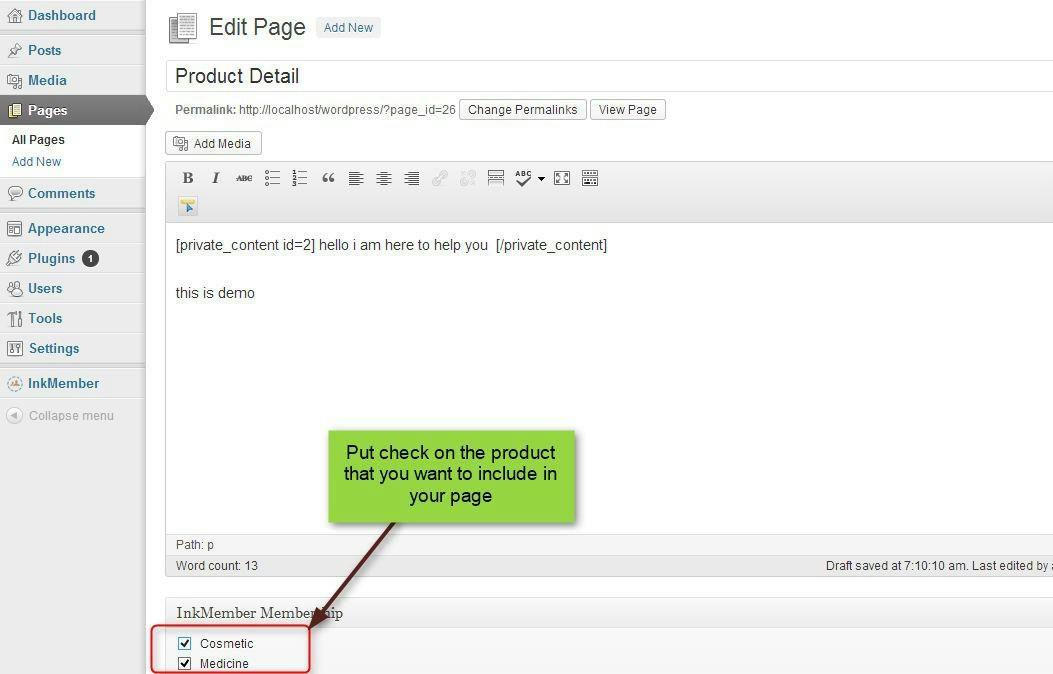
And then click on Update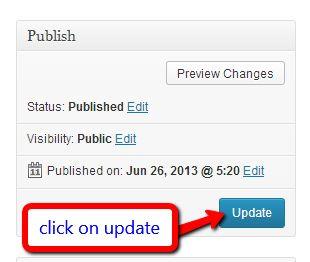
Step#10. You can see here how it appear to your viewers and if user is interested then they can click on Buy Now with PayPal option to make payment for purchasing your product.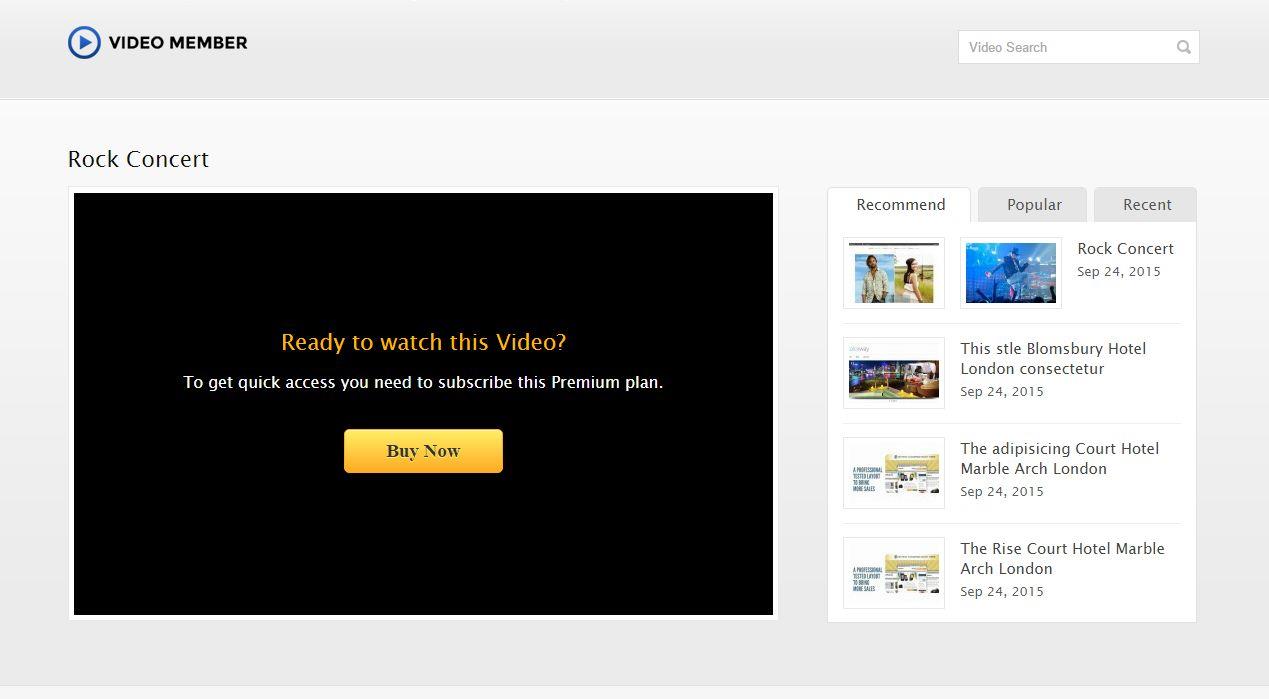
So, get your own video sharing website with Video Membership Website With WordPress
Heading to launch your membership website? You might also like our article on how to create your membership website for selling digital content.
Viagra cost pbs australia: Sildenafil Terry White Chemists healthdirect The results could be messy and driving risk way higher than the approach intended. viagra pill Recent Leagues.

