Foogo WordPress Theme Complete
In the following documentation, you will know about how to use the Foogo WordPress business theme on your website. Following are the points that have been explained:
What is a Foogo theme?
How to install the Foogo theme?
How to create pages?
How to create the menus?
How to create drop down menu?
How to create posts on your website?
How to build up Gallery?
How to display a video on the Home Page?
How to set up the widgets?
How to use the various functions of the theme options panel?
How To Upload Logos and Home Page Top Image, Heading, Sub Heading, Top Button Text, Top Button Link?
How to do the Home Feature Settings?
- How to use the Home Page Bottom features?
- Set Your client logos slider
- How to use the Styling Options?
- How to do the Footer Settings?
You can see various previews of the Foogo theme at this link – https://www.inkthemes.com/wptheme/foogo-theme
Let us discuss the above topics one by one.
What is a Foogo Theme?
The Foogo is an elegant WordPress Business theme for your business website that helps you to showcase your products and services in a very professional way. The theme is elegantly designed to grab the attention of your visitors.
This brand new, highly responsive WordPress theme is extremely flexible to be used for multiple kinds of niches.
The Foogo theme focuses mainly on providing better exposure to your business by letting you to effectively showcase your products and services and just about everything that attracts people. With whatever activity you are involved, Foogo lets you drag people’s attention to your work.
The Theme is highly customizable and fully responsive and you can have your own brand new Website for your Business or Personal Use within few clicks.
How to Install the Foogo Theme?
Before installing this Foogo theme on your website make sure that:
You have a web server installed on your machine.
You have installed WordPress on your server.
Installing the theme is very simple and easy. It will hardly take a minute. Just follow the simple steps given below.
Go to your WordPress dashboard to install the theme.
Dashboard -> Appearance -> Themes -> Add New
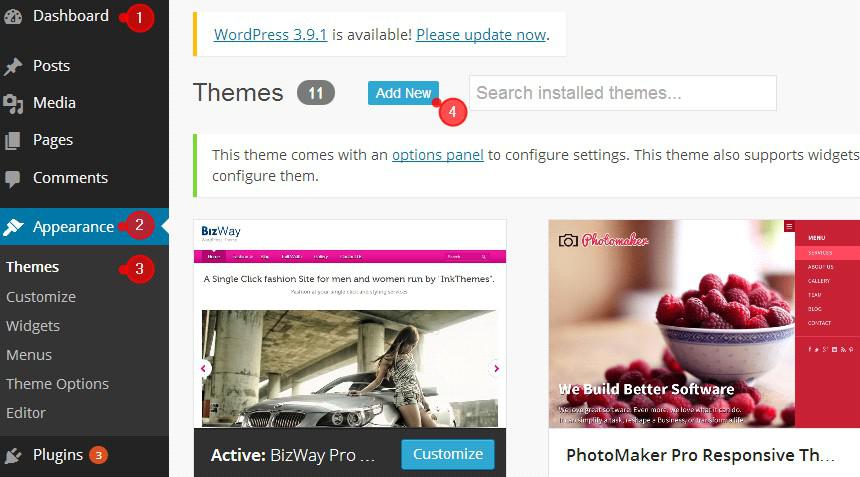
Choose the downloaded ‘foogotheme.zip’ and upload it on your dashboard.
Upload -> Choose File -> Install Now
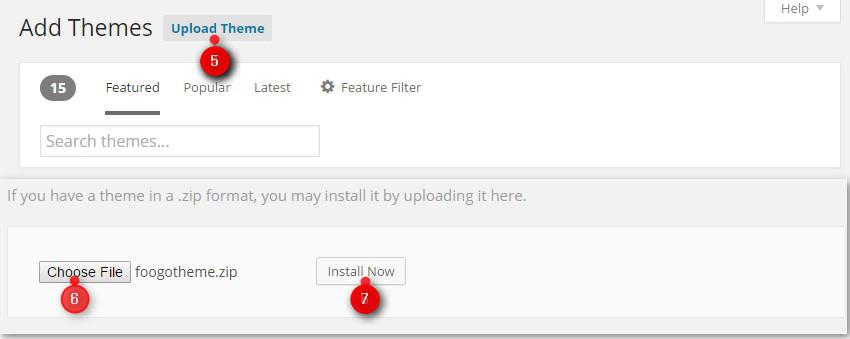

Click on option. The theme is now. activated and you can configure it from the theme options panel.
How to Create Pages?
Various Page Templates have been provided in this theme.
Blog Page
Contact Page
Fullwidth Page

You can easily create pages using these page templates by selecting a template from the ‘Template’ option.
For example-
Creating an ‘About Us’ Page with a ‘Full-Width Page’ Template:
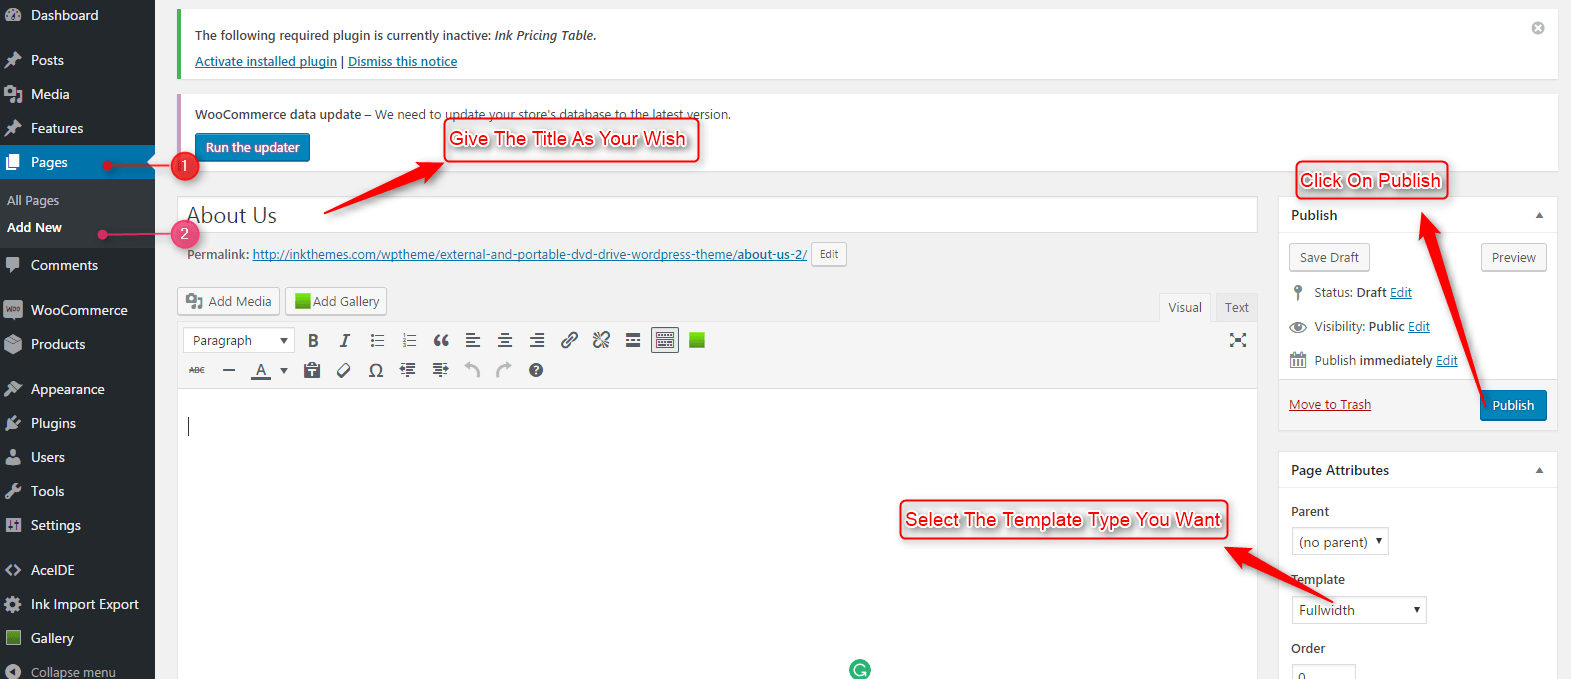
Go to the Dashboard -> Pages -> Add New
Click on ‘Publish’ and your ‘About Us’ page with the full-size template is created.
You can create many pages with a particular template or you can also choose the default template for creating pages without these available templates.
How to Create Menus?
Creating the menus is very simple. Follow the directions provided below: Then, Click on create-> a new menu-> Enter Menu Name-> let’s say ‘menu’.
The menu is created. Now you can add pages and customize the Menu. Have a look at the illustration provided below:
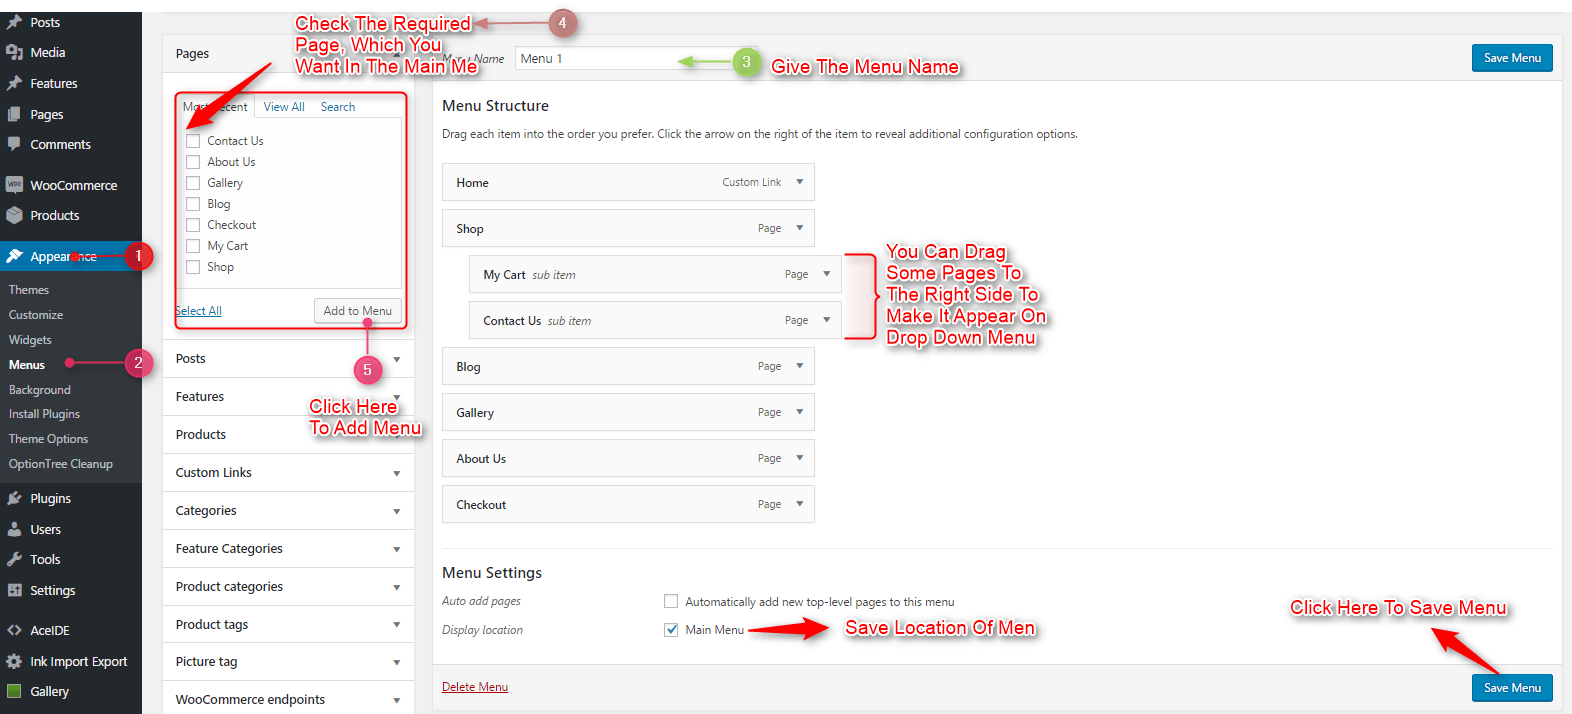
Click on ‘Save Menu’.
How to create a drop down menu?
Go to Dashboard -> Menu -> Select a menu to edit -> Select
Drag and place the submenus below the home page menus as shown below:
Click on ‘Save Menu’.
How to Create Posts on your website?
Go to Dashboard -> Posts -> Add New

-> Click on publish.
How to add a video to the Home Page Sidebar Feature Widget Area?
You can also add a video on the Home Page at the Sidebar Feature Widget Area or theme options panel. Follow these steps to add a video.
Go to the Dashboard -> Appearance -> Theme Options -> Home Settings
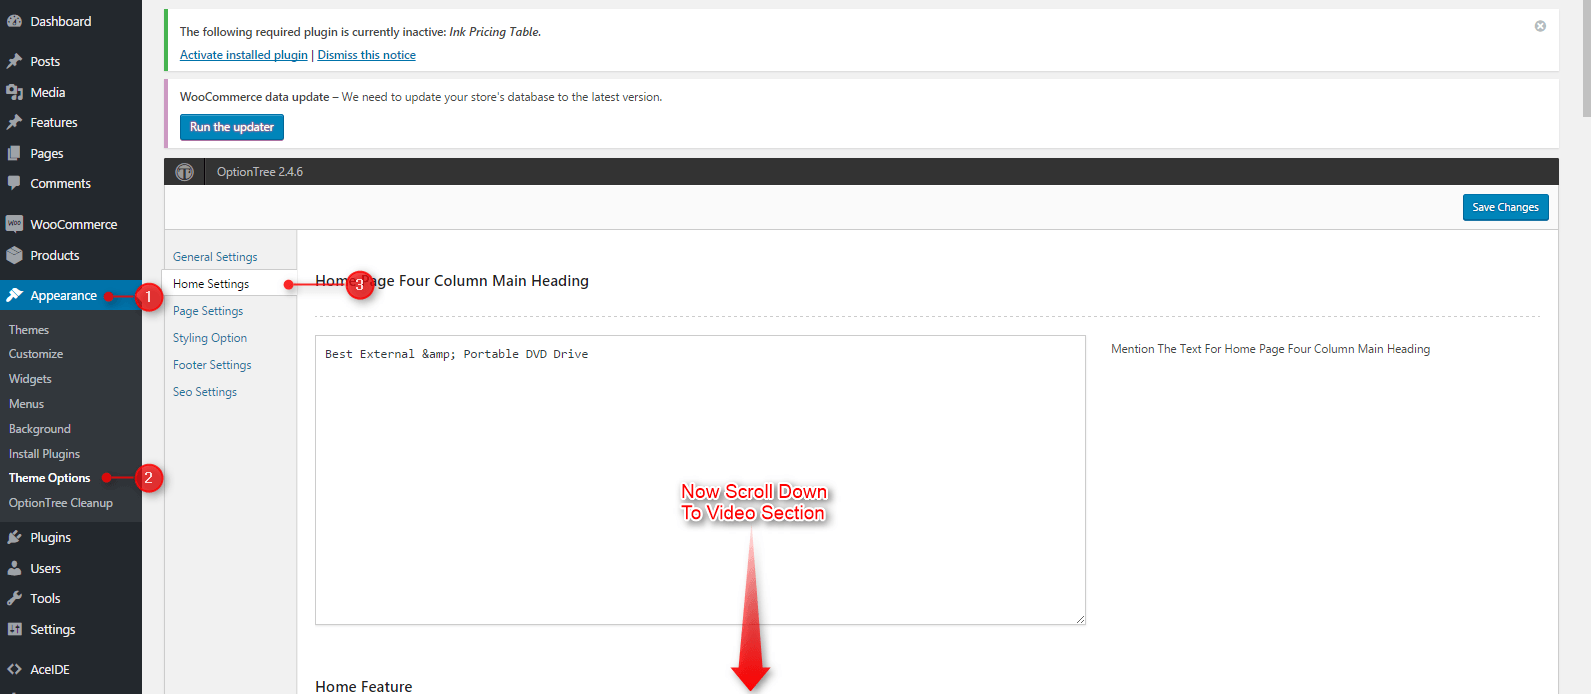
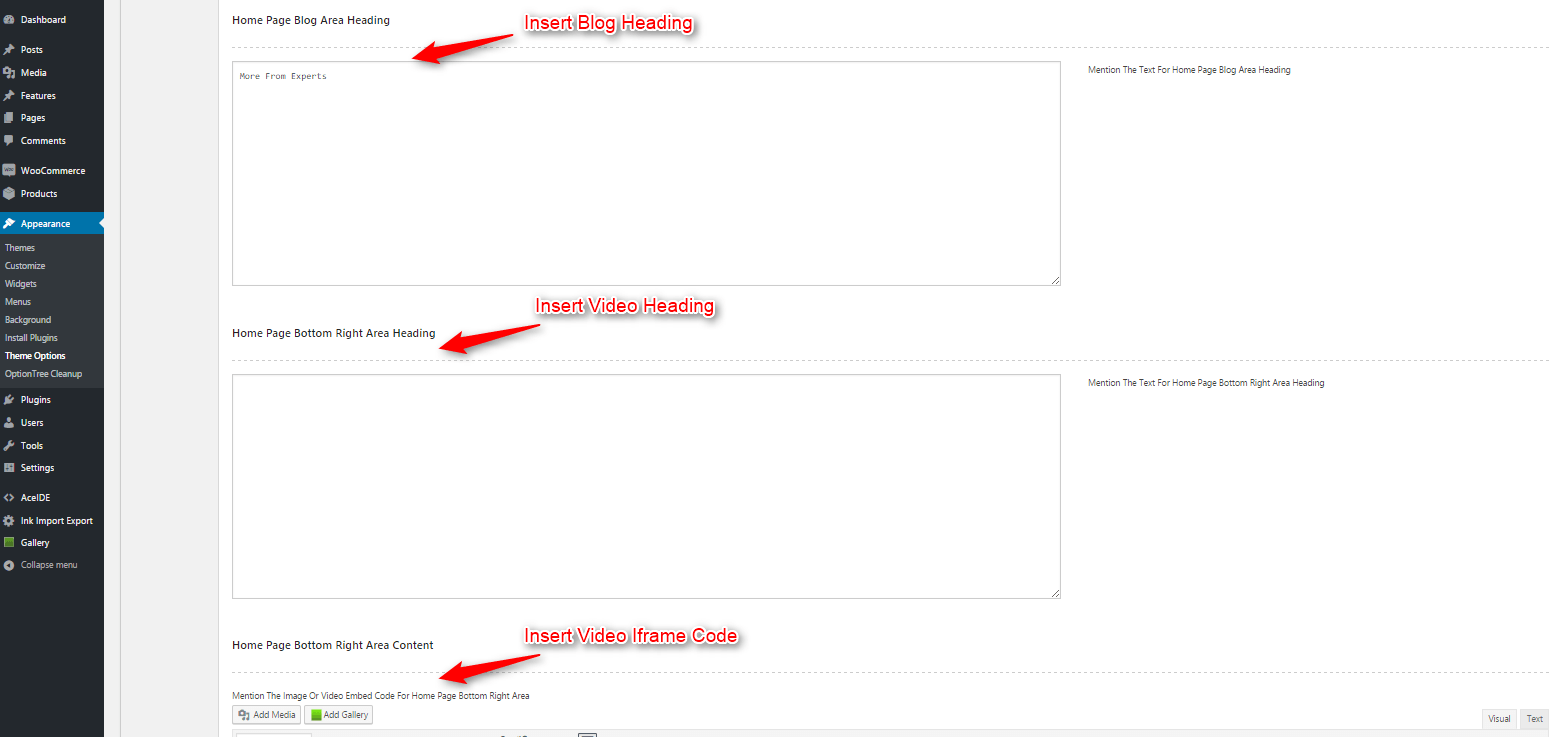
Go to the home settings and scroll down to reach video section, put the iframe code into the box and save it.

Give a Title that’ll display above the video and paste the <iframe> code of a video.
How to use the Widgets?
Go to Dashboard -> Appearance -> Widgets
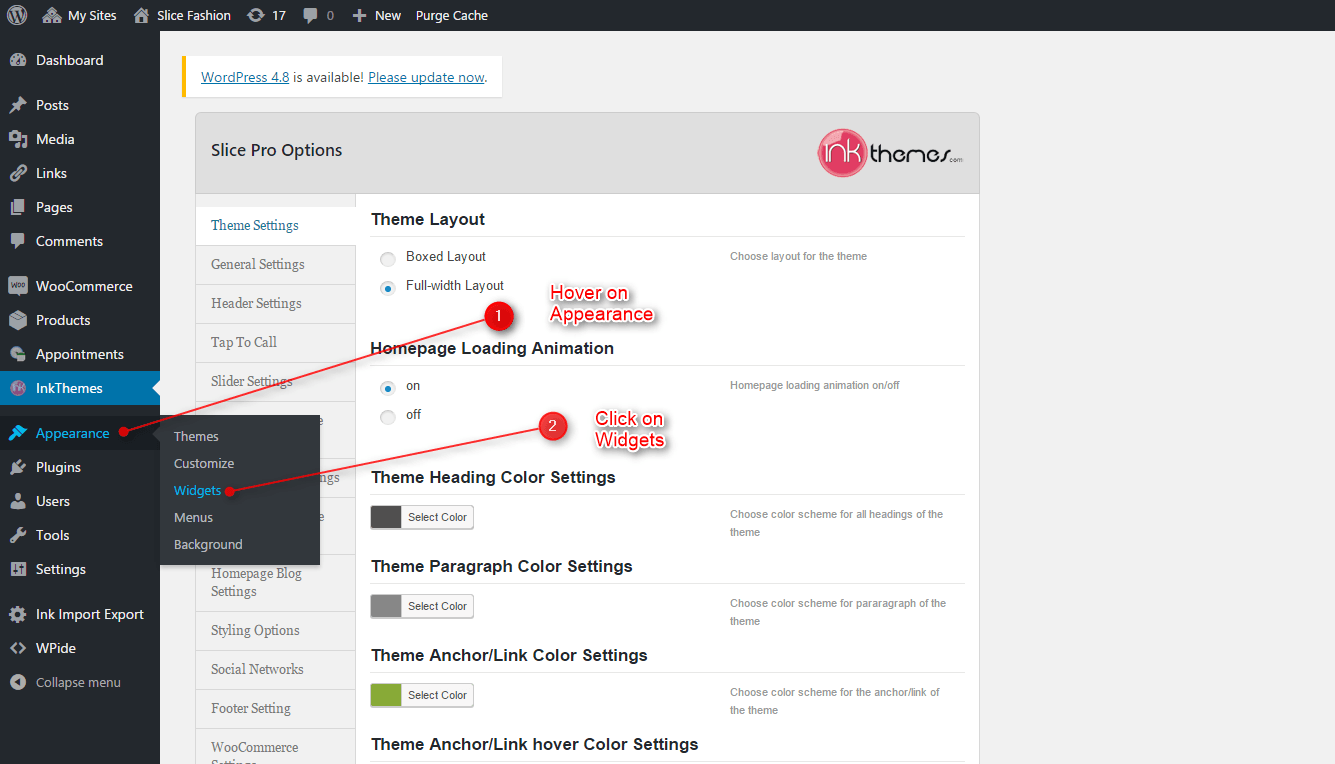
Now you can simply drag the required Widgets of your choice from the left and drop them at the desired widget areas displaying on the right side.
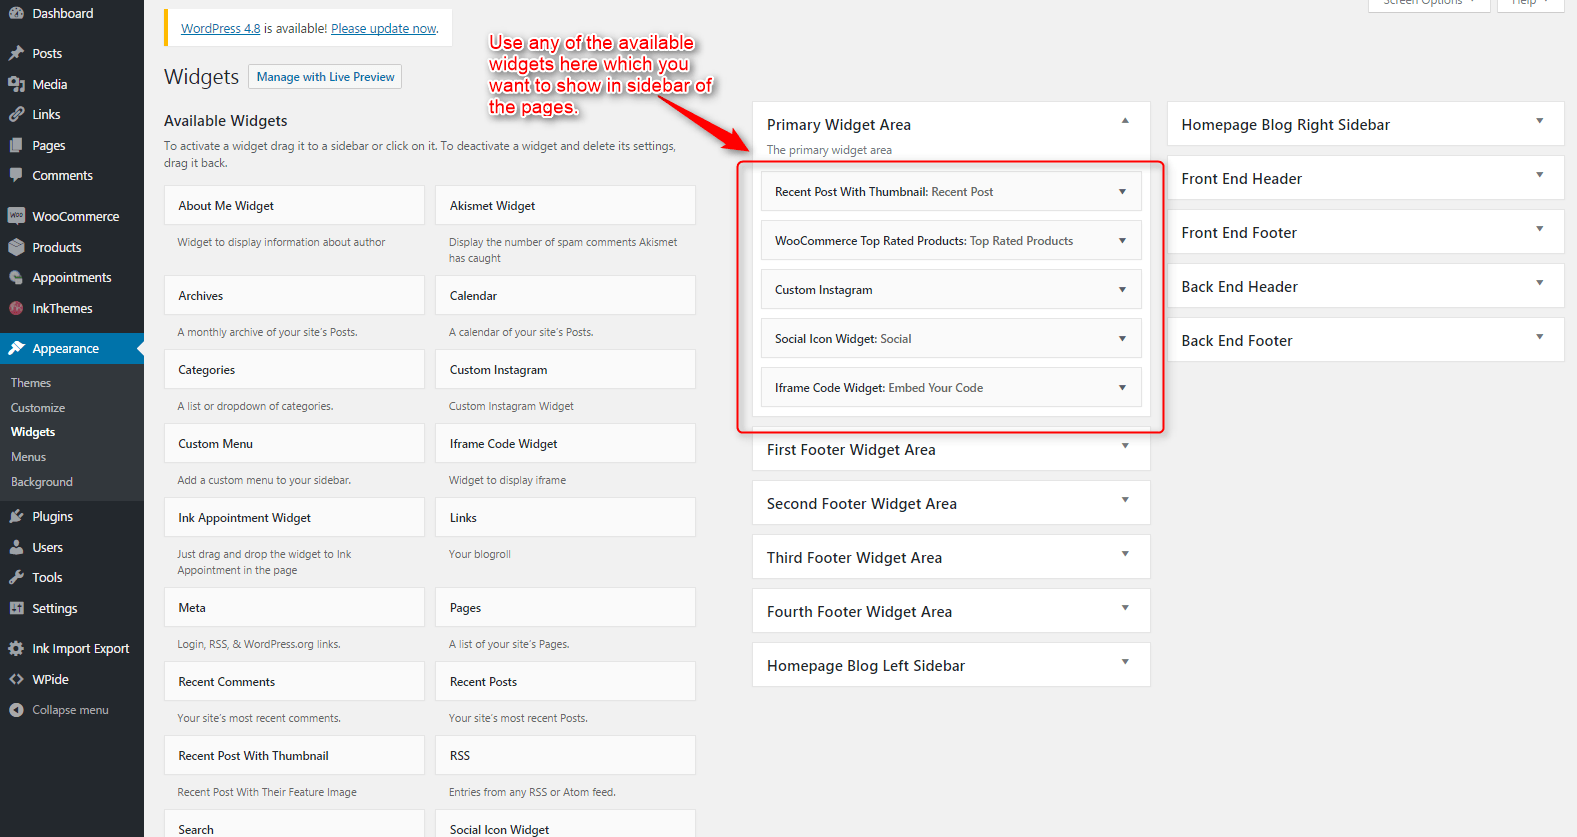
Click on ‘Save’ as soon as you finish setting up the widgets.
How To Upload Logos and Home Page Top Image, Top Heading, Sub
Dashboard -> Appearance -> Theme Options -> General Settings
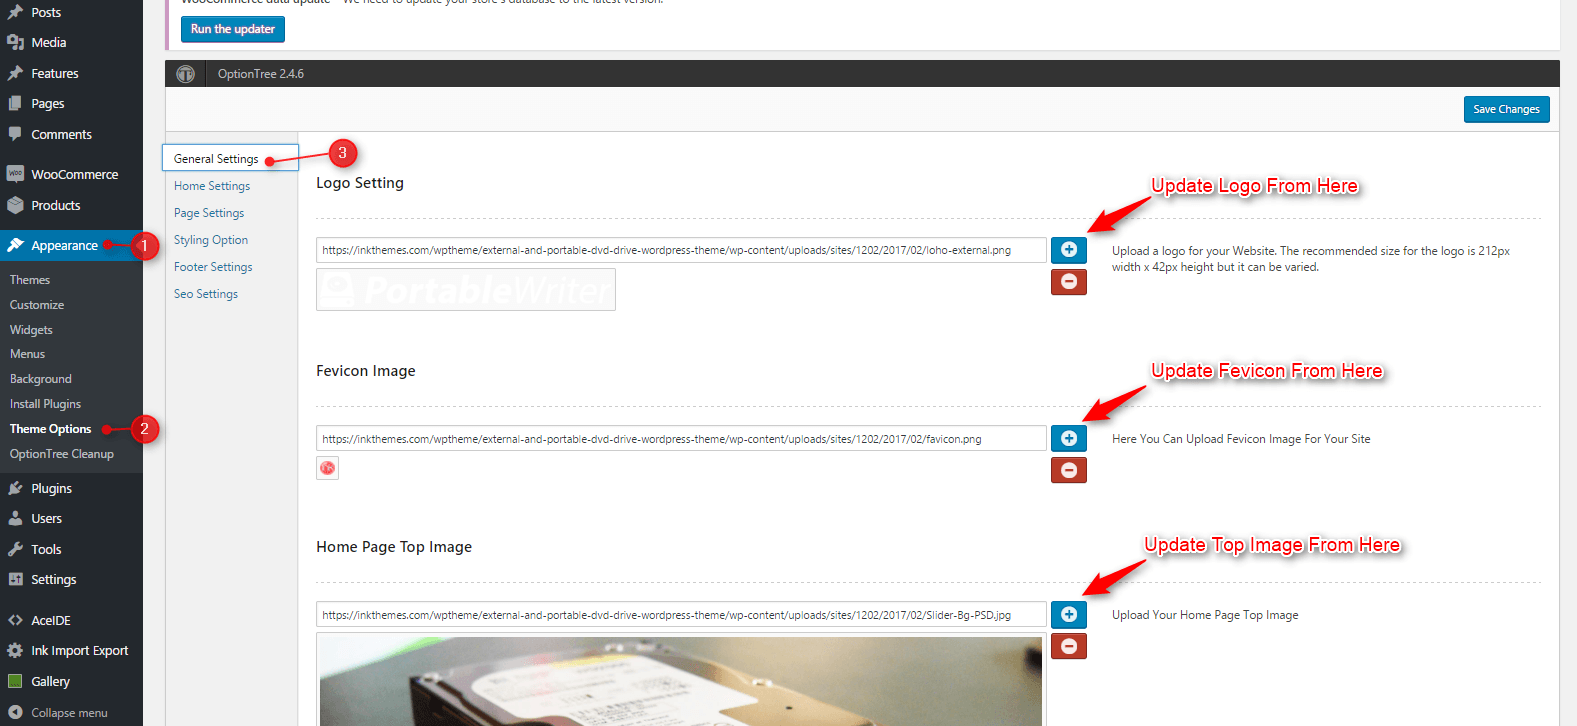
Follow these steps to set Home Feature box
Dashboard -> Appearance -> Theme options panel -> Home Settings:
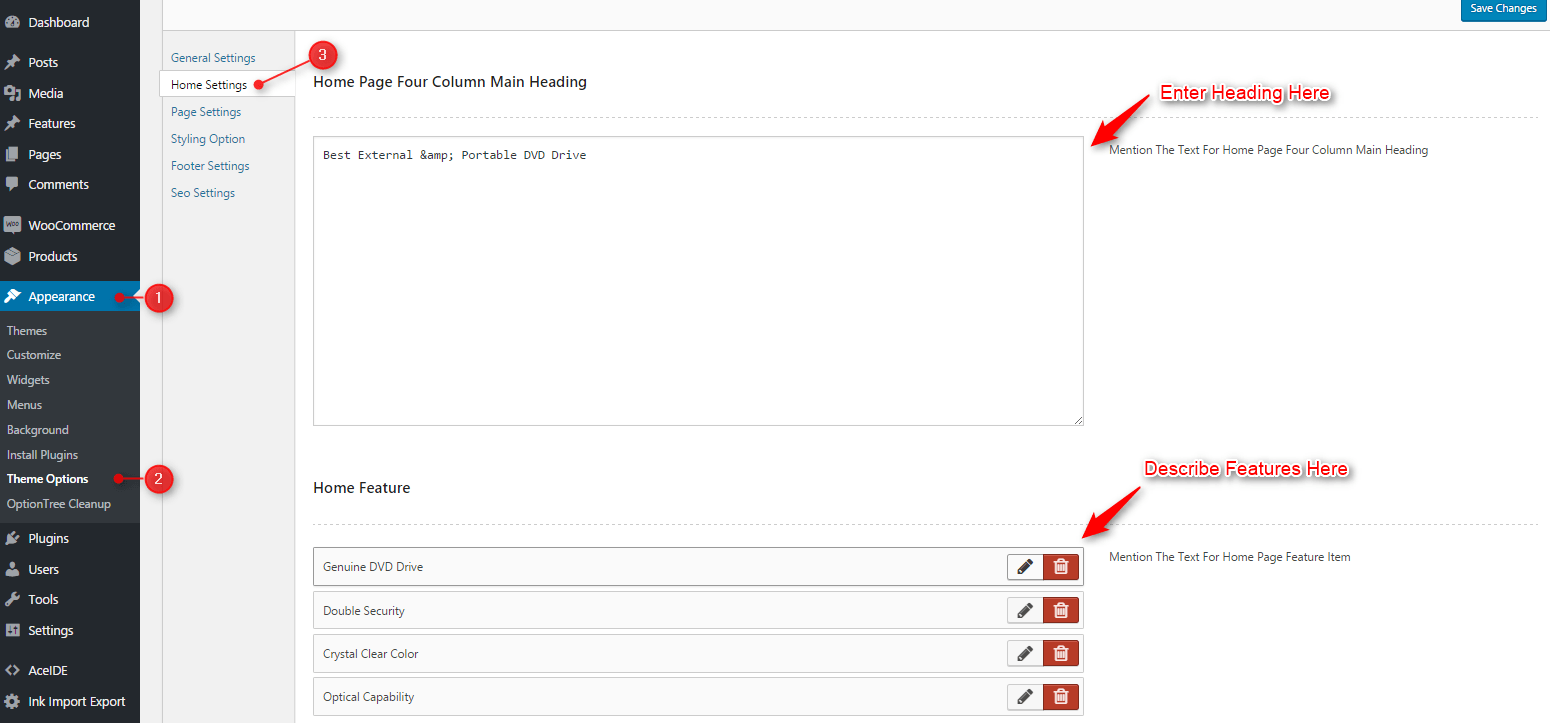
Similarly, add the other feature boxes by click on Add New and then click ‘Save All Changes’.
How to use the Home Page Bottom features?
From this section, you can manage your Home Page bottom settings. Give Background Area Image, Headings, Sub Headings, button text and button text link.
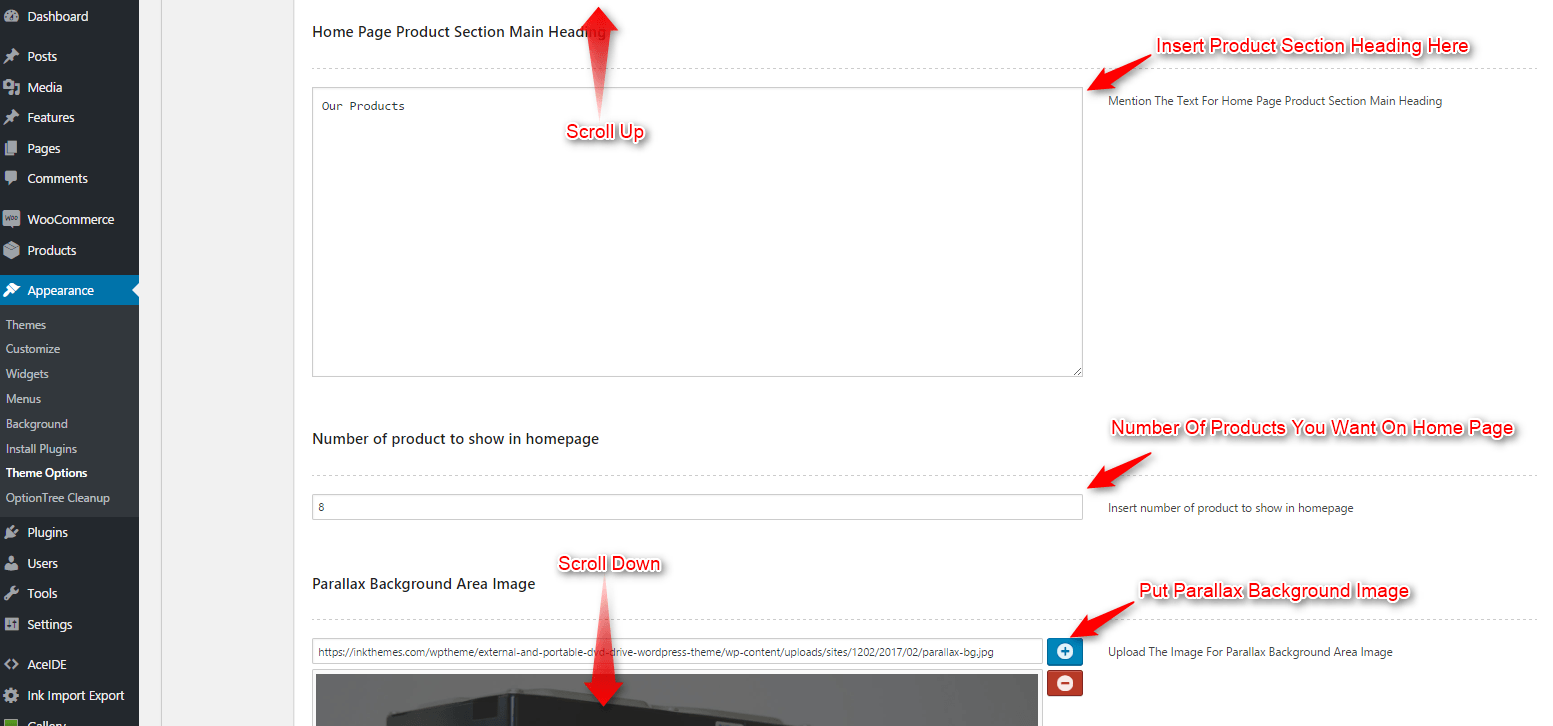
Also, give title and subtitle to the homepage blog section and right area content from here.
Dashboard->Appearance->Theme options panel -> Home Settings:
Under client logo section click on add new to add logos.
Theme options panel -> Styling Options
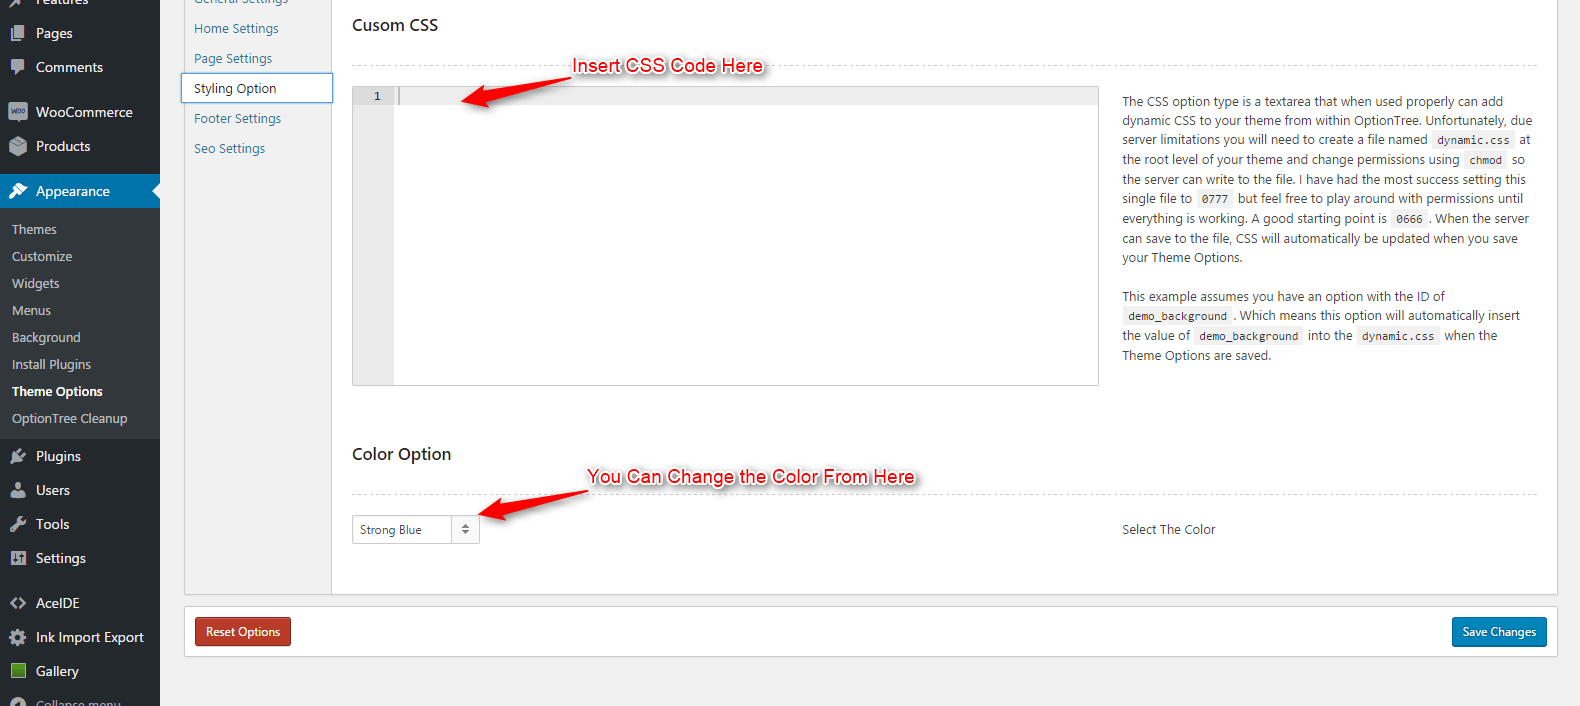
Select the desired color or add custom CSS code and then click on Save All Changes.
Dashboard-> Appearance->Theme Options -> Footer Settings
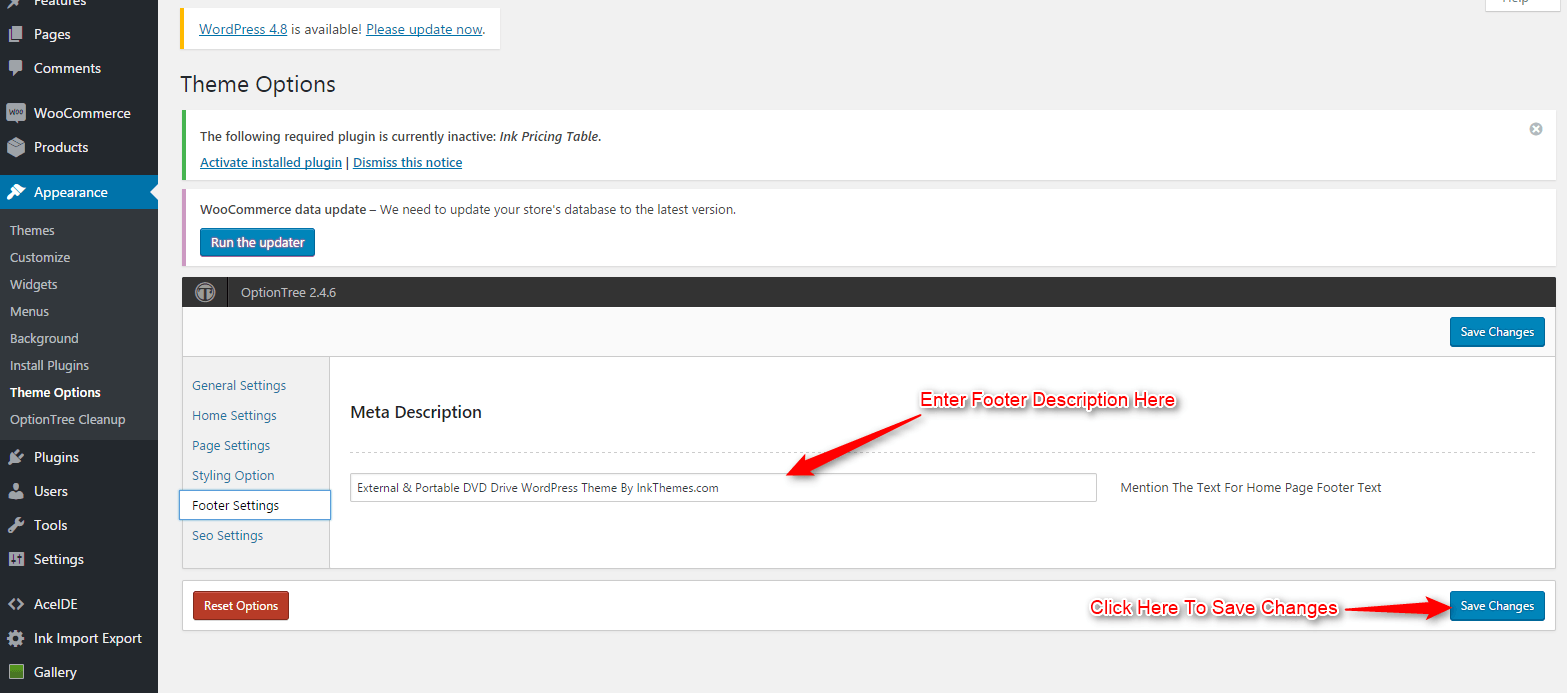
Here you can enter a text that will be displayed in the footer of the Homepage.
Dashboard features-> Add New Feature.
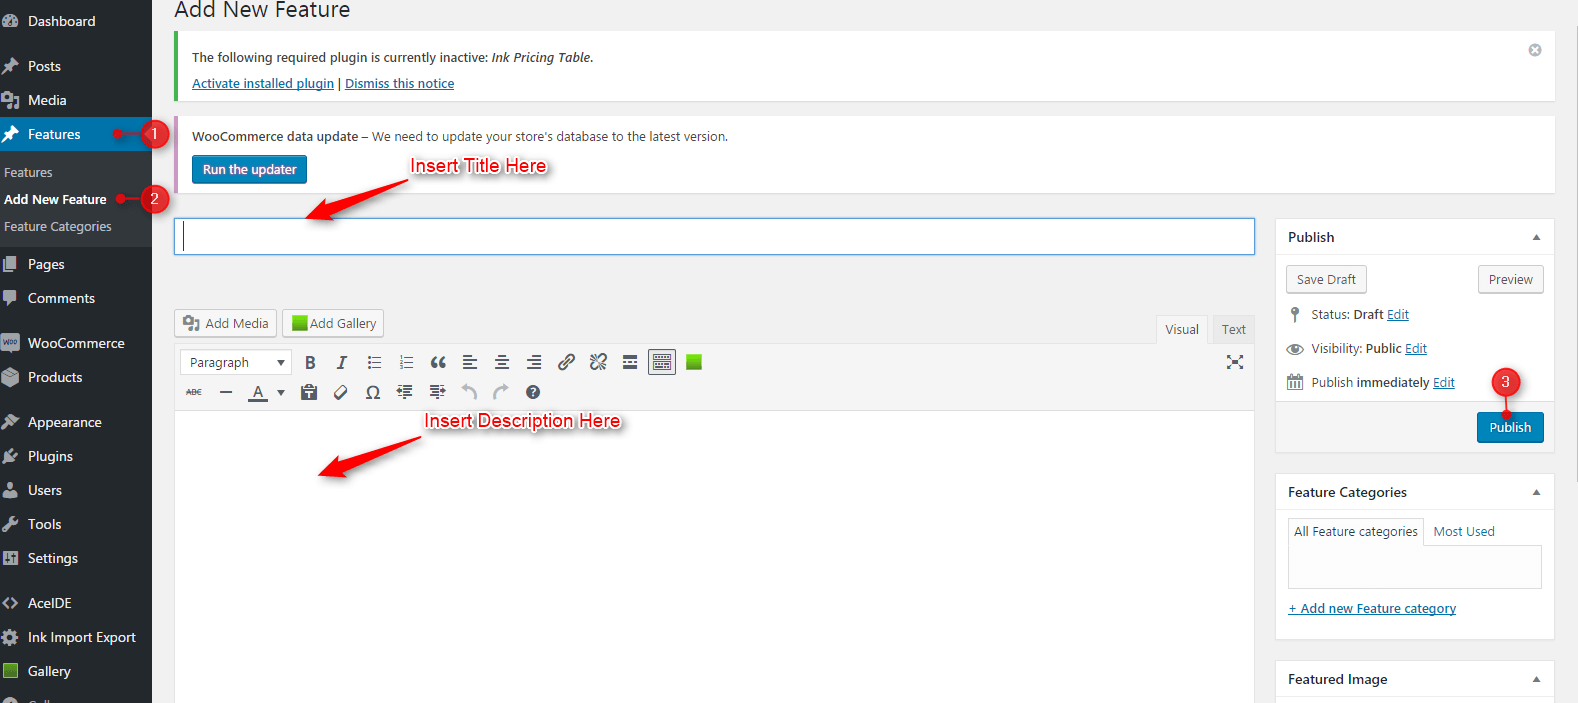
This will show feature slider on the homepage.
Like other themes of InkThemes, this Foogo business theme is also extremely easy to install and setup and you’d love creating your website with this theme.
http://www.youtube.com/user/InkThemes(for our older themes)
You can follow InkThemes on social networks:
https://www.facebook.com/InkThemes
Thanks for purchasing Foogo theme. If you have any questions that are beyond the scope of this documentation, you can freely ask it on our support forum.
Here is the link you need to follow- http://www.inkthemes.com/community.


