Hotels are our second home where we can enjoy, rest and live a life.
Hotels are becoming one of the most profitable business nowadays because it generates revenue from their room booking facility.
In the past decades, it was difficult to book hotel’s room locally or via an agent. As the internet is booming, every business owners are now adopting online technologies.
So if you own a hotel and want to create a website for your business then you need a golden platform where people can avail online room reservation facility.
BookingValley – HotelBooking Pro WordPress Theme gives you a grandiose bandstand to build a responsive website for your business which allows your site users to book hotel’s room from their mobile.
Worried about the installation of the theme?
Don’t go anywhere, here we are providing you a full documentation and installation of HotelBooking Pro WordPress Theme with proper screenshots which gives you the points, how to install and use the theme.
Click here to have a glance of our pre-defined template which looks like your feature Hotel room website.
Below are the points which are explained as follows:
- What is HotelBooking Pro theme?
- How to install the theme?
- How to activate the theme?
- How to install & activate Booking Valley WordPress plugin?
- How to add hotel rooms?
- How to manage booked rooms?
- How to use custom widgets?
- How to customize your website?
- How to create the blog and other pages?
- How to create blog posts?
1. What Is HotelBooking Pro Theme?
HotelBooking Pro WordPress Theme has an inbuilt Booking Valley WordPress Plugin which allows you to accept hotel room booking services online.
You can mention your multiple hotel rooms, it’s extra facilities that you provide, etc.
So, create your website with our premium and responsive HotelBooking Pro WordPress Theme.
2. How To Install The Theme?
Before installing HotelBooking Pro Theme on your website make sure you have installed the web server on your machine and installed WordPress on your server.
The theme installation is very simple, you need not to touch any single line of the technical codes. Just follow the steps and your website will be ready within minutes.
- Step 1 – Go to your WordPress Dashboard where you will found so many features that help to customize your website as you want.
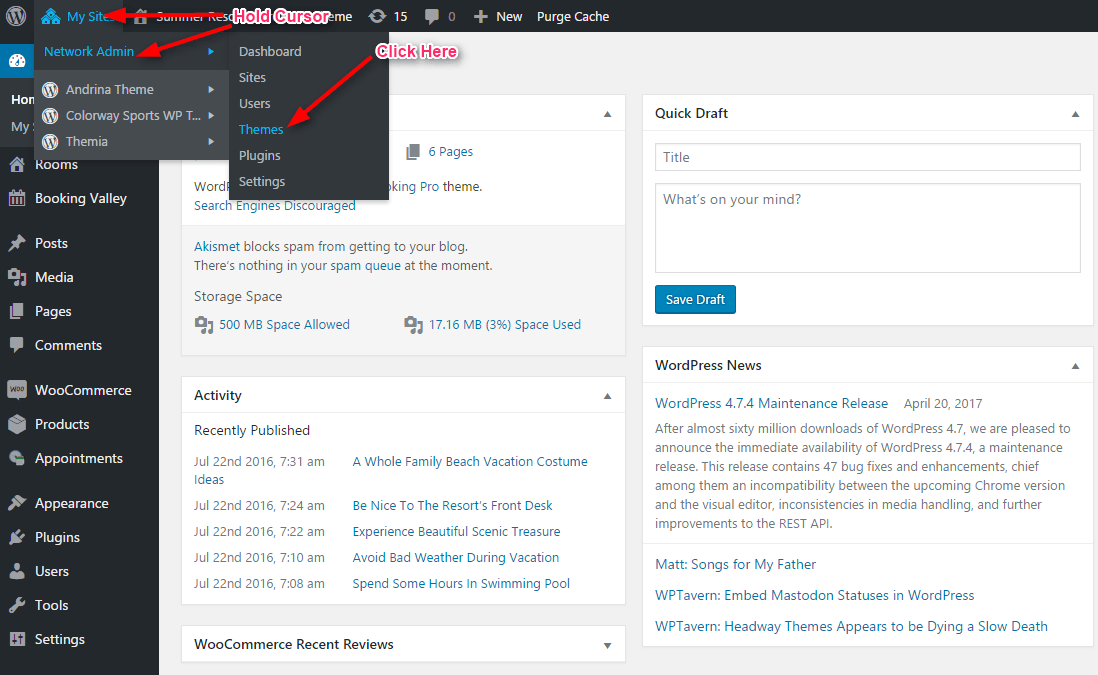
- Step 2 – To install the theme, just hover your mouse cursor on the My Site button then Network Admin and then click on Themes button.
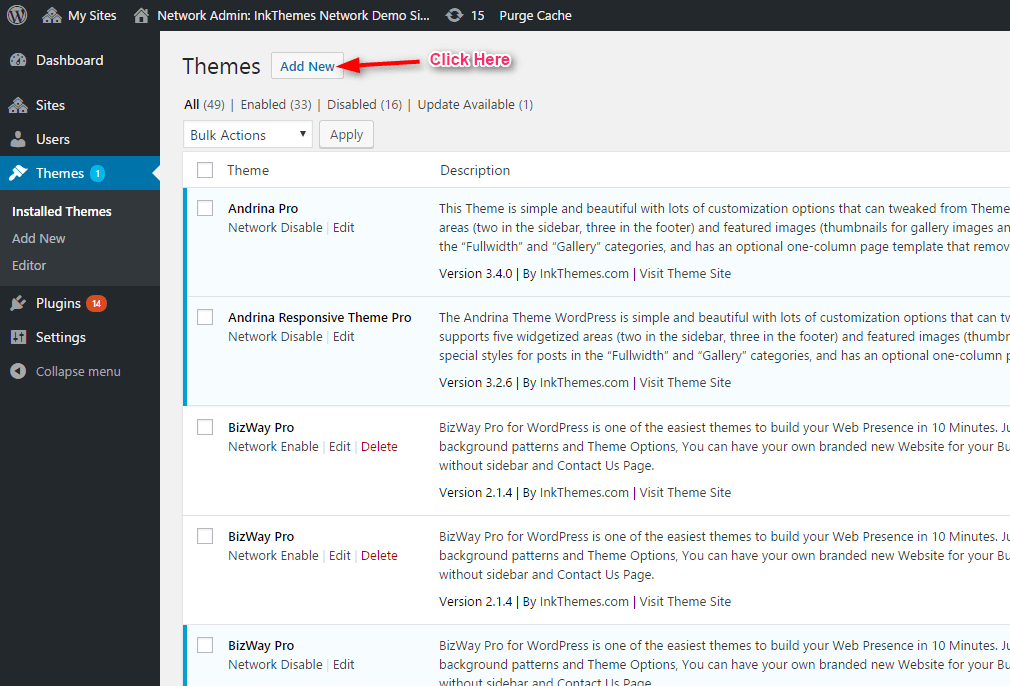
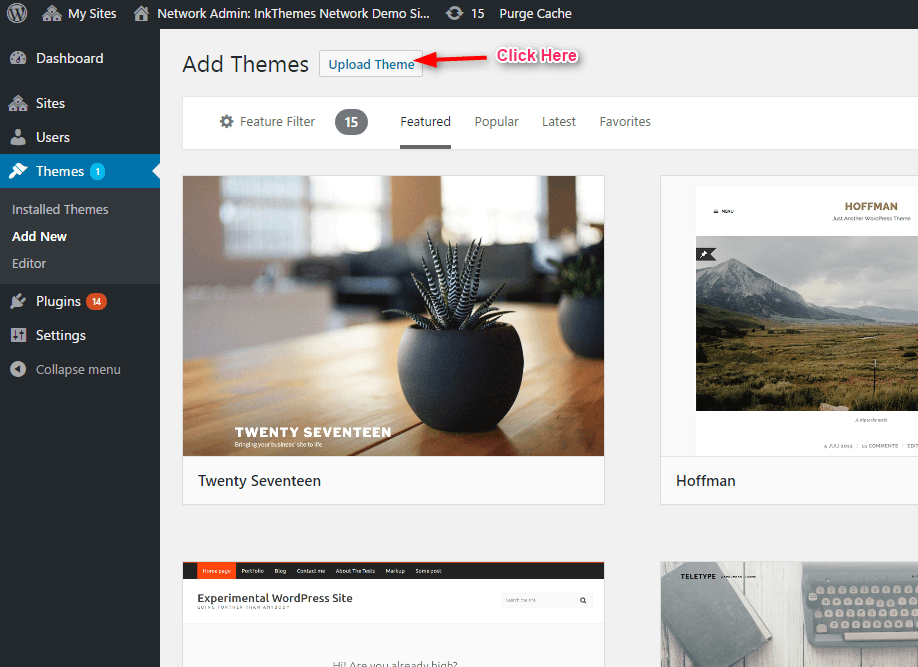
- Step 3 – After clicking on Themes button, a new window will pop-up where you need to click on Add New button which leads you to the next page and then click on the Upload Theme then Choose File button to upload the theme .zip file from the destination folder and last click on the Install Now button.
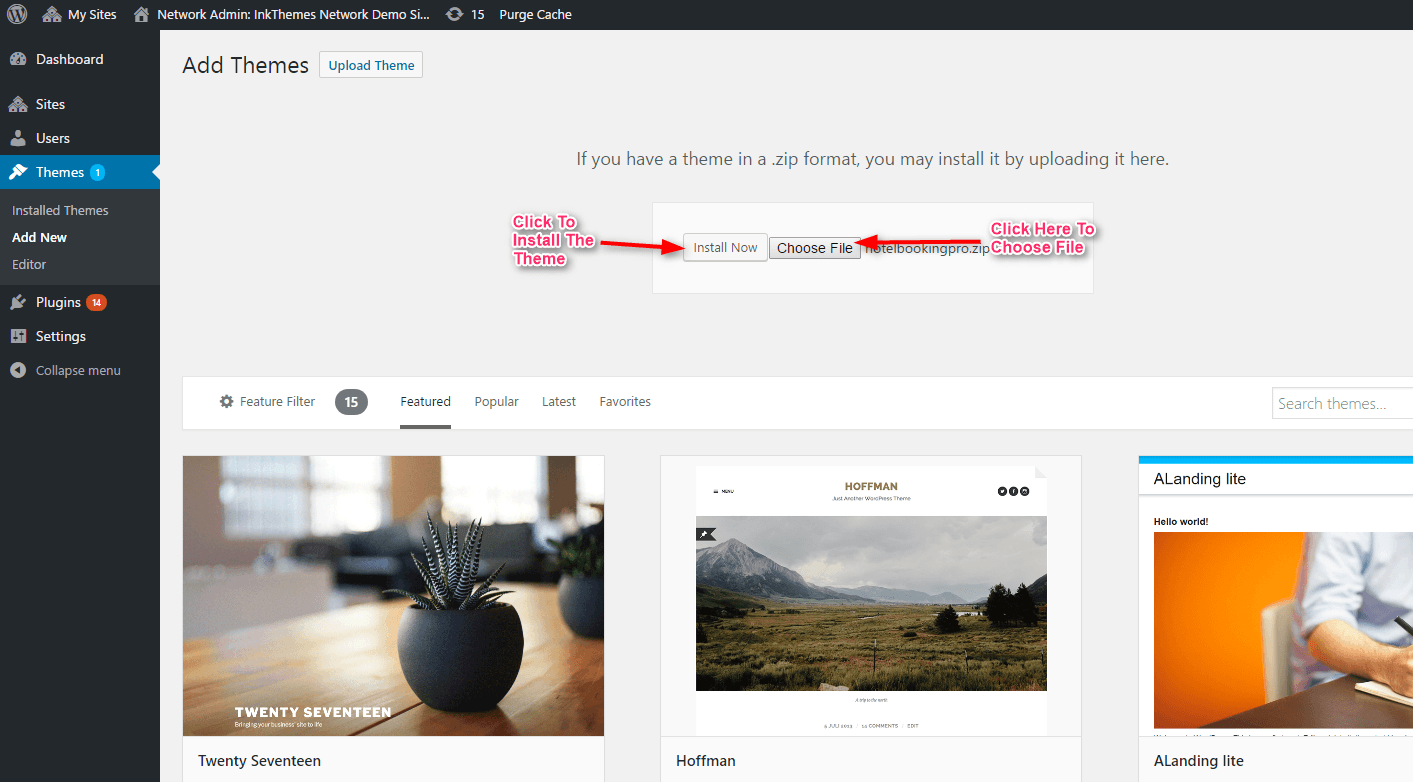
- Step 4 – After installing the theme, HotelBooking Pro Theme will be displayed on the installed themes page.
3. How To Activate The Theme?
After the successful installation of the theme, you need to activate the theme to avail its features and functions. To activate the theme just follow few steps.
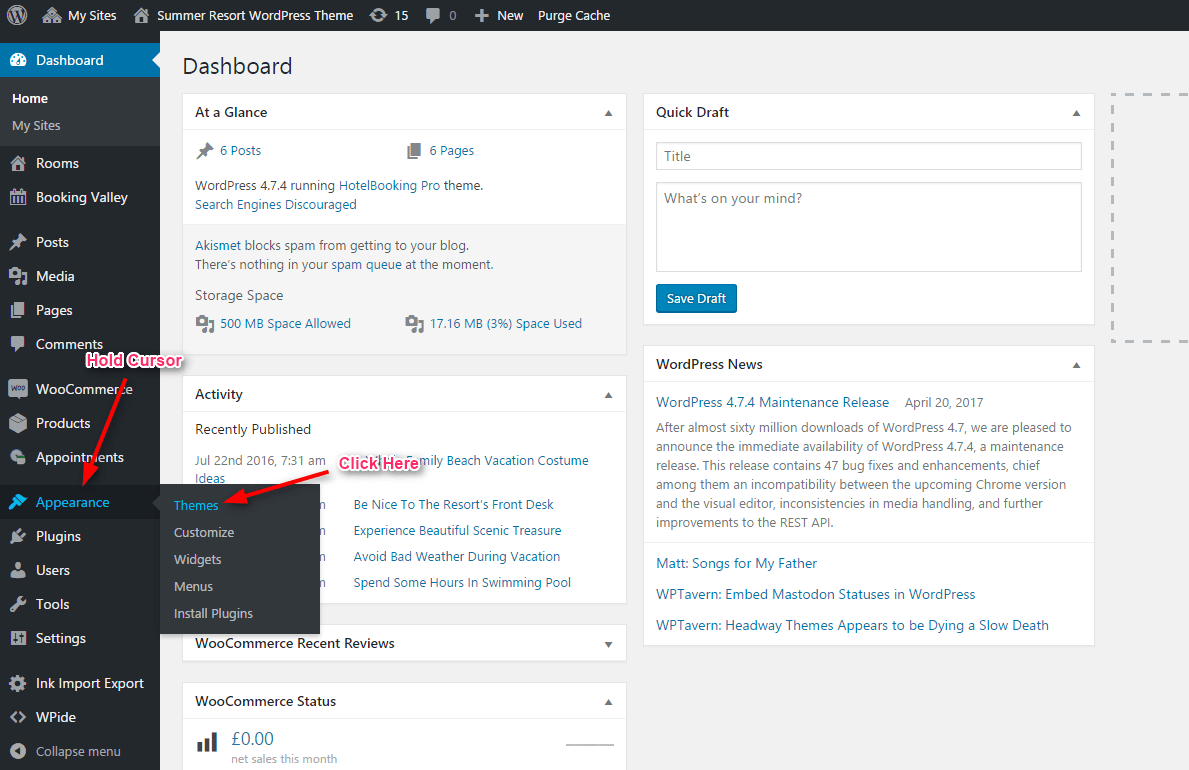
- Step 1 – Again go to the Dashboard and then hover your mouse on the Appearance button and then click on Themes which will lead you to the themes selection page.
- Step 2 – Now select and activate HotelBooking Pro Theme.
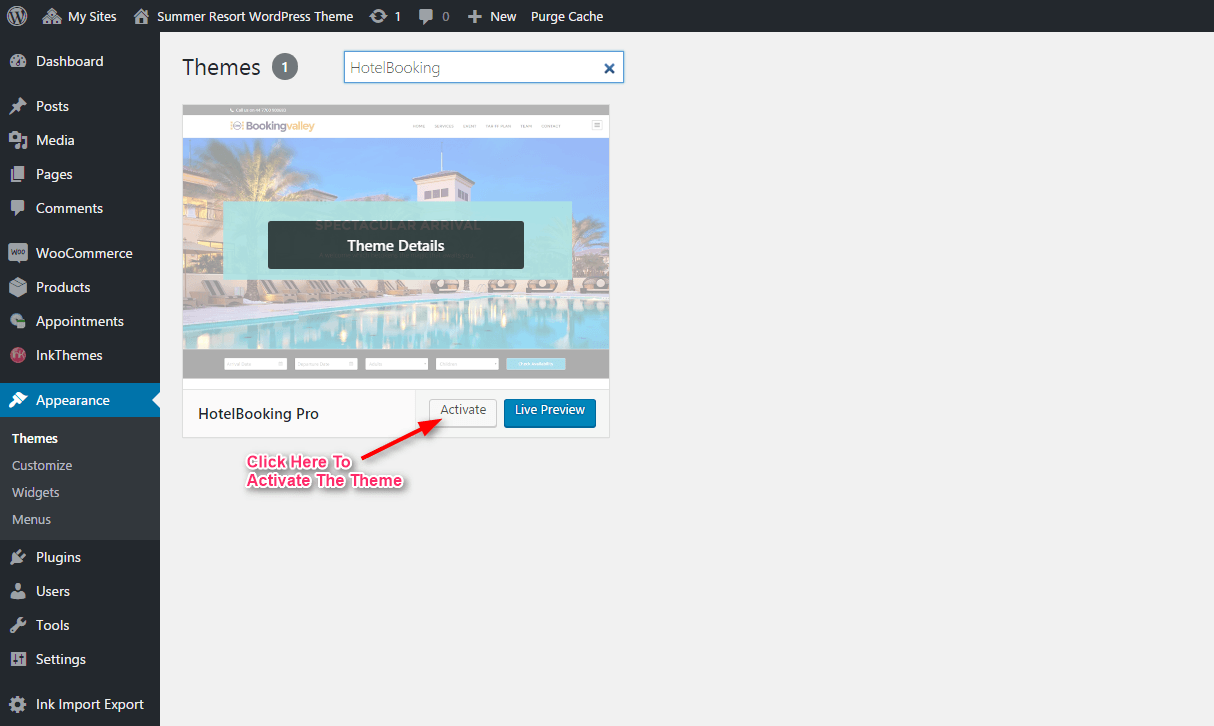
After activating the theme, you will notify with a message which displays Theme Installed Successfully.
4. How To Install & Activate Booking Valley WordPress Plugin?
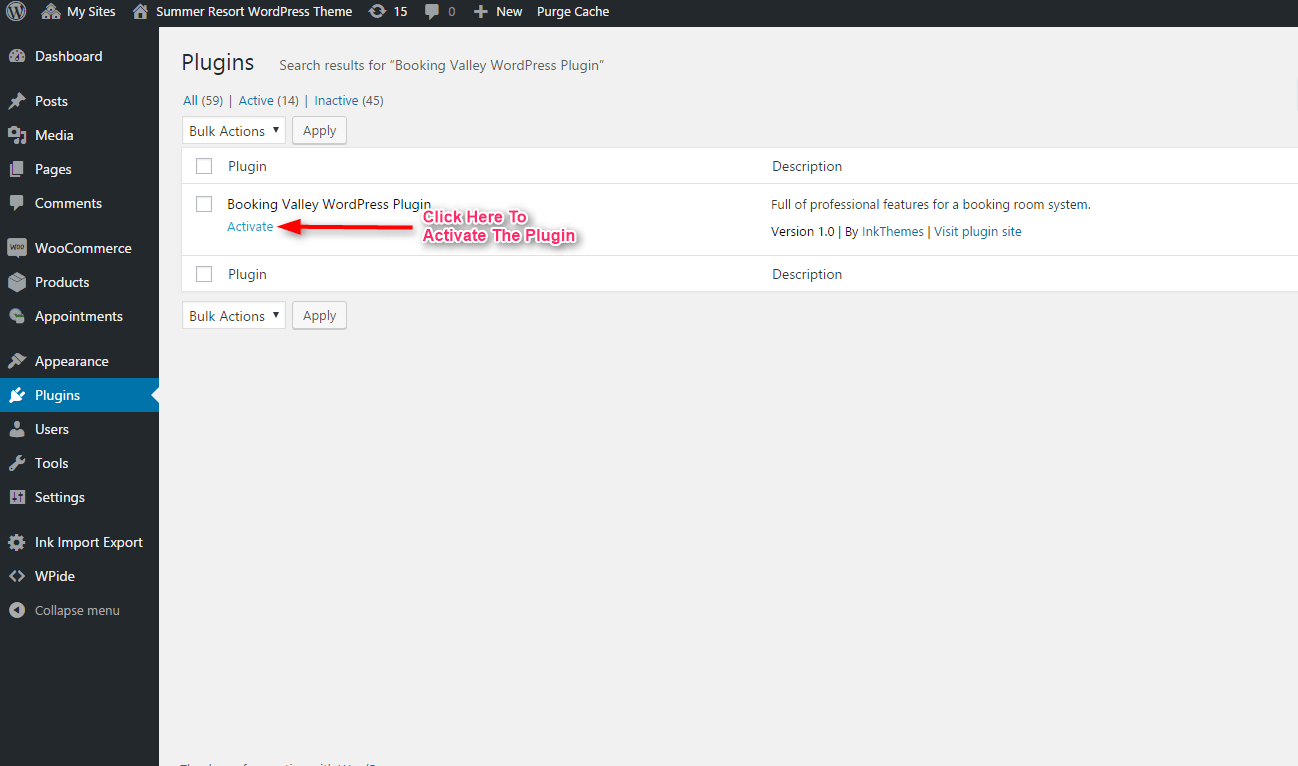
It’s essential to install and activate Booking Valley WordPress Plugin to manage and avail hotel booking services.
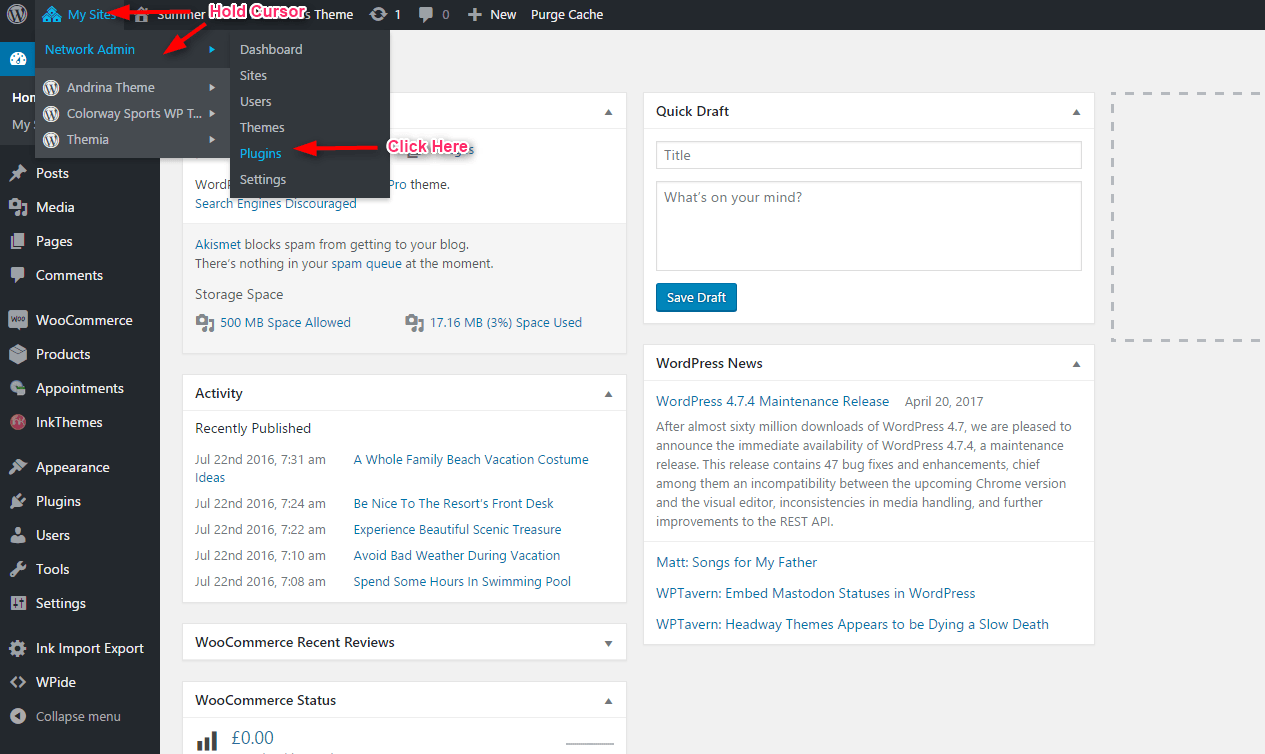
The installation and activation process of the plugin is the same as the theme, you have to select Plugins option instead of the Themes option, just follow the picture which is given below.
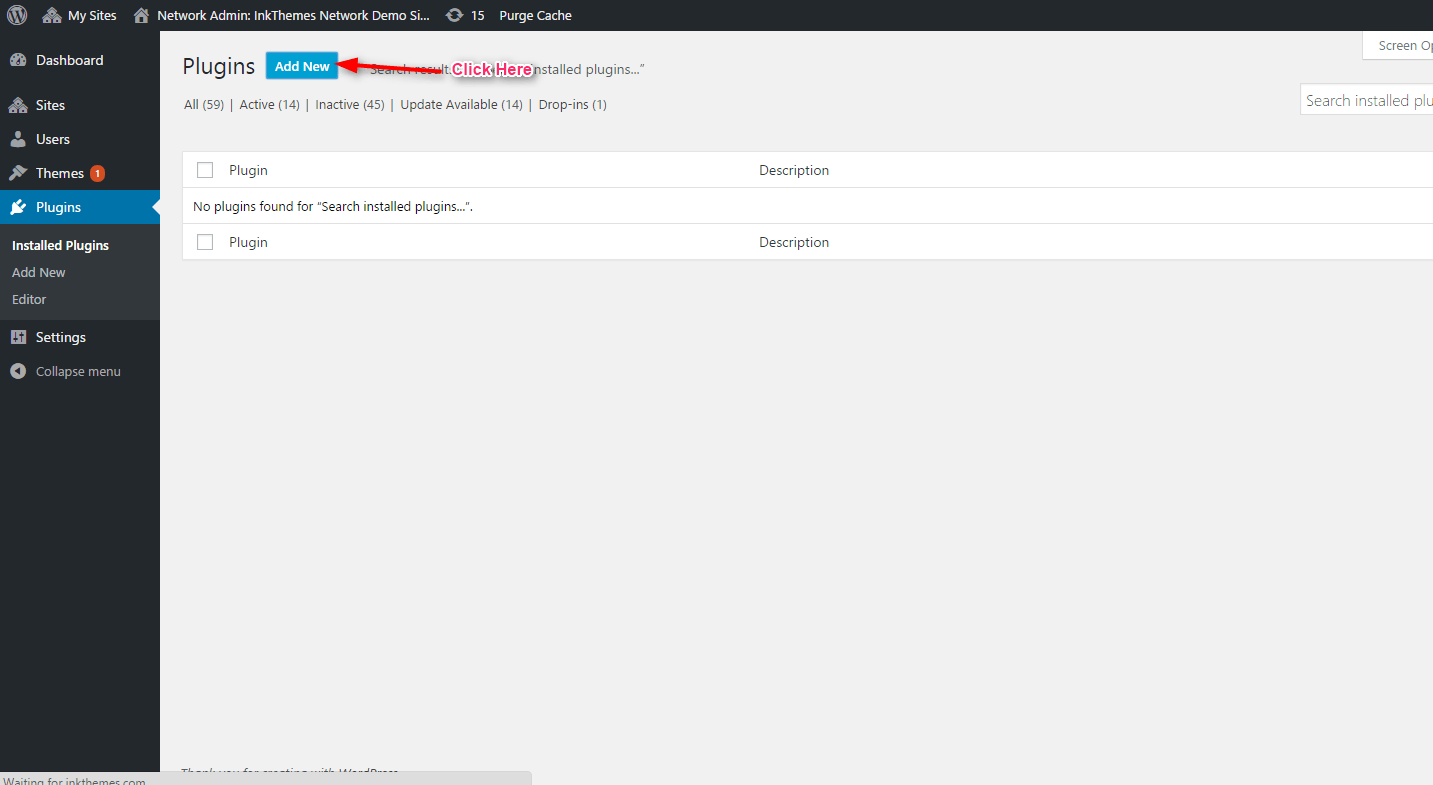
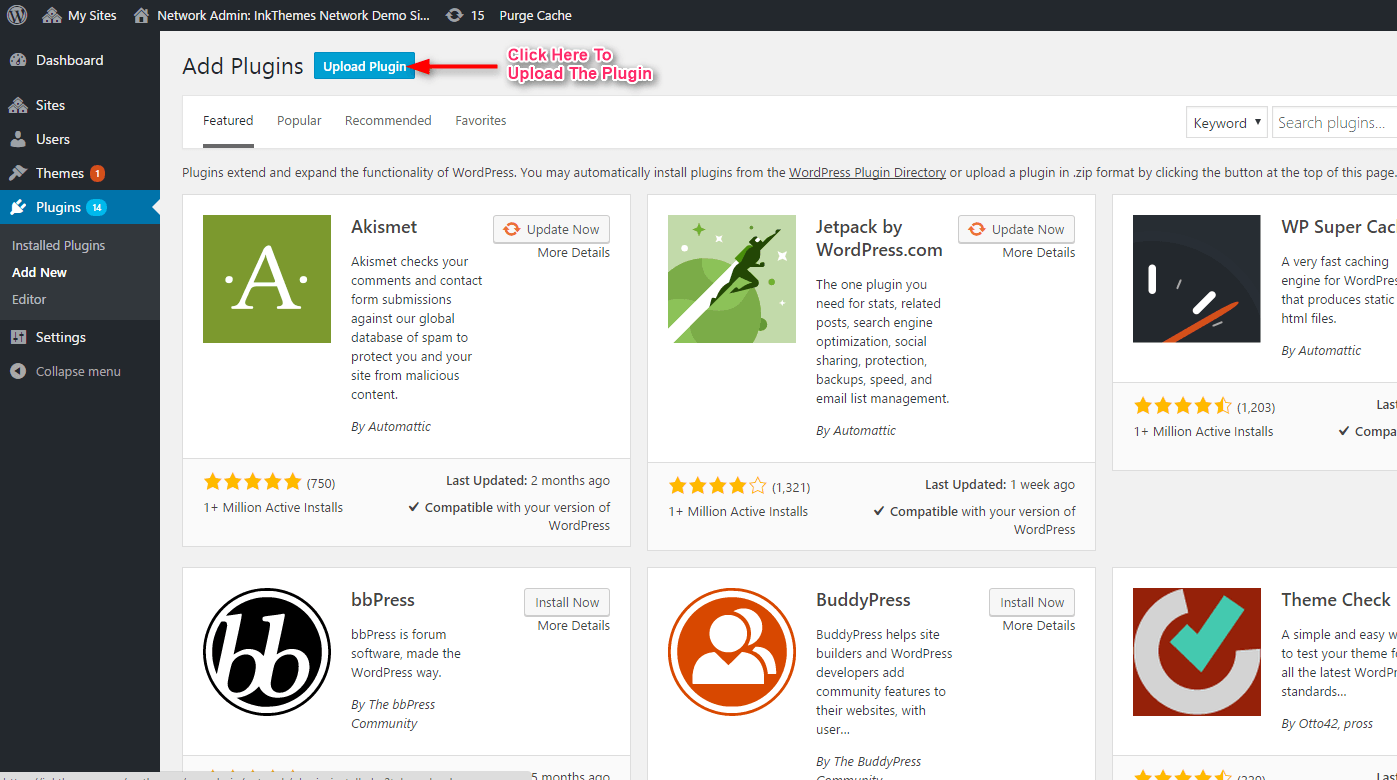
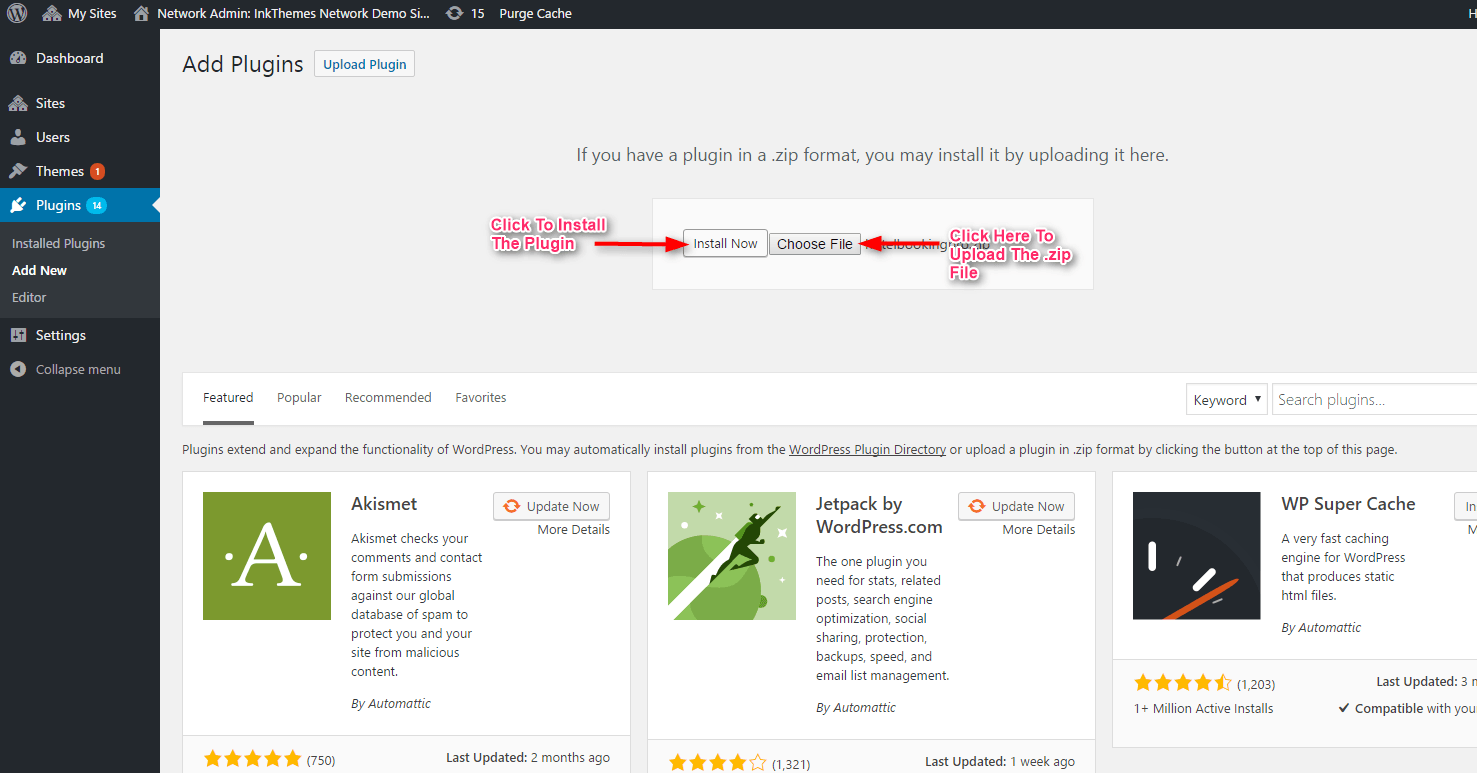
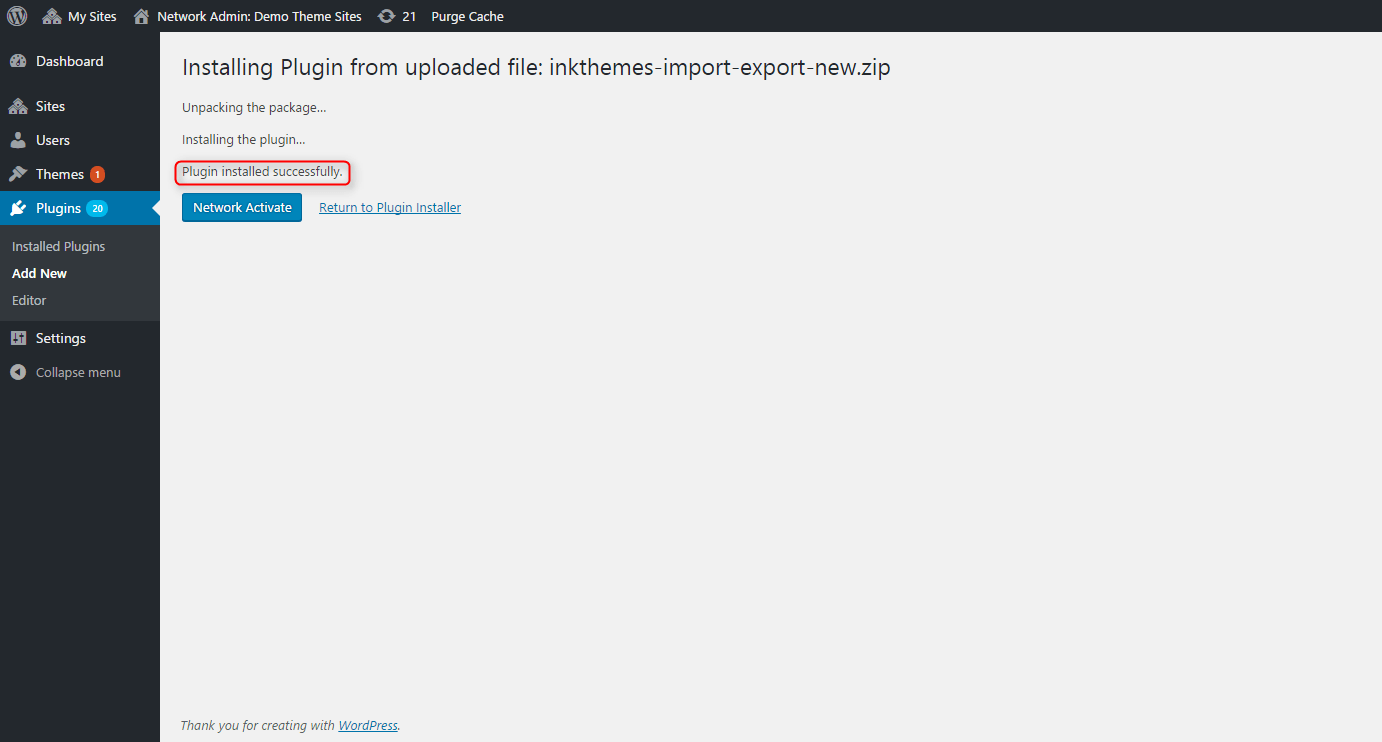
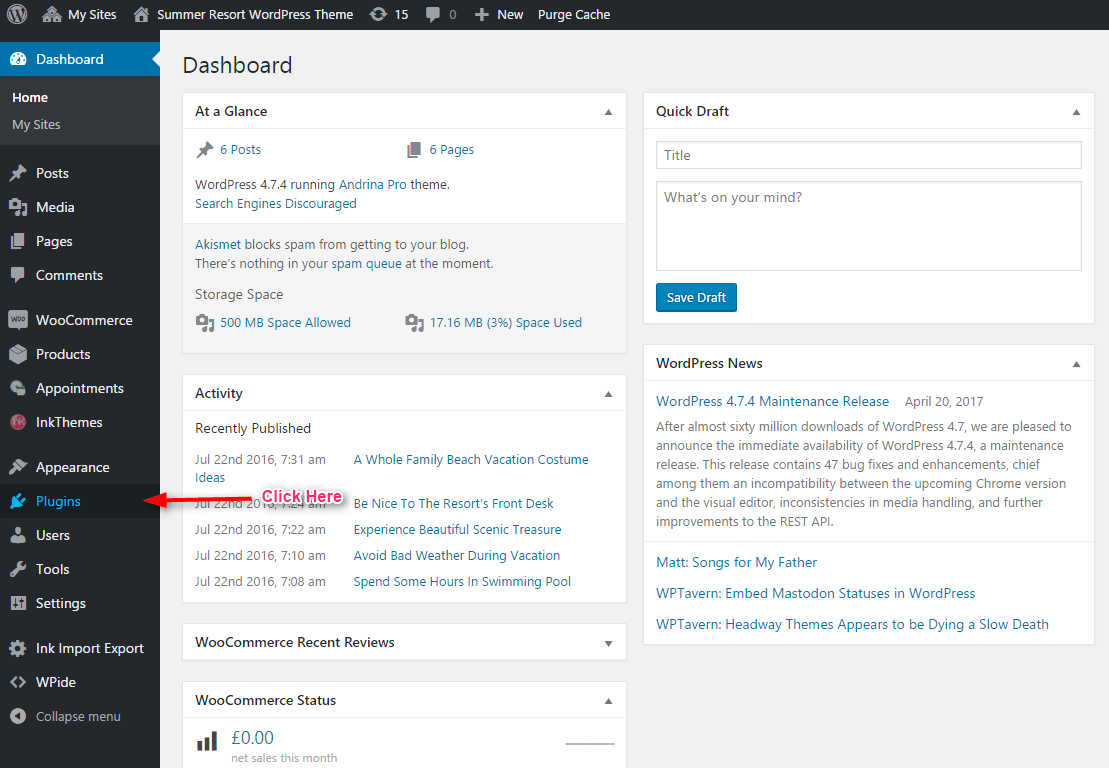
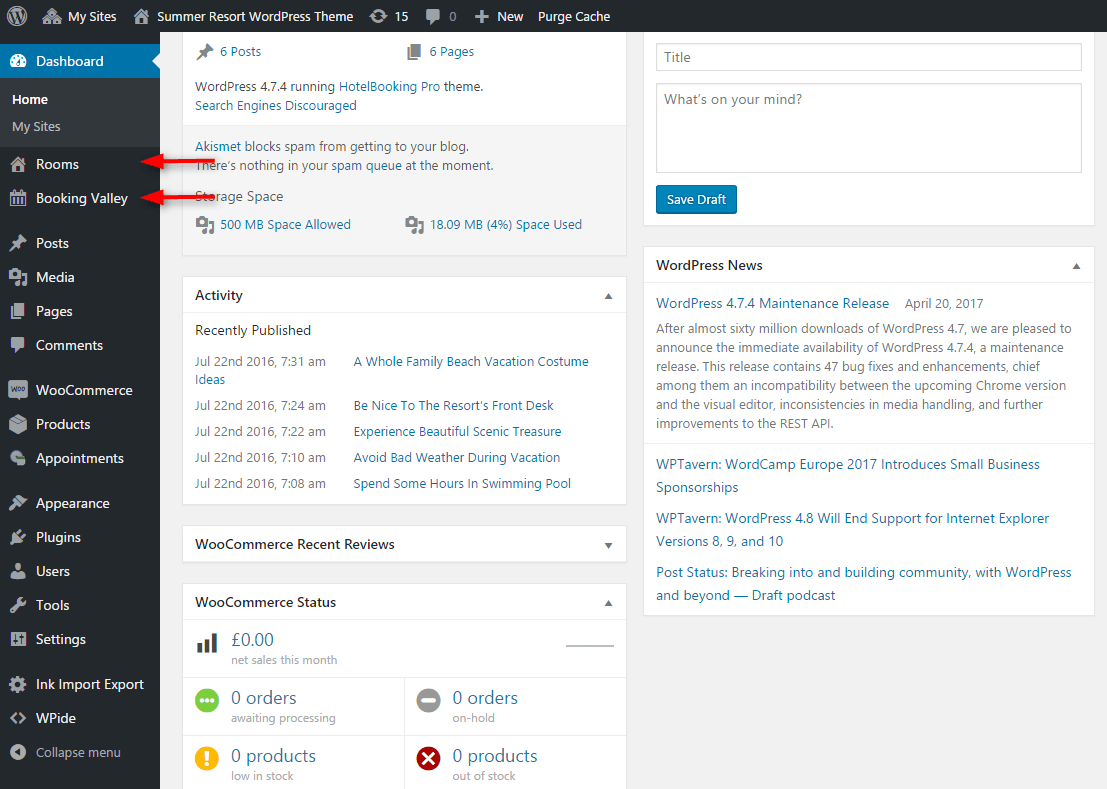
After installing and activating the Booking Valley WordPress Plugin, Rooms and Booking Valley options will be displayed on the Dashboard.
5. How To Add Hotel Rooms?
Before adding hotel rooms, you need to create Room Types and its Capacity.
To add new Room Types and Room Capacities, just follow steps and pictures.
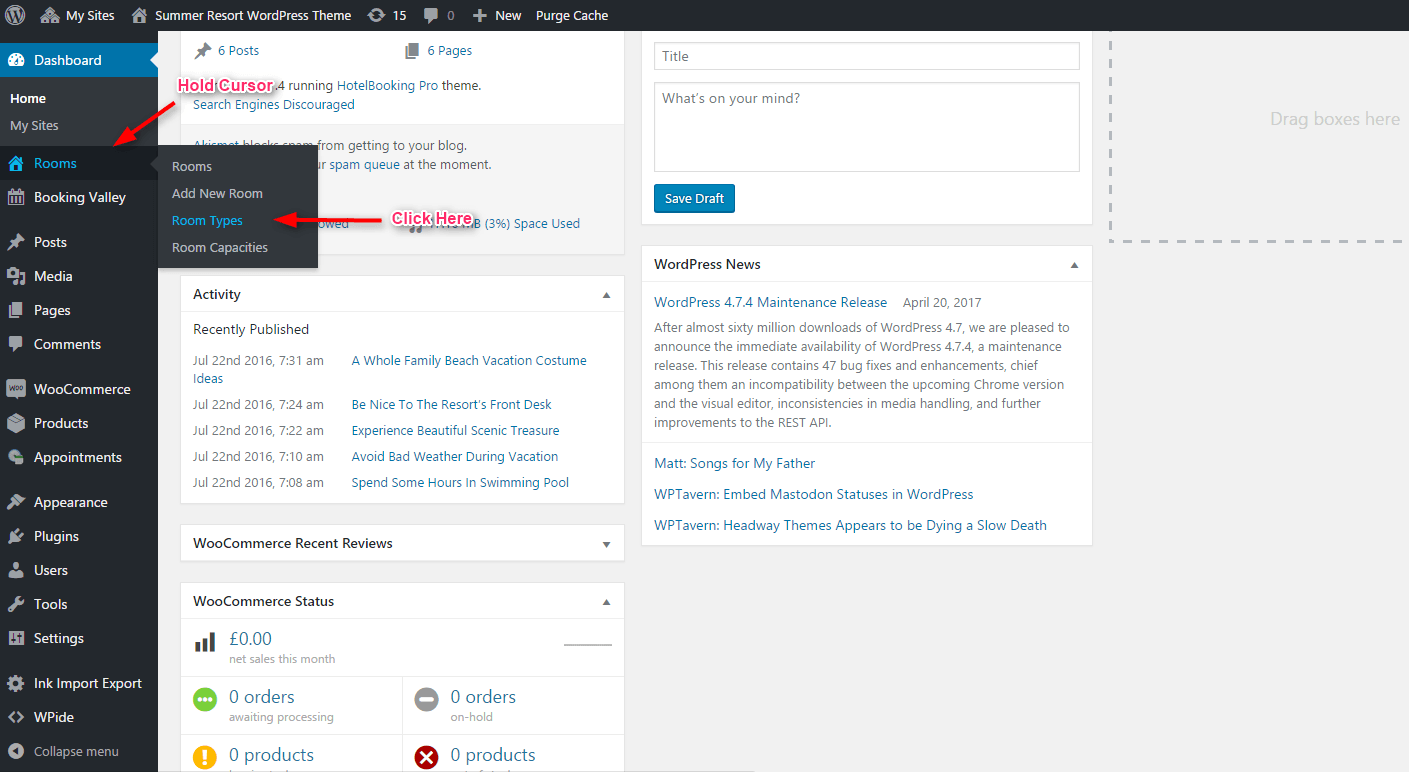
- Step 1 – First hover/ hold your mouse cursor on the Rooms option then click on the Room Types button which will lead you to the Room Types page.
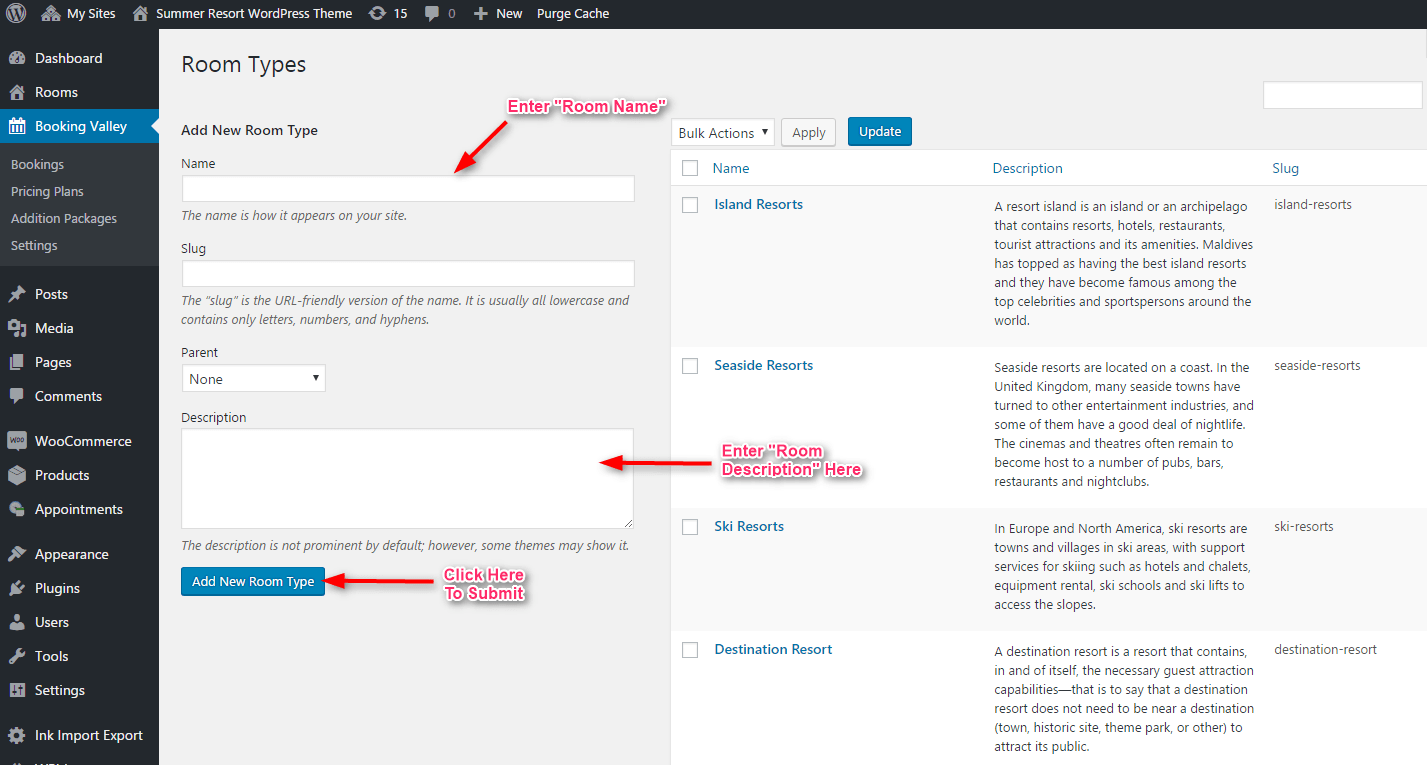
- Step 2 – Here, you can assign the name of the room, you can also manifest the description of the room. To submit details click on the Add New Room Type button.
- Step 3 – Repeat “Step 1 and Step 2” to assign the capacity of the room, you have to select Room Capacities option instead of Room Types option, you can see details in the picture.
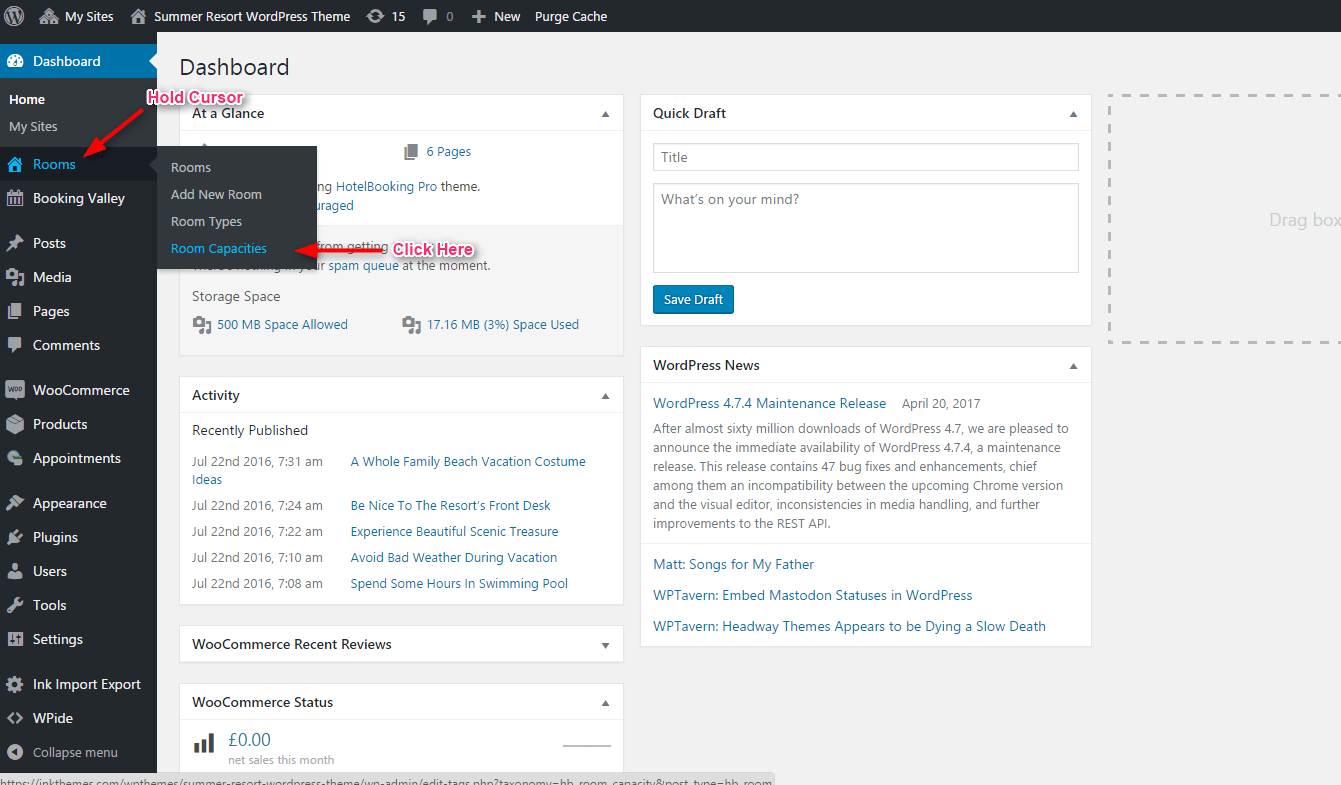
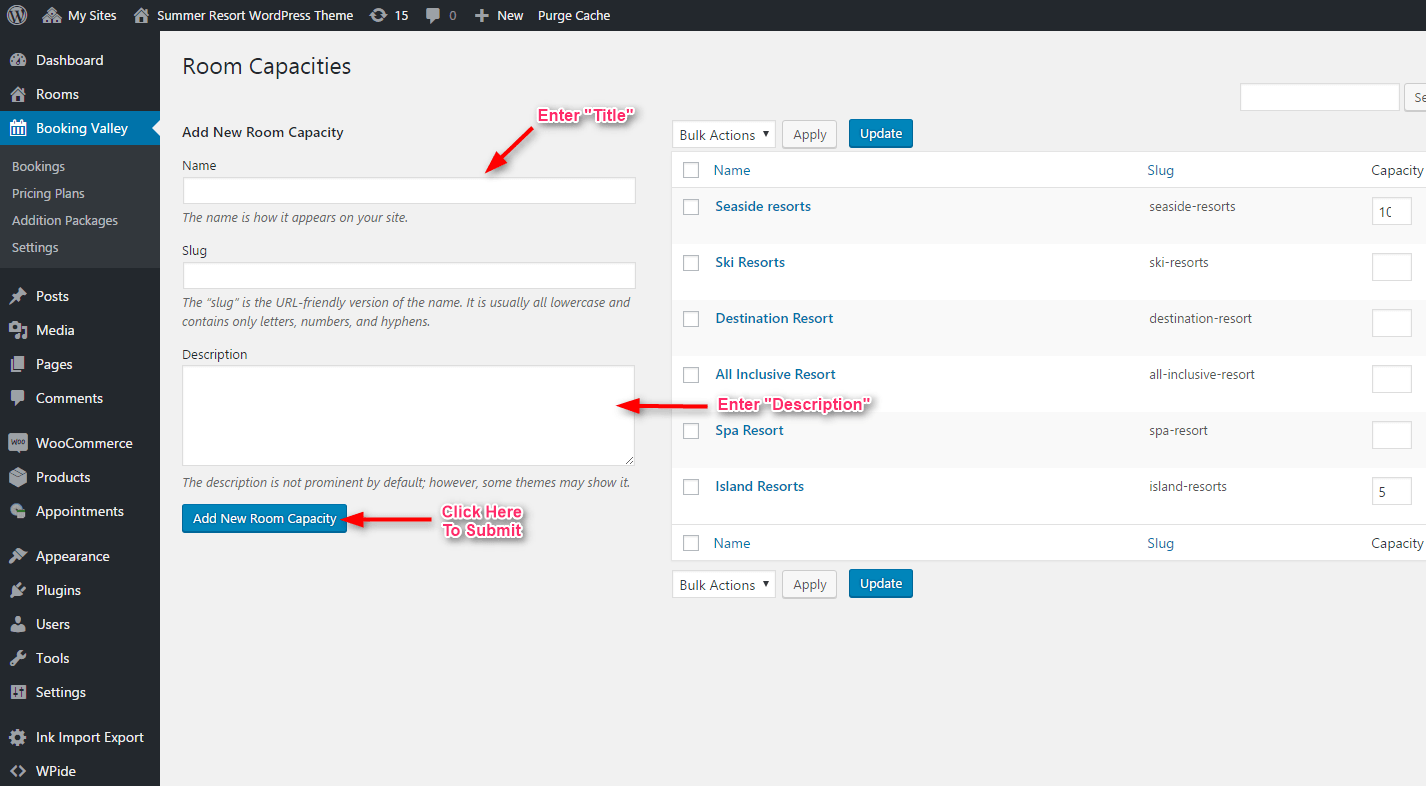
After assigning Room Types & Room Capacities, you can add hotel Rooms because room types and its capacities are required when you are adding new rooms of your hotels. Now follow few easy steps or pictures to add new rooms.
- Step 1 – Again hover/hold your cursor on Rooms option then click on the Add New Room button which will lead you to the new page where you can new room of your hotel.
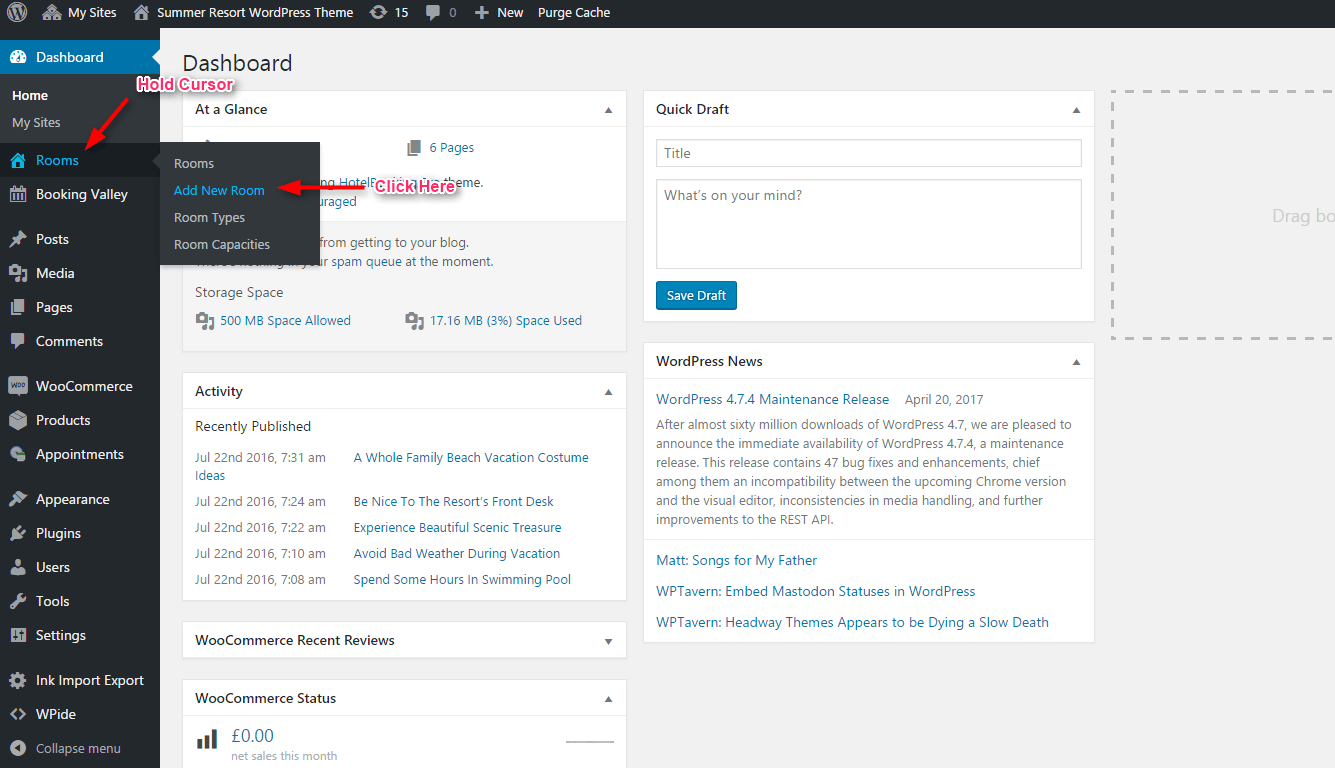
- Step 2 – Here, you can assign the title of the room and give details about the room like room images, description and other details.
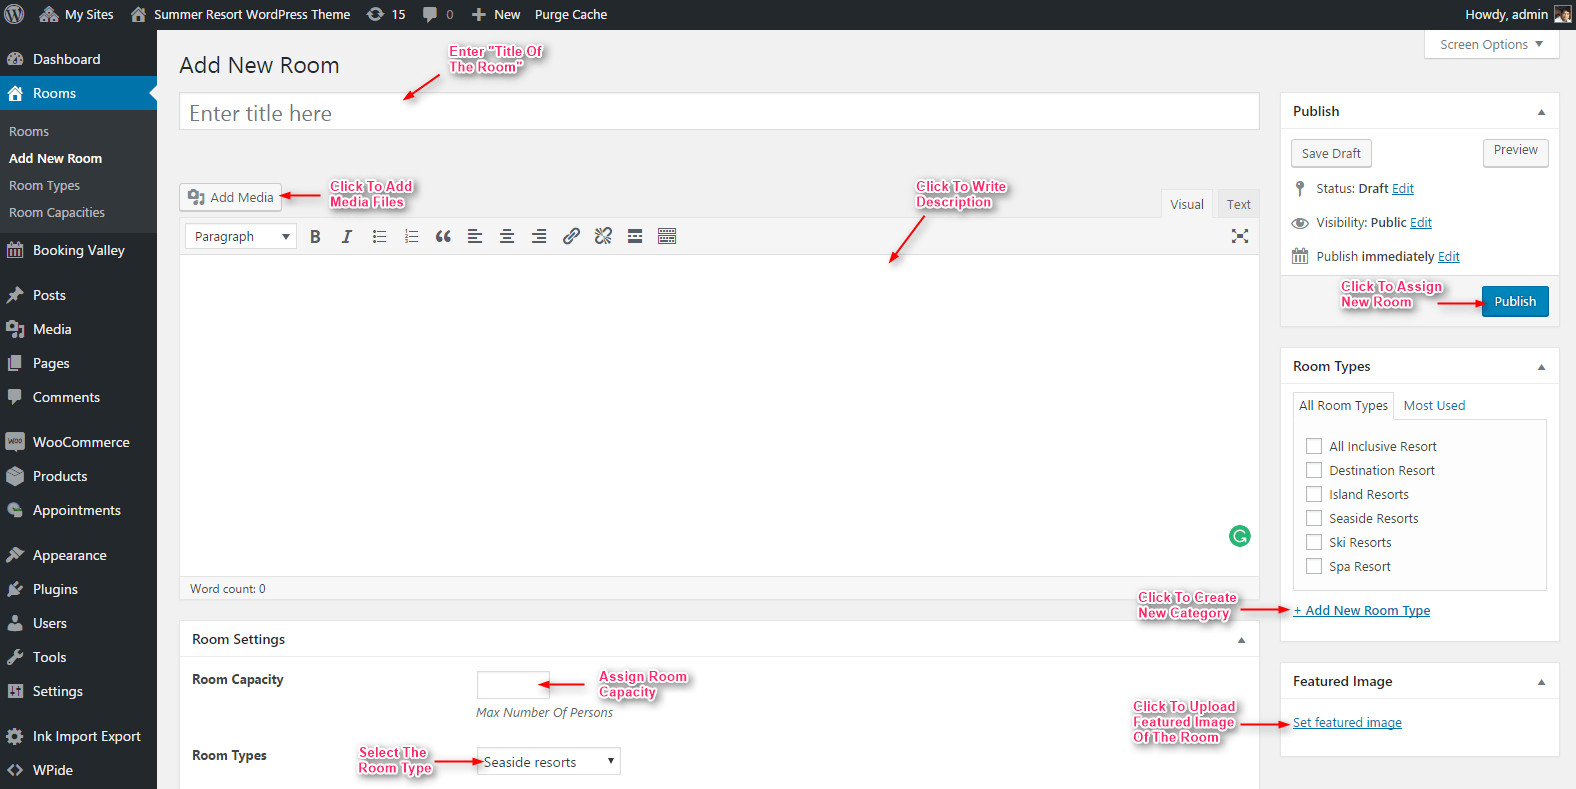
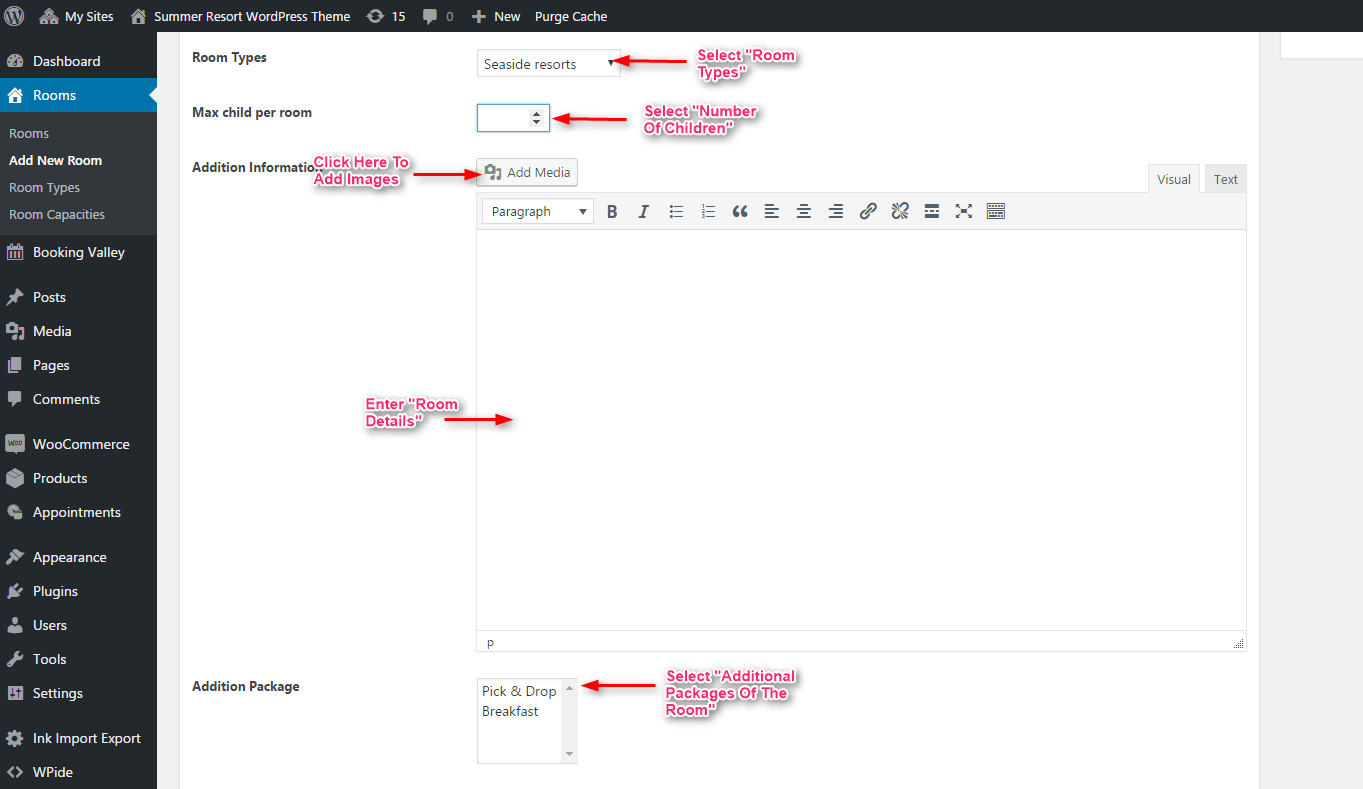
- Step 3 – Now assign the room capacity like max number of person & child, its type, additional information and package.
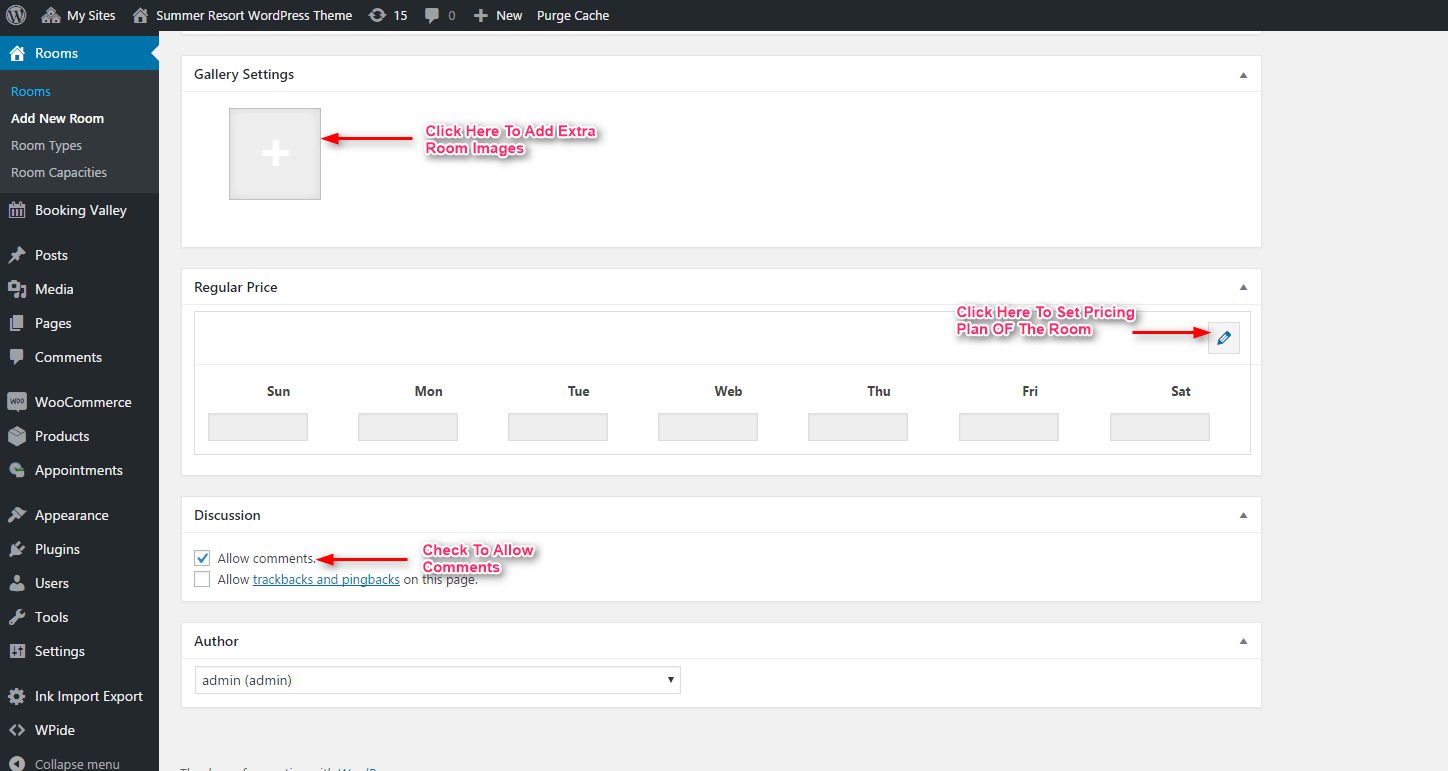
- Step 4 – Click on the “+” icon in the gallery setting to add multiple pictures of either the same room or other related rooms.
- Step 5 – To set the regular price of the room according to days, first click on the “pencil” icon then set your desired price.
6. How To Manage Booked Rooms?
It allows you to manage all booked rooms, you can also add new pricing plans, additional packages or other such things.
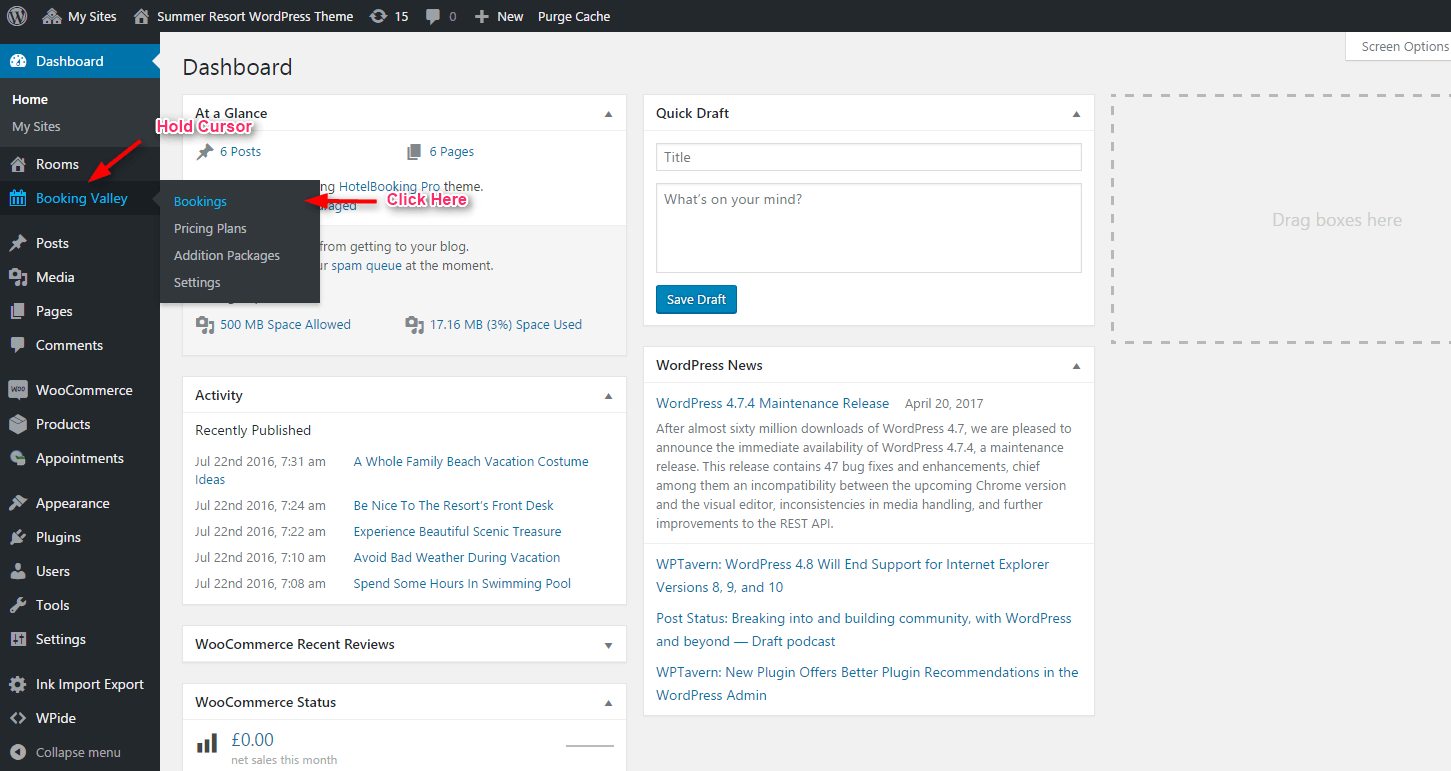
- Step 1 – Hover your mouse cursor on the Booking Valley option then click on Bookings button where you can see all booked rooms.
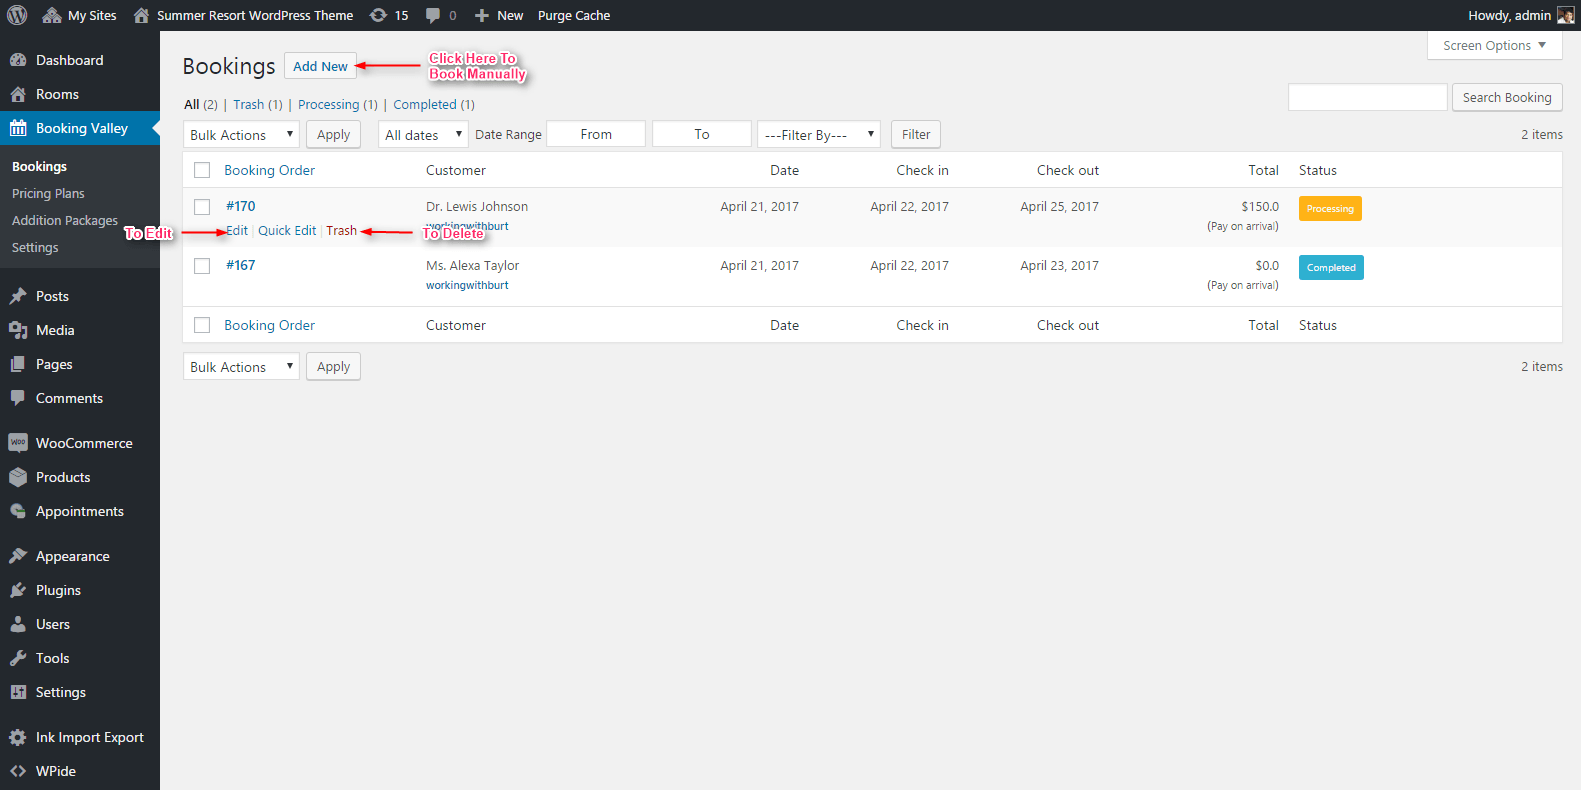
If your customers want to book your hotel rooms via phone calls then you can easily book the rooms by just following simple steps.
- Step 2– Follow previous Step 1 and then click on the Add New button.
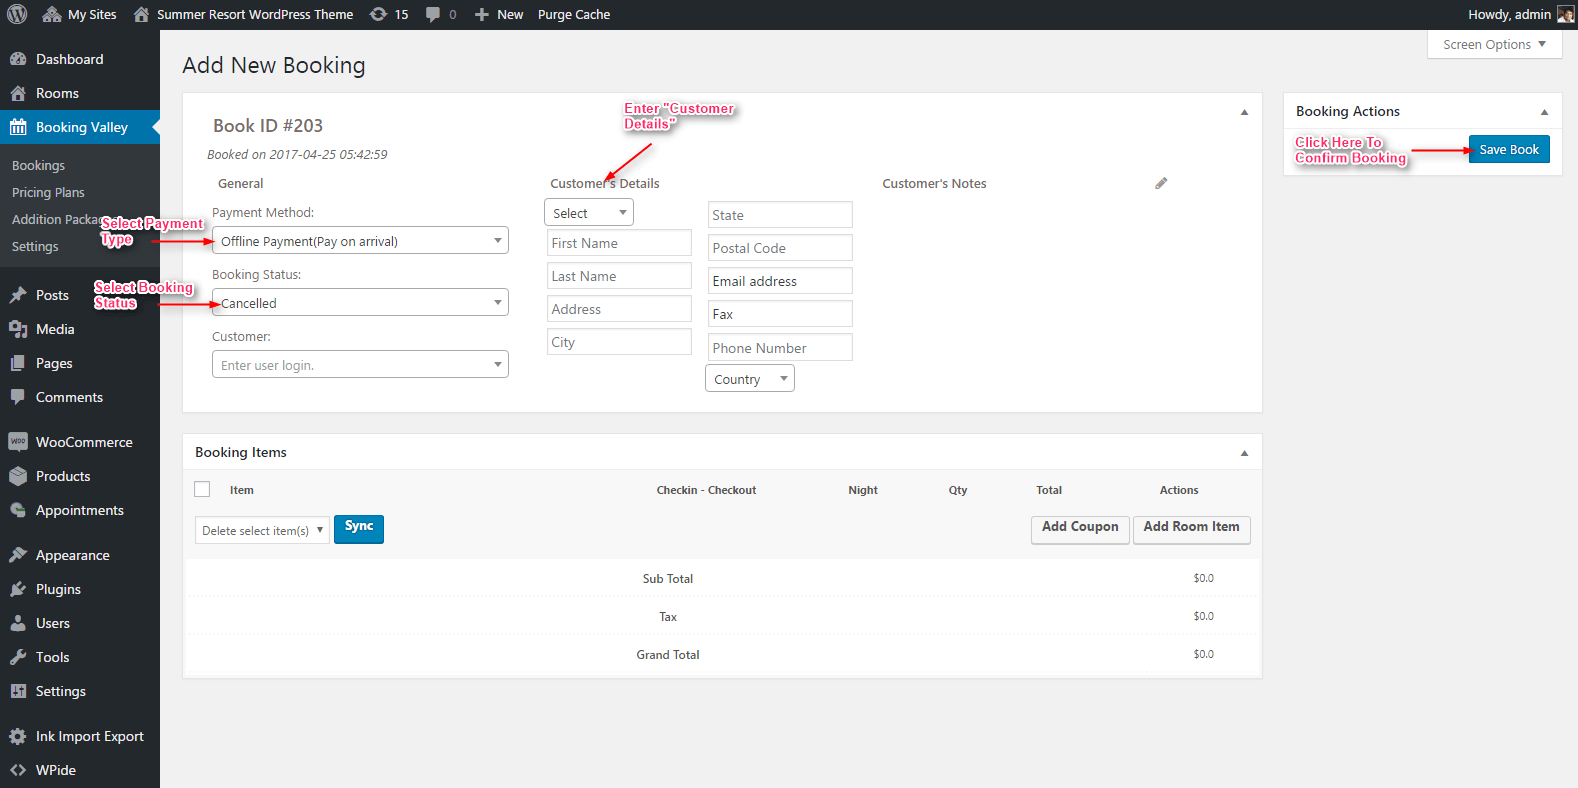
If you want to create pricing plans for your hotel rooms to display offers or discounts to customers then follow pictures and steps.
- Step 1 – First click on Pricing Plans button and then click on the Select Room which shows the list of your hotel rooms and last select the room.
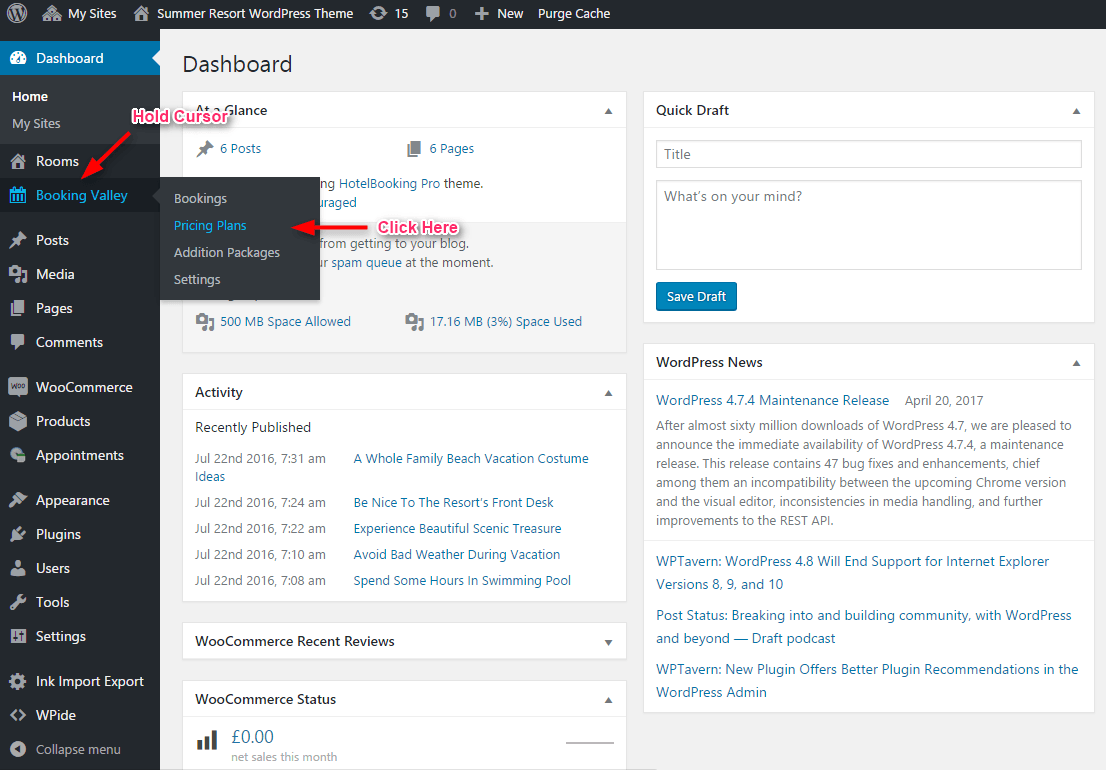
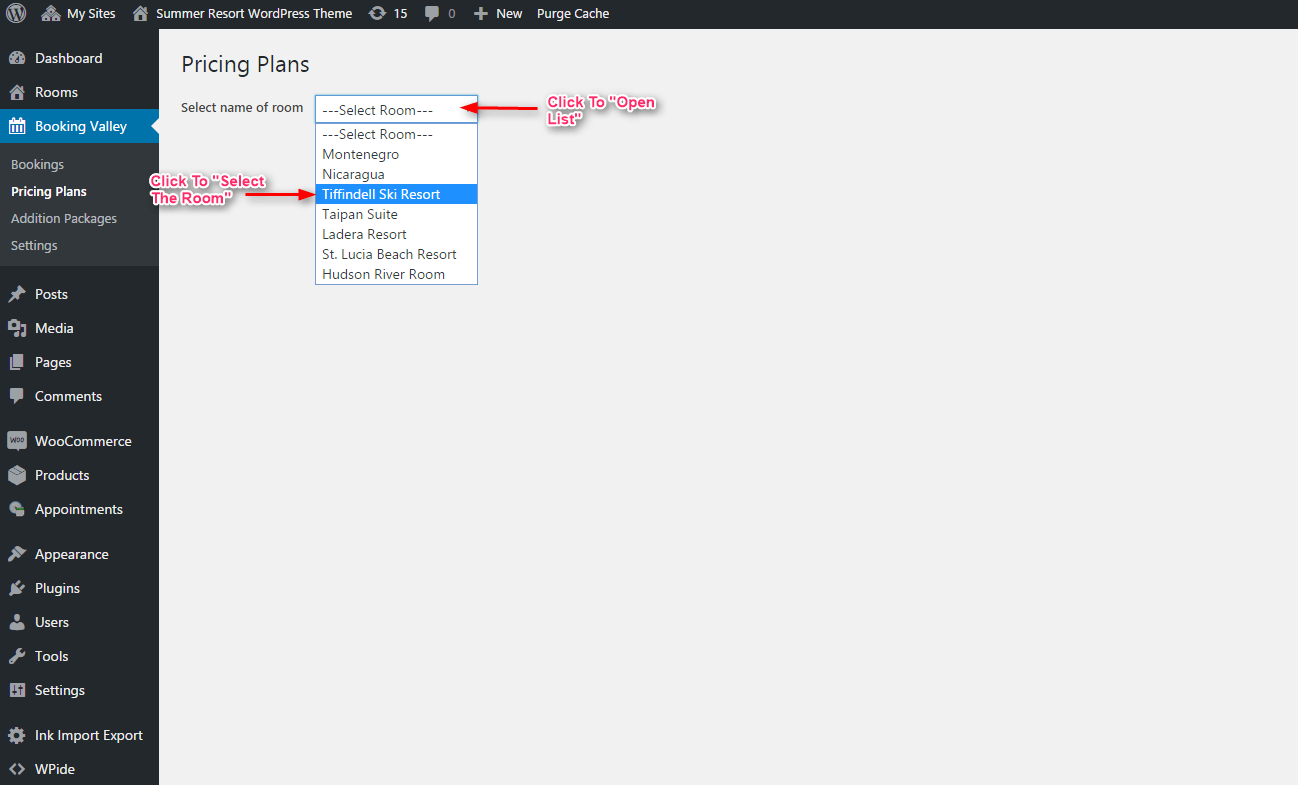
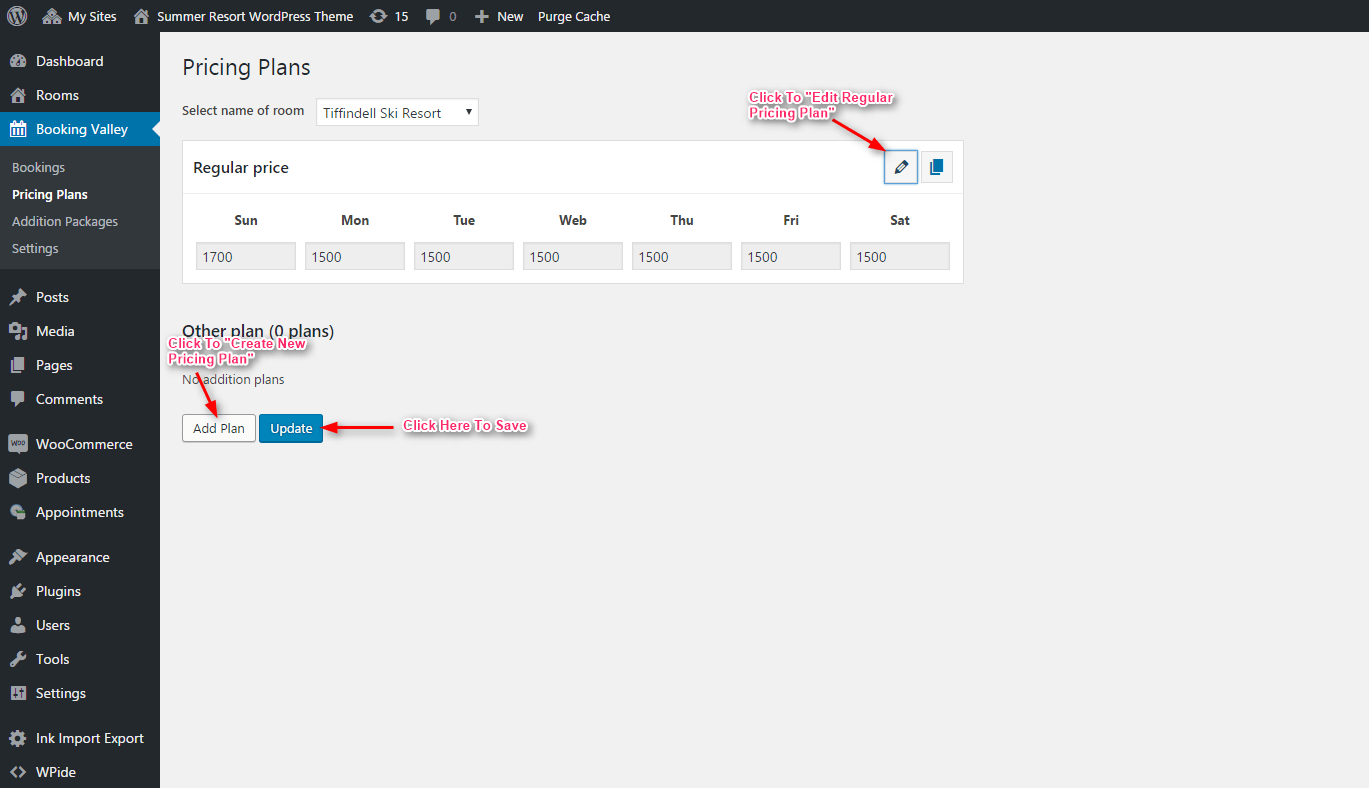
- Step 2 – Here, you can see the regular pricing plan of the room if you want to edit this regular plan then you need to click on the “pencil” icon button otherwise click on the Add Plan button to create new plans and last click on the Update button to save the pricing plan.
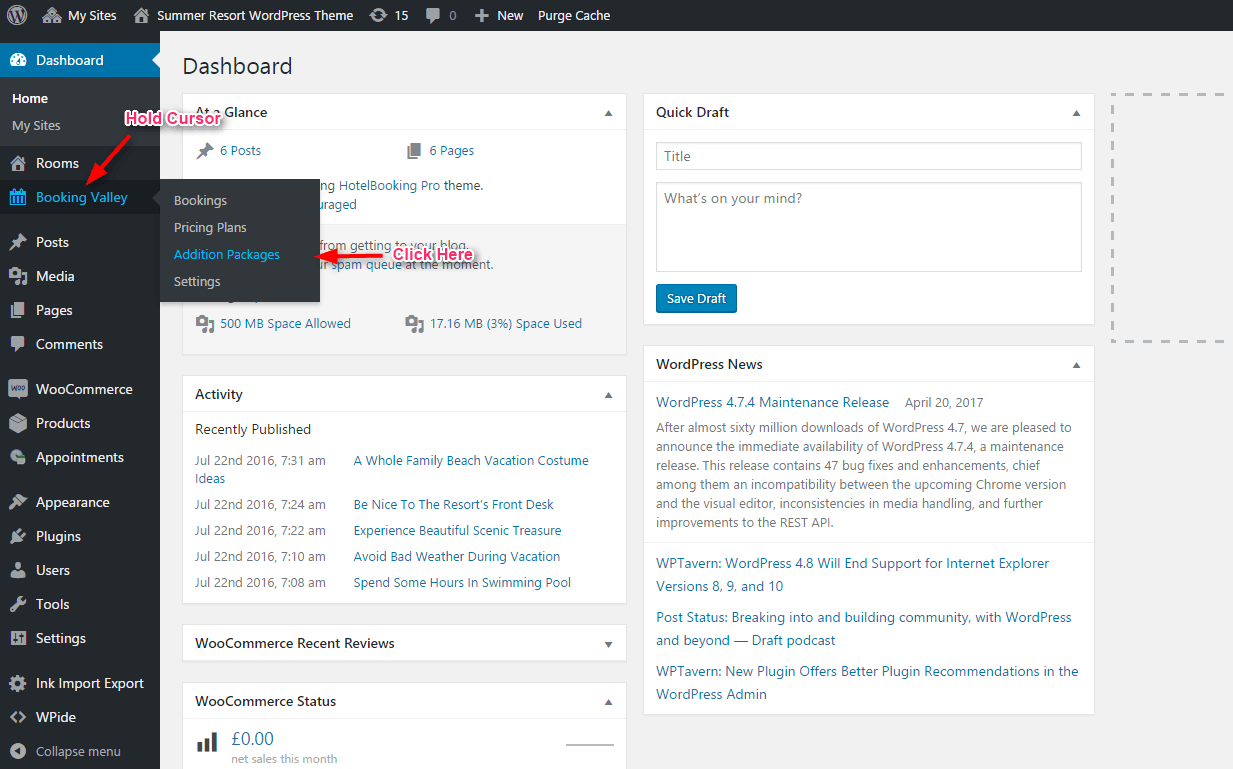
You can also additional room services (like pick up & drop, valet parking) or extra packages (breakfast & lunch) for your hotel rooms.
- Step 1 – Click on Additional Packages option and then click Add Another Item button to add additional room packages.
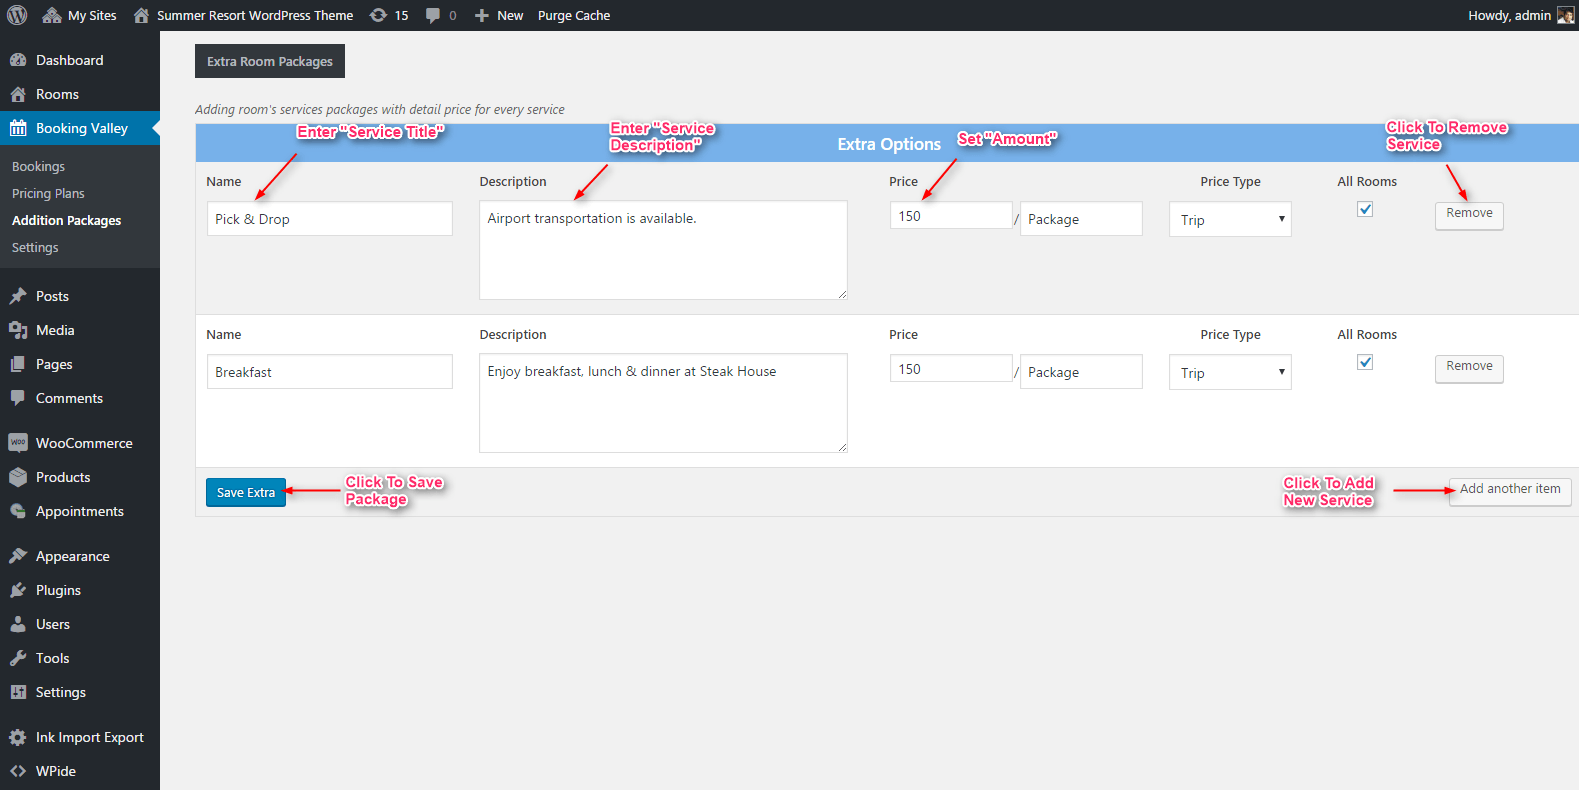
- Step 2 – Here you can enter the service name and its description along with the price. If you want to include this package to all rooms then select All Rooms checkbox button.
- Step 3 – Click Save Extra button to save the package.
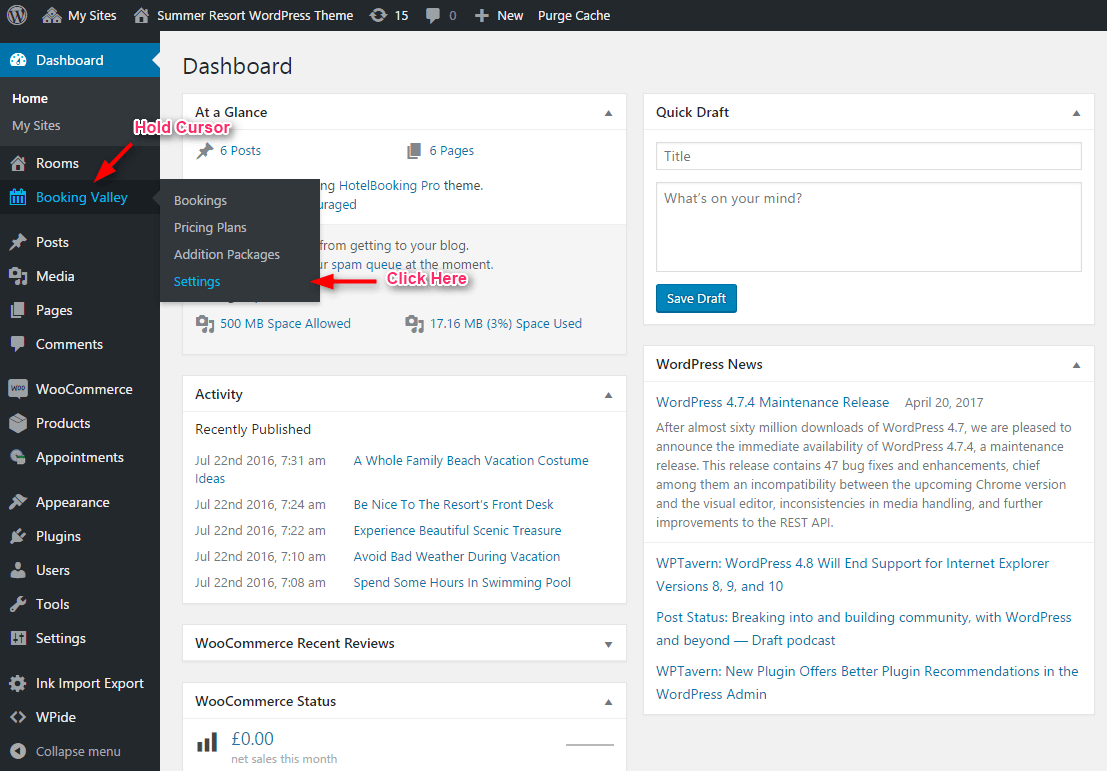
If want to customize your hotel information and other general settings then follow steps & images.
- Step 1 – First go to Settings option which will lead you to the General setting page.
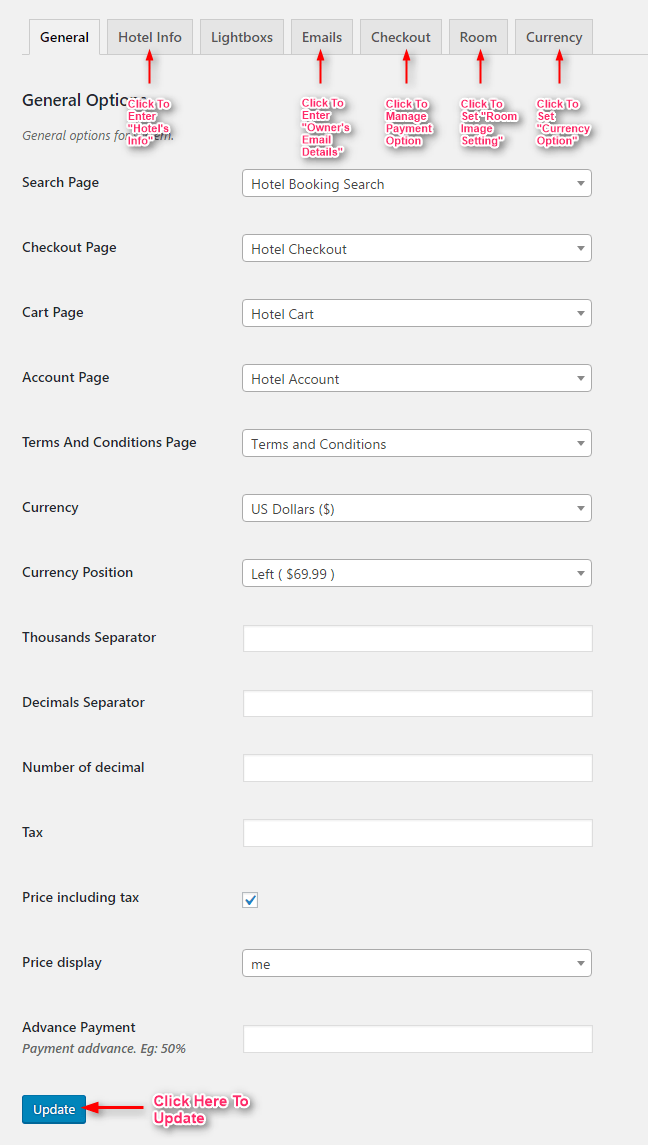
- Step 2 – To enter your hotel information, click on the Hotel Info tab.
- Step 3 – To enter owner’ email details, click on the Emails tab.
- Step 4 – To set room image settings, click on the Room tab. These images will display either on the homepage of your website or on the related room page.
- Step 5 – Click on the Currency tab to set payment currency option.
7. How To Use Custom Widget?
You can use any custom widget with our theme, let’s see how to use it.
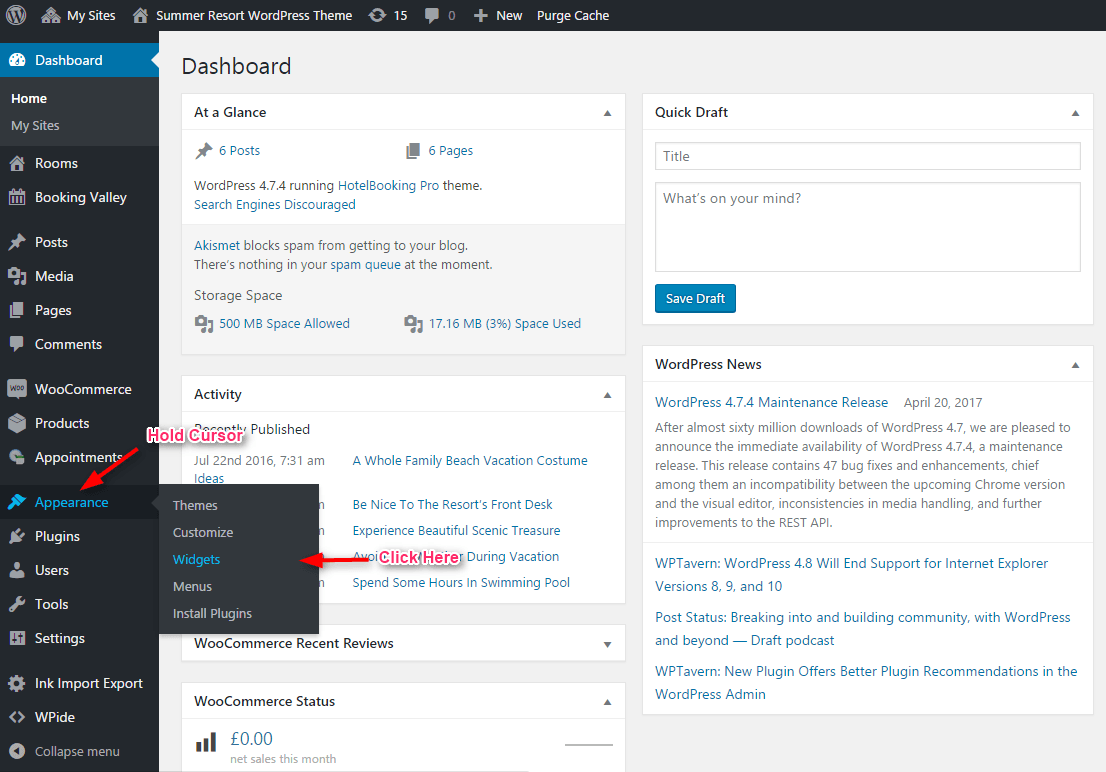
- Step 1 – First go to Dashboard, then hover your mouse cursor on the Appearance option and then click on Widgets button which redirects you to the widget setting page.
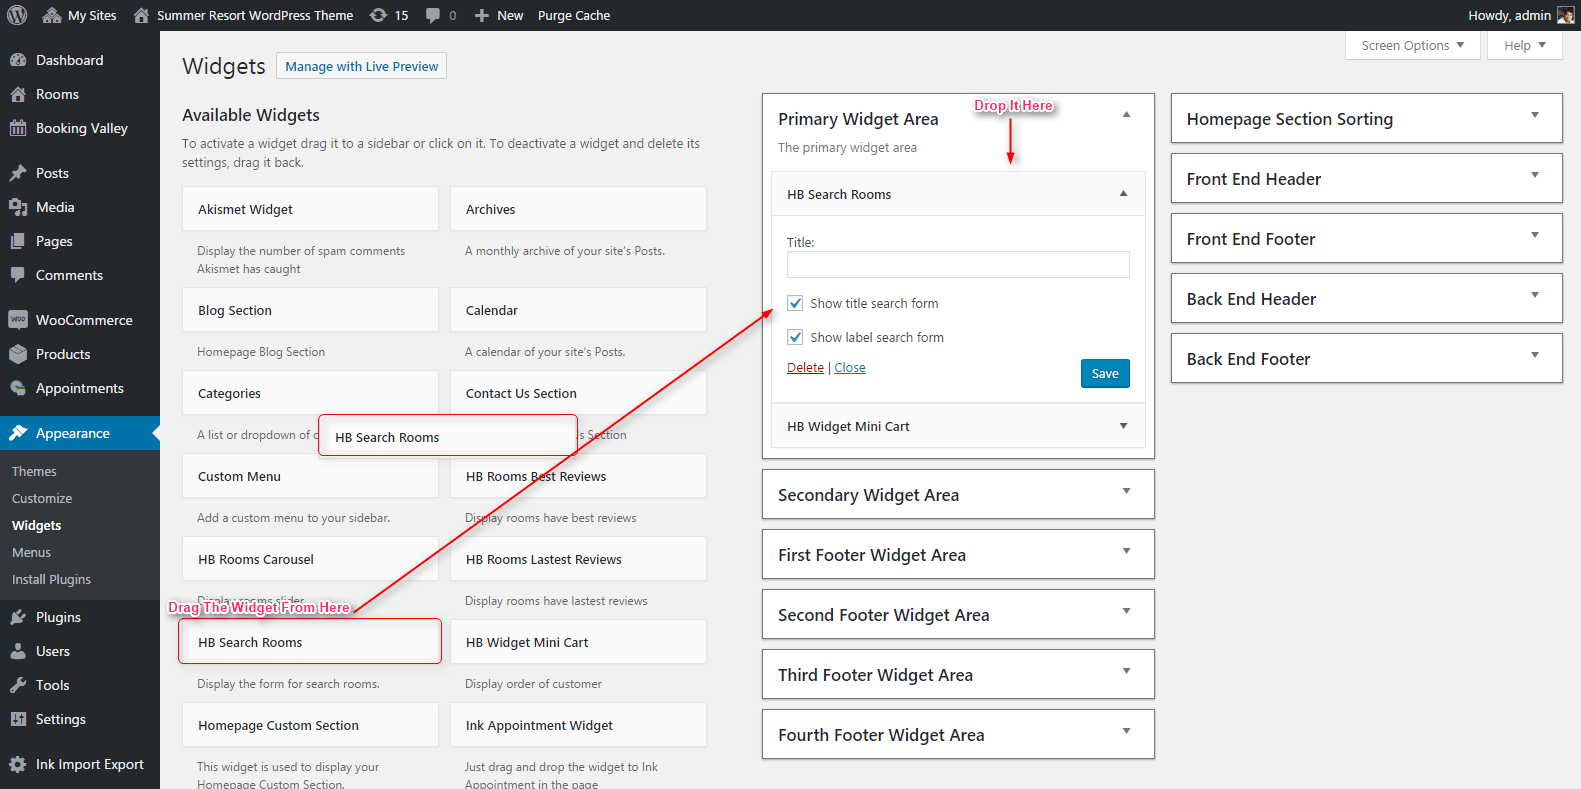
- Step 2 – Here, you can see two sections first one is Available Widgets and the second one is Theme Widget Area. To activate the widget, you just need to drag the desired widget from Available Widgets section and drop it on the Theme Widget Area.
8. How To Customize Your Website?
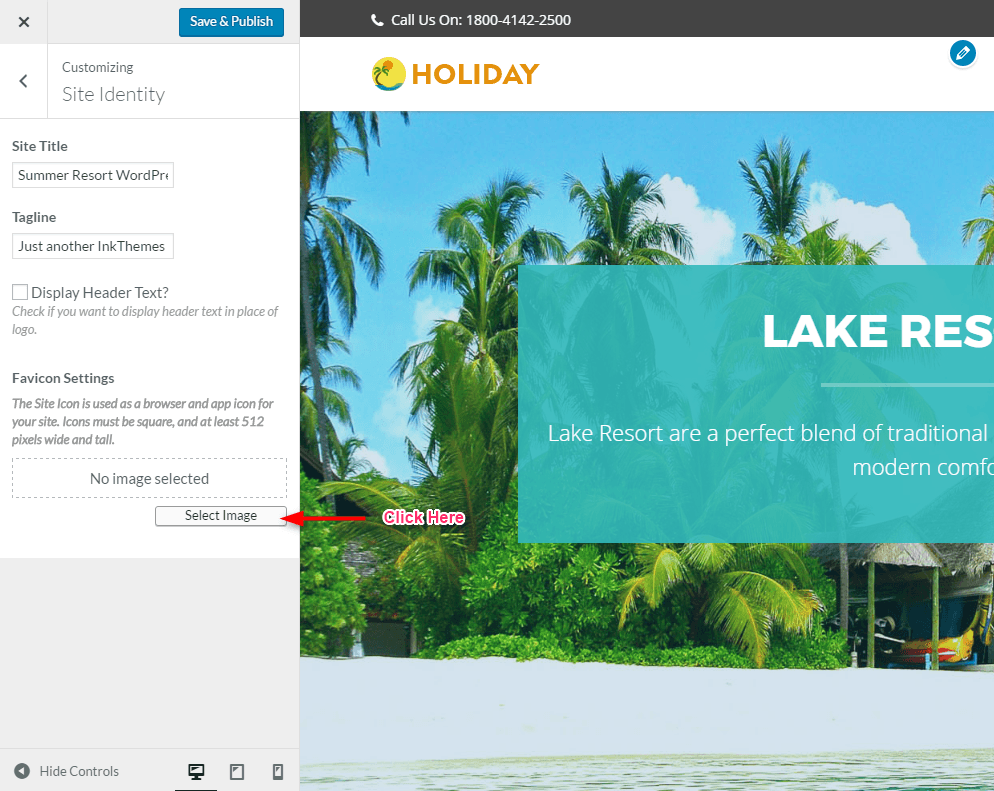
The theme customizer allows you to change your business logo name, favicon icon and other customizable things. To customize your website follow steps and pictures.
The theme has a front-end customizer which reflects changes immediately.
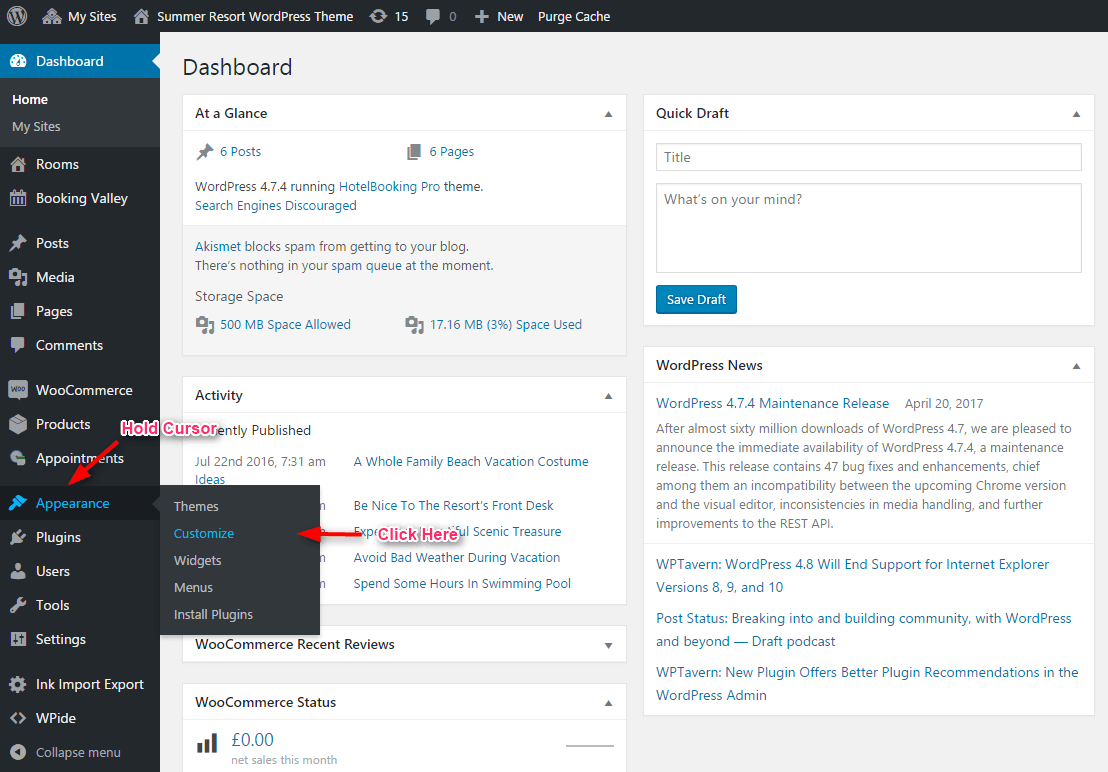
- Step 1 – Go to Dashboard, then hover mouse cursor on the Appearance option and then click on the Customize button which leads you to the front-end customizer that permits you to customize your website as you want.
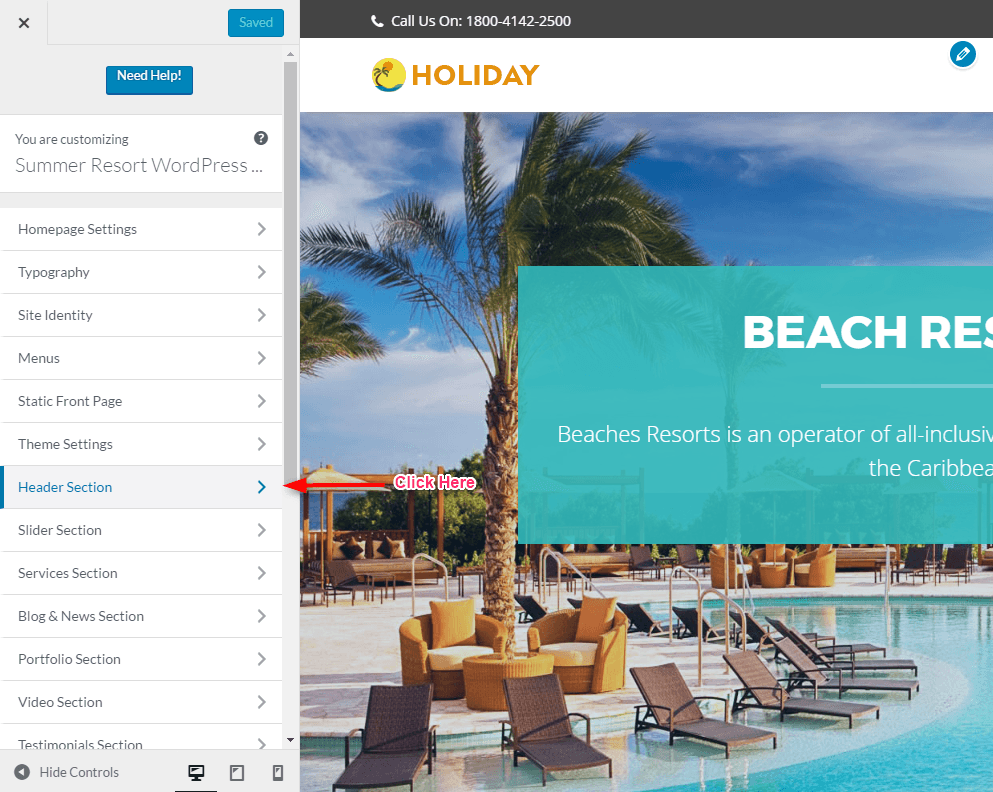
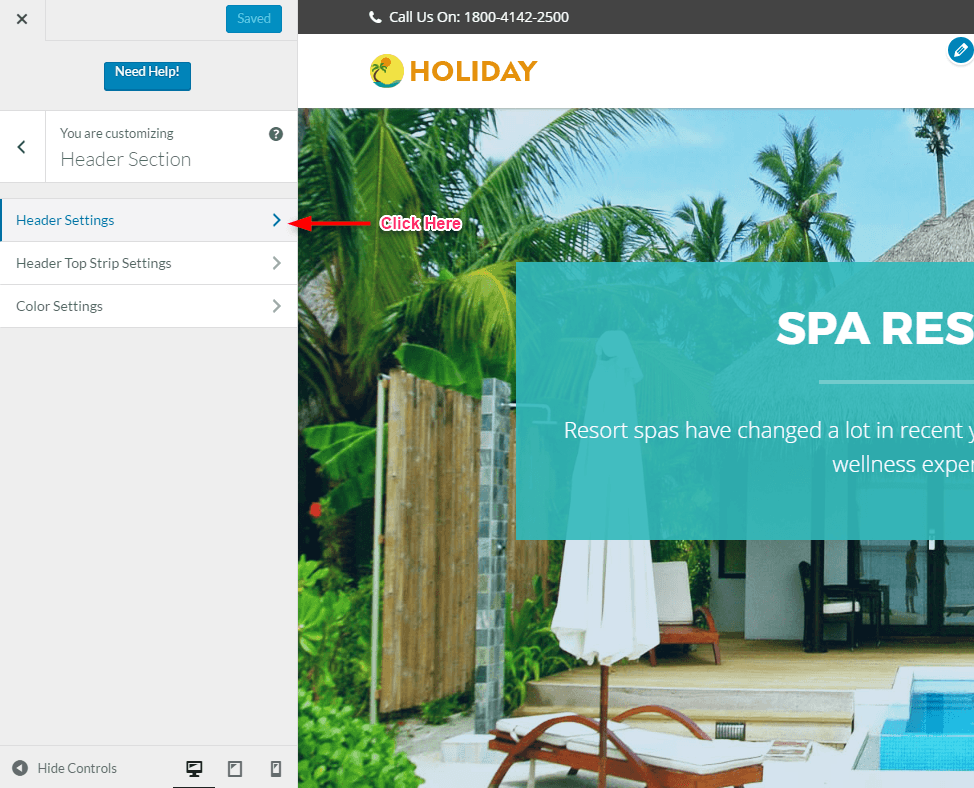
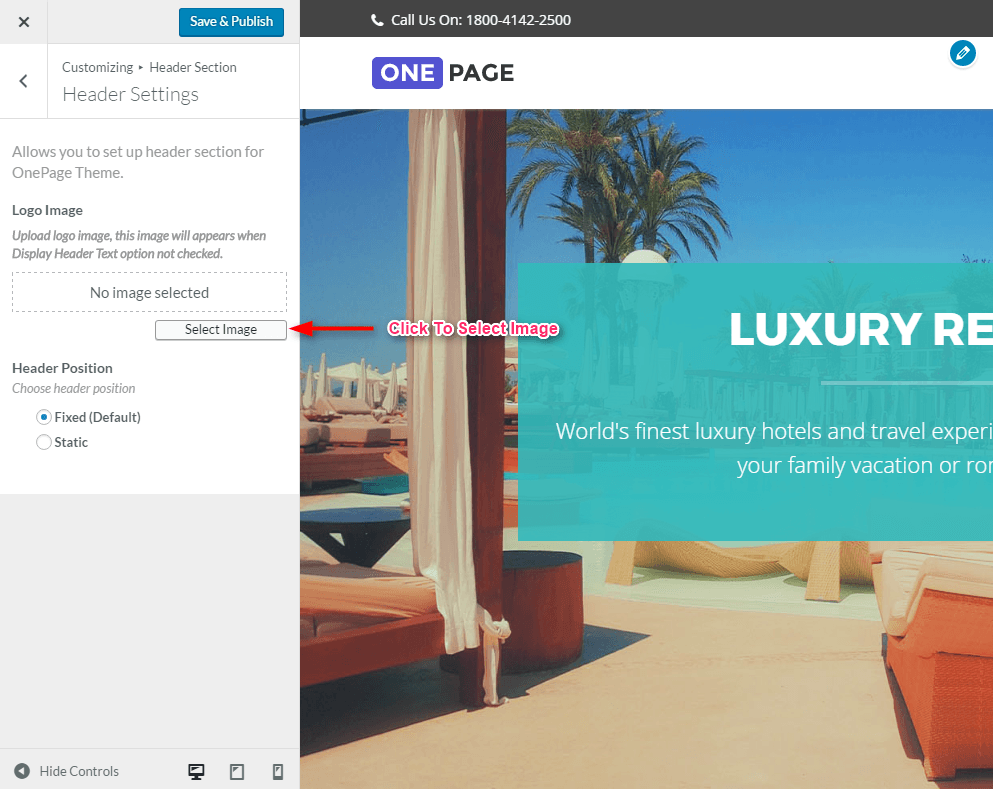
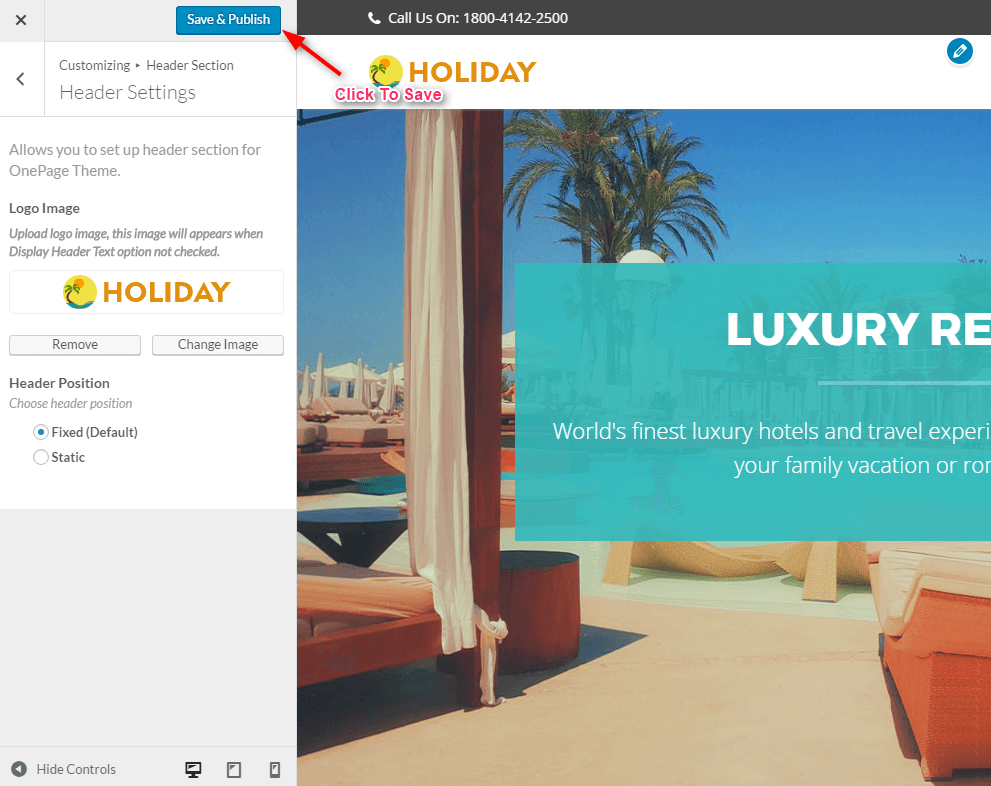
- Step 2 – Click on the Header Section option then Header Settings button and last click on the Select Image button to upload your company business logo.
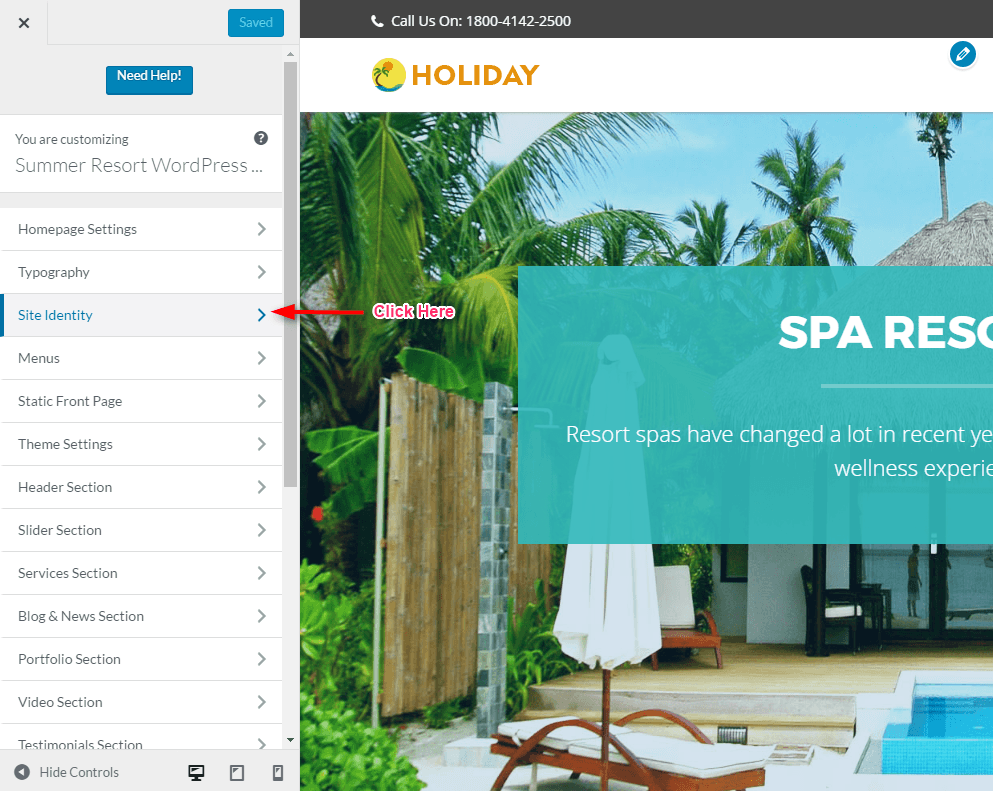
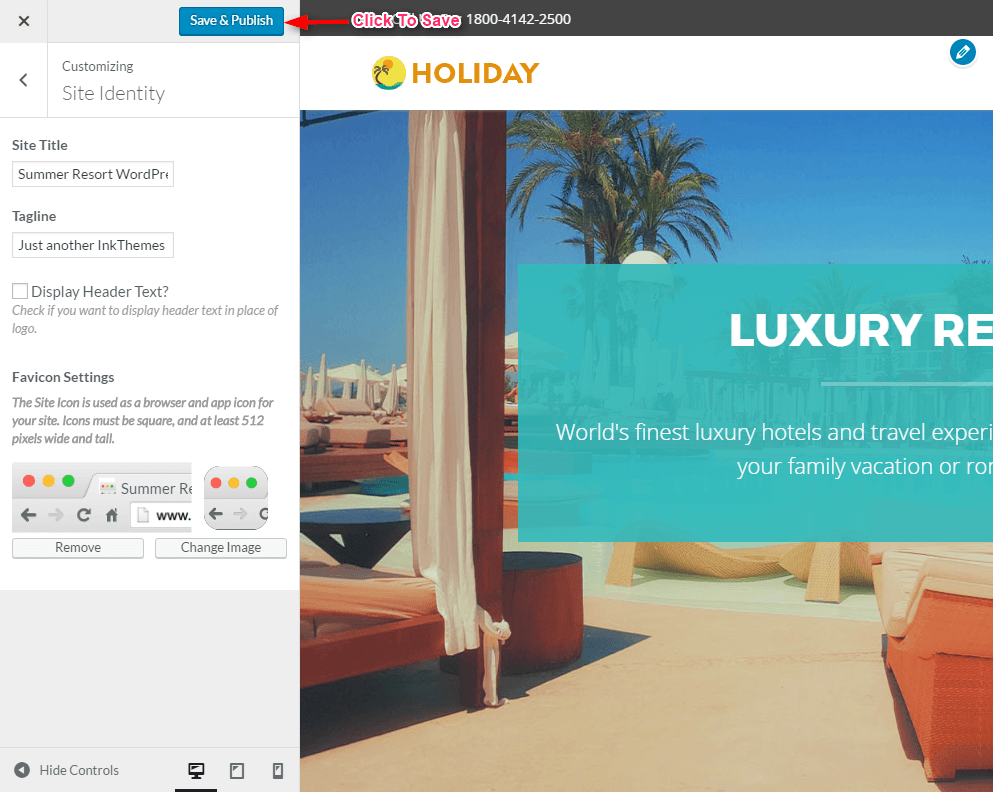
- Step 3 – Click on the Site Identity option then click on the Select Image button to upload your desired favicon image.
9. How To Create Blog & Other Pages?
A blog is the best medium to share business tips, thought, news, etc. So if you want to create a blog page where people can gather information then follow below guidelines.
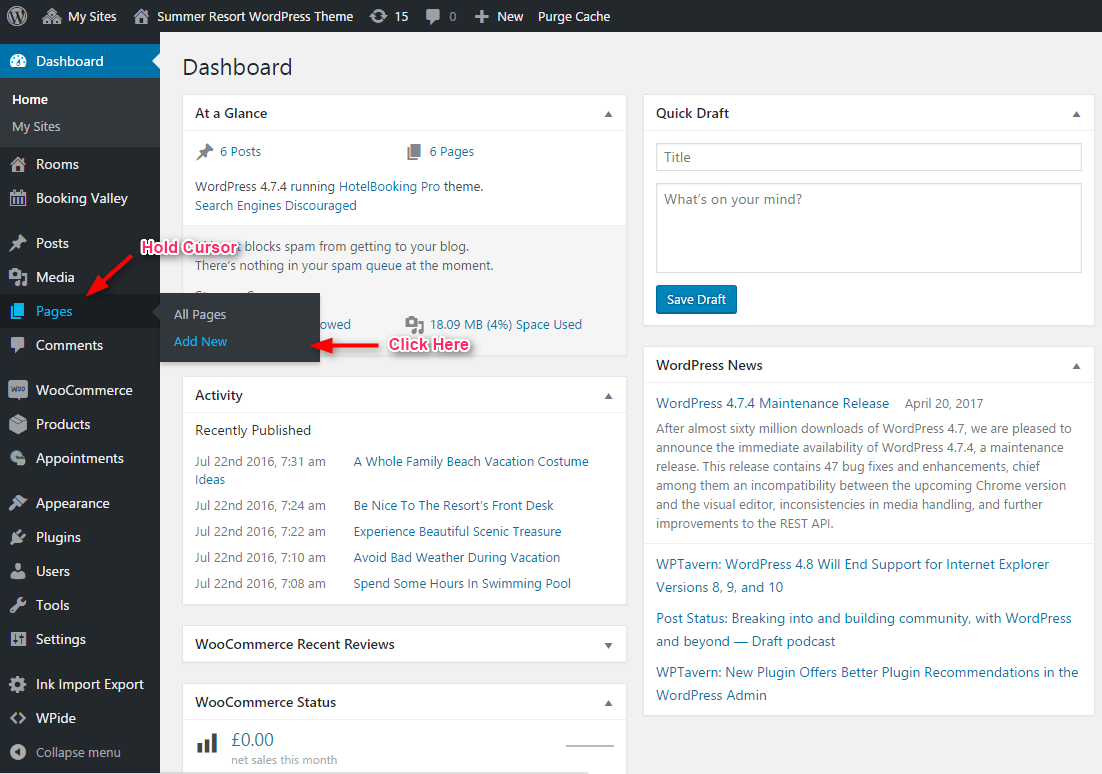
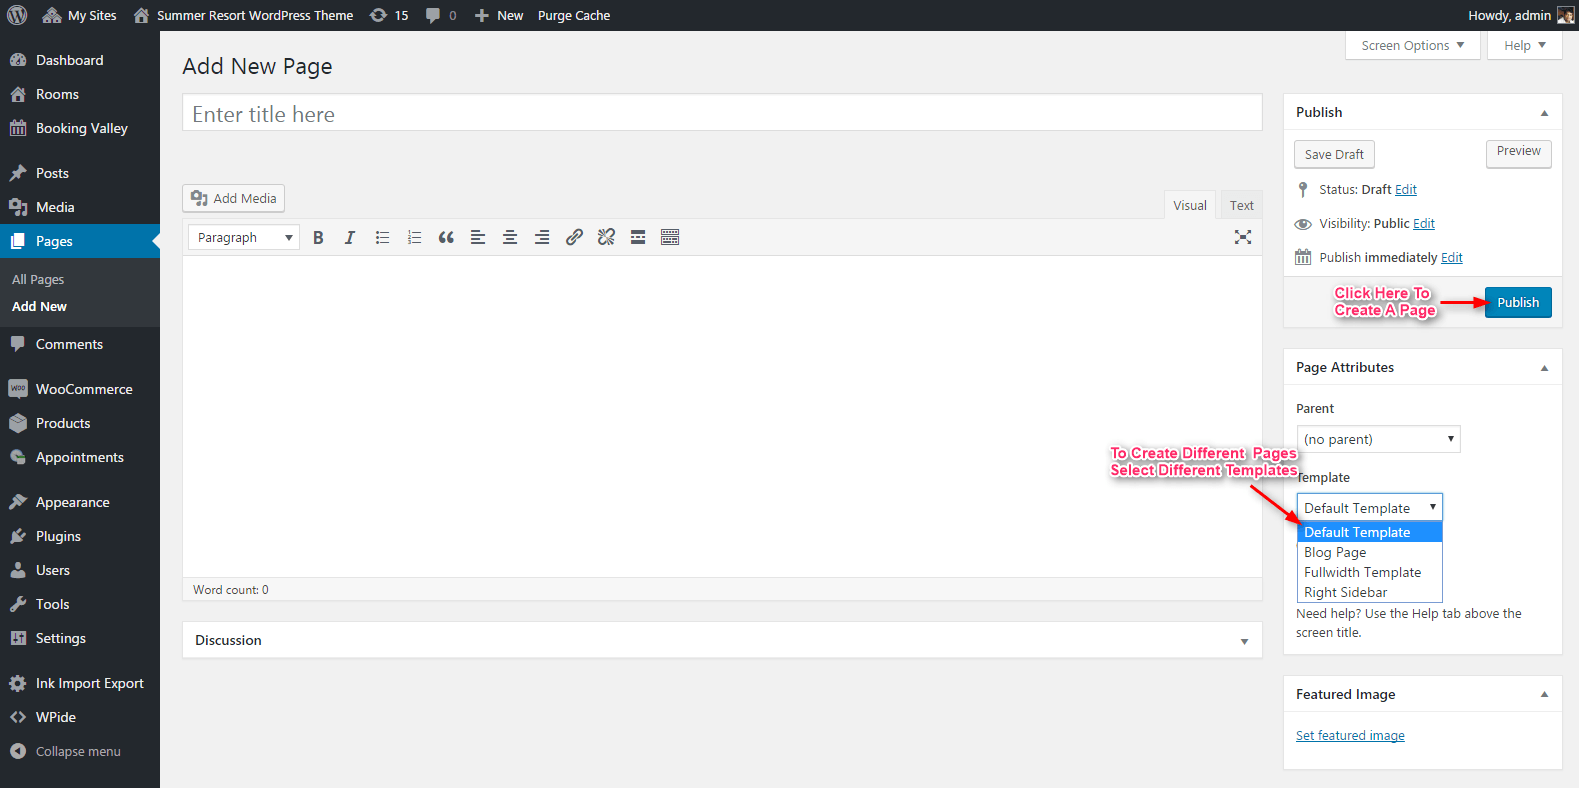
- Step 1 – First go to Dashboard then hold/ hover mouse cursor on the Pages option then click on the Add New button.
- Step 2 – Enter the title of the page, click on the Template option to select Blog Page template and last click on the Publish button to create the blog page.
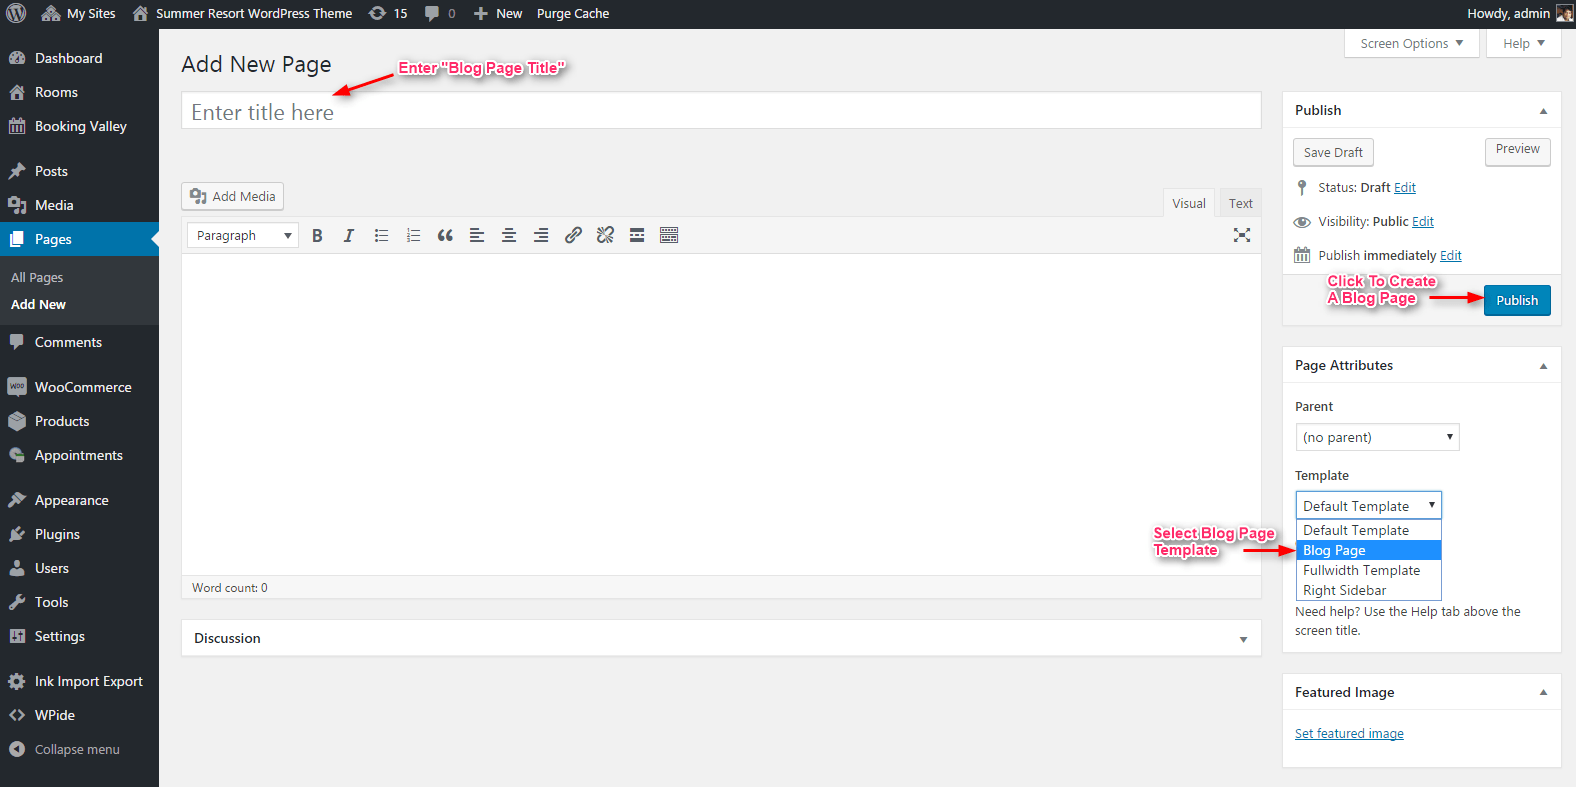
To create different types of pages click on the Template option to select other template options.
10. How To Create Blog Posts?
To create blog posts then follow steps and pictures.
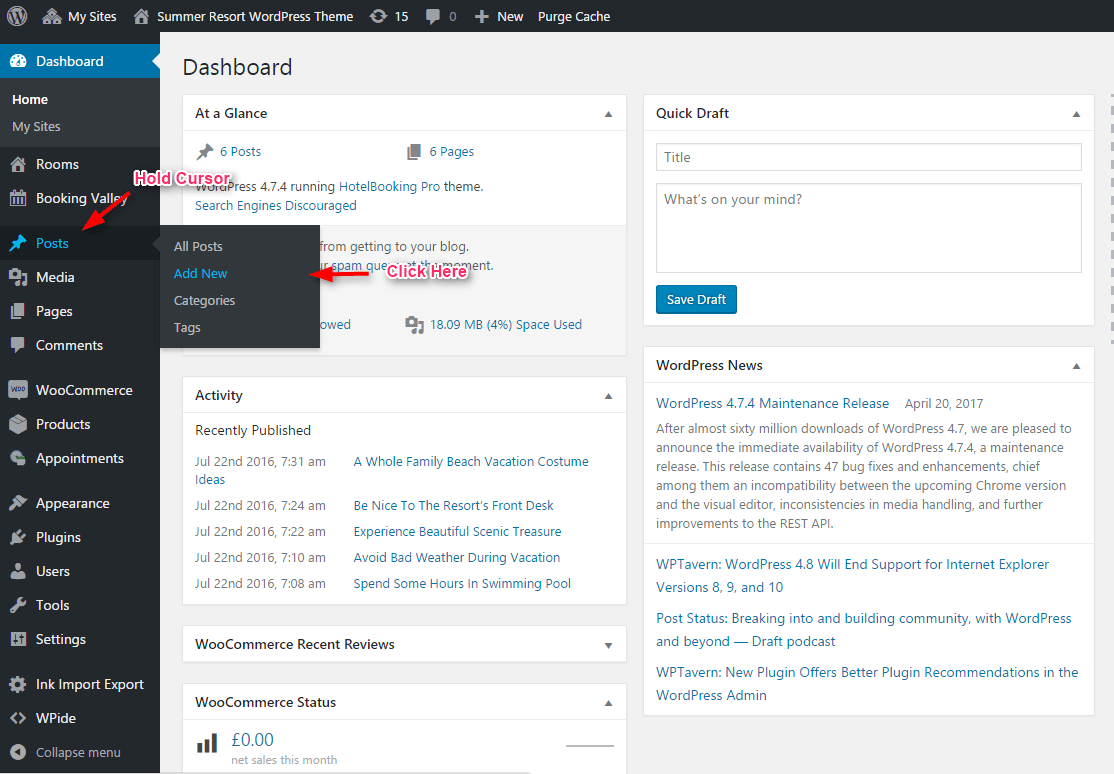
- Step 1 – Again go to Dashboard then hold mouse cursor on the Posts option then click on the Add New Post button which will lead you to the blog post creation page.
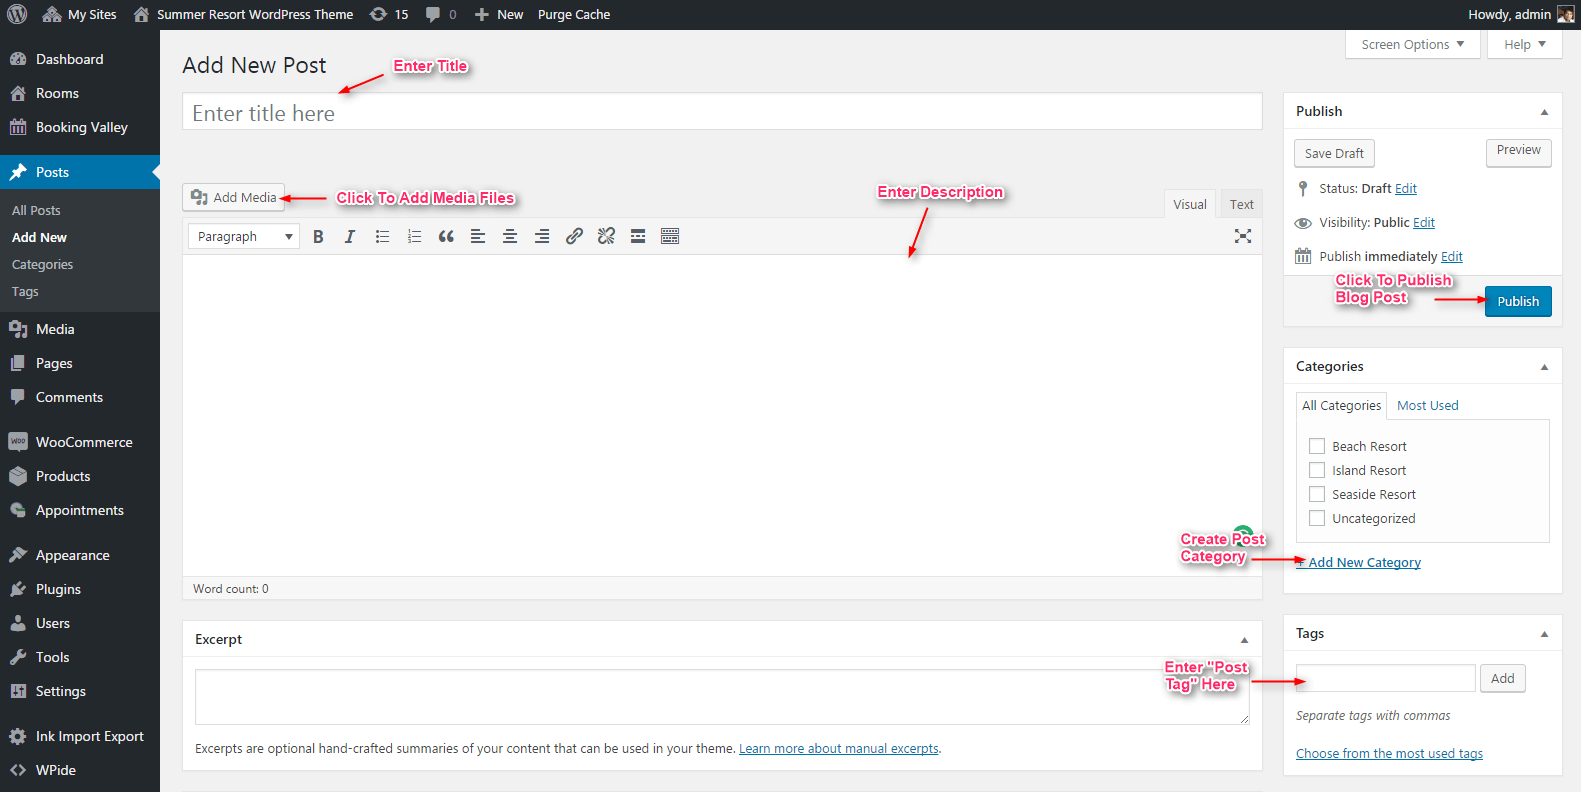
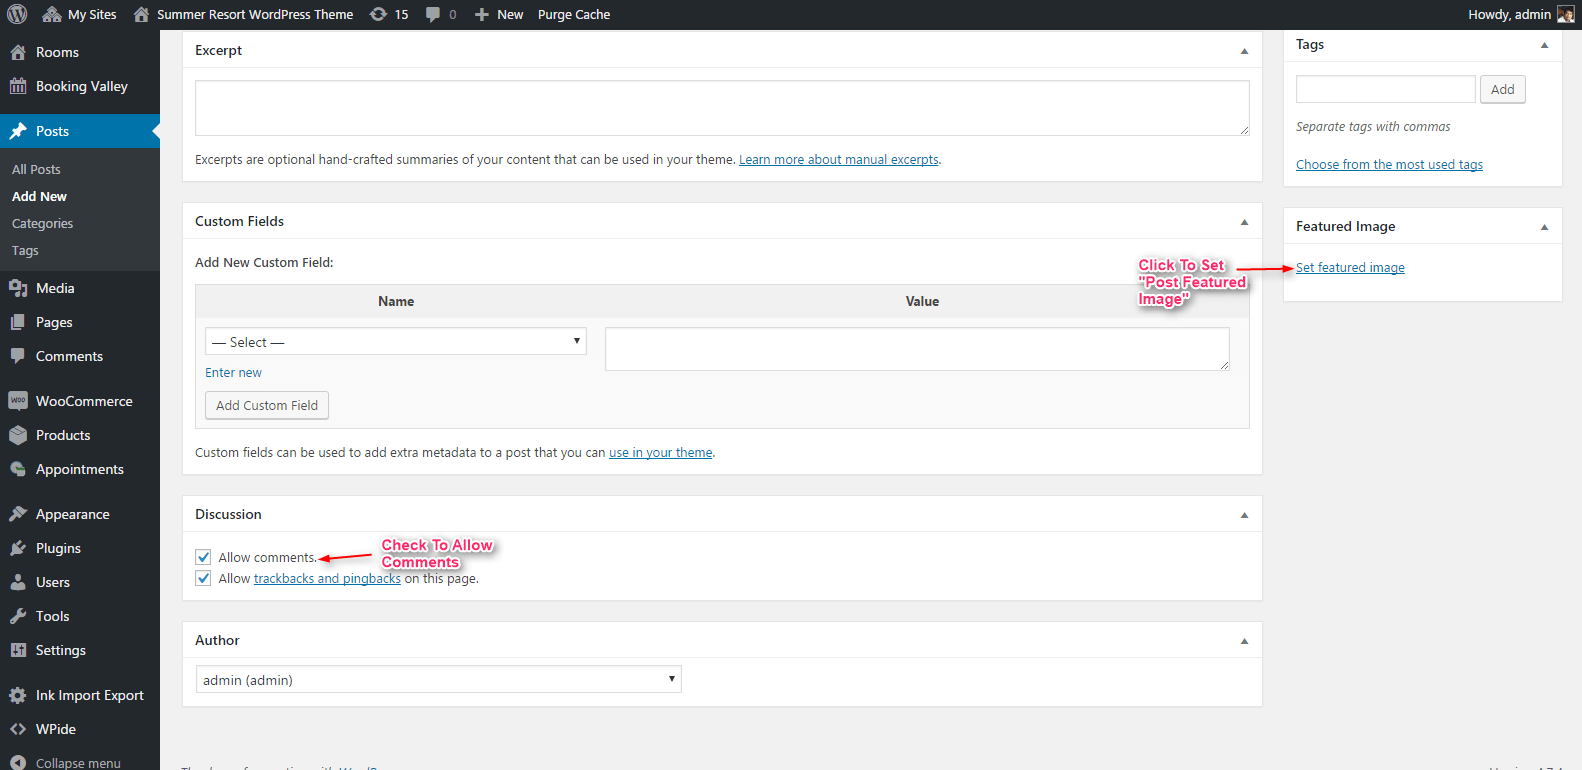
- Step 2 – Enter the title of the post, select category, write the description in the content area then click Publish button to publish the post.
Last Words…
After reading this tutorial, now you have a clear idea about how to use and install this theme.
So, try our responsive HotelBooking Pro WordPress Theme to create a room reservation website for your Hotel & Motel business.


