Looking for a WordPress theme to create a responsive business directory listing website?
Well, Geocraft is smart, responsive, best directory WordPress theme meant to create an online business listing site.
Using this directory listing WordPress template, you can set up your own directory website in seconds and start earning a decent profit for your business.
Just go through it once and surely you will realize how flexible it is making a Directory using GeoCraft WordPress theme.
This is how your website would look- Click here.
In the following article, I have covered the following points:
• How to Install GeoCraft Directory Theme?
• How to Configure GeoCraft Directory Theme?
• How to add listing from Frontend and Backend?
• How to create pages?
• How to add widgets?
• Answers to some general queries.
Head on to these links –
- Classified WordPress Themes
- Create Website Like OLX
- How to Create business directory WordPress website.
Let’s get started-
1. How to Install GeoCraft WordPress Directory Listing Theme?
Before you install the GeoCraft theme on your website make sure that:
• You have a web server installed on your machine.
• You have installed WordPress on your Web site.
• You have purchased the GeoCraft Directory theme from the InkThemes market.
Steps for installing the GeoCraft WordPress Directory Listing Theme
• Go to your WordPress Dashboard.

• Click on the “Appearance” section & select the “Install Themes” option..

• Click on “Upload” option.

• Click on “Choose file” button.

• Now select GeoCraft’s zip file and open it.

• Click on “Install Now” button.

• After installing the theme click on “Activate” option. This will activate the theme on your website.

2. How to Configure GeoCraft WordPress Directory Listing Theme?
After installing and activating the GeoCraft theme on the website, let’s see how GeoCraft can be configured?
Under the GeoCraft theme, there are two sections
• GeoCraft Settings.
• Business Listings.
Fields under the GeoCraft Settings – Various fields are available under GeoCraft setting:
• Theme options
• Payment Settings
• Custom Fields
• Transaction
• Leads Capture
• Import/Export
Uploading Logo, Image & favicon – Follow the steps and upload images, logo and favicon on the website.
GeoCraft Settings –>Theme Options –>General Settings

Text for Post Button, Featured Slider & Recently Added Heading – Follow the steps and set the text for post button, featured slider heading and recently added heading.
GeoCraft Settings –>Theme Options –>Homepage Settings

Enabling Lead Capture, Free & Paid Listing – Follow the steps and enable or disable lead capture form, free and paid listing.
GeoCraft Settings –>Theme Options –>Listing Settings

Adding Color & Custom CSS to the WordPress Theme – Follow the steps and choose the color of the theme and also add custom CSS to the theme.
GeoCraft Settings –>Theme Options –>Styling Options

Adding Text in the Footer WordPress Widget – Follow the steps and add text in the footer section.
GeoCraft Settings –>Theme Options –>Footer Settings

Adding Social Icons to the Website – Follow the steps and add the social icons to the website.
GeoCraft Settings –>Theme Options –>Social Icons

Managing SEO options – Follow the steps and use meta keywords, descriptions and add the name of the author under SEO section.
GeoCraft Settings –>Theme Options –>SEO Options

Selecting Modes of Payment: There are three types of payment packages available under GeoCraft theme:-
• Free Payment Package: A listing owner doesn’t have to pay anything for listing the business and his listing would be active for a period of time mentioned in the theme options. This listing is free of cost.

• One Time Payment Package: Once the listing owner chooses this option the listing will be published as a paid listing for a period of time mentioned in the theme options. When the listing expires it goes to the draft mode where it can be reactivated again.
When the time period of listing expires, listing owner will get an email notification to reactivate his listing. Also he can choose to feature his listing on homepage slider/category slider by paying an extra amount.

• Recurring Payment Package: If the listing owner chooses this payment package then as long as the listing owner pays, the listing will be active. The time the listing owner stops paying his listing will be expired. Also with this package, the listing owner can choose to feature his listing on homepage slider/category slider.

Customizing the Fields on the WordPress Directory Website: Follow the steps and customize the listings, lead capture form etc. as per your requirements.
GeoCraft Settings –>Custom Fields

Importing/Exporting CSV (Common Separated Values): Follow the steps and upload CSV.
GeoCraft Settings–>Import/Export
A listing owner can export/import his own CSV through “GeoCraft settings” option under the dashboard. Under the GeoCraft settings, there is an option of “Import/Export”. Select this option and first export the CSV document in the system. After downloading the document checkout:
• The format of the CSV document.
• Name of the column fields.
• Follow the same format in your own CSV.
After making CSV, click on “choose file” option. This will upload the CSV and at last click on “Import” button.

Creating Listing From Backend (Admin Side): An admin can create his own listings through the following steps: Dashboard –> Business Settings –>Add New

Add Listing Category (Admin): Add your Listing category from the available categories or click on “Add New” button to add a new category. Follow the steps:
Business Settings –>Listing Categories

Adding Listing Tags (Admin): Add your Listing tags from the available categories or click on “Add new category” button to add a new tag. Follow the step:
Business Settings –>Listing Tags

Creating Listing From Front-end (Listing Owner’ side): A listing owner can create his own business listings through the following steps:
Dashboard –>Add New Listing

3. How to Create Pages?
Various templates for available for creating new pages. Follow the steps and add new pages on the website-
Dashboard –>Pages –>Add New

4. Building Menu With Menu Manager-
GeoCraft has a prebuilt feature of displaying all the pages and sub pages in the menu. However, you can build your custom menu through these steps:
Dashboard –> Appearance –>Menus –>Click on “Create Menu” button & enter the menu name.

5. How to Add WordPress Widgets?
Follow the steps and add widgets in the sidebar:
Dashboard –>Appearance –>Widgets

6. How To Use GeoCraft WordPress Theme To Create Business Directory Website
GeoCraft theme has various exciting and useful templates for a Website. A perfect WordPress Theme for Business Directory. Easy to customize and style. Every feature looks perfect. This blog post will explain the complete approach about each template i.e.
- Types of Templates in GeoCraft.
- How to use each template to create Business Directory Website.
Types of templates in GeoCraft theme:
There are ten different templates available in the GeoCraft theme. They are as follows:
- Default Template
- Search Template
- Blog Template
- Contact Template
- Dashboard Template
- Featured Listing
- Fullwidth Template
- Left Sidebar Template
- Listing Template
- Submit Listing Template
Default Template: Initially default template is activated on each page which can be further replaced to any of the available templates.
Search Template: A search template is used to search the following on the Website:
- Listing title
- Listing description
- Tags
- Category in left box and
- Map addresses in the right box
Blog Template: A blog template is used to show all the blog posts on the Website.
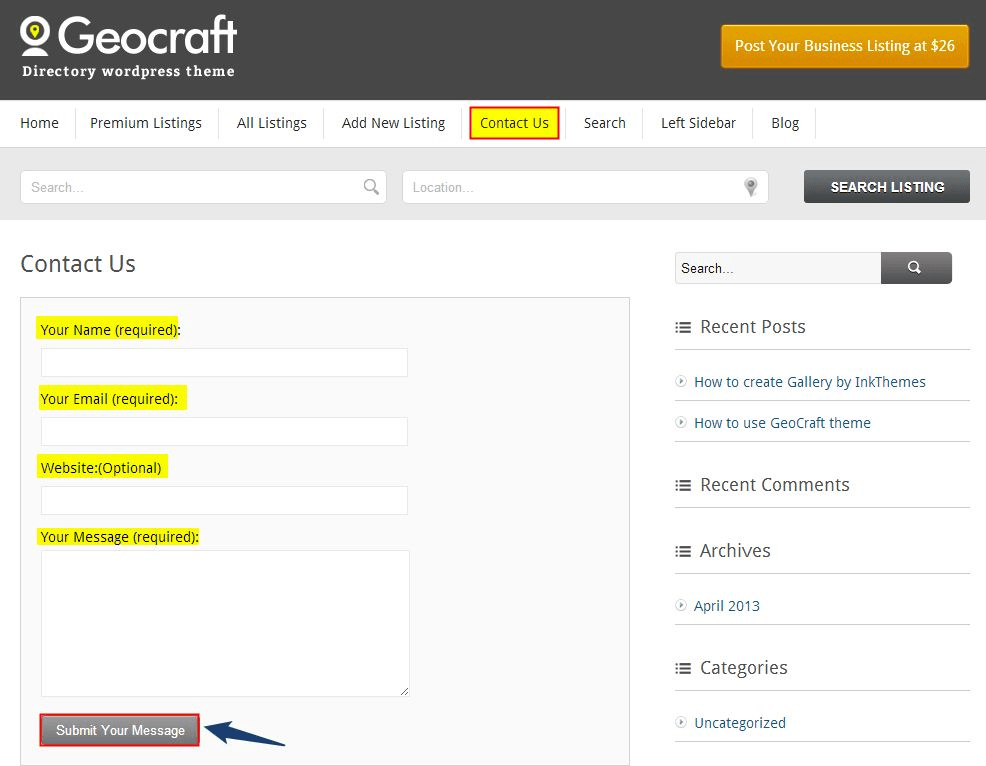
Contact Template: A contact template is used to display the contact form on the Website. This template contains all the required fields of information through which anyone can submit the message (like feedback or comment) regarding the Website.
Dashboard Template: A dashboard template is used to show user’s personal information, comments on their listings and also lead capture form on the front end of the Website.
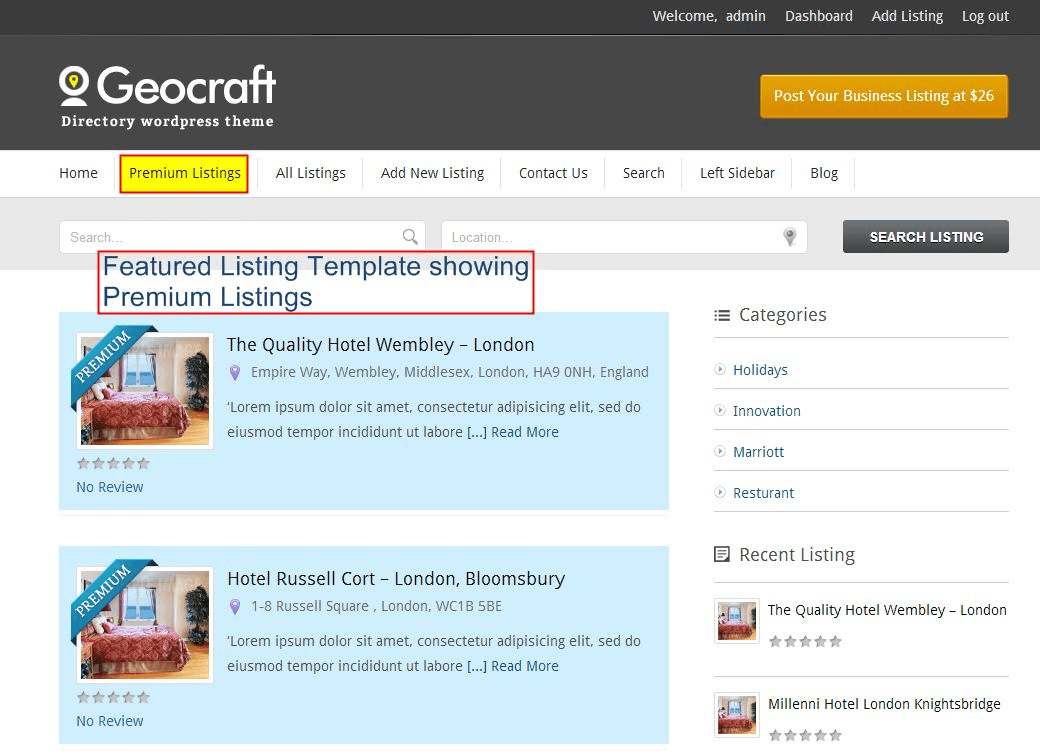
Featured Listing Template: A featured listing template is used to show all the premium listing ads on the Website.
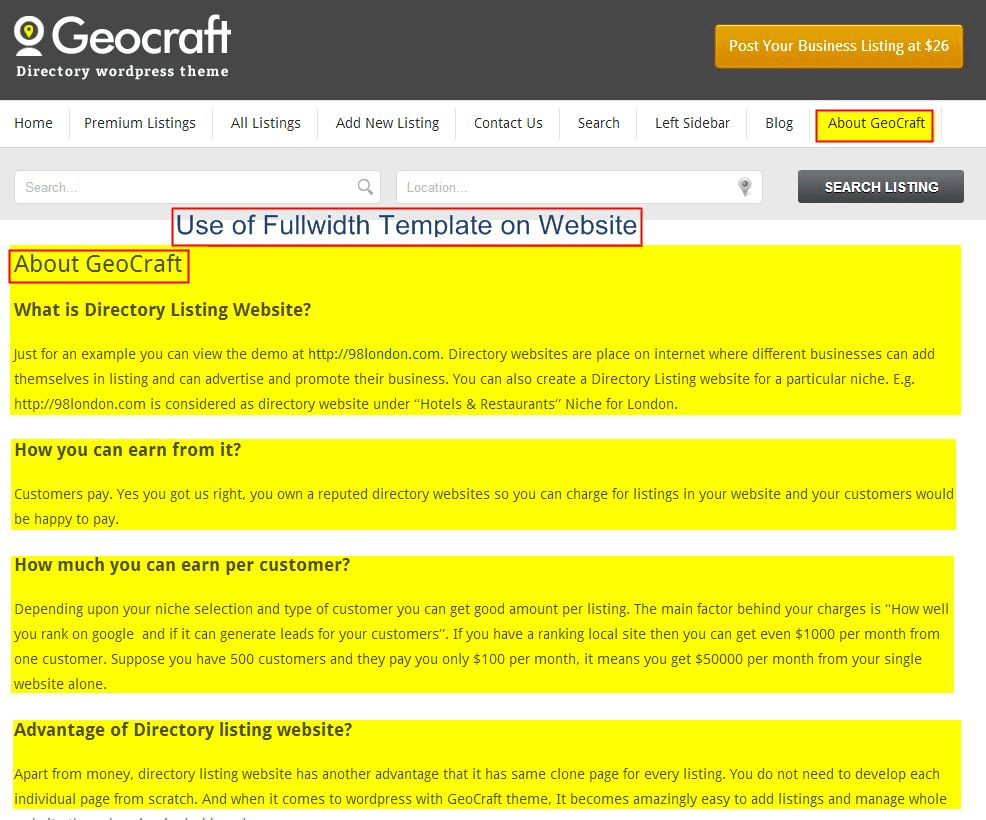
Full-width Template: A full-width template is a full layout template that means it has no sidebar.
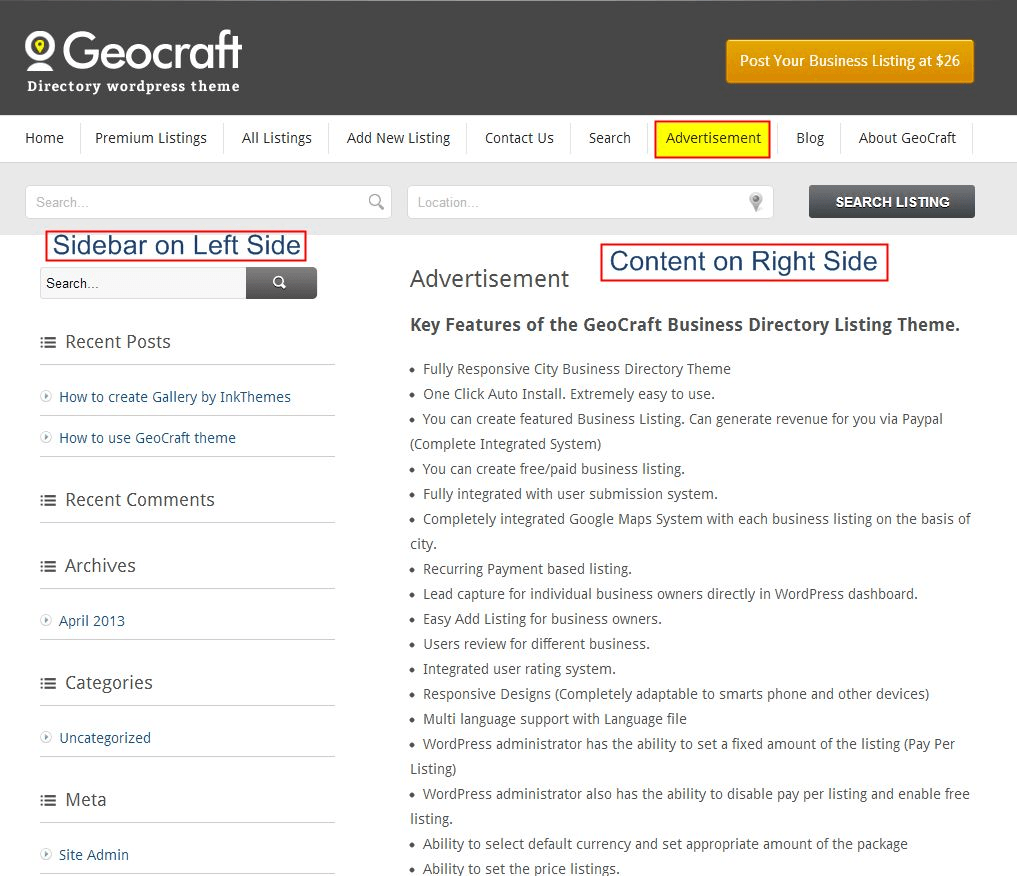
Left Sidebar: A left sidebar template is used to switch the right sidebar to the left sidebar. If this template is activated, content block will be appearing on the right side.
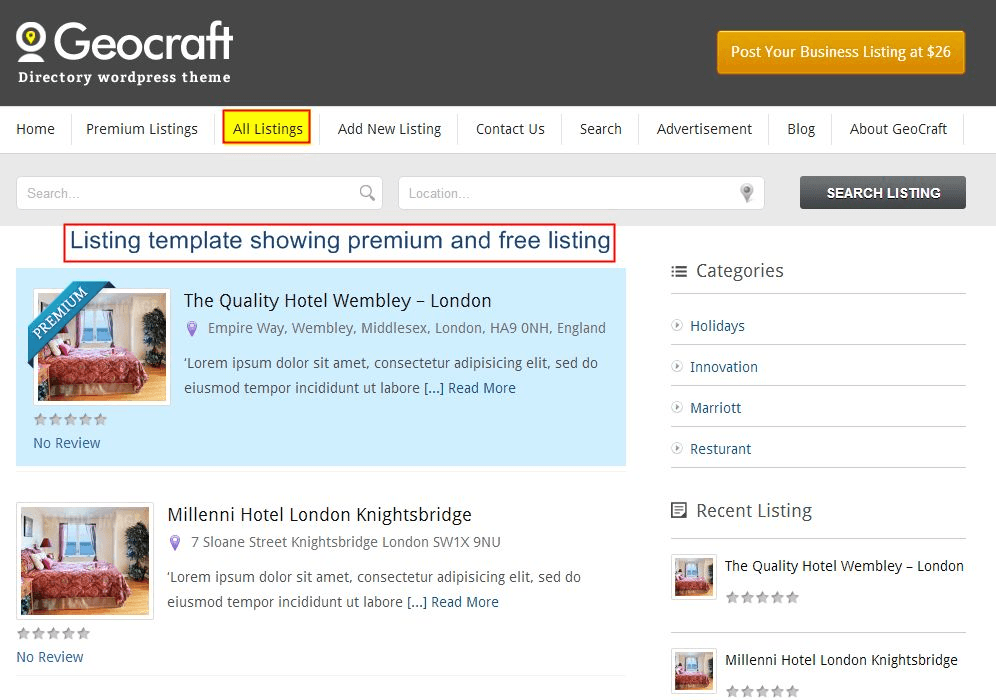
Listing: A listing template is used to display all the listings on the Website. This template will display the free listings as well as the premium listings.
Submit Listing: A submit listing template is used on a Website that allows users to submit their listings. This template includes all the required fields regarding the business listing.
Note: Search template, Dashboard template and Submit Listing Template are the core templates of the GeoCraft theme. They get activated once the theme is installed on your Website. So you don’t need to create or make any changes to these templates. The rest of the templates can be used as follows.
Let us see how each template can be used in the Website
Blog Template: To activate this template, follow the steps given below:
- Create a page first.
- Go to your Dashboard –> Pages –> Add New and mention the name of the page
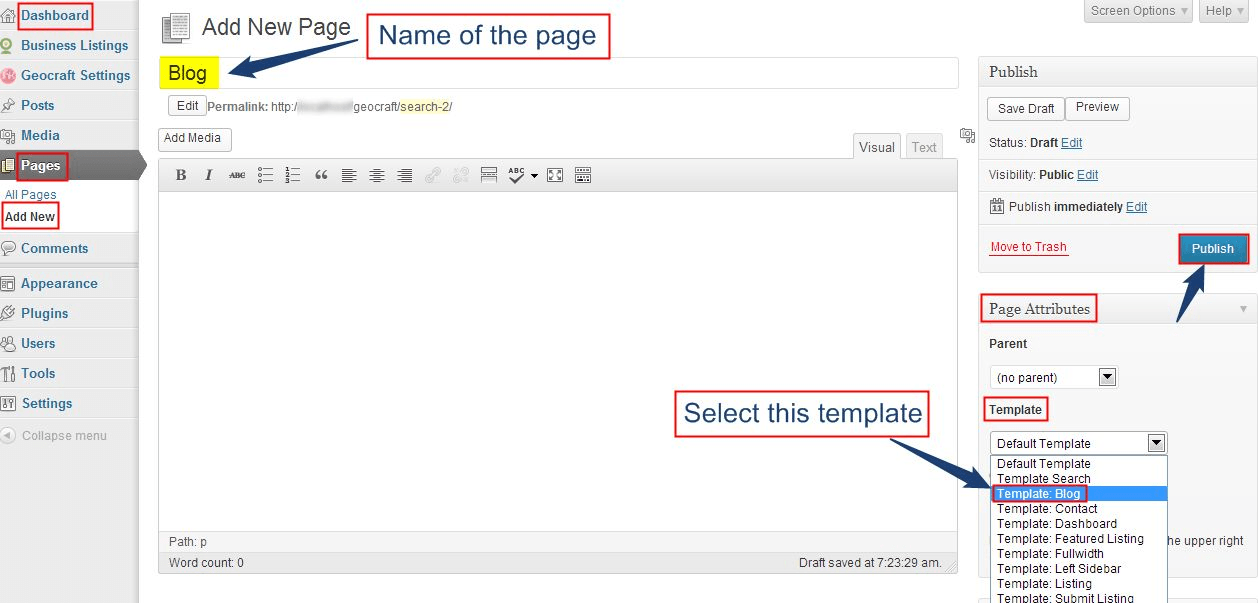
- After creating the page, choose the “Blog Template” from the Pages Attribute option.
- Now publish the page.
- All the blog posts will be shown (under the same page) on the Website.
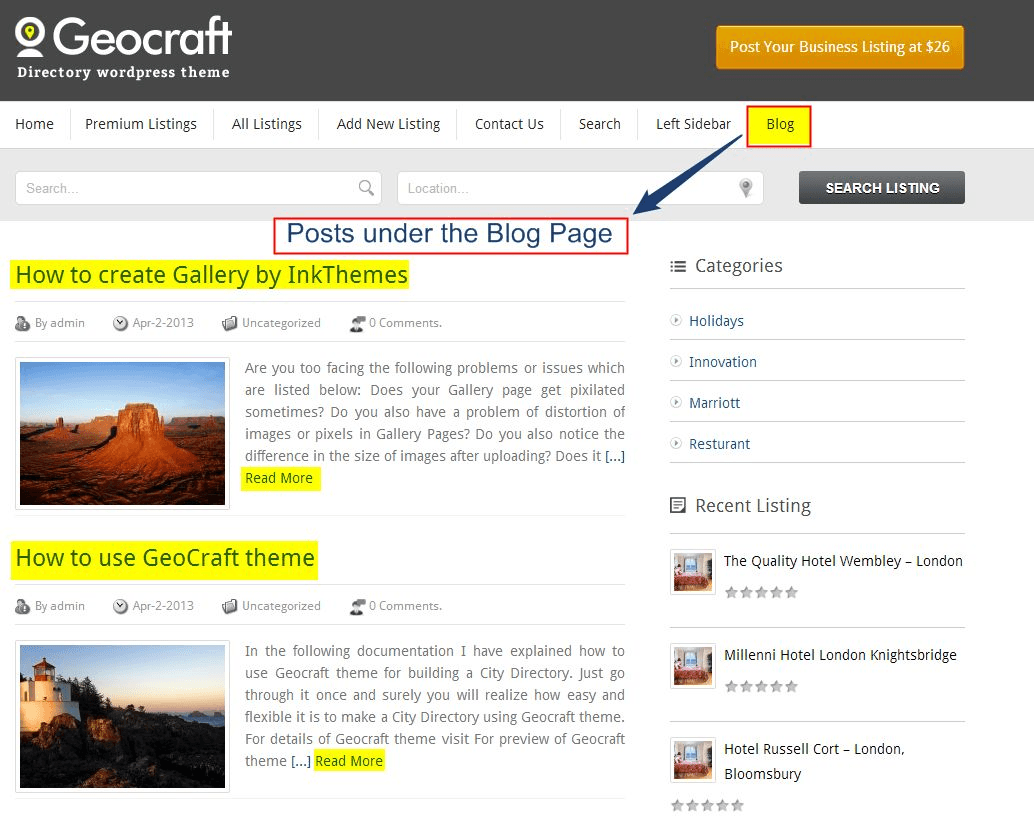
Remember– Once this template is activated it will start displaying all the posts on the Website. If further the posts will be created they will be displayed automatically on the blog page.
Contact Template: To activate this template, follow the steps given below:
- Create a page first.
- Go to your Dashboard –> Pages –> Add New and mention the name of the page
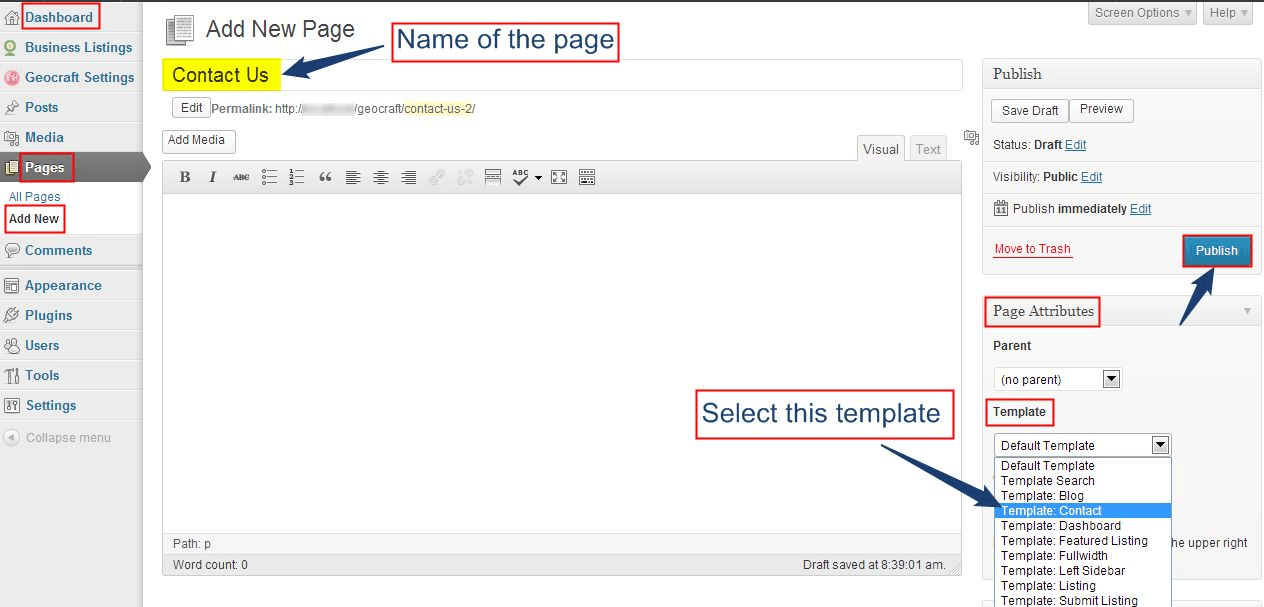
- After creating the page, choose the “Contact Template” from the Pages Attribute option.
- Now publish the page.
- A contact form will be shown on the Website with all the required information fields that will allow the visitors to share their opinions and comments regarding the Website.
Featured Listing Template : To activate this template, follow the steps given below:
- Create a page first.
- Go to your Dashboard–>Pages–>Add New and mention the name of the page
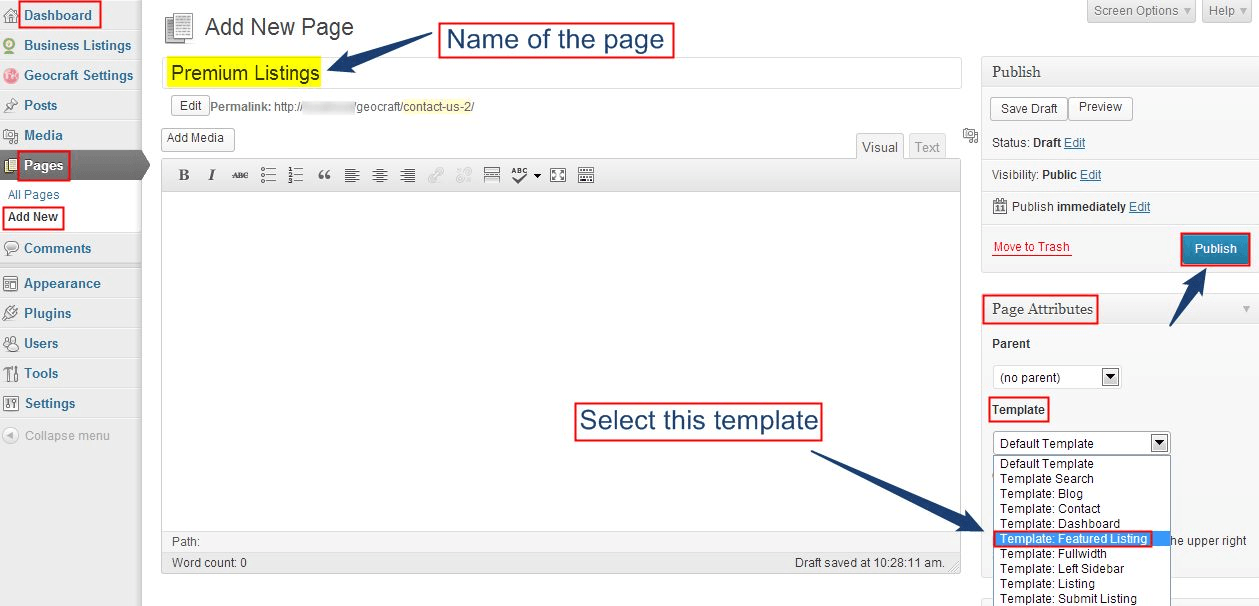
- After creating the page, choose the “Featured Listing Template” from the Pages Attribute option.
- Now publish the page.
- After publishing the page, all the premium listings will be appeared under this template (under the page created on the Website).
Fullwidth Template: To activate this template, follow the steps given below:
- Create a page first.
- Go to your Dashboard –> Pages –> Add New and mention the name of the page
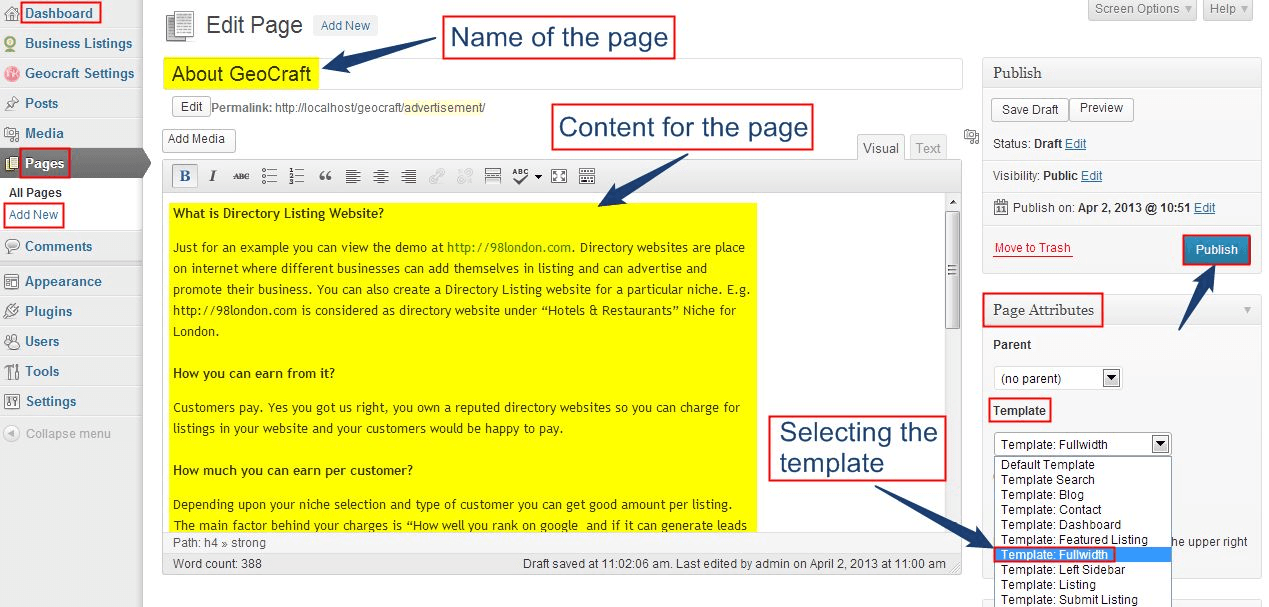
- Write the content for the page which you want to show on the Website.
- After this, choose the “Fullwidth Template” from the Pages Attribute option.
- Now publish the page.
- After publishing the page, only the content will be appearing on the Website.
- No sidebars will be displayed on the page.
Left Sidebar: To activate this template, follow the steps given below:
- Create a page first.
- Go to your Dashboard –> Pages –> Add New and mention the name of the page
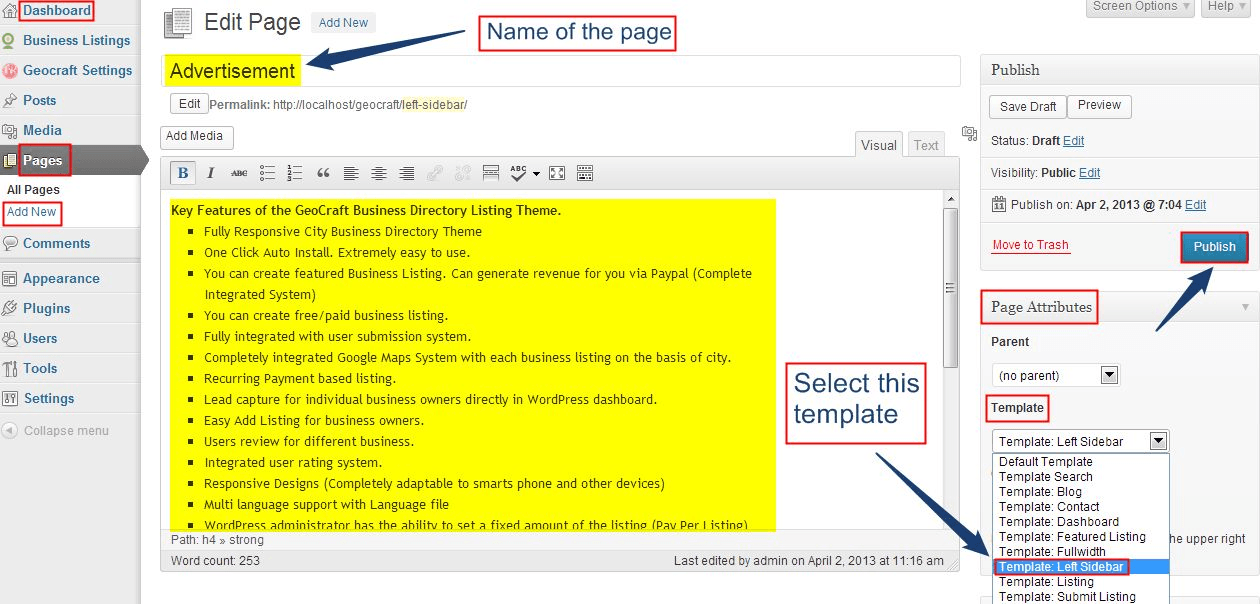
- Write the content for the page which you want to show on the Website.
- After this, choose the “Left Sidebar Template” from the Pages Attribute option.
- Now publish the page. After publishing the page, the content will be appearing on the right side and the sidebar will be appearing on the left side.
Listing: To activate this template, follow the steps given below:
- Create a page first.
- Go to your Dashboard –> Pages –> Add New and mention the name of the page.
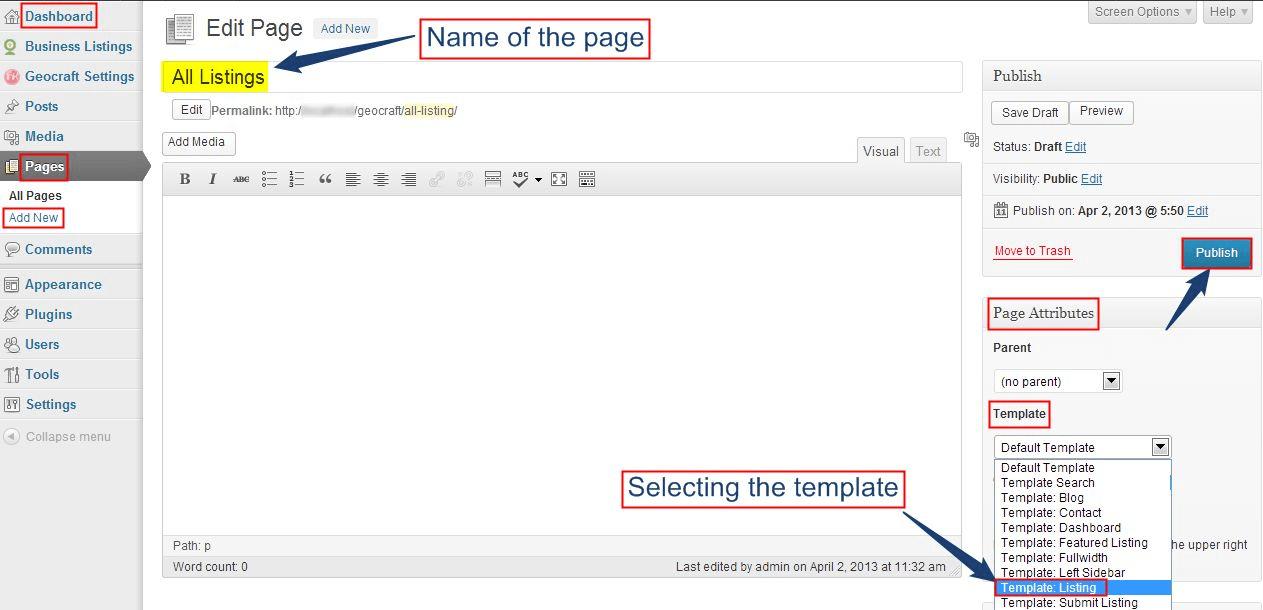
- After this, choose the “Listing Template” from the Pages Attribute option.
- Now publish the page.
- After publishing the page all free and premium listings will be displayed on the Website.
7. Features Updated in Geocraft Version 2.x.x
Home Page Map search feature –
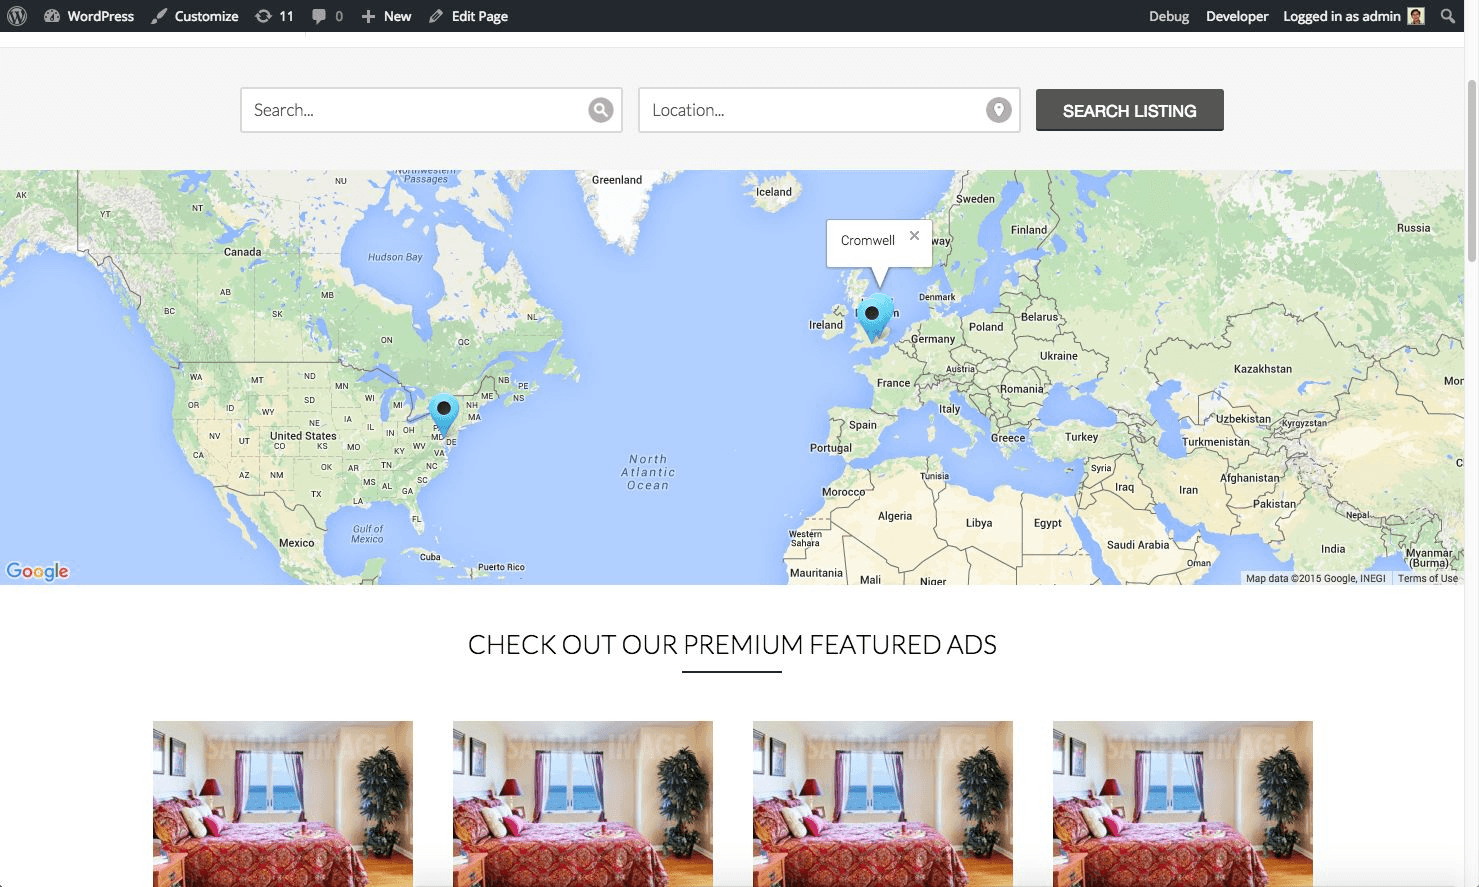
Homepage Map search functionality provides search results customized to the user’s location. You can list any kind of entity or activity on a Global or Local basis. This advanced, customizable, and speedy search feature drop a pin on the map during the” create a listings location process” it shows the precise location of the business. Searchify click on it’s marked location on map and system provide search results related to it’s location and explore listing without page reloads.
To Enable this feature, you have to create a proper Javascript Map API key with your domain authentication from here: https://developers.google.com/maps/documentation/javascript/get-api-key
Since Google has recently updated its Map API and it will work only with a proper Map API key and use it in the specified area as shown below:
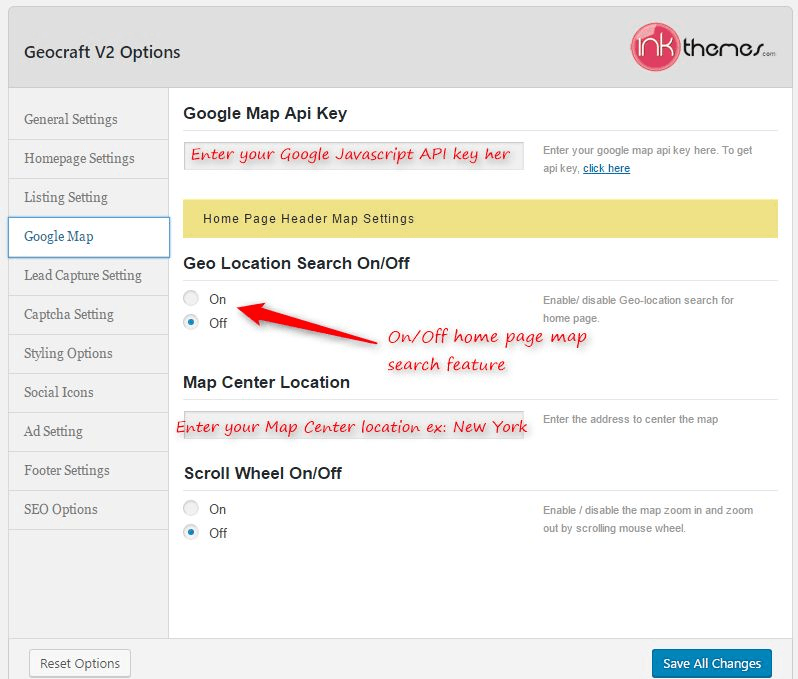
Geo-location search on/off feature – The theme gives you ability to turned on/off Geo-location feature from the theme option panel. If you don’t want this feature you can simply turn it off.
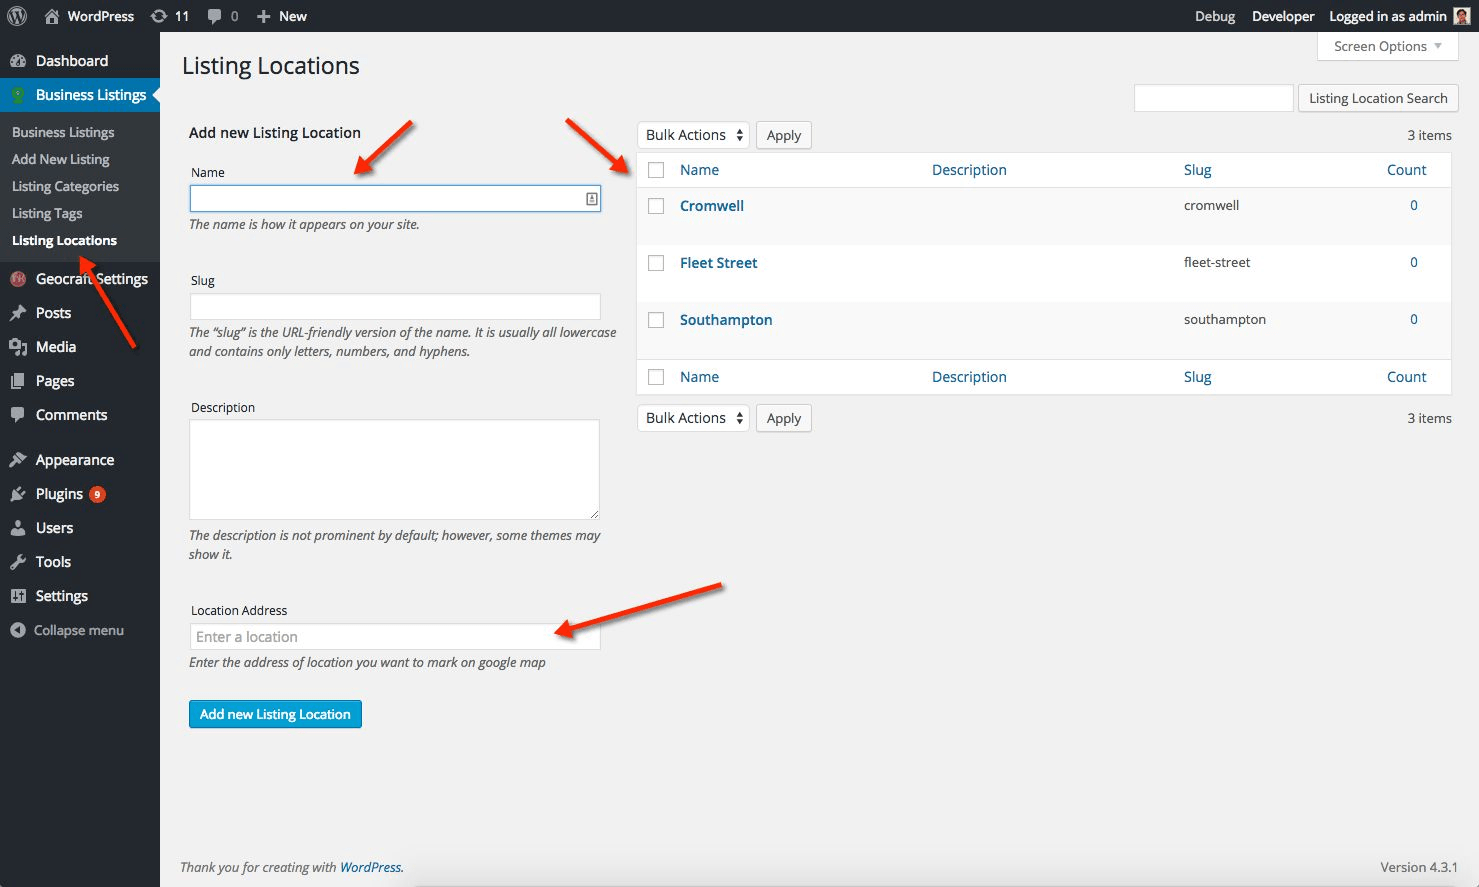
Adding Listings Locations to get the Map Pins:
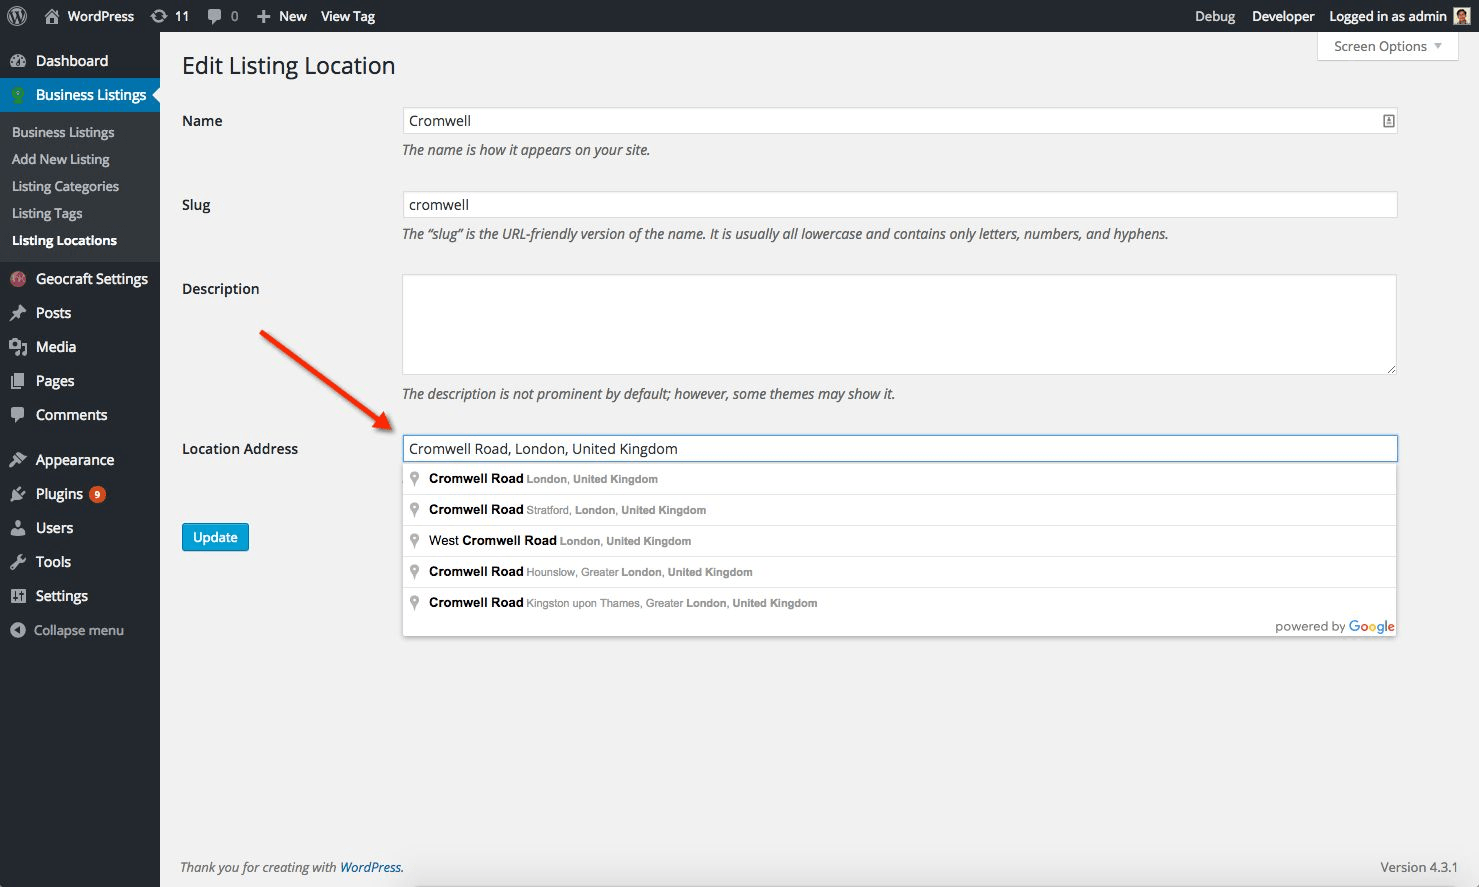
If you want to display pins on your Home Page map then, you need to add Listing Locations with proper Google address which gets populated in Location Address field as shown below:
Dashboard->Business Listings -> Listing Locations
Editing Listing Locations
Geo Listings will be displayed in the website as below
Claim listing feature –
This feature gives the ability to your users to visit and claim their free and premium listings. Don’t wait for business owners to come to you! Persuade them to sign up for this claim a listing features. Supply your site with lots listing and mark these listings as “claimable”, then let business owners claim and pay for the listing. Claim Listing feature allows your visitors to become an owner of item by getting themselves register and they’ll be able to edit this item.
This is the easiest part of the process. It’s so simple that you can do it in about a minute. First, choose any existing listing in the WordPress admin. You can find all listings by going to “Business Listings” in the sidebar admin menu and then click the listing of your choice.
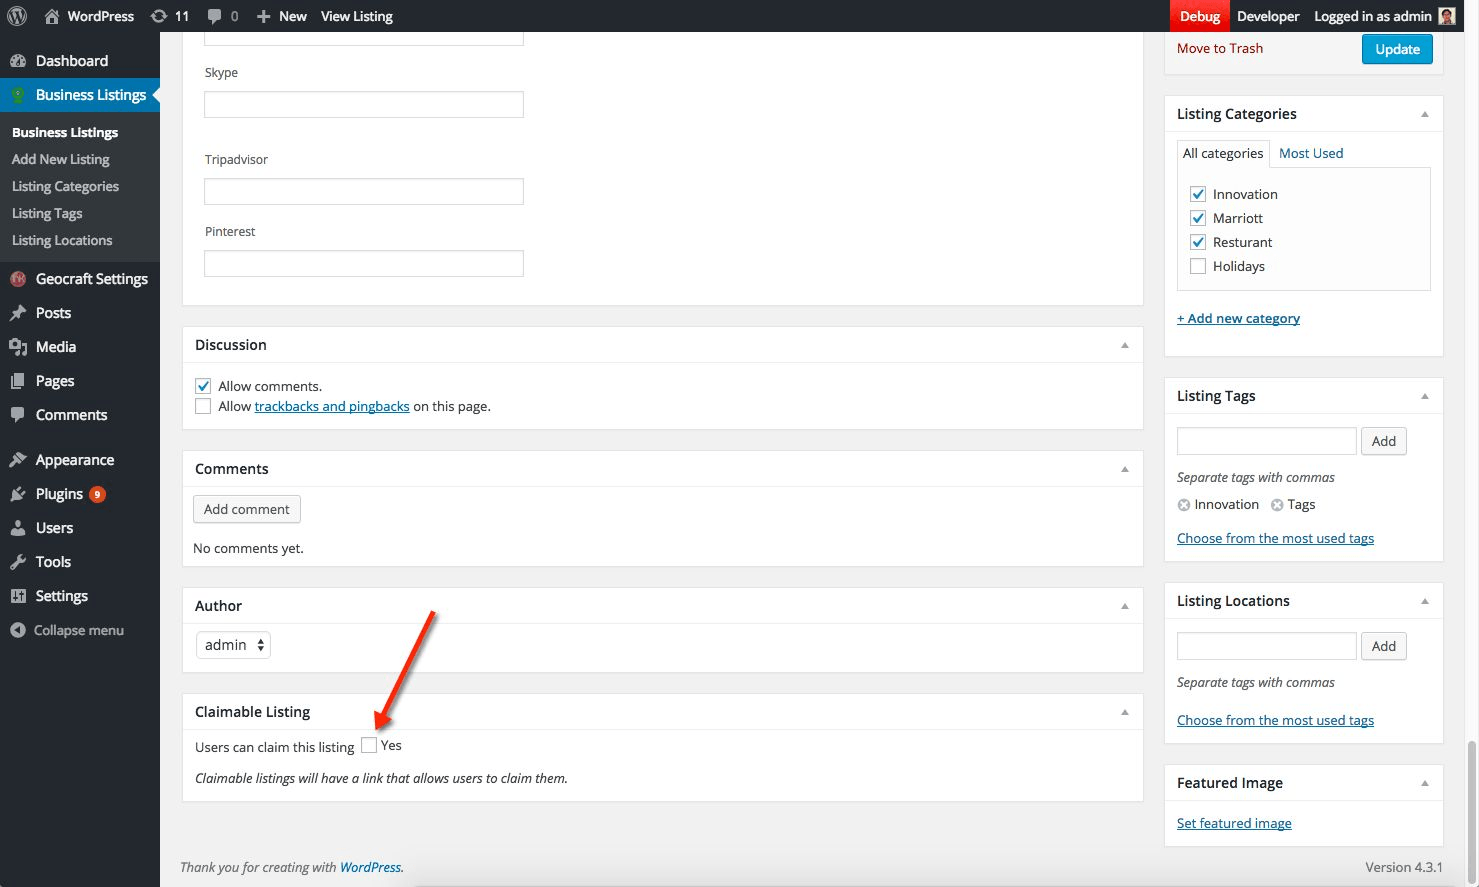
Or you can find the claim listing option when you go for editing a listing. simply check the “Yes” box next to “Users can claim this listing”.
Now scroll back to the top of that page and click the blue “Update” button. That’s it! The listing is now available to be claimed.
New Listings –
If you’re creating a new listing, you can follow the exact same process to make it claimable. Also, when importing listings, there is an option to ‘Mark All as Claimable’ in the importer. After this, you can see a ‘Claim Listing’ button at the bottom of that listing as you can see below
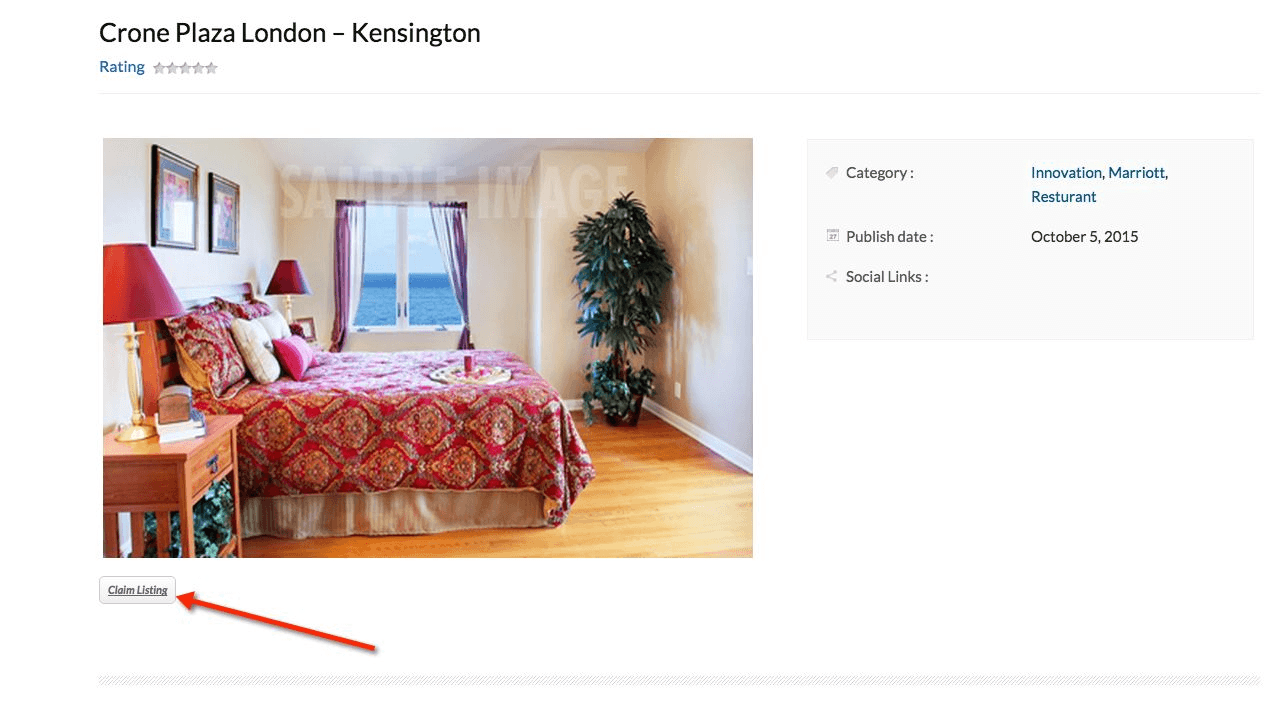
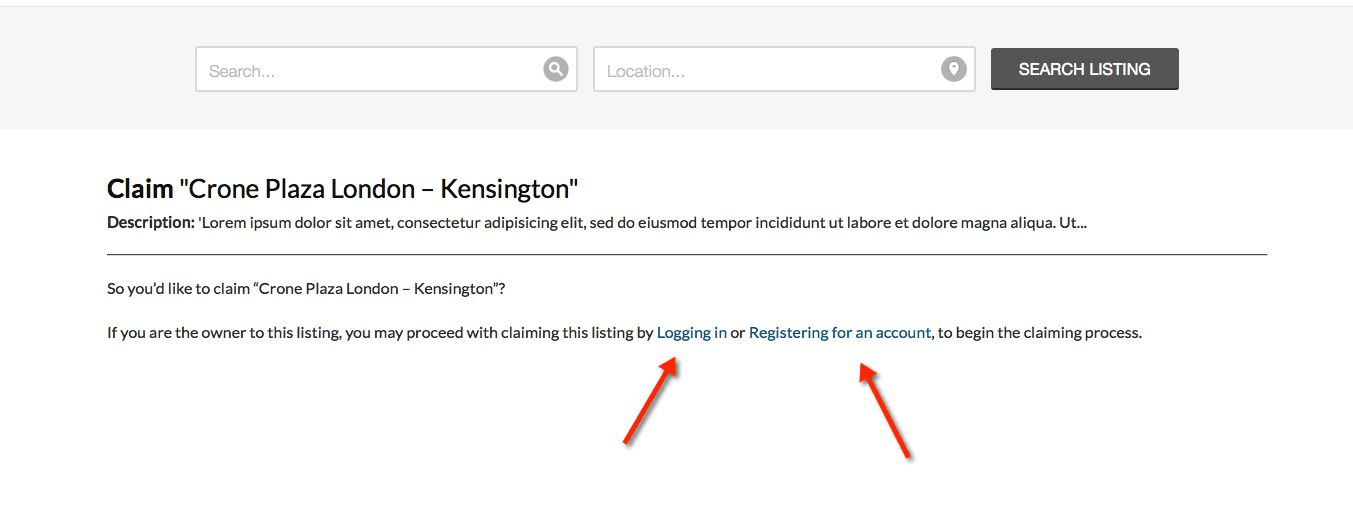
As you click on ‘Claim Listing’ you have to login to the page to claim it. You can either Login or Register for an account (for new users).
Then click on continue
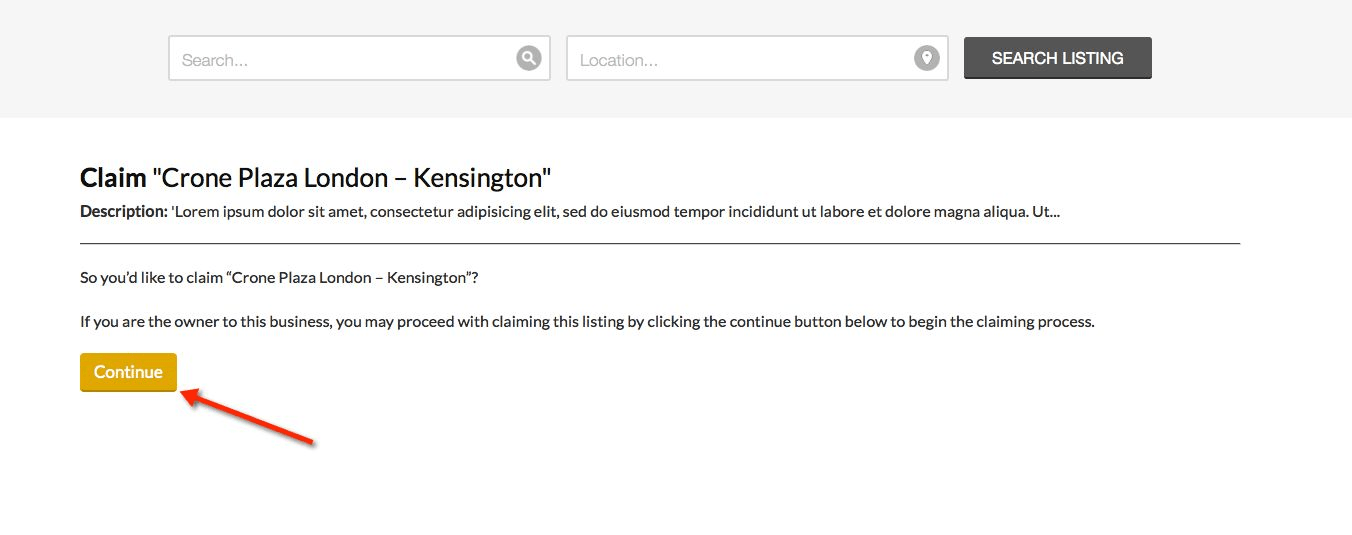
After you confirms that you wants to claim the listing, you will be taken to the pricing page. At this point, it’s just like purchasing a new listing. You can select from one of the packages available
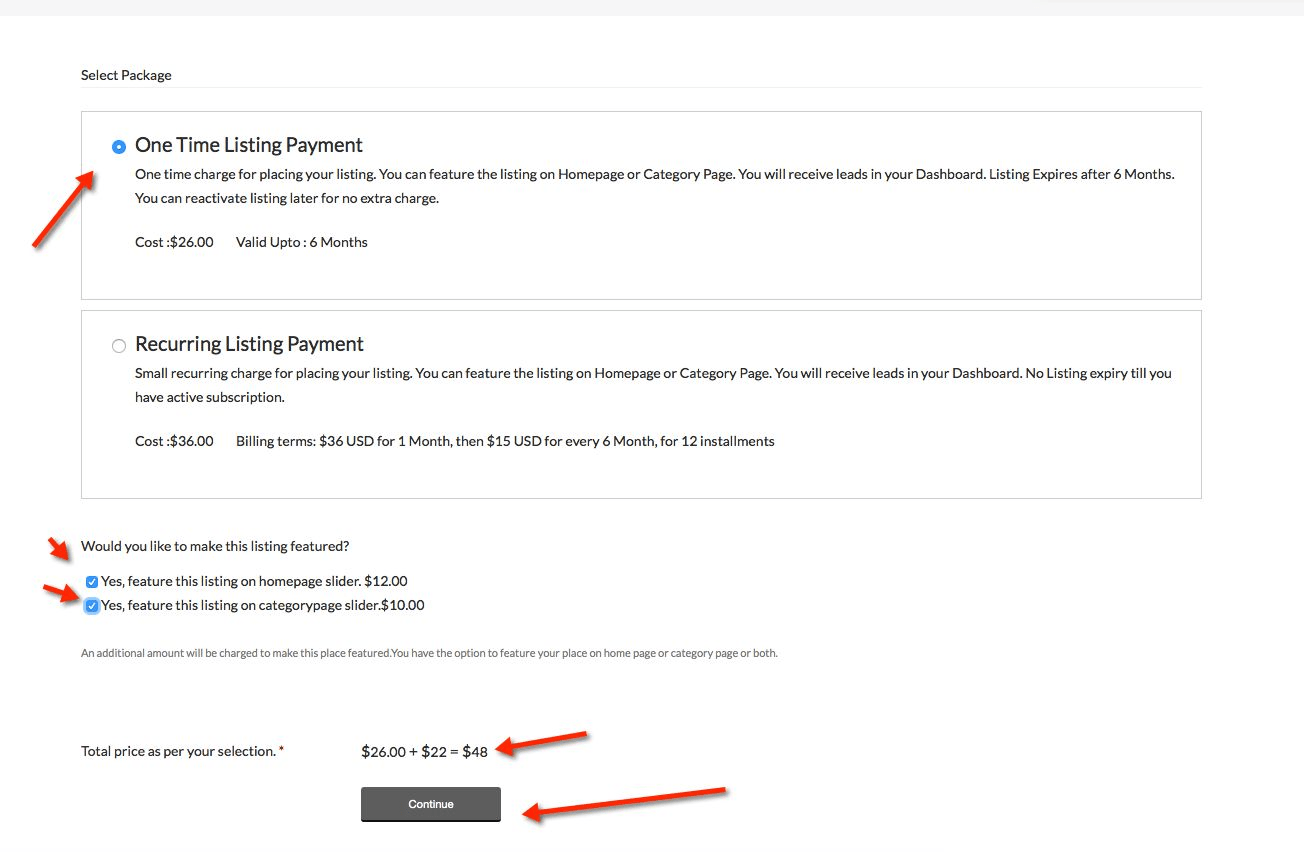
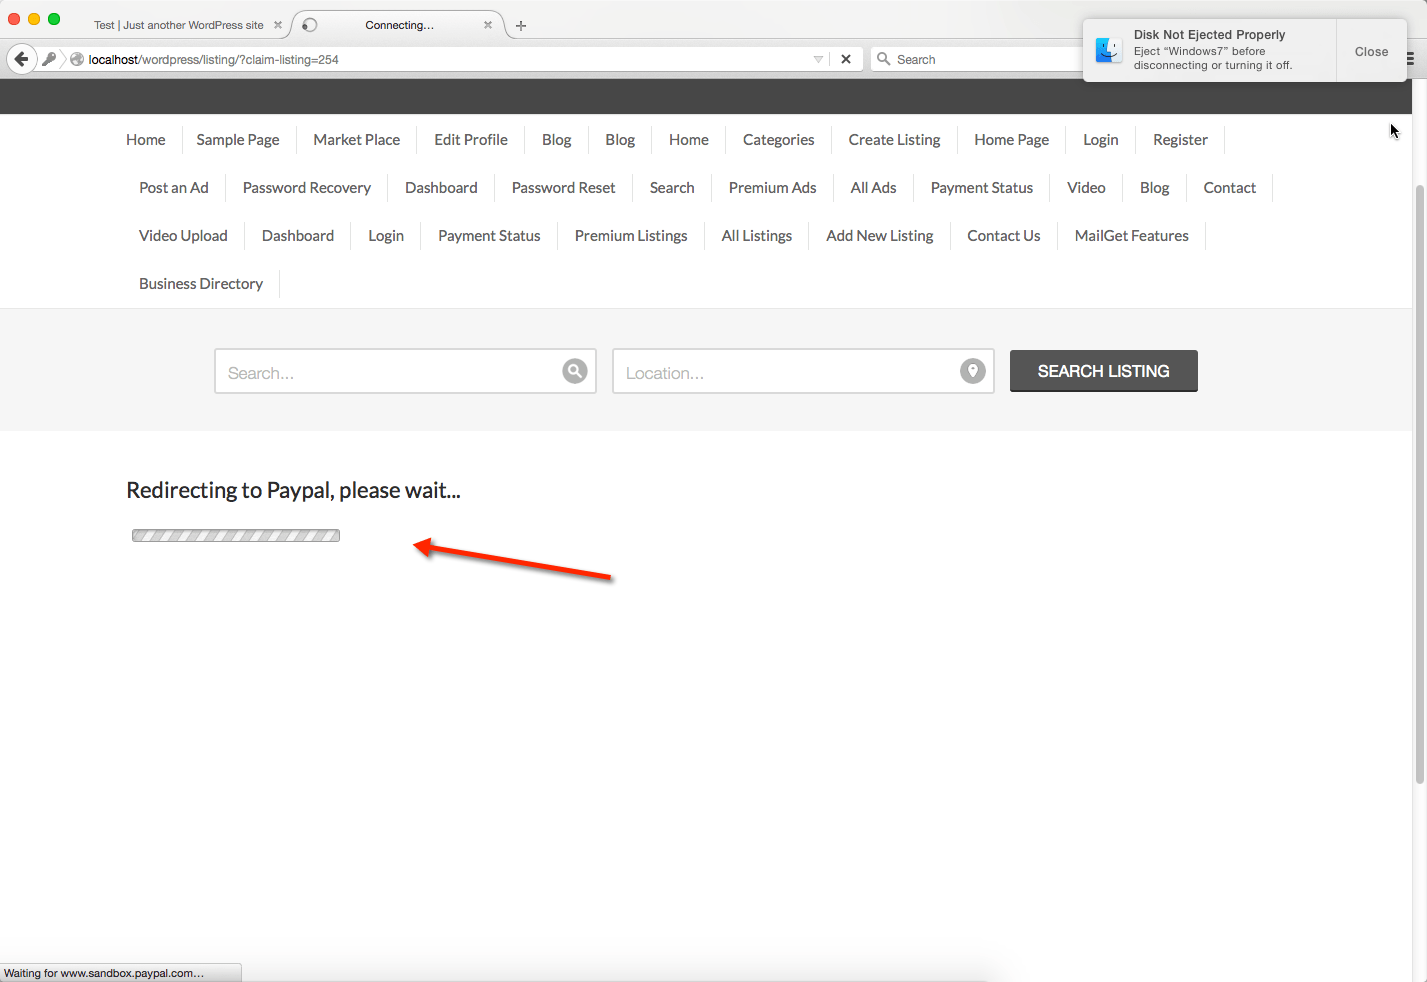
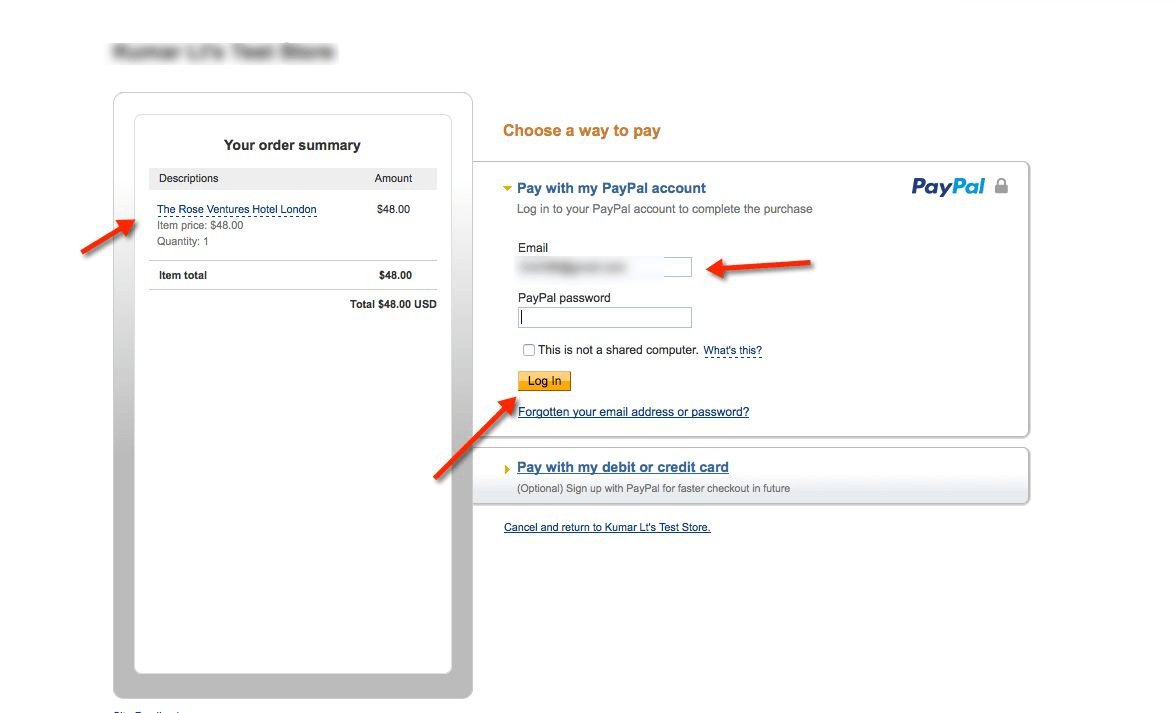
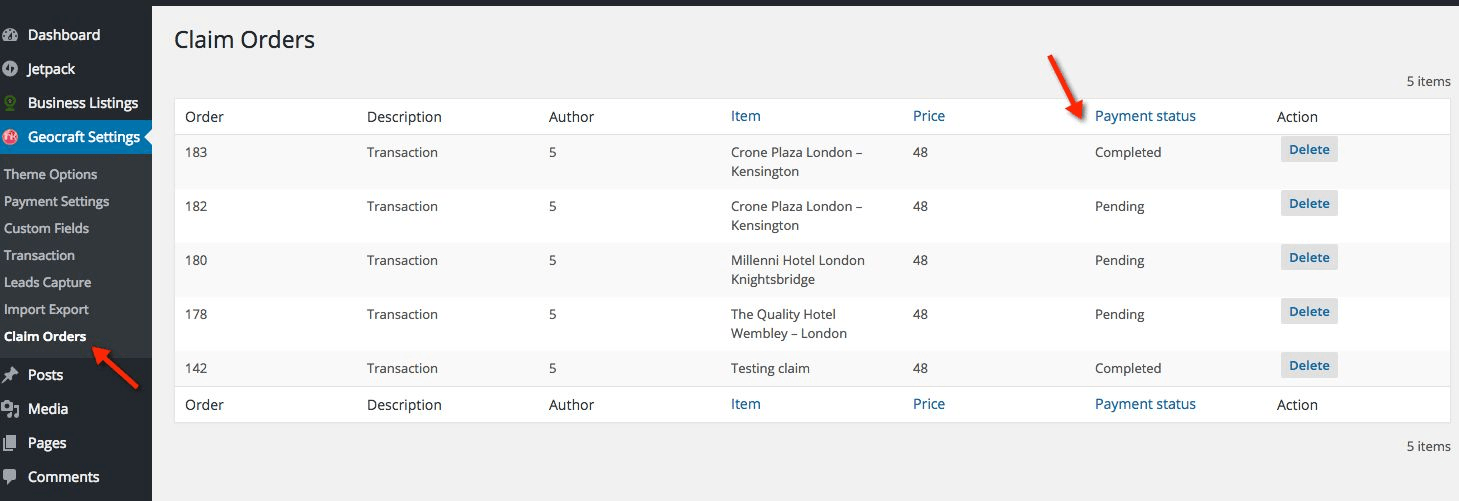
Once you clicks the “Continue” button, you’ll be passed off to the payment gateway. After finishing his payment, the listing goes into pending mode.
Approving the Claim –
Once you have claimed the listing and done the payment. This puts the listing into pending status. Although you can see the listing in the dashboard, you cannot edit the listing. You will need to approve the claim in order to make the listing active.
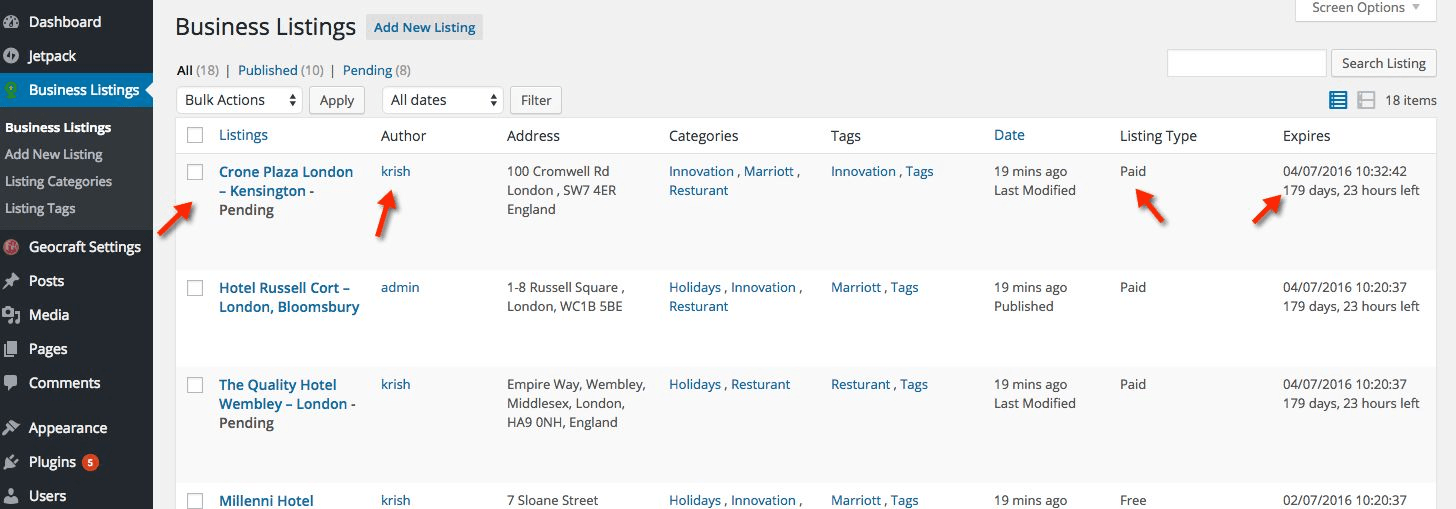
To get to the screenshot above, you can click the “Quick Edit” link on any listing. If you approve of a claimed listing, just change the status to “published” then click the “Update” button. The listing is now active and it has been assigned to the user who has paid for it.
8. Have Queries?
Here are some general queries which may arise in your mind-
Q. What is the difference between a free listing and a paid listing?
Build an efficient business listing website. A free listing is a regular listing. This listing has no blue box in its background and no premium tag. The leads for the free listings are not viewable on the listing owner’s dashboard.
On the other hand, a paid listing gives more exposure. The paid listings are shown under the premium listing menu item. A paid listing has a special blue background color with featured tag. It also has the lead capture option and all the leads data is viewable on the listing owner’s dashboard. It shows multiple images (while in case of free listing, it depends on the site administrator whether he wants to show one or more images on free listing).
Also through the “GeoCraft custom field” setting, the site administrator can decide whether he wants to display business listing data like phone no., website, email etc. on a free listing or not.
Q. What does the “premium on homepage slider/ category slider” mean?
Paid listing can be made premium by listing owner on homepage slider/category slider by paying an extra amount. The free listings cannot be made a premium on the slider. However, the site administrator can make the free listing as premium on homepage slider/category slider through admin dashboard.
Q. What are the motivators for listing upgradation from free to paid?
For upgrading the listing from free to paid, various motivators are available like:
• Paid listing has the lead capture system.
• Paid listing shows multiple images.
• Paid listing shows complete business details.
• Paid listings are included in the featured listing menu item.
• Paid listing can be made a premium on homepage slider/category slider.
Q. How the listing is upgraded?
A listing owner can upgrade his free listing into a paid one through his Dashboard. Under the dashboard, there is an option of “Edit Your Listing” and at the bottom of the same option, there is an “Upgrade” checkbox from where the listing owner can upgrade a free listing into a paid one. Once the listing owner marks that upgrade checkbox he can choose his payment package from the available payment packages and after that, the listing will be a paid one.
Whereas, an admin can upgrade the listing from free to paid through “Business listing” option on his Dashboard. Under the business listing field, there is an option of “Listing Type” from where an admin can convert his free listing into a paid one.
Q. How to list your business In Directory WordPress Theme?
A site owner can list business through “Add New Listing” or “Add Listing” option. The listing owner will have to mention the following things in his listing:
• Category of business listing.
• Details of listing (location, map, address etc.).
• Uploading images for business listing.
• Entire contact information (contact name, website name, phone number, links to social networking sites, email etc.).
• Listing description and time duration for business listing.
• Type of payment package.
Note: The number of images shown on the listing will be decided by the admin.
Q. How the listing import/export feature works?
A listing owner can export/import his own CSV (Comma Separated Values) through “GeoCraft settings” option under the dashboard. Under the GeoCraft settings, there is an option of “Import/Export”. Select this option and first export the CSV document in the system. After downloading the document checkout:
• The format of the CSV document.
• Name of the column fields.
• Follow the same format in your own CSV
After making CSV, click on “choose file” option. This will upload the CSV and at last click on “Import” button.
Q. Where can I hide multiple images or various business details like phone number, website URL or email address for a free listing?
A site administrator can set or hide the motivators according to his requirements through custom field option available under the “GeoCraft setting” field.
I hope this article will provide a complete approach to make a business directory using GeoCraft theme. You may also like the following:
• How to install WordPress on your machine using WAMP server.
• How to create a child theme in WordPress: An approach to save Theme’s modifications.
• 12 Ways to Optimize Speed of Large WordPress Websites.
Done with all the doubts and tutorial?
Great!
Now build your own directory listing website with GeoCraft WordPress theme.
You might also be interested in:
- Directory WordPress Themes
- How to create real estate property listings WP website.


