Want to create a website using WordPress?
Take a look at these steps of the process.
A series of points that we follow in this article:
1. Select A Domain Name
2. Choose a Hosting Service Provider
3. Setup Nameservers
4. Installing WordPress
5. Selecting Themes
6. Create & Add Required pages
7. Adding New Blog Posts & Categories
8. WordPress Customizations
9. Install The Required Plugin
10. Optimize WordPress For SEO
11. Set up Analytics & Webmaster Tool
12. BackUp
13. Increase Site Performance By Caching Website
14. Make Your Website Security Stronger
Today I am going to explain 14 actionable steps that are required to create a complete website ->
1. Choose Domain Name: Give Your Website A Unique Identity
How will it be possible to find a website without a domain name?
Just like every human being, every website must have a name that represents its identity. The name that gives a unique identity to the website is called Domain name.
A typical example of a domain name is inkthemes.com and the complete URL with domain name may look like this:
[code]http://www.inkthemes.com[/code]like I did, You have to choose a domain name for your website
How To Choose Perfect Domain Name?
You must consider some points before you proceed to pick a domain name for your website.
A. Domain Name Must Be Relevant To Your Company
For instance, suppose you are a fan retailer that has a brand name CoolCom fans and site name has mikeparker.com?
It is possible your audience doesn’t know that mikeparker.com is related to CoolCom fan.
Conversely, if your site has the domain name as coolcom.com, now there is a great possibility to discover your product by searching brand name.
B. Go For Top Level Domains
Recently a large amount of website extensions are introduced like .club, .space, or .company. For example in the domain name xyz.club, the club is an extension.
I don’t recommend to use this bizarre and newer domain name extensions. Always try to get the top level domain (TLD) i.e. the domain name end with .com,.org, .net and .edu.
These four extensions are highly recommended. Just check out the meaning of this extensions:
- .com: used by commercial organizations or individuals (.com is highly recommended for commercial use)
- .org: used by non-profit organizations
- .net: used by network technology firms
- .edu: used by educational organizations and institutions
C. Short Domain Names Are Easy To Remember
Short domain name is always better than the longer one. For example github.com, reddit.com are easy to remember while generatemyrevenuequickly.com is ugly to look and hard to remember.
D. Keep Main Keywords In Domain Name
But, if you are running a website with a goal of product or content marketing, you can also put keywords in a domain name that targets your niche. Here’s an example:
[code]www.inkthemes.com // the domain name includes a word theme that itself says, the company might be relevant to Themeswww.autotrader.com // this domain shows the site is related to automobile sector[/code]
E. Select Domain That Can Be Typed Easily
Now, you’d understand an easy to remember domain name is catchy and appealing. But do you think if still, your short domain name is hard to type and might confuse user to search the exact keywords
Let’s see with this example
[code]www.inkthemes.com // the domain name is suitable and combination of two names ink and themes, both spellings are correct and thus easy to typewww.inkthemz.com // this domain name contains the keyword them and may confuse visitors to type the exact word[/code]
F. Smartly Select Domain For Local Business
If you are a local merchant or a regional service provider, you can include location or city name in your domain. For example –
[code]Goaclothes.com// This domain name tells the visitor your website is a clothing-based business pertaining to Goa city[/code]
G. Keep Away Hyphens & Numbers From Domain Name
A domain name with hyphens and numbers is often hard to memorize and even difficult to get caught by users. Just look at this example:
[code]www.allen-pizza-services-23.com // this domain is looking unprofessional and ugly.[/code]
Domain Name Providers: There are a large number of domain providers available on the internet. It isn’t too difficult to choose a domain host for your website.
So, try to choose the company, that has excellent after sales customer support, economical domains and competitive discount offers.
Bluehost, GoDaddy, and Namecheap are some famous domain name providers that you can consider to buy.
2. Select Hosting: Provide Web Space For Your Website
Hosting company provides web space on the server for your website and that’s why it is too much important to select a right hosting provider. Your website will be hurt if you select an inappropriate hosting package.
There are various things you should consider while selecting a hosting company
- Your server must provide high uptime percentage. (Uptime defines the time at which your server lives or website is running properly. Rest of the time, when server is down or website is not available live, called downtime)
- Only select the hosting company that supports WordPress.
- Your host must have a plan for unlimited bandwidth and storage.
- Your hosting company must satisfy the answer to your technical queries.
The main experience of a hosting company comes from using on your own. But always tend to the company with positive user ratings.
There are many server hosts available and only several companies have most of the users. Bluehost is widely used and has a good user rating.
Here you will find more hosting companies.
3. Configuring Nameservers: Connect Domain Name and Hosting
Note: If you are using a hosting and domain name from the same company, then you do not require to set up nameservers.
Configuring nameservers is only required when you have a domain and hosting account from different companies.
In order to create a connection between a domain name and hosting, you need to point your domain to the hosting nameservers.
Nameservers: They are the specialized servers that translate domain names into the IP address.
Under your hosting account, search for the nameservers details so that we can point out domain to the website and email service.
Nameservers may somewhat look like this: ns1.xyz.com and ns2.xyz.com
Once you find the nameservers, copy them on a notepad and now login to the dashboard of your domain company and search for the option that changes nameservers.
Under the option, the values that you copy in notepad, paste it here on the given fields.
Once you hit the save button for nameservers, the update values become effective within next 24 to 48 hours. After the updation of nameserver, your website becomes life and when you put URL of your website in the address bar, then your server show the default page.
Note: In order to avoid hectic DNS or nameservers setting, buy hosting and domain from the same company.
4. Installing WordPress: First Step To Create Website
Installing WordPress is the first step for website creation.
Those days are gone when hosting company needs lengthy and manual installation. Several prominent companies provide single click installation for WordPress and other CMS systems like Joomla and Drupal.
Note: Before purchasing any hosting plan, try to find out whether the company provides any application for single click WP installation or not.
1. Just login your Hosting account and open c-panel.
2. Try to find the WordPress icon in the c-panel that is shown in below image.
![]()
3. Clicking this icon, you will redirect to the screen that installs WordPress easily.
4. Next Screen is a WordPress setup page that requires to fill up various information like Domain name, site name, site description, admin username, password, and email.
The mentioned screen may look like this:
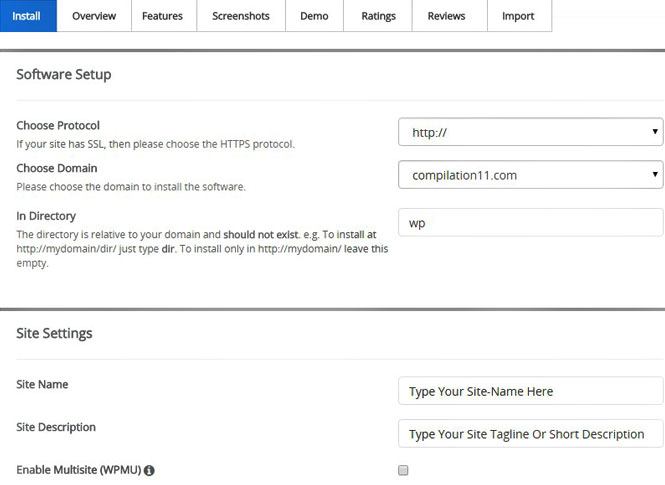
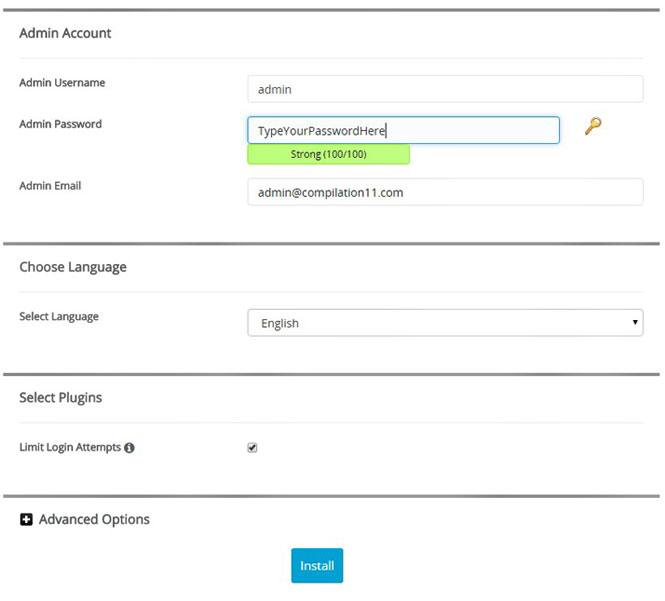
5. Remember one thing, by default WordPress, installs itself in directory folder ‘wp’. Remove wp string in the directory field otherwise your website will open with URL yoursite.com/wp.
6. After filling all the required information, hit the install button and Well done, WordPress is installed on your server.
Still, if you haven’t any hosting space, you can perform WordPress installation on the local server. There are two reasons to learn WP installation with local server:
1.For testing websites
2.Getting familiar with WordPress dashboard
Here’s how, check this article on: How to Install WordPress on Localhost.
5. Selecting Theme: Design Your WordPress Website
Now, we have a neat and clean WordPress website after the step 4. You can see a simple WordPress layout instead of default server page.
But, after installing WordPress, work is not over here. Every website has its own requirements and you have to optimize website according to your needs.
I am considering everyone is not a professional coder and web designer. That’s why WordPress themes come into the picture. A theme is an entire groundwork of a website that represents layouts and design.
There are always free as well premium WordPress themes available that you can select and adapt to suits your website niche.
Here’s a video that describes – how to install WordPress theme?
Though if you want to build a professionally designed WordPress website, you should always select a premium WordPress theme.
How To Select A WordPress Theme For Business?
A website serves the purpose of your business. Maybe, you are creating a site just for fun.
Anyway, if you are a real estate agent – you need a property listing website, or you want to sell your digital product, you can opt for a membership website.
In these cases, you should select a unique theme for real estate or membership website. These themes must include features those are required for a niche site.
Presently, there are some niche or types of WordPress theme popular over the internet. Have a look at these theme categories:
Whenever you buy a theme, try to check out these essential features mentioned below:
- Rock solid design
- Responsive layout (mobile ready theme)
- Cross browser compatible
- Good customer support
- Easy customization
- Compatible with the most popular plugins
- SEO friendly interface
- Clean code and optimized for performance
6. Create and Add Required pages: Most Important Information in Pages
Page contains most important information in them and these pages do not frequently update Like(Office Address, Products etc) Now we are going to create pages, it is quite simple and doesn’t require any rocket science to learn. Just insert the URL:
www.xyz.com/wp-admin in the address bar of your browser and replace XYZ with your domain name. When you hit the enter, you will be redirected to the WordPress dashboard of your website.
The resulting screen will provide you a section to put your content and title there.
[php]WordPress dashboard > Pages > Add New[/php]
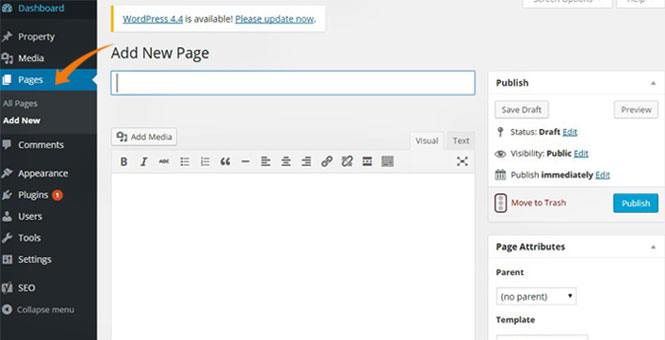
Moreover, every website should have some basic pages such that a visitor could know something about a website.
Home Page is a fundamental page that is always placed in the first position. By default, WordPress uses a blog page on the homepage navigation. About Page is also the quintessential way to display the company information. This is the static page, where companies like to display a complete information about visions and missions.
It might possible that some of the audience want to contact regarding suggestion, queries or for any other reasons. The contact page is the best way to connect visitor with a single click. Further, any local business can create a Product page that displays about product or services offered by them.
This is an ideal example of About page from apptopia.com

7. Adding New Blog Posts & Categories
By default, WordPress is a blog site. If you use a theme, it depends whether your theme contains blog page or not. So, if you intend to create some amazing blog posts, you must jump on the Posts option under WordPress dashboard. Finally, click the Add New button to insert your first post.
[php]WordPress dashboard > Posts > Add New[/php]

Before you can attempt to publish your first post, you need to know about WordPress categories. These categories are useful for visitors as they will be able to read a post with a specific category.
Creating categories for each post is simple and you can follow these simple steps:
[php]WordPress dashboard > Posts > Add New > Categories (visible in right side) > Add New Category[/php]
Once the category is created and saved, you can use this specific category with other posts.
8. WordPress Customization: Make Changes To Dashboard
WordPress can be customized a lot. You can make a lot of changes from the dashboard itself.
So, let’s start with some basic things that I am presenting at a single section:
Website Title And Tagline
Site Title: As the name “Site Title” itself suggests that it’s all about the title of the site. It describes the nature of the website to the visitors.
Many people prefer to include their targeted keywords in the Site Title option. It is also good for search engines where they can understand what our website is all about.
This is the path to update your site title:
[php]WordPress dashboard > Settings > General > Site Title[/php]
Similarly, every page and post have the facility to define a specific title for each.
Taglines: A tagline is often described by a short sentence that ended with the title itself. Simply taglines define the punchline or characteristics of the titles. Path to update tagline:
[php]WordPress dashboard > Settings > General > Tagline[/php]
Disable comments:
Many blogs and website accept a large amount of comment on their posts. But still, there are some organizations and corporate companies that might not wish to appear comments on their website.
So follow the given instruction to disable comments on your WordPress website:
[php]WordPress dashboard > Setting > Discussion > Default Article Settings > Uncheck the option (Allow people to post comments on new articles)[/php]

Customize Sidebar & Widgets
The position and appearance of the sidebar is totally depended on which WordPress theme you use. Most of the theme display sidebar on the right side while some of the themes don’t carry any sidebar.
Most of the time sidebar consists of widgets and you can alter its parts or composition by editing widgets.
Follow these simple steps:
[php]WordPress dashboard > Appearance > Widgets[/php]
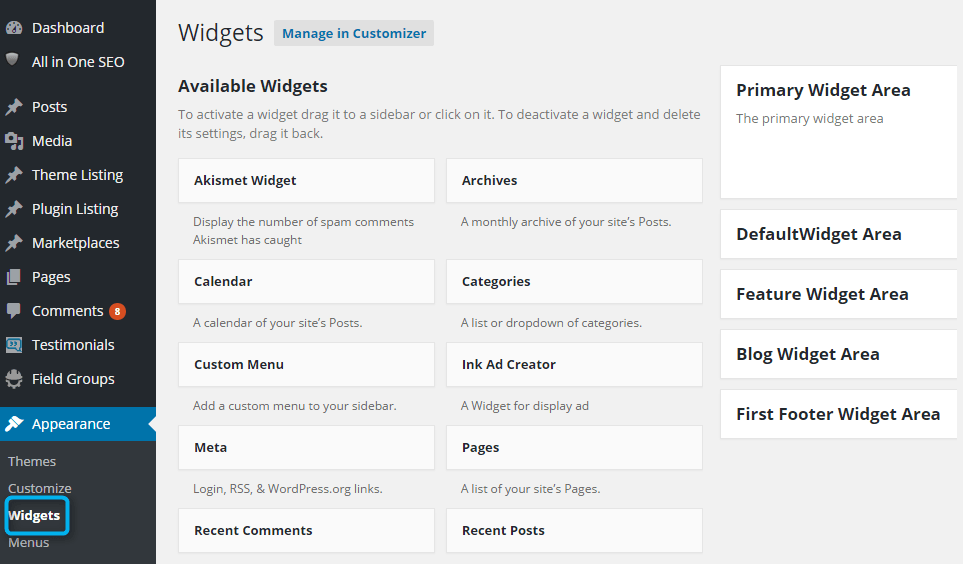
Note: Widget screen may different for other users. It depends on the theme that arranges its default widgets according to theme layout.
Here, you can add and remove each widget in the sidebar section. Remaining widgets might use in the footer and other sections of the website. You can delete or add widgets in any part easily.
Optimize Permalinks For Post & Pages
WordPress provides the optimum option to improve our permalinks for posts and pages. If you would directly publish a post without handling the permalinks, your default link may look like this: http://xyz.com/?p=123.
The above link is not SEO optimized and search engine friendly. Even the search engine bots can’t understand your link structure.
So, I am going to describe you to create custom permalinks. With custom links, you can control how your URL looks.
Let’s take an example, like you write a post with the title: Best WordPress Themes. Then you can create a custom permalink like:
www.xyz.com/best-wordpress-themes
Now, follow the steps to turn on custom permalink facility:
[php]WordPress dashboard > Settings > Permalink > Common Settings > Custom Structure[/php]
In custom structure, there is a blank box where you need to paste this keyword:
[php]/%postname%/[/php]
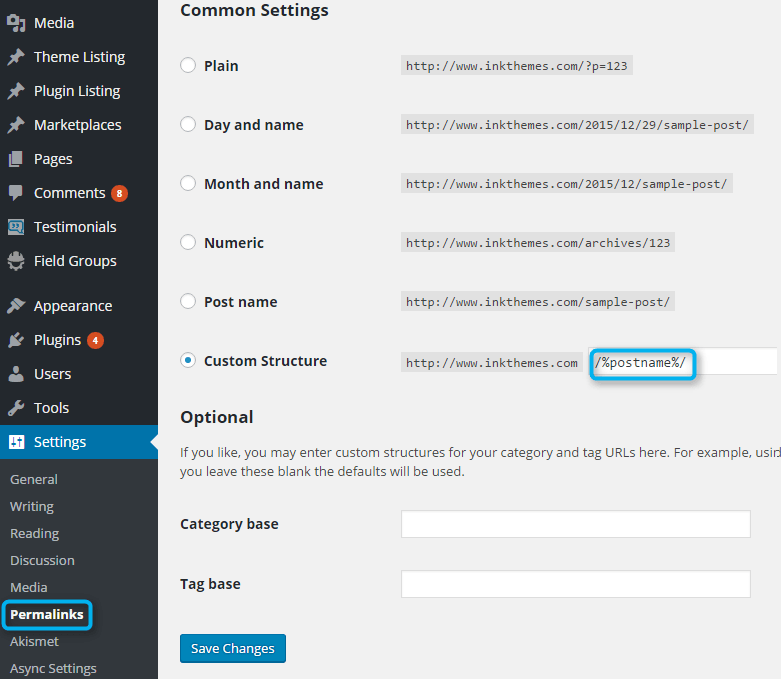
Once you have saved the changes, now you can create a search engine friendly URL or even customize anytime.
Fighting Against Spammers With Akismet
If you are worried about spam comments and want to deal with them. Then Akismet is the leading WP plugin. It comes with WordPress by default.
Once you activate this program and generate its API, Akismet starts working in real time.
What can Akismet really Do?
Akismet takes care millions of blogs, websites, and internet forums. They have a leading technology to fix the spammers. They are dealing with comments factories, social engineering trick, spambots, buffer websites and many harmful programs.
Use Gravatar
Gravatar is small-sized image and is mostly used for comments. Whenever you leave a comment on other blogs or websites, your Gravatar image will appear (if the particular website uses default WordPress commenting system).
Once you insert your image in Gravatar profiles, your image will visible anytime everytime you add comments to blogs.
9. Install Plugin: Enhance Extra Features
WordPress plugins are the program built to run with WP dashboard. A plugin enhances extra features of WordPress website.
There are several things that you want to integrate with a site as add-on functionalities. Plugin does the same thing without tweaking the codes.
Plugin has a wide range of categories and does almost anything required for a website. They are used to create an online store, widgets, enhance SEO performance, speed optimization, beautifully designed galleries and much more.
Where to add a new plugin
Want to add the first plugin to your WordPress website? Just follow the steps:
[php]WordPress Dashboard > Plugins > Add New > (select the plugin from WordPress plugin list or otherwise upload from your computer, if you have file of the desired plugin)[/php]Once the plugin is selected, you need to install and activate it.
Precautions To Select WP Plugins
There are thousands of options available for plugins but you shouldn’t use these plugins randomly.
Make the list of essential plugins and arrange them according to priority and then find out the review of selected items. This will help to sort out only worth-to-use plugins.
Other things that you must consider while selecting a plugin, is that whether the plugin developer is trusted or not, is plugin affect other functionalities or performance of your website?
Few Recommended Plugins For Beginners
Though, there are hundreds of plugins in different categories are trusted and recommended by most of the WordPress experts. Let’s have a look at some of the plugins:
For SEO optimization: Yoast SEO
For creating amazing image galleries: NextGen
For creating contact form: Contact Form 7
For increasing website speed and performance: W3 Total Cache
For building eCommerce store within WordPress site: WooCommerce
Note: If you are online Marketer and looking for plugins that could increase your email sign-ups and leads, then don’t miss these plugins: Premium plugin by InkThemes
10. Optimize WordPress For SEO: Attract Search Engine Traffic
SEO is a must-essential technique to tell the search engines what your website is all about and how valuable your content is. Better SEO practices always lead to better search engine traffic.
If you want to bring your website to an extra mile, I would recommend using an SEO plugin – WordPress SEO By Yoast.
This plugin is itself an effective solution for On-Page SEO optimization and has several advantages mentioned below:
- It allows the freedom to keep desired title, keywords and meta description for a particular post or a page.
- It provides Snippet preview that shows – how our content looks on the search engines.
- Yoast users can use Robots Meta settings for index or deindex a website from search engines.
- Yoast provides various other advantages over using other SEO plugins like 301 redirects to change page URL, permalinks settings for categories, pages, and posts.
- With Yoast, you don’t need to create xml-sitemaps. XML sitemaps are the documents that tell the search engine to crawl all content of the website.
The real value of SEO depends on the knowledge and therefore I would like to recommend to read complete Yoast SEO guide.
11. Set up Google Analytics & Webmaster Tool
Google analytic track every activity of users on your website and webmaster (search console ) can maintain a complete report for the website if your website falls with any type of errors.
Google Analytics
When it comes to the website stats, analytics gives us a lot of useful data that is useful for measuring a website performance.
Google Analytics provides a wide range of information like…
- Number of Pageviews
- Stay time of a User
- Number of total users in a specific interval of time
- And much more…
Google Analytics provides web-stats completely free.
Setting up G.A. is also simple. Just proceed with your Google or Gmail account and login to Google analytics with Gmail username and password.
Once you login to Google Analytics, you will get a JavaScript code. You have to insert this code before the end body tag (</body>) in the footer.php section.
If you feel learning Google Analytics a must thing after creating a website, refer to Analytics Support & Training page.
Google Webmaster Tool
Google allows us to use its webmaster tool (previously called Google webmaster tool).
Webmaster tool is a very important tool to analyze the basics structure of a website.
It tells how do Search engine bots see your website.
For example, it shows, how Google bots crawl and index a website.
It is easy to add search console to your WordPress website.
There are the quick steps to follow-
1. Login Google Webmaster Tool to your Google account.
2. In the welcome screen, enter the URL of your site, and click the Add Property/Add Site button.
3. In next screen, Google wants to confirm whether you have the authority of that particular website or not. Google asks you to follow the verification step.
You can choose a verification method as there are several options available.
4. The easiest method is to do it via HTML Meta Tag. Click on alternative method and select HTML Tag.
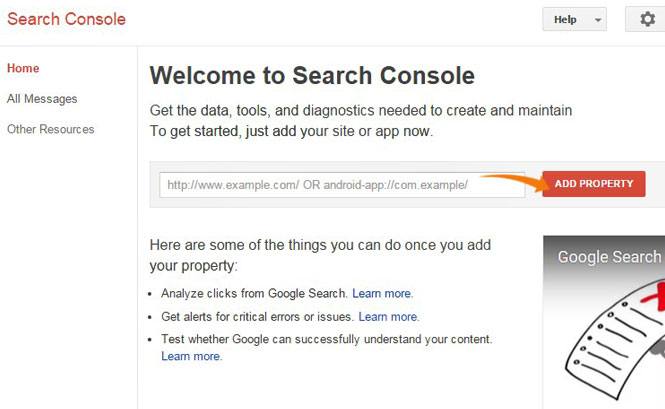
Copy the meta tag from here and leave this screen open in your browser.

5. Go to WP dashboard and select Editor under Appearance option and search for header.php.
Paste the given code after the <head> section. You can take reference from the above image how the head section may look like.
Finally, after inserting the Meta Tag, don’t forget to save your updated code with a save button given below.
6. Come again to the Google Webmaster Screen and click the verify button.
Once, step 6 is completed, you will be able to run the search console dashboard to see the important data on your website.
If you need a thorough guide to learning webmaster tool, Google has released a complete resource page for Search console officially.
12. BackUp: Restore Your WordPress If Something Went Wrong
Backing up a website. If your website gets hacked or something went wrong with the plugin then your website data get lost, you can easily restore your website with a backup facility.
Luckily, there are several programs or plugins launched to backup the WordPress websites.
BackupBuddy is very famous and premium plugin used for backup. Regardless of the BackupBuddy, there are several free plugins to backup the site. You can download and install BackWPup which is completely free and use for daily, weekly or monthly backups.
13. Caching: Increase Site Performance
If your site has a good number of visitors, you must optimize your website speed via caching. As every time a visitor surf your website, the browser sends a request to the server.
A large number of visitors leads to a large number of requests sent to the server. This way, it may hamper your website speed.
But it is not so hard to deal with the problem. Think about to display a static version of a web page that avoids multiple requests for many users. This job can be accomplished by the W3 Total Cache plugin.
However, if you intend to optimize website performance and speed to a next level ahead you should read this awesome article: How To Optimize Speed Of WordPress Websites?
The plugin used to create a cached version of web pages and renders this version when browsers start to request these pages.
14. Provide Strong Security
WordPress provide strong security to websites. Still, some loopholes can create some issue with security. You can also check detail article on WordPress security here.
Follow some points to provide strong security:
- Always update your WordPress software to the latest version.
- Themes and plugins must be up-to-date.
- If you don’t use any plugin, delete them from your WordPress dashboard.
- Download and use any WP themes or plugins from a trusted source.
- Keep your WordPress password of a combination of alphabets, letters, and special characters.
- Try to avoid to keep Admin as your WP username.
- Two-step authentication: In order to prevent brute force attacks or dictionary logins, you can use a two-step authentication module with WordPress login. In this method, additional to the password, a code is required that is sent to your mobile phone. So, you can add the extra layer of protection to the site. You can install Google Authenticator Plugin to do this task.
Limit logins: Hackers are always trying to log in your WP site multiple times until they hack the password. This method of hacking sites is often called brute force attack. Login LockDown is a smart plugin to limit login attempt for any particular IP address. Therefore this plugin is capable of preventing fro brute force attacks.
Visit below articles to extract more information on WordPress website making
- Create Website With One-Page WordPress Theme (Tutorial)
- Schedule, Reschedule & Unscheduled a Blog Post in WordPress
- WordPress Child Theme Tutorial
- Web Designing WordPress Themes
- Flat Design WordPress Themes
- Redirect Default WordPress Login Into A Custom Login Page
- Code To Integrate WordPress Media Uploader In Plugin or Theme
- How To Use GitHub To Manage Your Project Online


