Are you too facing the following problems or issues which are listed below?
- Does your Gallery page get pixilated sometimes?
- Do you also have a problem of distortion of images or pixels in Gallery Page?
- Do you also notice the difference in the size of images after uploading?
- Does it ever happen to you that you see a repetition of images (duplicate images) after uploading?
- Have you ever tried to change the order of images on the Gallery Page?
If yes, then you might be looking for the solution to get rid off from the above issues. Here is the complete solution. In the following article, I am going to explain the reasons behind the above problems-why this happens? What are the possible reasons? And also providing the solution to fix up the problem at the end.
Let’s discuss the above issues:
Problem #1: Why the Gallery Page gets pixilated or why distortion of images occurred?
Reason: It has been an issue with lots of customers that their gallery page gets pixilated (i.e. Images or pixels get distorted). The reason behind this problem is that they use the default gallery page of the WordPress instead of using the gallery page of the theme.
It’s quite unusual but still, it makes a difference to the website. Although creating a gallery page with any WordPress theme is very simple. At the end of reading this article, you will get the solution to fix the problem.
Problem #2: Why the differences occurred in the images or why repetition of images occurred?
Reason: At the time of uploading the images the users click on “Insert into post” button. It creates the repetition of the images on the Gallery Page (the images look in different formats, one that appears normally and the other inherits the feature of the gallery page of the theme).
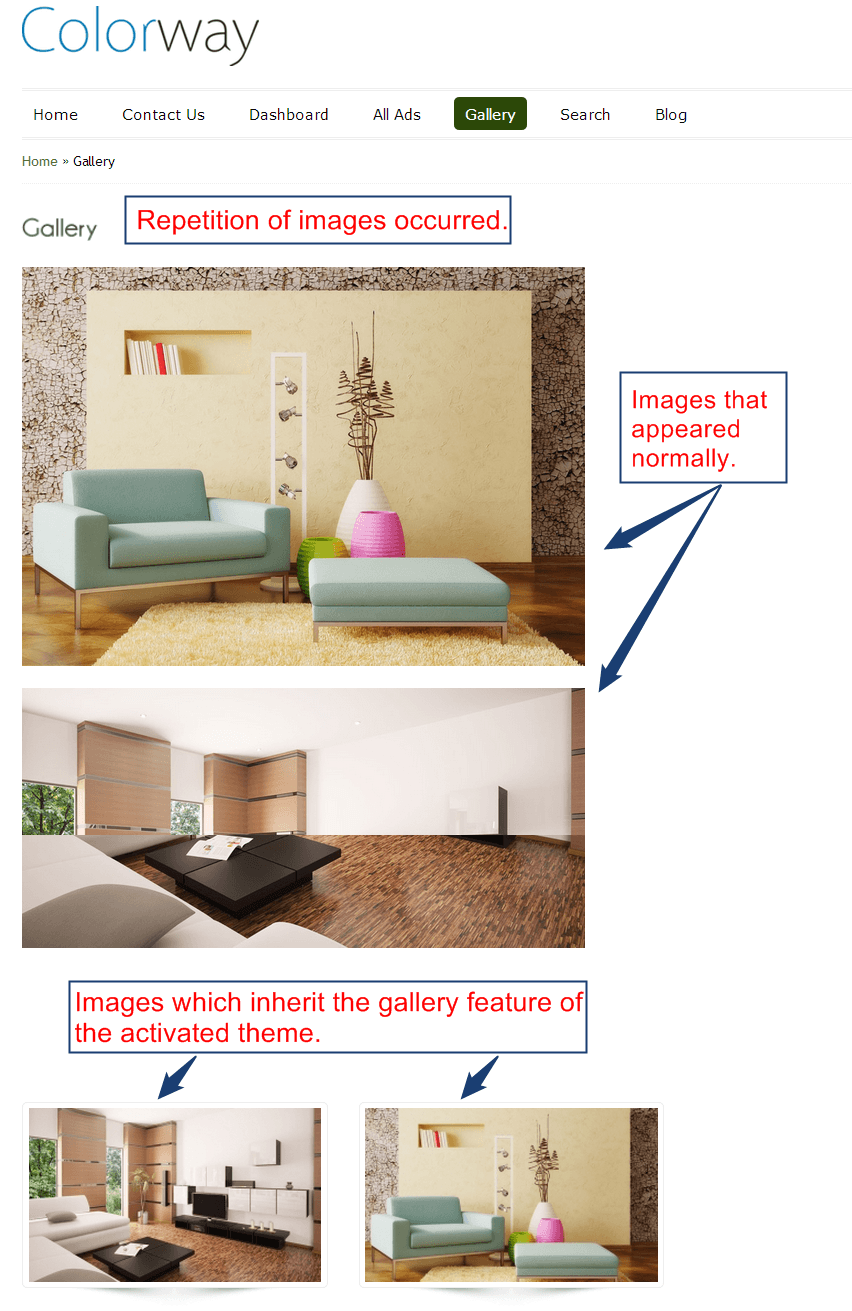
Problem #3: Why the images inherit the feature of default gallery pages of WordPress?
Reason: Mostly, users apply the following approach; they click on “add media” button and then select “Create a Gallery” option. And upload the images. No matter whether they select the Gallery Template or not but the images inherit the default gallery feature of WordPress.
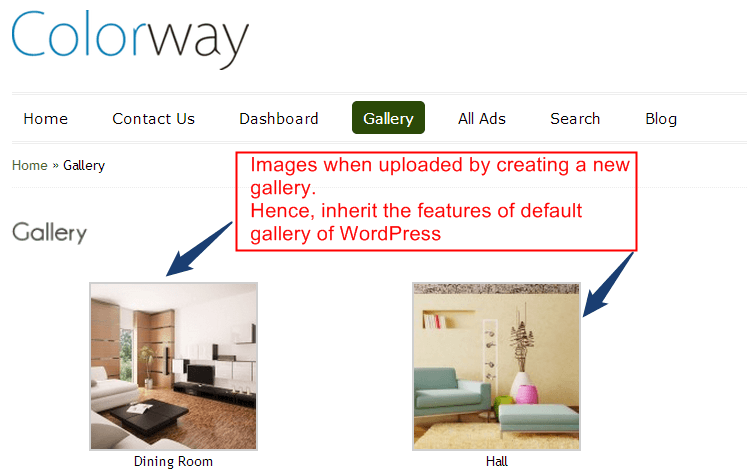
Solution: How to resolve the issue?
There are different ways to fix up the problem. But the one which I find is the easiest and more importantly not complicated as compared to the others. I would recommend all the readers to apply the same approach while creating their own gallery page using WordPress themes.
In the following procedure, I have created a gallery page in the Colorway WordPress Theme. However, you can use any WordPress theme for creating a gallery page.
Steps:
Before creating a gallery page, make sure you have installed the Colorway WordPress theme (or any theme whatever you want to use) and activated it.
- Go to your Dashboard and apply the following steps:
Dashboard –> Pages –> Add New Page. - Mention the Title of the page as “Gallery” and select the template as “Gallery Template” from the Page Attributes option.
- Now click on “Add Media” button to upload the images.
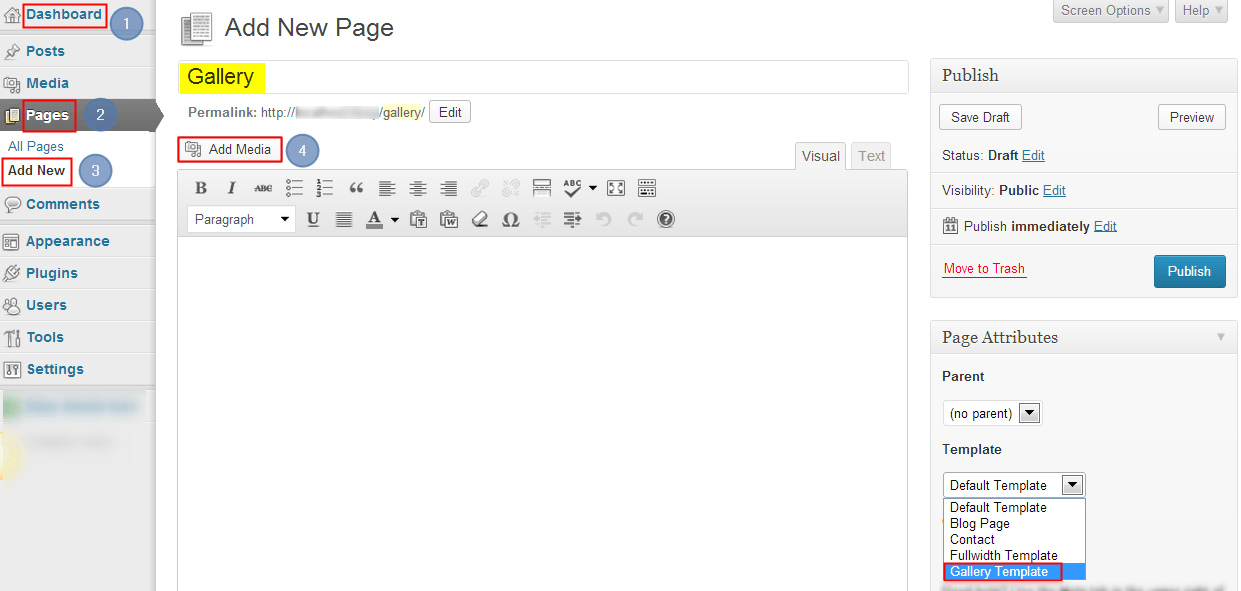
- Click on “Upload Files” button and select the images which you want to show on the Gallery Page.

- After uploading the images, click on “Insert into post” button.

- Now on the Editor Page, click on “Text” option and remove all the codes of the images and leave it blank.
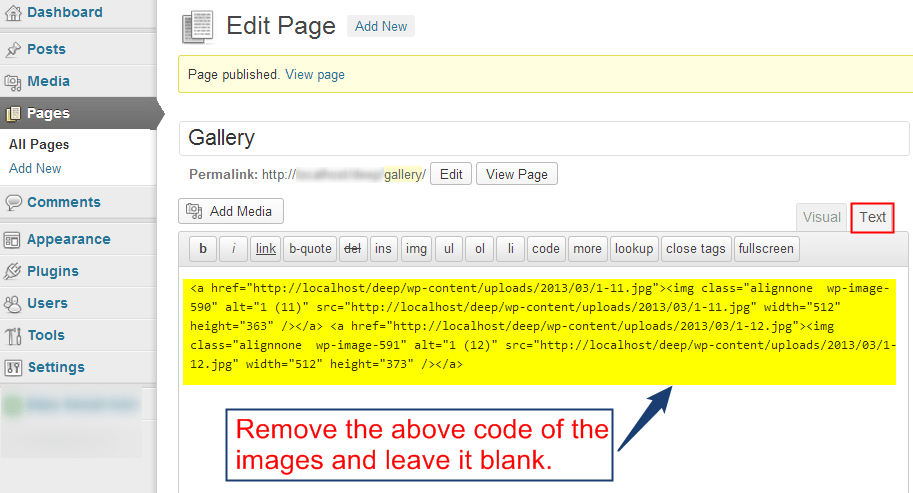
- Click on “Publish” button. This will show the images on the Gallery Page which will inherit the gallery feature of the theme you installed on your website.
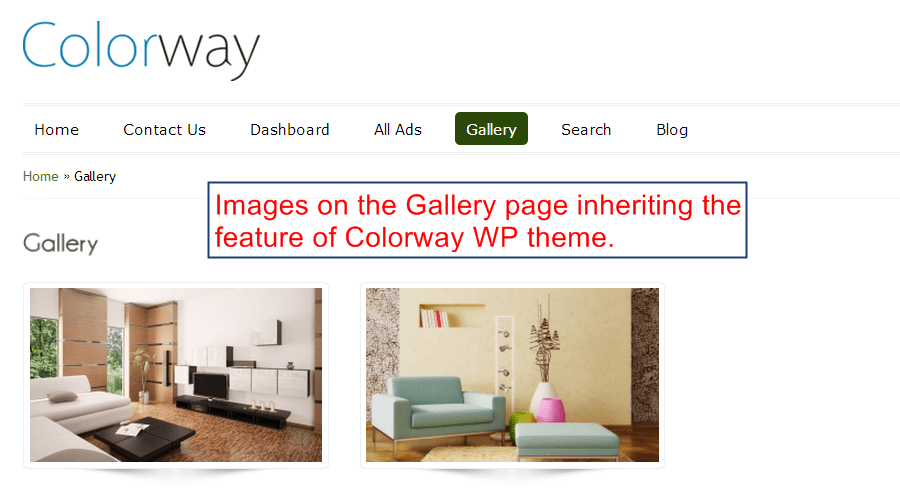
Although it is an unusual technique but still it is worth to apply for resolving the issues.
What’s next? How to upload multiple images to the Gallery Page I created?
If you further want to upload more images in the Gallery Page you created, you can upload them through the media files or from the directories of the system. But after uploading the images just keep in mind to remove the codes of the images from the “Text” option and at last click on “Update” button. It will add the images to the Gallery page.
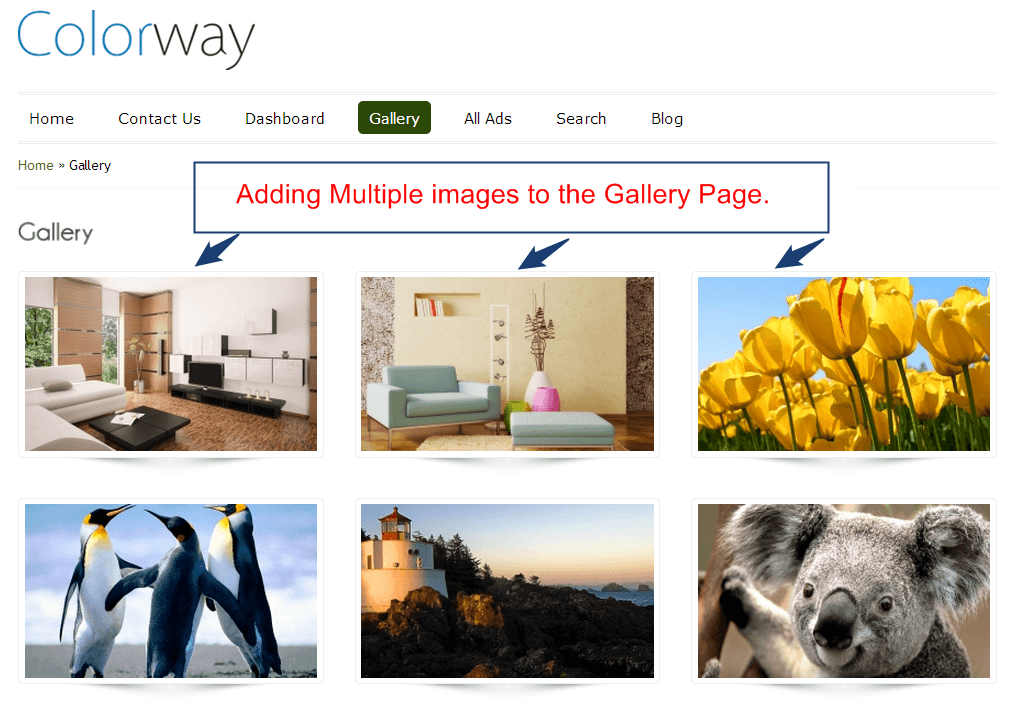
How to delete images from the Gallery Page?
If you have uploaded the images which you do not want to show anymore on the Gallery page you can remove them by applying the following steps.
- Go to the Gallery Page.
- Click on “Add Media” option.
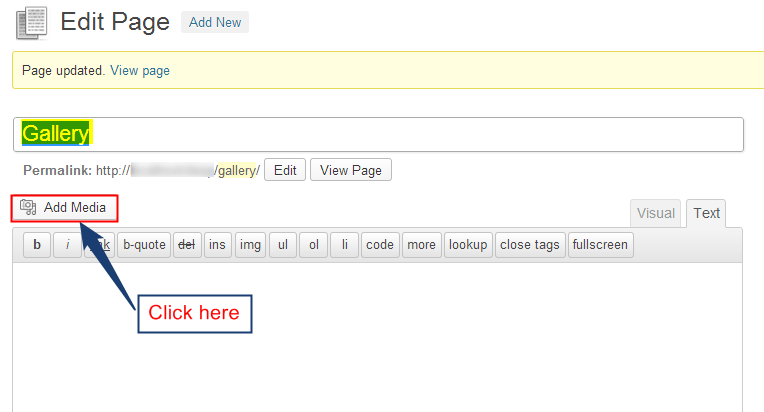
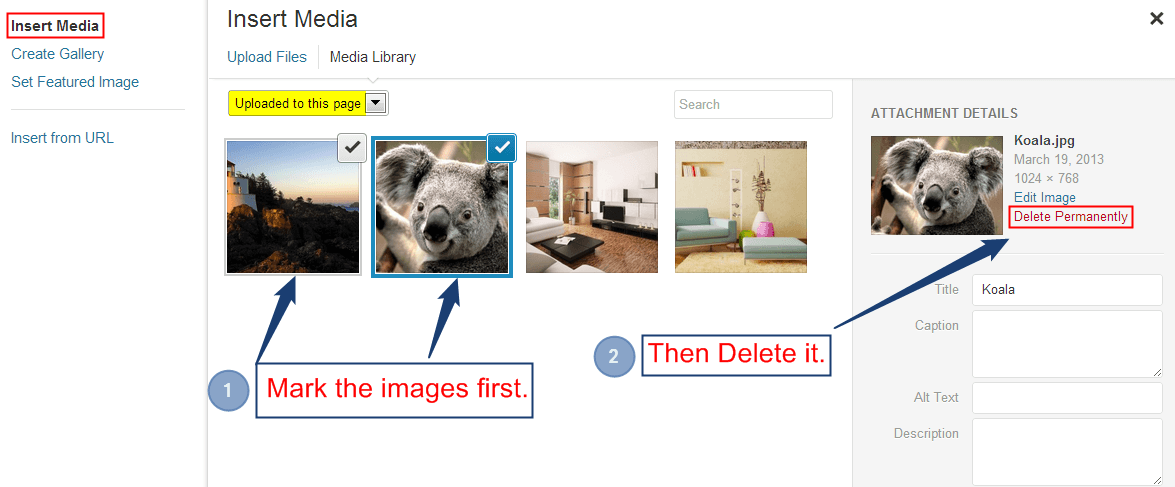
- On the next page, under the Insert Media, select “Uploaded to this page” option in the checkbox.
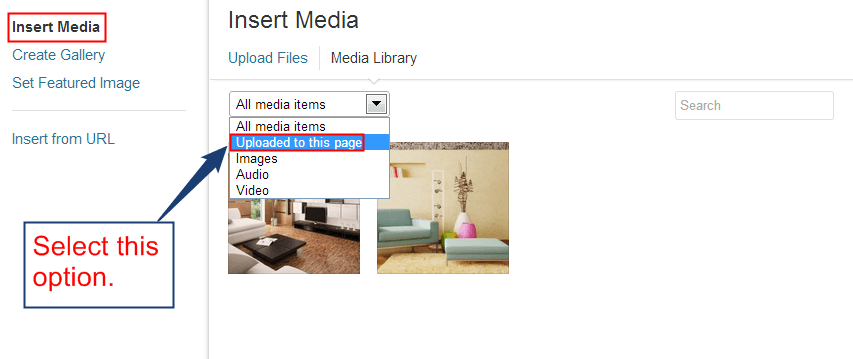
- Now mark the images and delete them. This will remove the images from the Gallery Page.
How can I change the order of the images on the Gallery Page of the Theme?
You can change the order of the images or sequence of the images in the Gallery page of the theme through the following steps:
- Go the Gallery Page you have created.
- Now click on “Add Media” button.
- On the next page do the following as shown in the screenshot below:
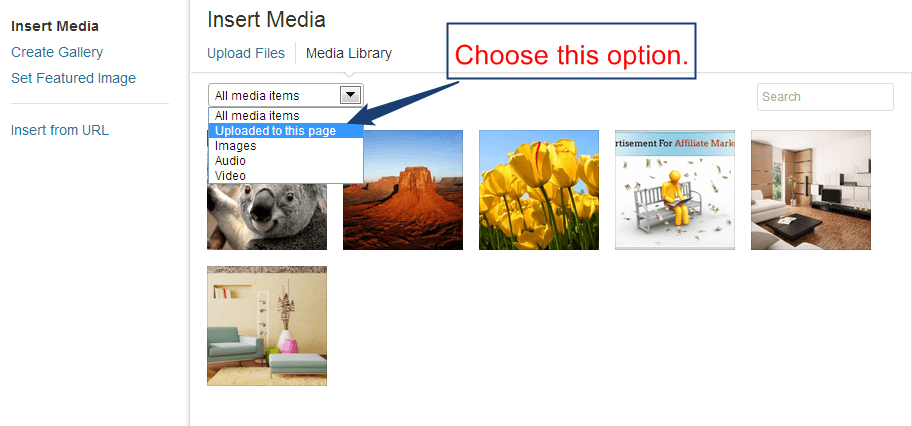
After that simply drag and drop the images that will change the sequence of images. Now close the window and click on “Update” button. Visit your gallery page. You will see the sequence of images has been changed.
Remember, you can change the sequence of images as per your requirement. All you need is to drag and drop the images according to the sequence you want to show on the Gallery page.
I hope this article will provide you the complete solution to the issues which I mentioned at the beginning. Follow the above procedure as it is; it will definitely resolve your issues. Moreover, it will allow the Gallery Page to use the gallery feature of the theme. For any views, thoughts, feedback, comments or queries you can post it freely under the comments section given below. I will appreciate your feedback and would like to clear your doubts if any.
You might also be interested in:


