ButterBelly WordPress Theme Complete Documentation by InkThemes
In the following documentation, you will know about how to use ButterBelly WordPress theme on your website. Following are the points that have been explained:
What is ButterBelly Theme?
How to install ButterBelly Theme?
How to upload logos, favicon on the website? How to activate slider on the home page? How to use homepage feature area?
How to use homepage bottom feature? How to use contact page map?
How to change the theme style options? How to add social icons on the website? How to use footer settings?
How to create posts on the website?
How to create drop-down menu on the website?
How to create a gallery page on the website?
Let’s discuss the above topics one by one.
What is ButterBelly Theme?
A ButterBelly theme is a WordPress theme which is simply designed for business purpose. The ButterBelly theme is very simple and easy to use and any business professional can create his website without any difficulty. It requires a single click installation and your website will be ready within no time.
How to install ButterBelly Theme?
Before installing ButterBelly theme on your website make sure that: You have a web server installed on your machine. You have installed WordPress on your server.
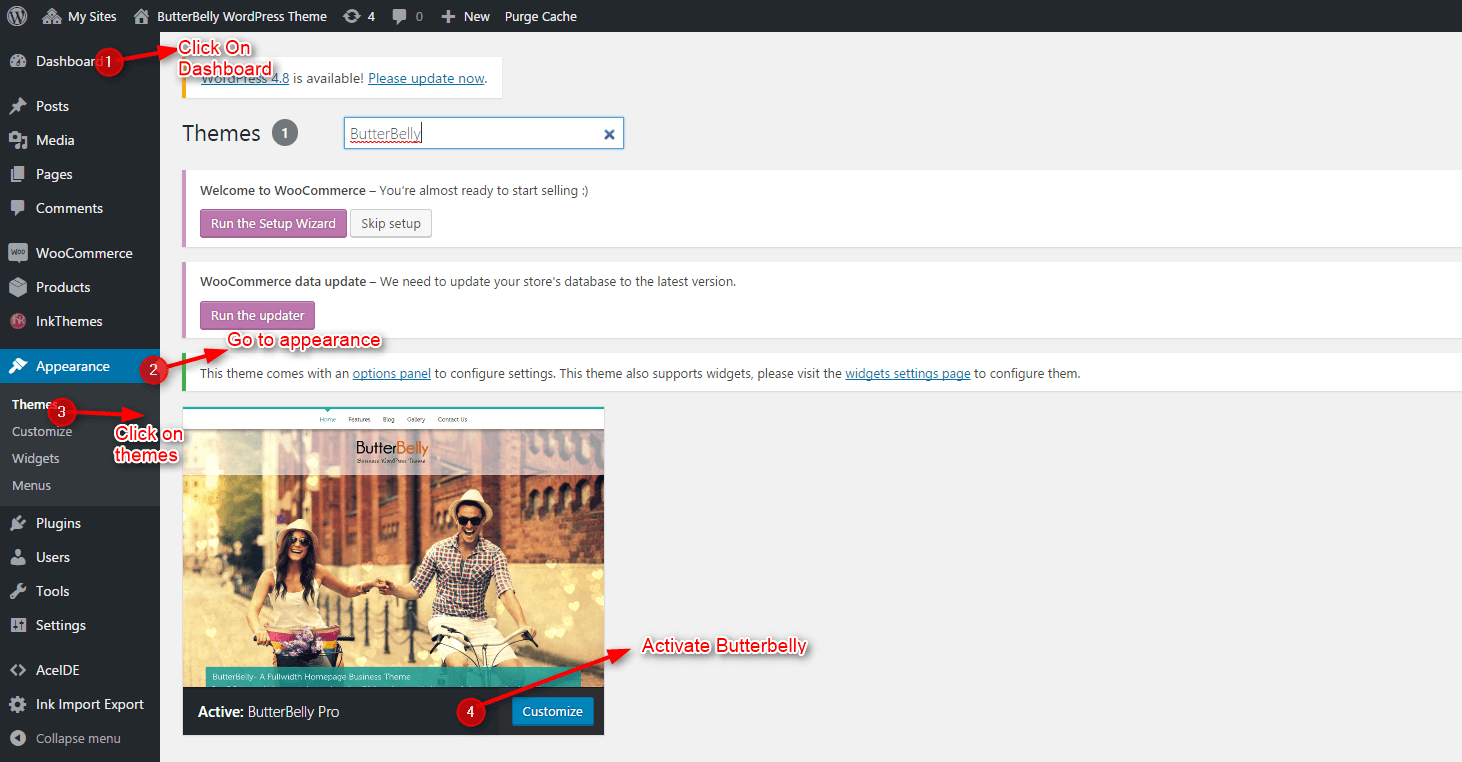
Installing the theme is very simple and easy. It will hardly take a minute. Just follow the simple steps given below:
1. Go to your WordPress dashboard to install a theme.
Dashboard -> Appearance -> Themes
2. Search ButterBelly Theme file and Click on Activate option to activate the theme.
3. Theme is now activated and you can configure it from InkThemes Options.
How to upload logo, favicon and background image on the website?
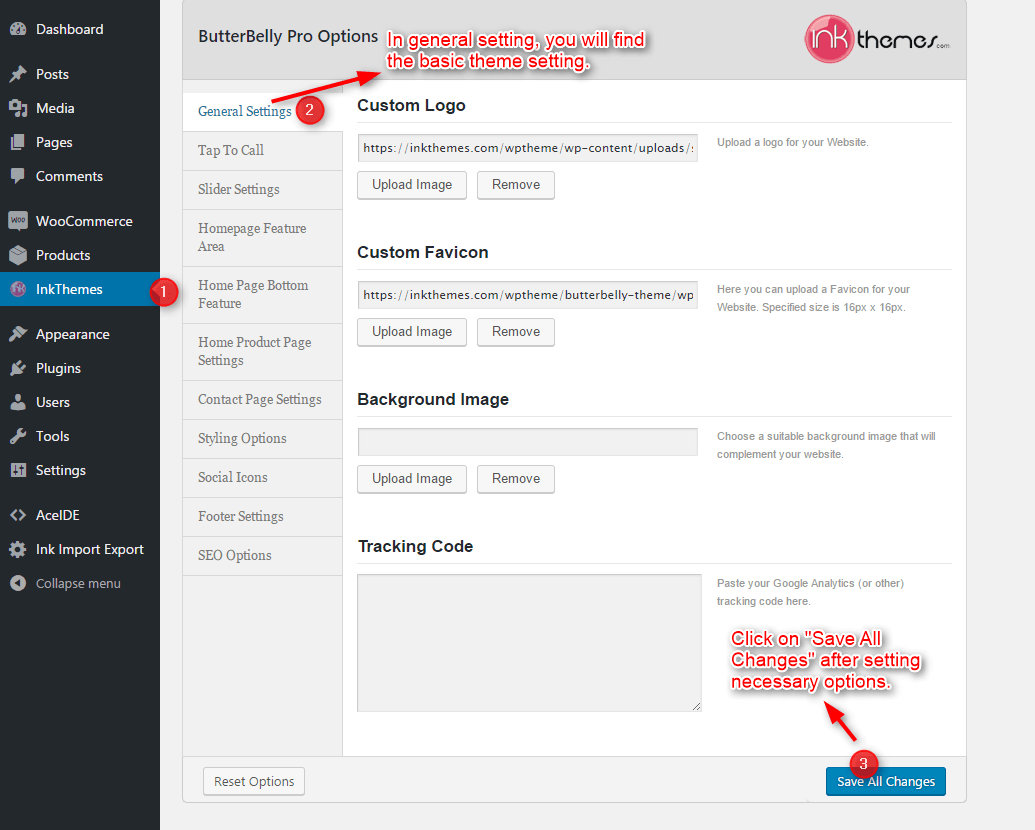
Uploading logo, favicon and background images on the website is very simple. Moreover, you can mention the mobile navigation menu on the website (which will display when the theme is opened in mobile browsers) and add Google tracking code. Just go to your dashboard and do the following steps:
Dashboard -> InkThemes -> General Settings
After uploading the logos, favicon, mobile navigation menu and tracking code, click on Save All Changes button.

How to activate slider on the home page?
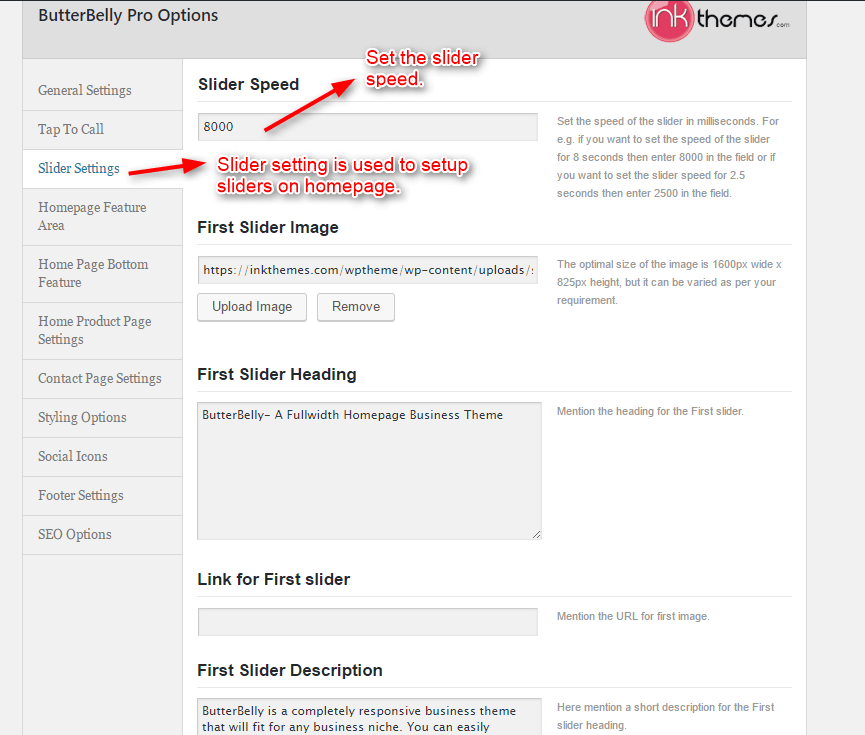
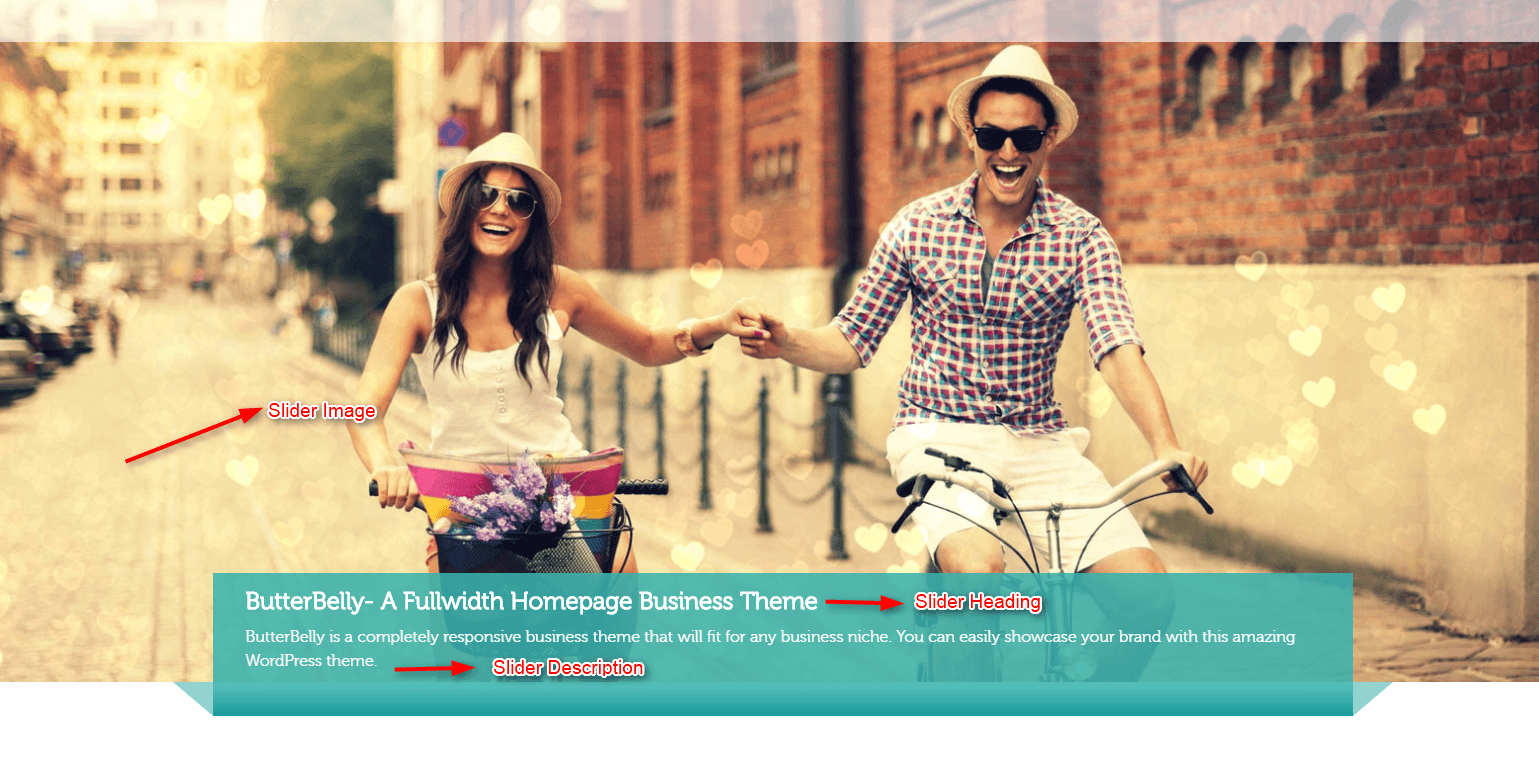
In the slider, you can show maximum of 6 images whereas minimum would be one. With each slider image, you can set the heading and short description according to you. Moreover, you can also give a link for slider images and its text.
Note: The optimal size for slider image is 1600px wide * 825px height. You can activate slider on the home page by performing the following steps given below.
Dashboard -> InkThemes -> Slider Settings
Click on Upload Image button and upload the images which you want to show in the slider.
Moreover, you can also set the slider speed (in milliseconds) according to you.
For e.g. If you want to set the slider speed as 5 seconds then enter 5000.
How to use homepage feature area?
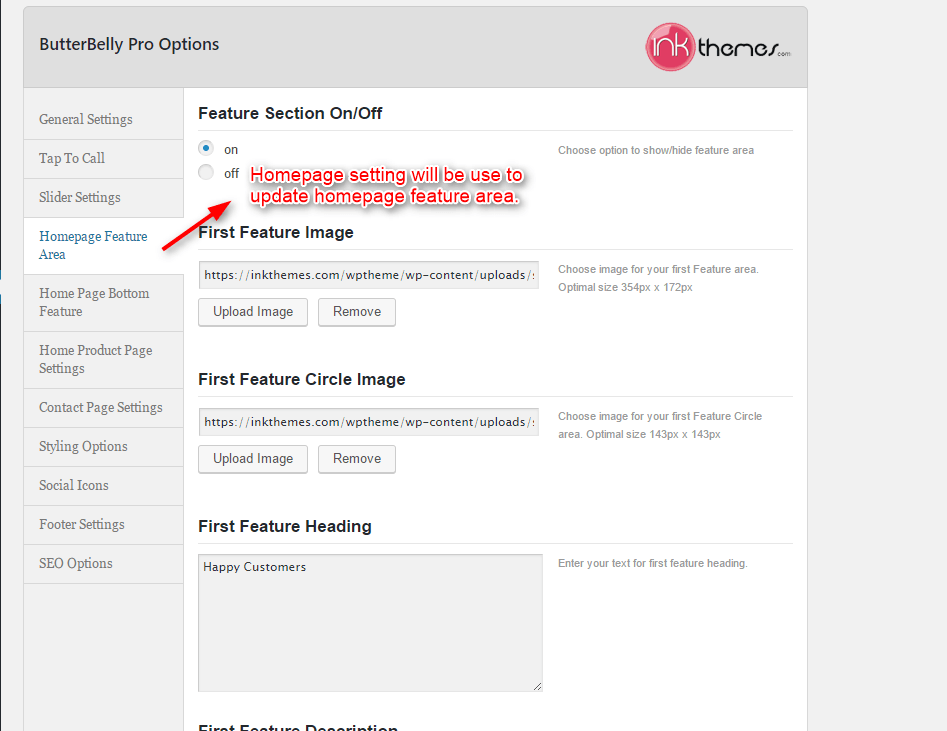
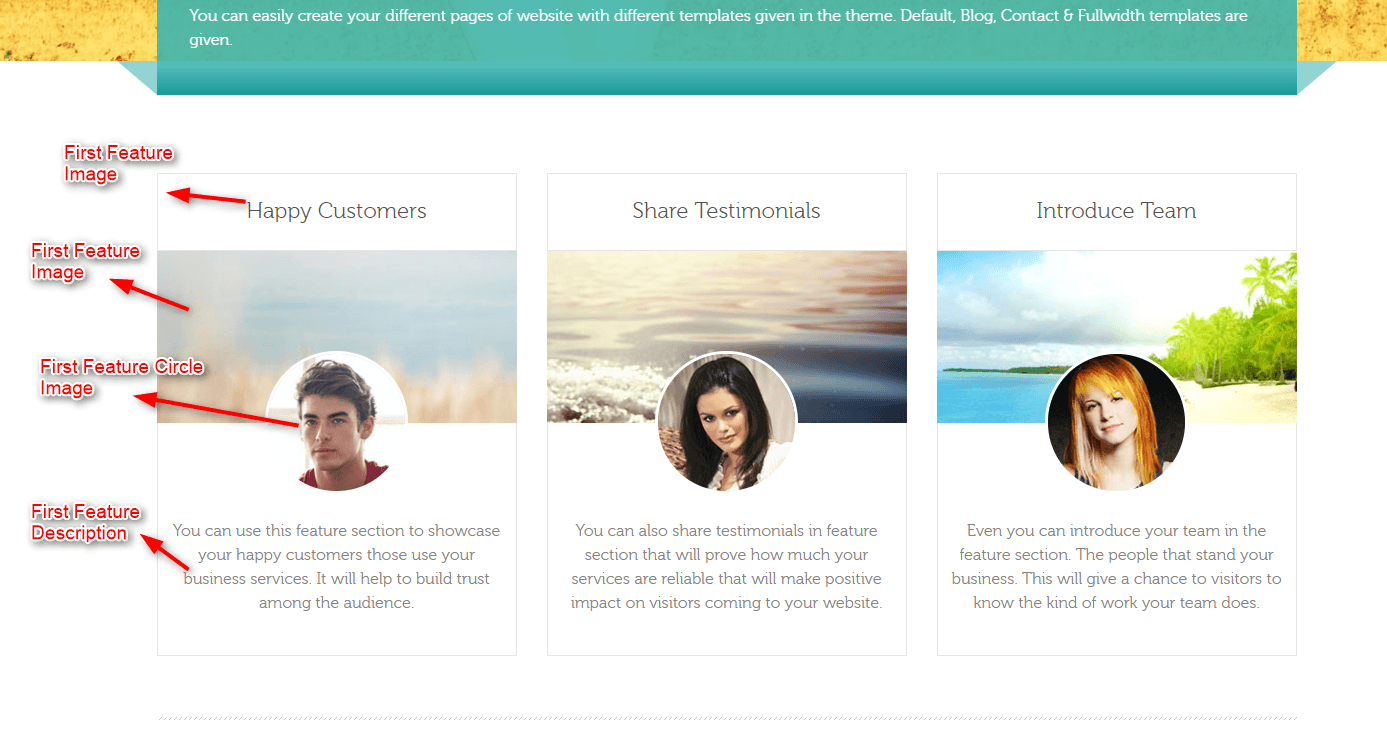
The homepage feature area consists of 3 feature sections.
You can set feature image, feature circle image, feature heading, feature description, and feature link in each of the section.
Note: The optimal size for feature image is 354px wide * 172px height.
The optimal size for feature circle image is 143px wide * 143px height. After finishing desire settings click on Save All Changes button.
For that go to:
Dashboard ->InkThemes -> Homepage Feature Area
How to use homepage bottom feature?
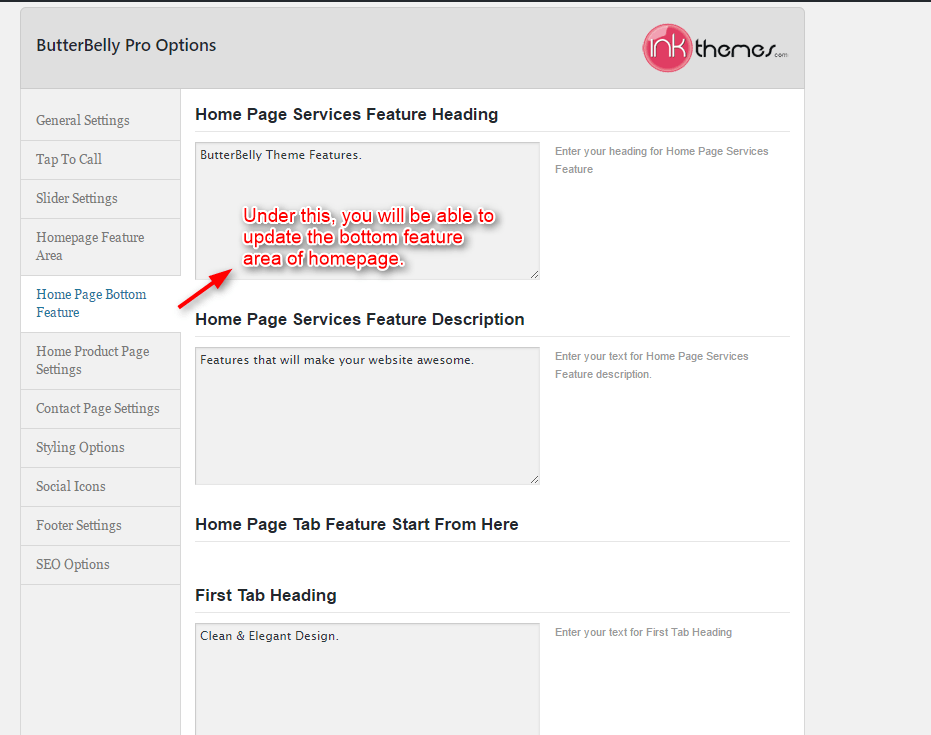
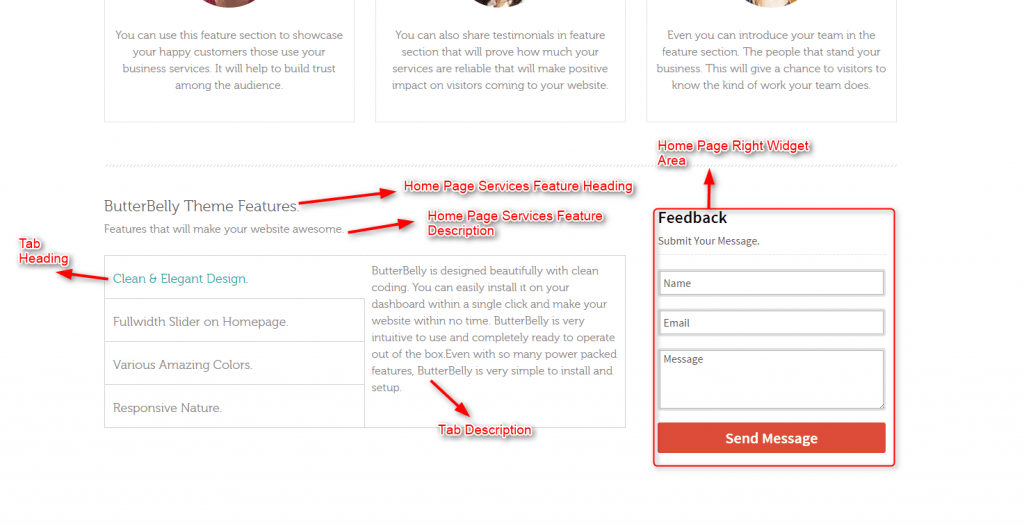
The home page bottom feature consists of following sections- homepage service feature, homepage tab feature, homepage blog feature.
In home page service feature you can set an appropriate heading and short description of it. There are 4 homepage tab feature, where you can show your services with suitable heading and description.
In home page blog feature you can show your blog post. Moreover, you can set how much number of posts you want to display on the home page.
For that go to:
Dashboard -> InkThemes -> Home Page Bottom Feature
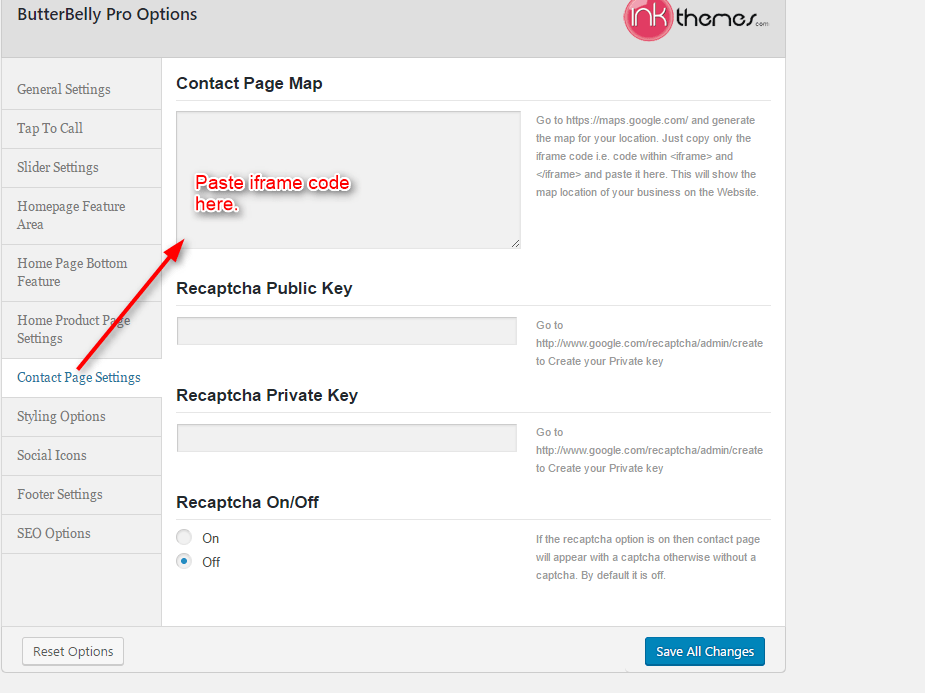
How to use contact page map?
You can show the map location of your business on the website by pasting the iframe code generated by google map in this section and then click on Save All Changes.
For that go to:
Dashboard -> InkThemes -> Contact Page Map
How to change the Theme Style?
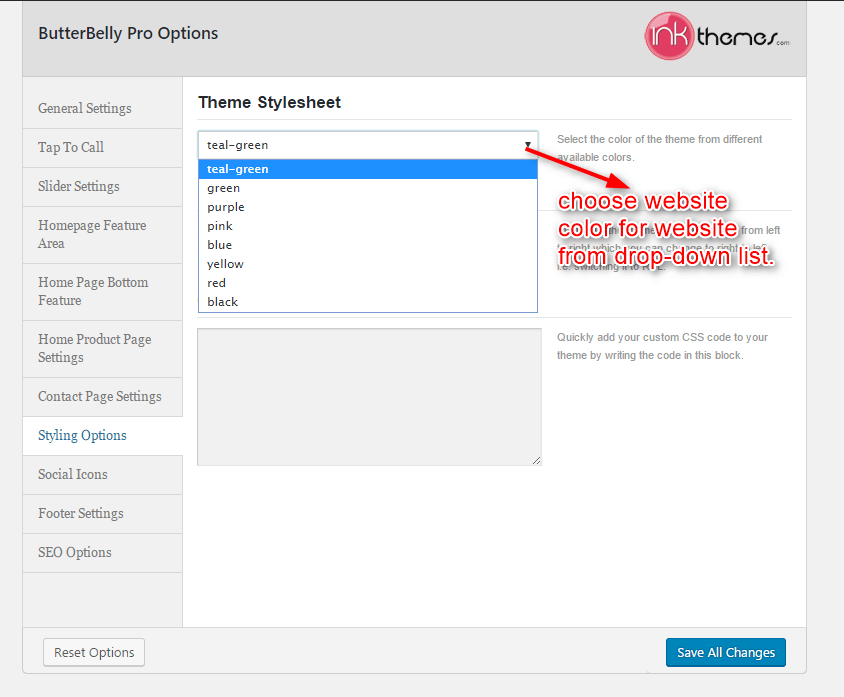
There are various styling options available in the theme. You can change the style of theme through the following procedure.
Dashboard -> InkThemes -> Styling Options
Moreover, you can also add your own CSS code here for any customization.
How to add Social Icons on the website?
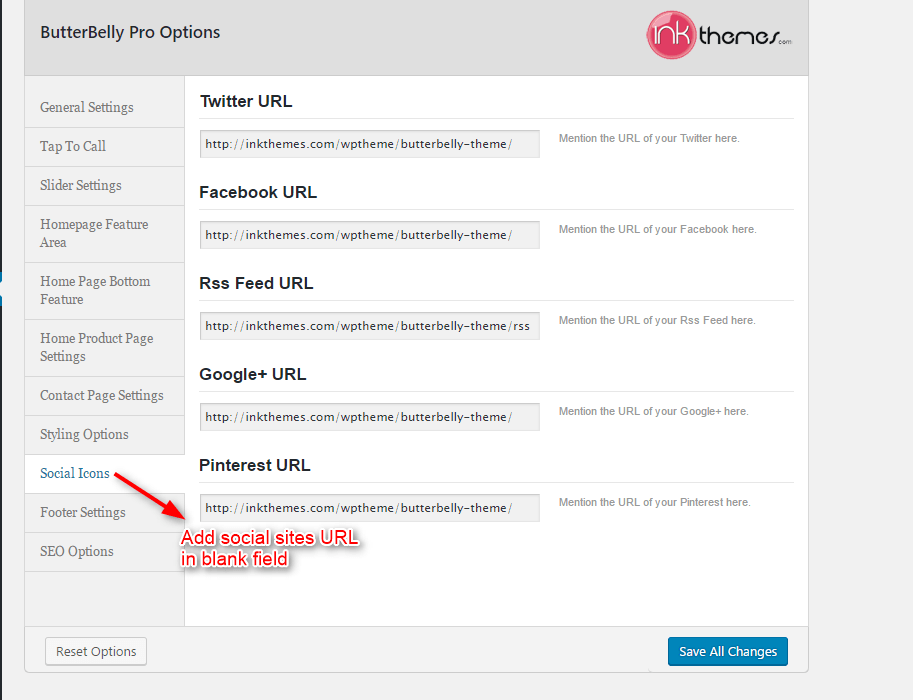
Social icons are very useful for a website. There are various social icons available in the theme. The social icons will be displayed in the footer. You can use them through the following procedure.
Dashboard -> InkThemes -> Social Icons
How to use Footer Settings?
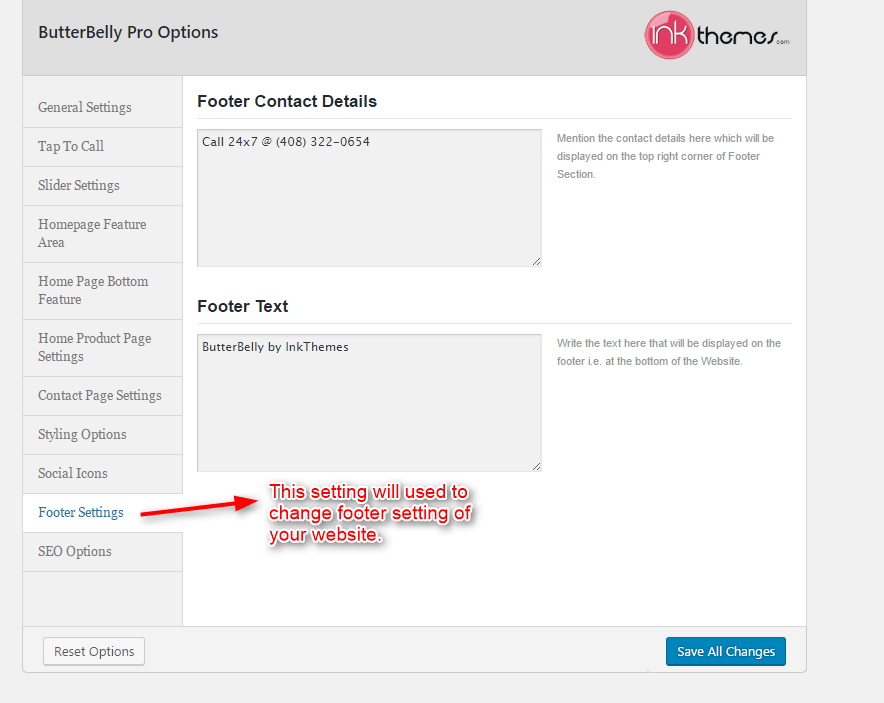
You can set the text of your choice that will be displayed in the footer. You can do it through the following procedure.
Dashboard -> InkThemes -> Footer Settings

How to create posts on the website?
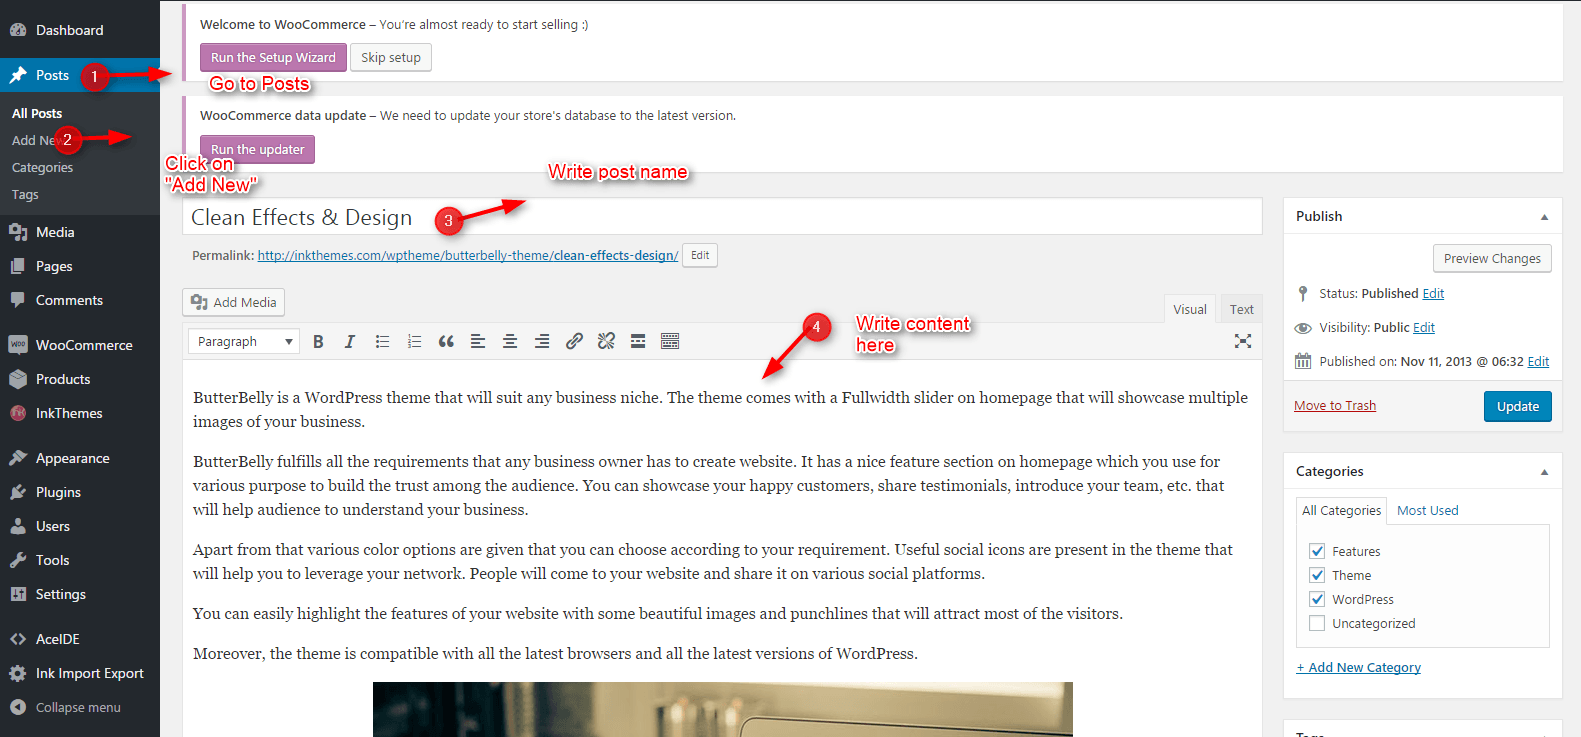
You can easily create a post on your website by following steps given below:
Dashboard-> Posts-> Add New
Write the post name with relevant content as shown in the image given below:
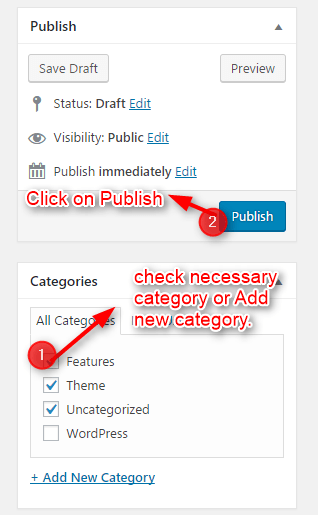
You can select the category for the post or create a new category. Then click on Publish.
How to create drop-down menu on website?
However, you can also build a custom menu using the Menus option under the “Appearance” Section. You can also change the order of the menu according to your requirement by simply drag and drop the menu items.
You can easily customize menu with the following steps:
Dashboard -> InkThemes -> Menus

How to create a gallery page on the website?
You can easily create a gallery page in the theme by following the steps given below:
Dashboard -> Pages -> Add New
- Click on Add Media to create a gallery.
- Click on Create Gallery.
- Go to Upload Files-> Select Files
- Select images to upload in a gallery.
- Click on Create a new gallery button.
- Select Column number from the option and click on Insert gallery.
- Select Default Template/ Fullwidth Page from the list and then click on Publish button.


This is how the desired gallery page appears on the home page.
How to add Widgets
Widgets in Sidebar
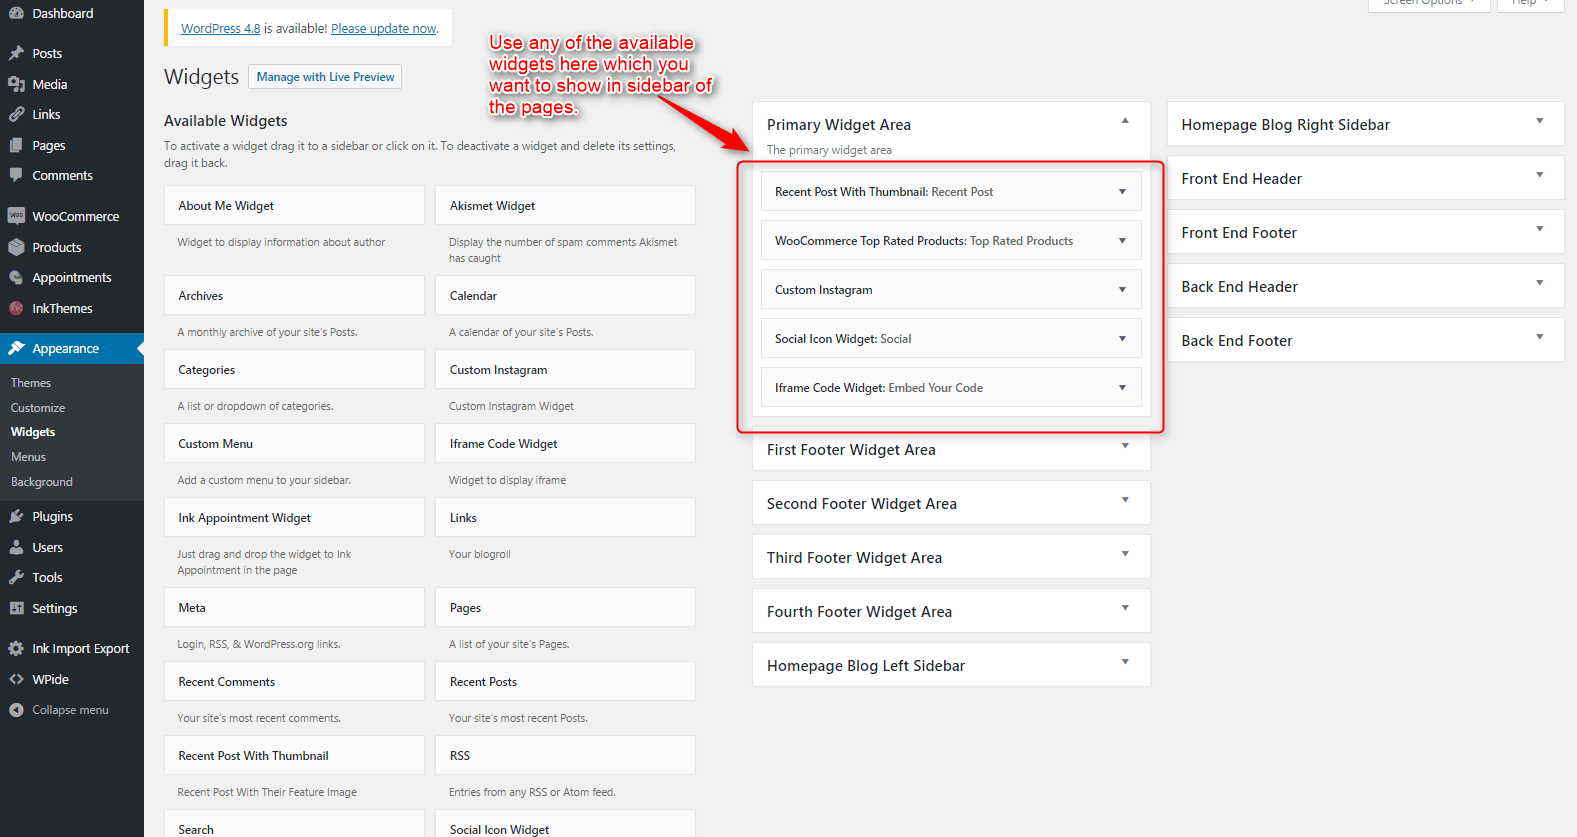
For adding widgets in the sidebar all you have to do is select Widgets option from Appearance panel, then drag widget of your need & drop it in primary widgets area or in secondary widgets area according to your requirement, at the end click save button and your widgets are ready to use.
Widgets in Footer
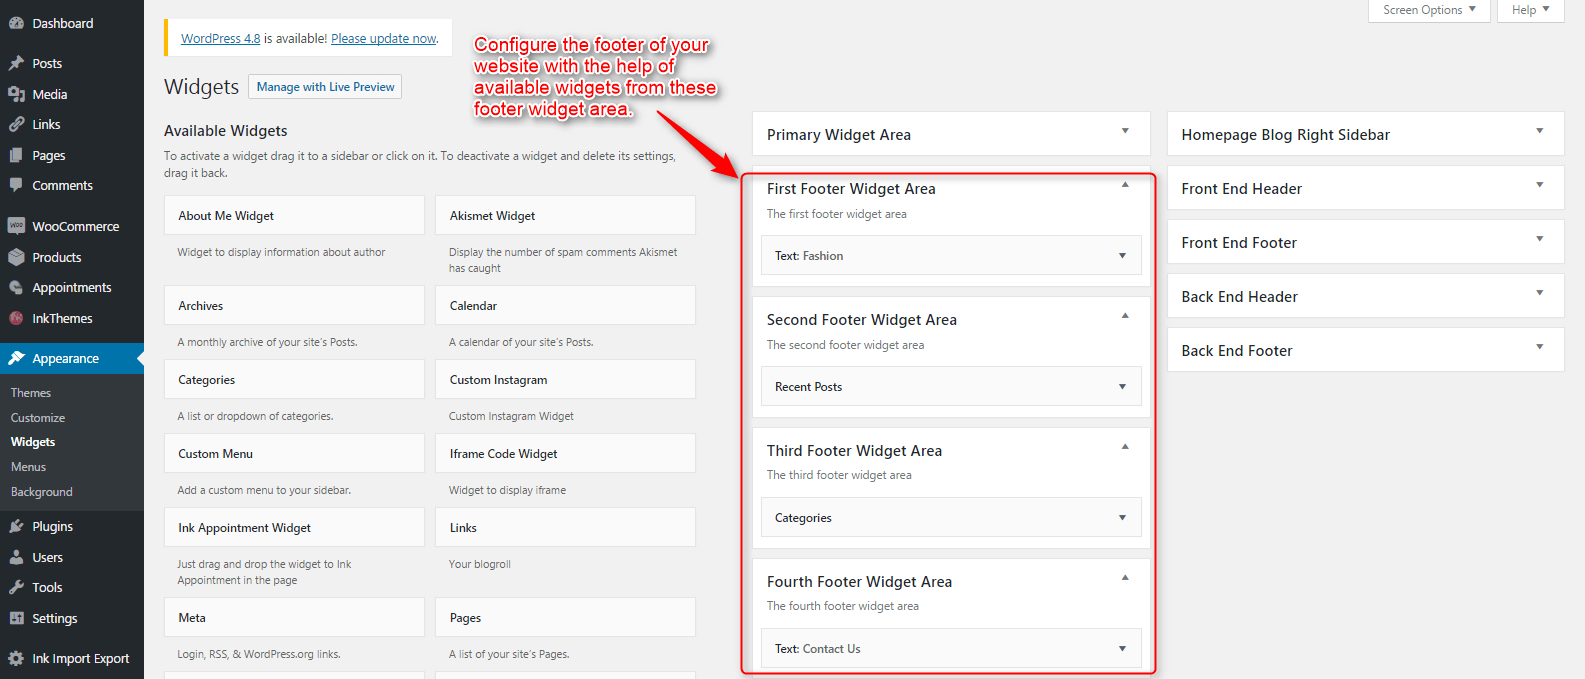
For adding widgets in Footer same as sidebar widgets all you have to do is select Widgets option from Appearance panel , then drag widget of your need & drop it in first footer widget area ,secondary footer widget area ,third footer widget area ,fourth footer widget area according to your requirement ,at the end click save button and your widgets are ready to use.
Thank You.
Once again, thank you so much for purchasing this theme. As we said at the beginning, we’d be glad to help you if you have any questions relating to this theme. Like other themes of InkThemes, this theme is also extremely easy to install and setup and you’d love creating your website with this theme.
In case if you need any help regarding theme tutorials, you can follow InkThemes YouTube channel.
https://www.youtube.com/channel/UCxrV5C3YZ8p2Zq_n70cN9aQ
https://www.youtube.com/user/InkThemes (for our older themes)
You can follow InkThemes on social networks:
https://www.facebook.com/InkThemes
https://twitter.com/InkThemes
Thanks for purchasing ButterBelly theme. If you have any questions that are beyond the scope of this documentation, you can freely ask it on our support forum. Here is the link you need to follow- https://www.inkthemes.com/support.


