“Covera PRO V2 WordPress” Documentation By InkThemes
Get Your Site Ready in Just 1 Click
Thank you for purchasing our theme. If you have any questions that are beyond the scope of this help file, please feel free to ask your queries either at our support forum or at [email protected]. You can also watch videos available in the membership Area.
If you wish to hire us for customizations, please click here, we would love to assist you.
Introduction :
InkThemes offers you with an extraordinary theme for your website – “Covera PRO V2 WordPress“.
This WordPress Template provides you with many eye-popping features that can make your website exclusive and rare.
Documentation Guide Of “Covera PRO V2 WordPress Theme” :
- Theme Installation
- Covera PRO V2 Options
- Building Pages
- Adding Blog Posts
- Adding Widgets
- Building Custom Menus
- Creating Gallery
- Building Contact Pages
- Notes
The following is the documentation which will guide you in setting up the “Covera PRO V2 WordPress Theme” on your website. The steps are explained as follows, so get started.
To be able to use “Covera PRO V2 WordPress Theme”, you need to install WordPress on your server. If you don’t know how to do it, please visit: https://codex.wordpress.org/Installing_WordPress.
After installing WordPress, “Dashboard” will appear consisting of various options. This will actually be your control panel of WordPress.
1 Theme Installation
Dashboard > Appearance > Themes
Step A –
Go to “Appearance” section from the left sidebar under “Dashboard” and select “Themes”. Now the themes window will appear with some sample themes.
Step B –
From the theme window, you can install “Covera PRO V2 Theme” by uploading it from your destination folder. For this, Click on “Add New” written at the top and upload the Covera PRO V2 file from destination folder and install it. Follow the mentioned below path. After installing the theme, your website will get ready to work on.
Themes > Add New > Upload Theme > Choose Covera PRO V2 File > Install Now
Covera PRO V2 Options :
Dashboard > InkThemes > Covera PRO V2 Options
To make your homepage more eye catchy you need to explore the left side options of your “Dashboard” panel. From there, select “InkThemes” option. It will further display the “Covera PRO V2 Options” using which, you will get various other options that will further helps you to configure your homepage. Below are the available options of Covera PRO V2 Theme that you will explore one by one to make your website more exclusive.
A. General Settings
Dashboard > InkThemes > Covera PRO V2 Options > General Settings
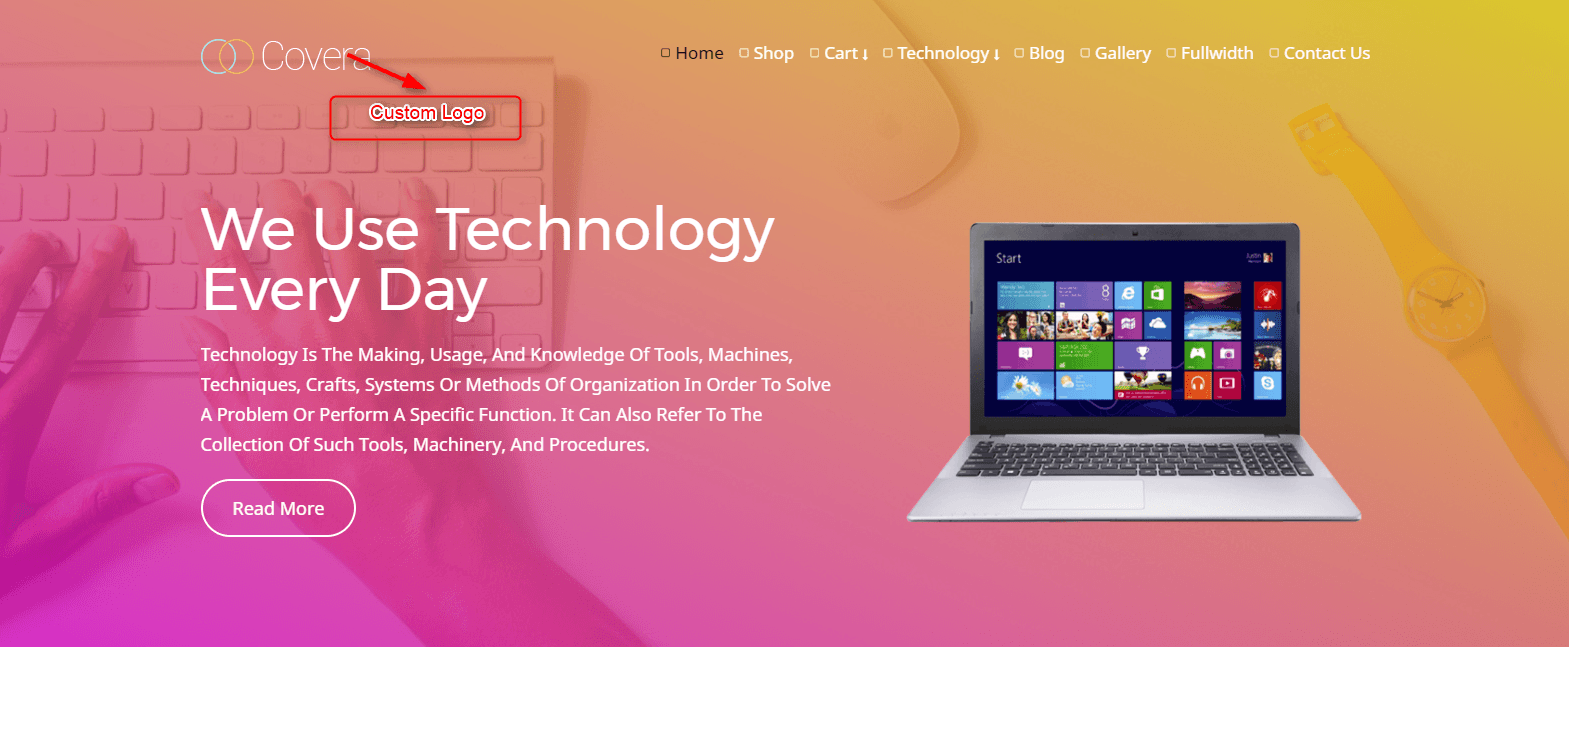
General Settings allows you to add your logo, favicon and background image simultaneously. You can add images by simply copying & pasting your image URL or by using “Upload Image” option. After adding all the necessary images, click on “Save all changes” to see the result.
Through “General Settings” you can also track your particular page by pasting “Google Analytics (or other) Tracking Code” in a “tracking code field”. It will help you to analyze how many times a particular page requests through various means.

 NOTE:
NOTE:
Reset Options: Covera PRO V2 Theme provided a “Reset Options”. With this option, you can reset all the changes in the default settings which you made so far.
2.Theme Settings
Dashboard > InkThemes > Covera PRO V2 Options > Theme Settings
Under “Theme Settings” you will get different options like-heading color, paragraph color, background color, text color etc., that will let you set the theme of your homepage accordingly to your requirements.

After selecting the color of all the options available in the Theme Settings, click on “Save All Changes” and Refresh your homepage to see the changes.
3. Homepage & Other Pages Settings
Dashboard > InkThemes > Covera PRO V2 Options > Homepage & Other Pages Settings
With this settings, you can customize the loading animation, layout, background image and overlay colors for Page Header etc of your
Homepage to make it look more attractive.

Choose the suitable color for given option and change the settings of your homepage and after saving, Refresh your homepage.
4. Slider Settings
Dashboard > InkThemes > Covera PRO V2 Options > Slider Settings
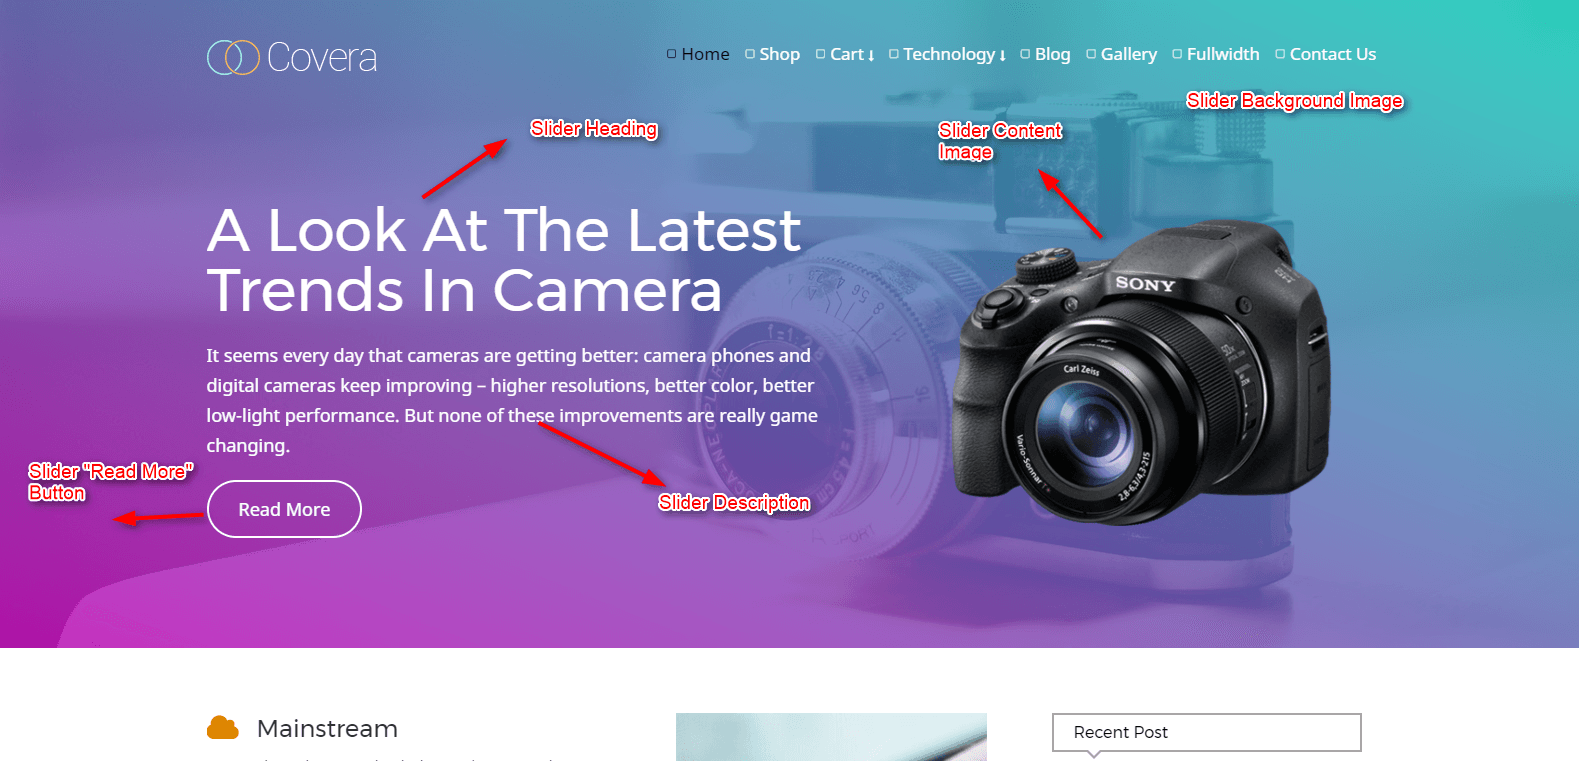
This theme allows you with extraordinary settings of your homepage slider section so as to make your website more creative and innovative. This section holds the maximum attention of your viewers.
You can choose On/Off button to set the autoplay option for slider. Explore various option provided in Covera theme and set them accordingly, to make your homepage more effective. Under this theme, you can insert 10 different slide images with suitable iframe code and add text description along with relevant link.


Follow the same procedure for other slides of your Slider Section, add the required details with image that you want to display in different slides along with added description and link. Then, click to “Save All Changes” and Refresh the homepage to further review the changes on your website.
5. Homepage Feature Section Settings
Dashboard > InkThemes > Covera PRO V2 Options > Homepage Feature Area
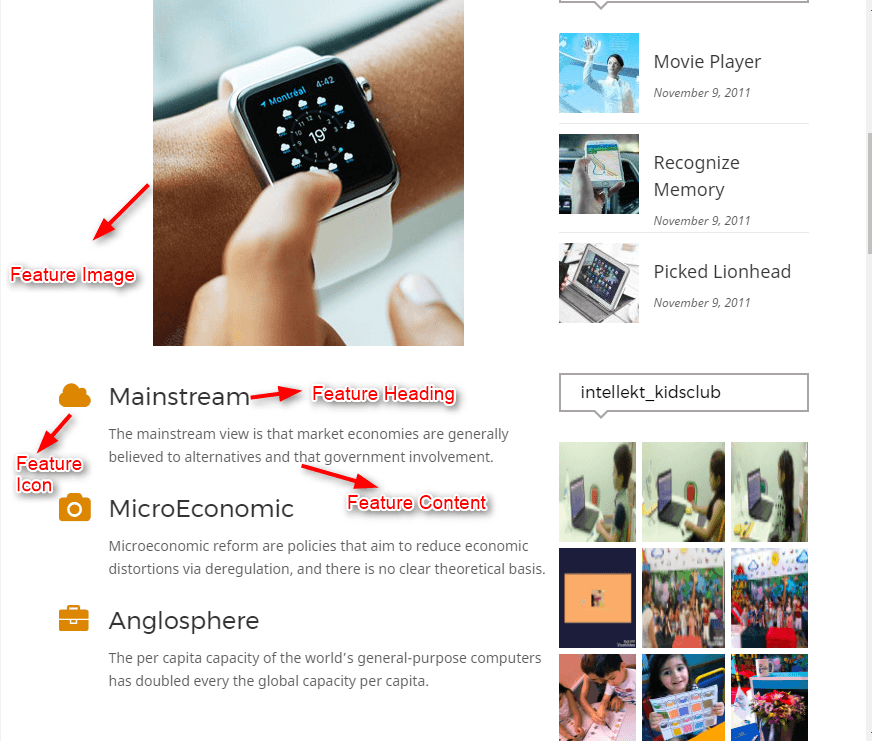
“Homepage Feature Section Settings” allows you to publicize your images with heading and description into three different columns.
You can show/hide your Homepage Feature Area by clicking on/off option.
Note :
To display icons in the feature section, use font awesome icon code. You can refer the codes from this link Font-Awesome-Icons. Write Icon Class and choose your required icons.
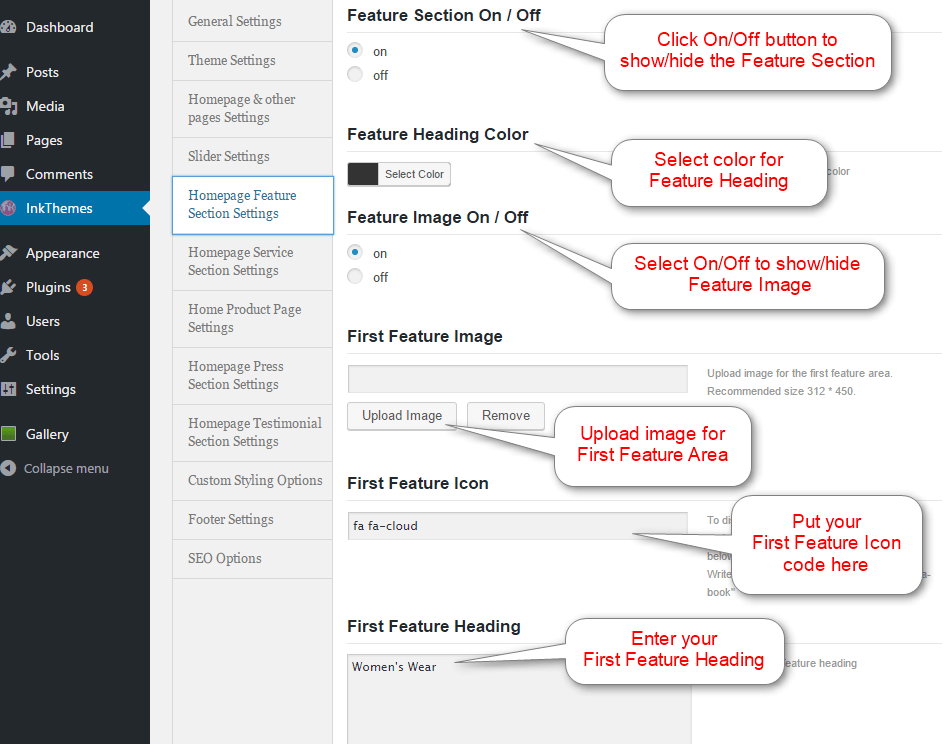

Similarly, continue the same process of filling the required information for First & Second Feature. After that, click on “Save All Changes” option then, Refresh your homepage and the content will be shown on your front end.
6. Homepage Service Section Settings
Dashboard > InkThemes > Covera PRO V2 Options > Homepage Service Section Settings
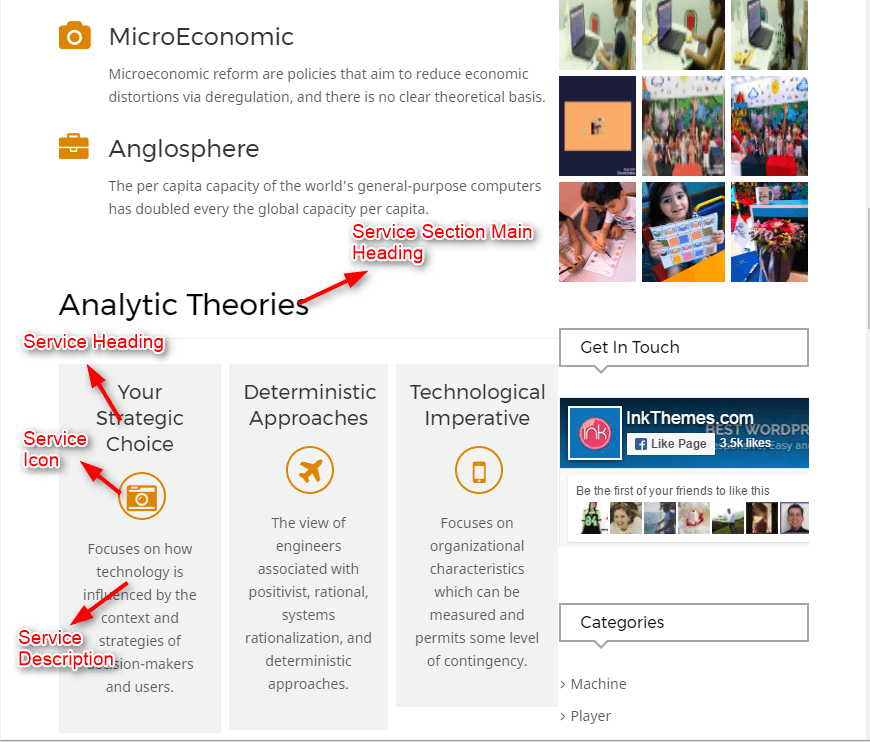
Using Covera PRO V2 Theme you can flaunt your services in aneye-catchyy way with the help of Homepage Service Section Settings. This theme provides you four different service section that you can setup varying upon your own requirements.


Repeat the same procedure that was followed for First Service Feature and change the settings of other three Service Features in the same way. After that, click on “Save All Changes” and Refresh the homepage, to make the above settings visible on your front end.
7. Homepage Product Settings
Dashboard > InkThemes > Covera PRO V2 Options > Homepage Product Settings
Note:
The information regarding WooCommerce Plugin is mentioned below in Step:7 under the heading “Notes”.
The “Homepage Product Settings” of Covera PRO V2 Theme, allows you to showcase your number of products with a suitable heading which further helps you to increase traffic for your website.
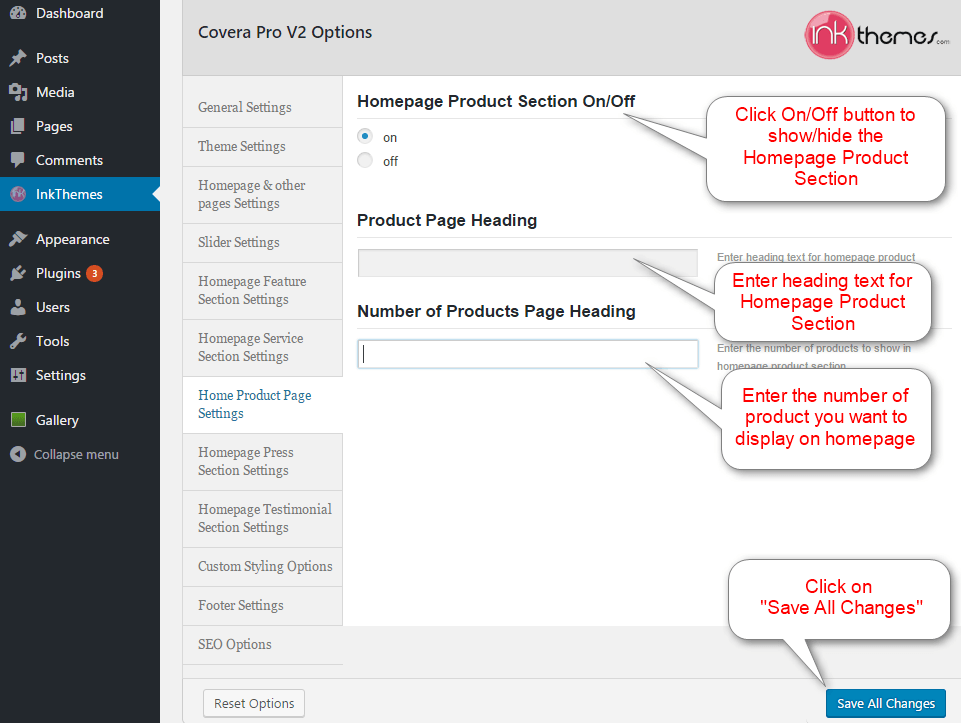
After Saving the settings, Refresh your homepage to see the above changes of your Homepage Product Section in the front end.
8. Homepage Press Section Settings
Dashboard > Inkthemes > Covera PRO V2 Options > Homepage Press Section Settings
“Covera Pro V2” theme offers you a Press Section on the homepage to feature all your blogs in a different astonishing layout. You can show/hide your Press Section Area by using On/Off Option in the settings and select the required number of press to show in your homepage carousel slider.
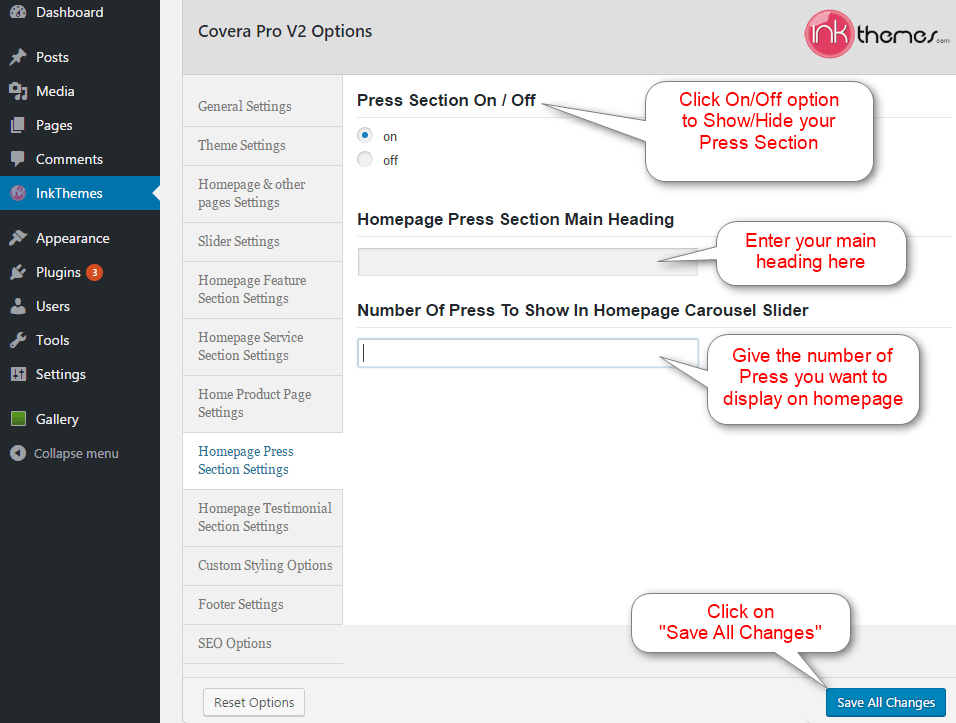
After saving all the changes, Refresh your homepage.
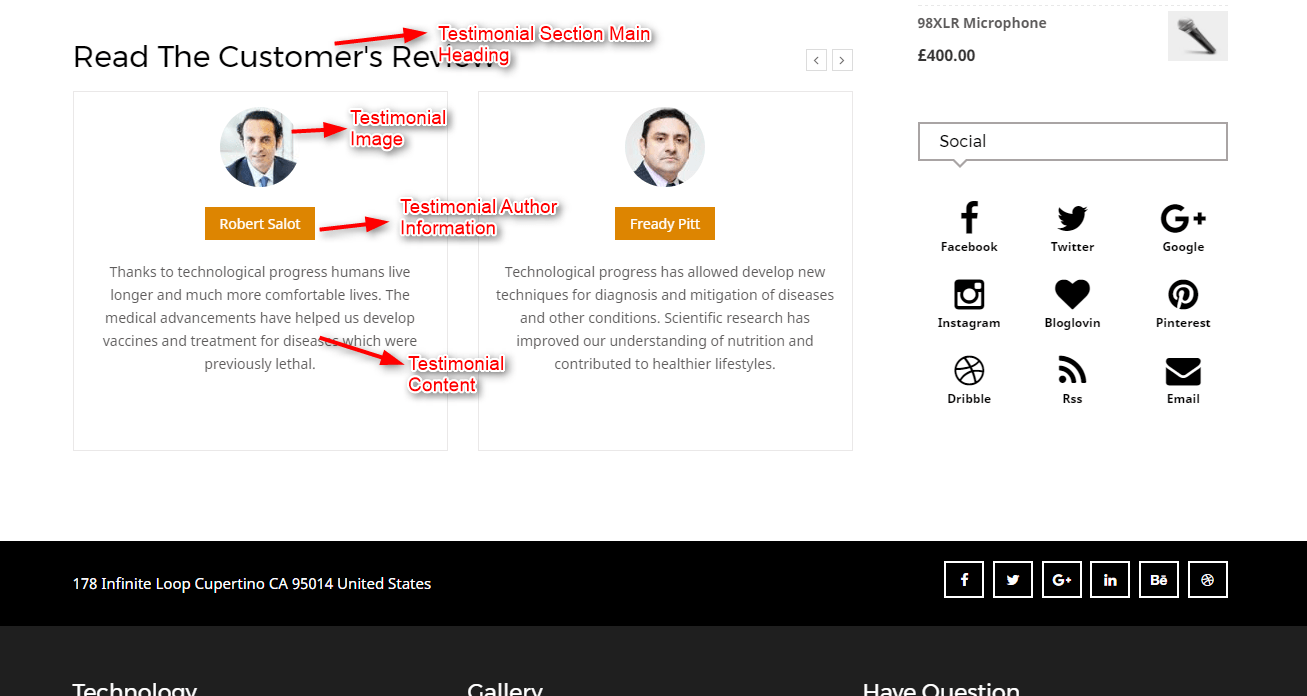
9. Homepage Testimonial Section Settings
Dashboard > InkThemes > Covera PRO V2 Options > Homepage Testimonial Section Settings
Follow the same procedure of filling the required options of Covera PRO V2 Theme and then, click on “Save All Changes” option. After this, Refresh your homepage to view the changes in the front end.

10. Custom Styling Options
Dashboard > InkThemes > Covera PRO V2 Options > Custom Styling Options
Covera Pro V2 template provides you with “In-built Custom CSS Option” in the Custom Styling Options, using which you can quickly add some CSS code to your theme.

11. Footer Settings
Dashboard > InkThemes > Covera PRO V2 Options > Footer Settings
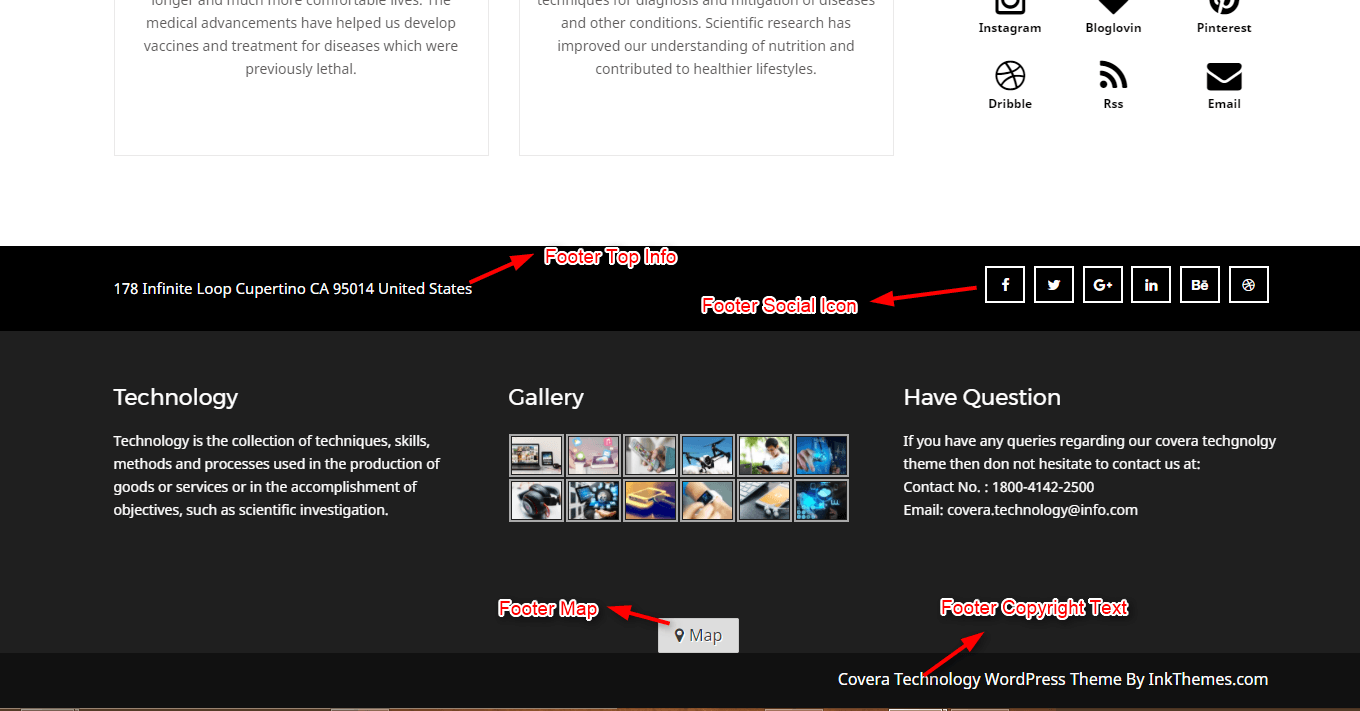
Under “Footer Settings” you can add background and content color to your Footer Top. You can also enter the link of your Social Network’s Profile, and it will automatically display the respective Social Icons that will allow your users to connect with you directly by clicking on the added social icons that are displayed in the Footer Sidebar.


After changing your Footer Settings, click on “Save All Changes” button and then, Refresh your homepage to further view the changes.
12. SEO Options
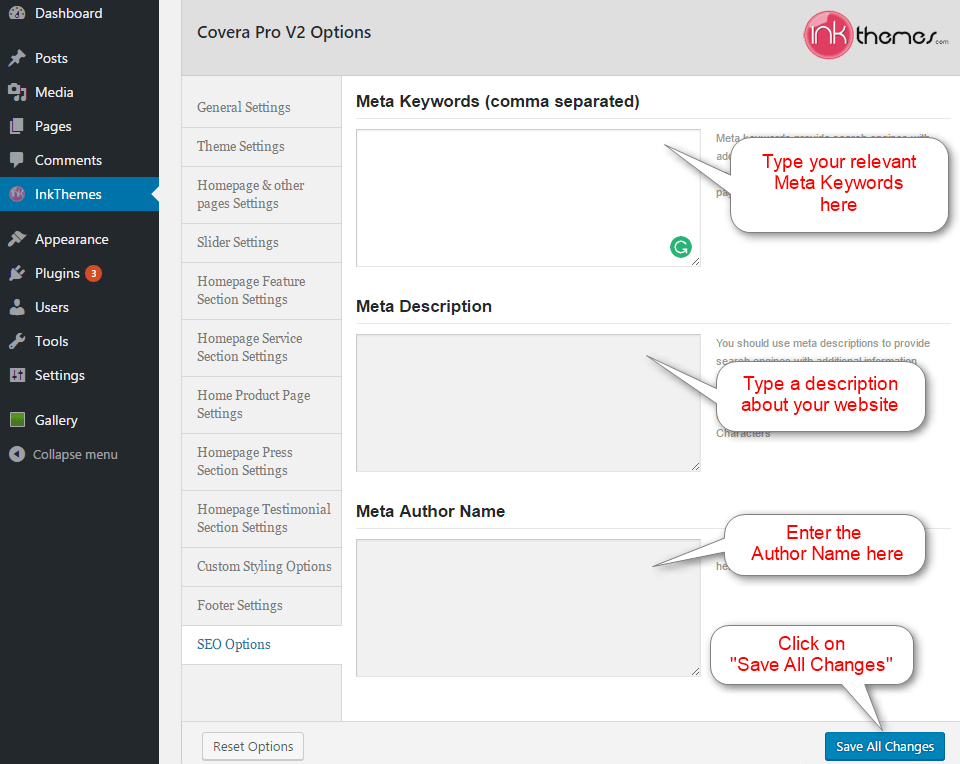
Dashboard > InkThemes > Covera PRO V2 Options > SEO Options
Covera PRO V2 Theme provides you with “In-built SEO Options”. SEO options helps to increase the amount of visitors to a website and give high ranking in the search result page of a search engines.
13 Creating New Post :
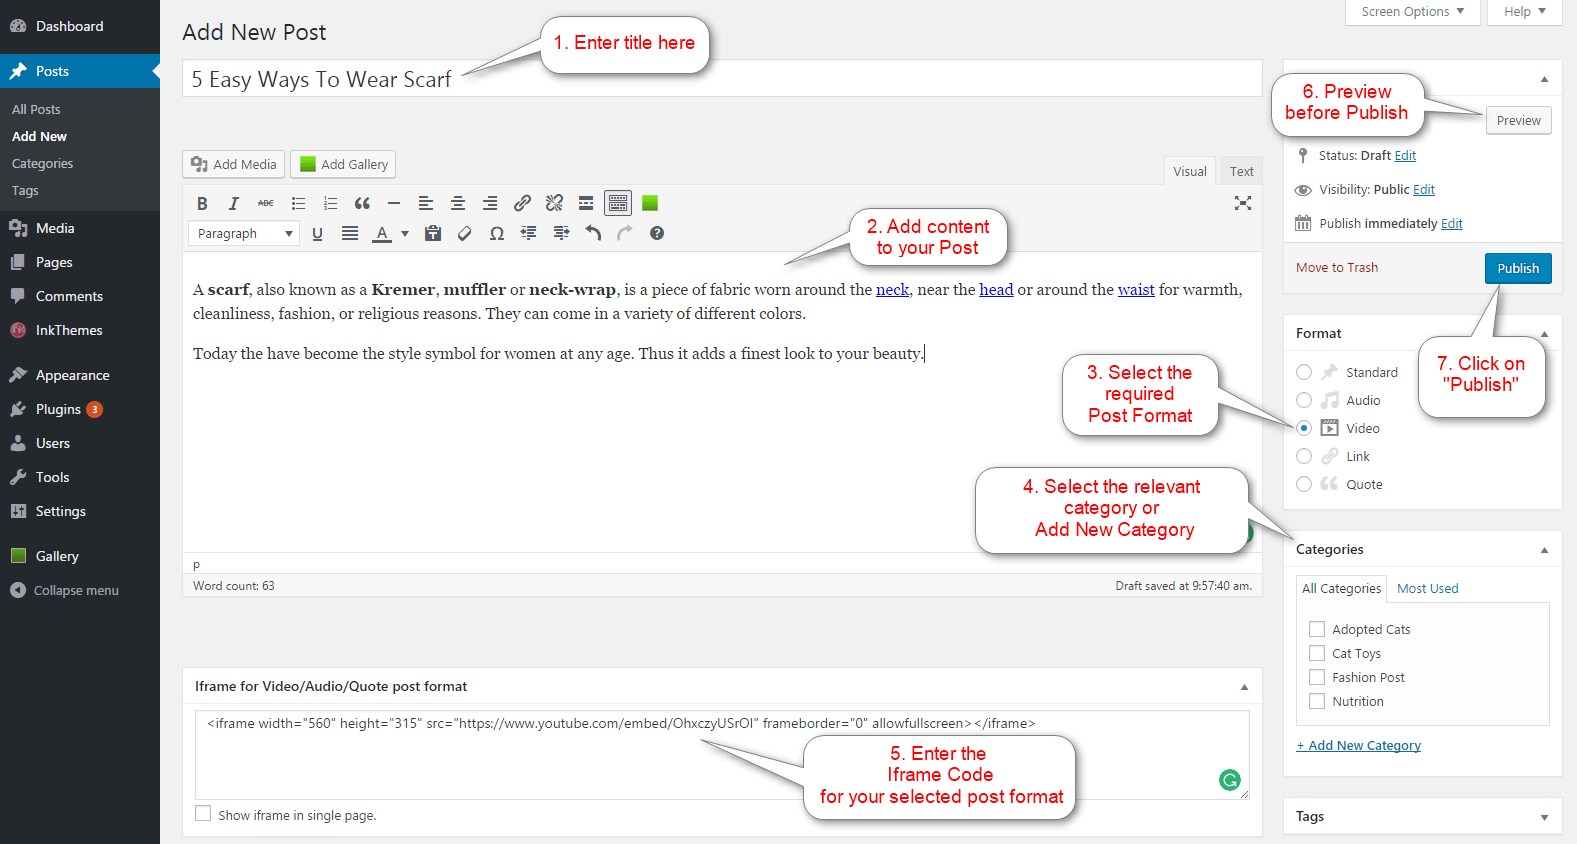
For creating a new post, just go to “Posts” and click “Add New” from the “Dashboard” and start filling the required fields.
Dashboard ➨ Posts ➨ Add New

14 Building Pages :
A. Gallery Page –
Gallery Page is the place where you can exhibit works of art. To create the Gallery Page follow these steps :
Dashboard ➨ Pages ➨ Add New
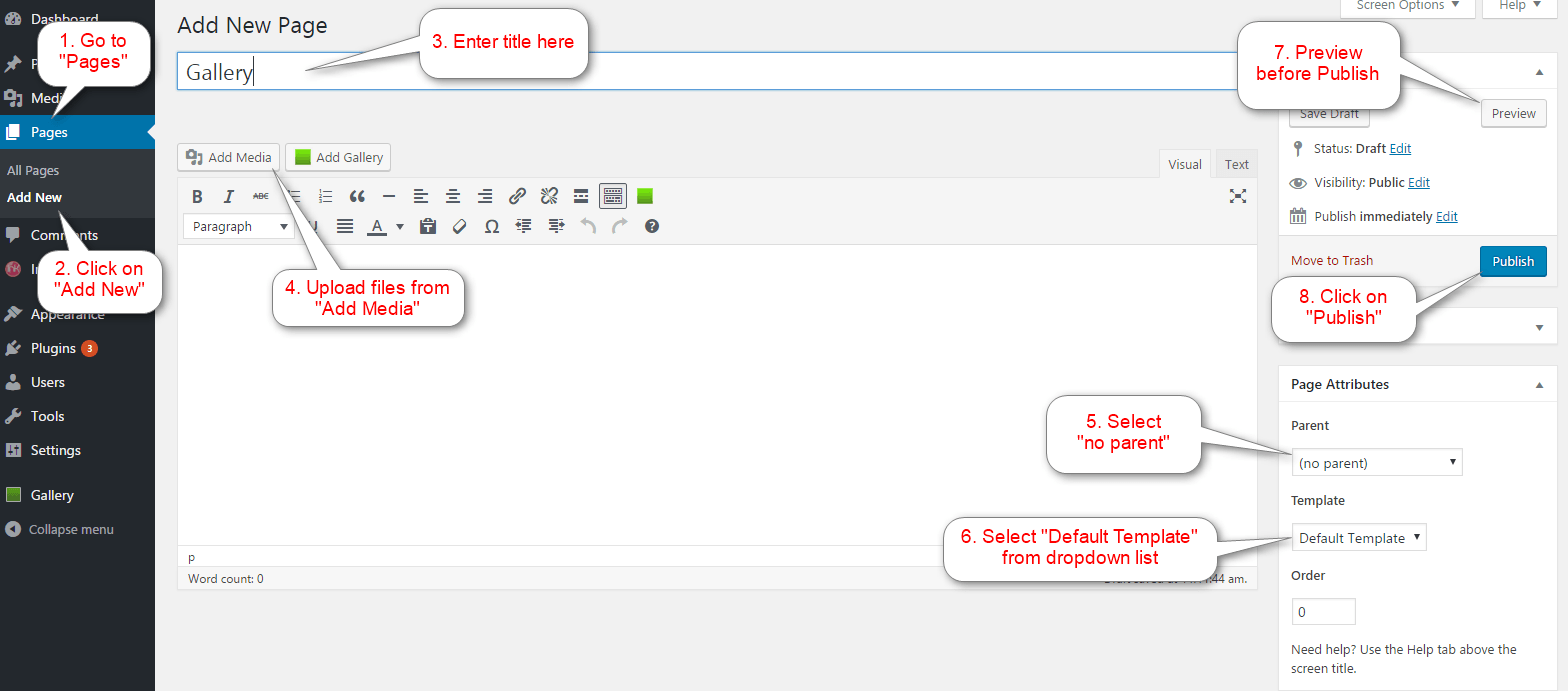
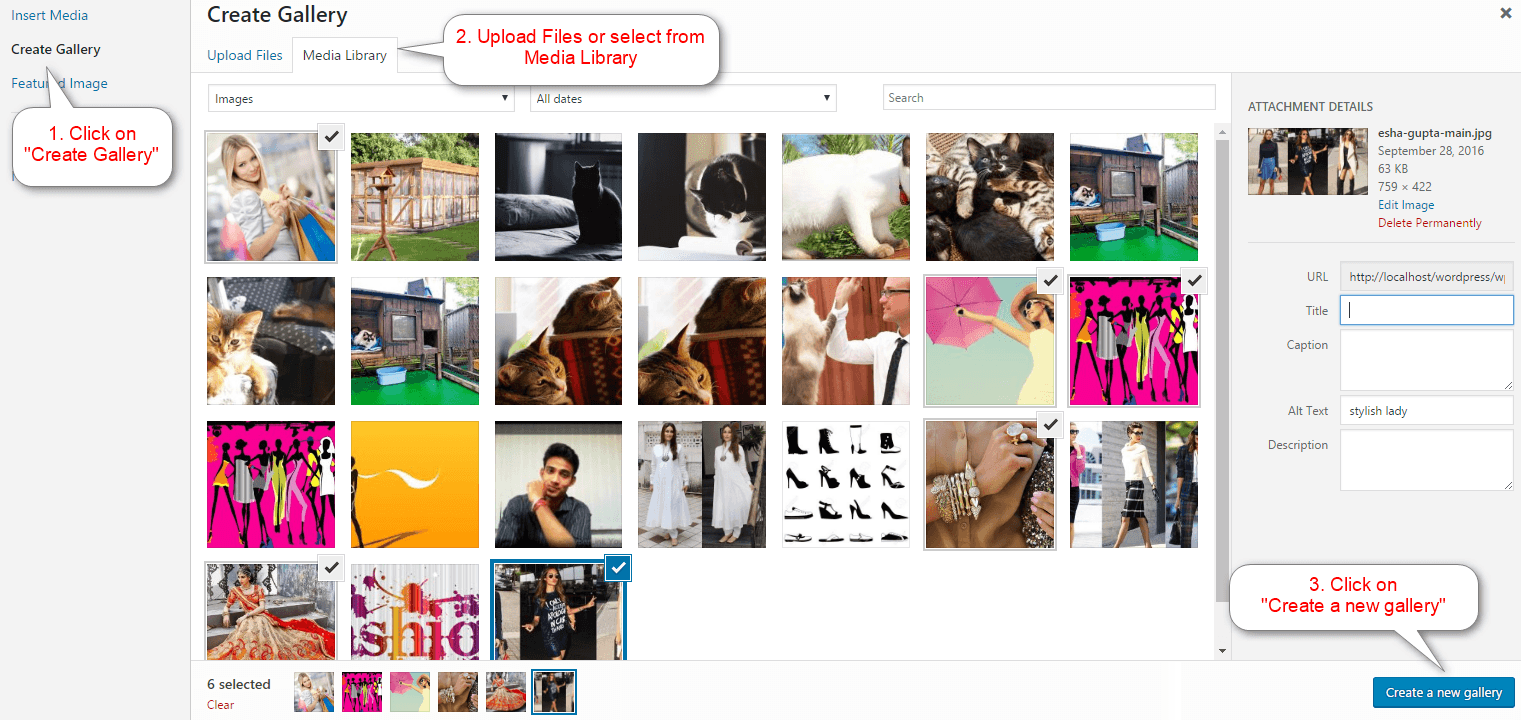
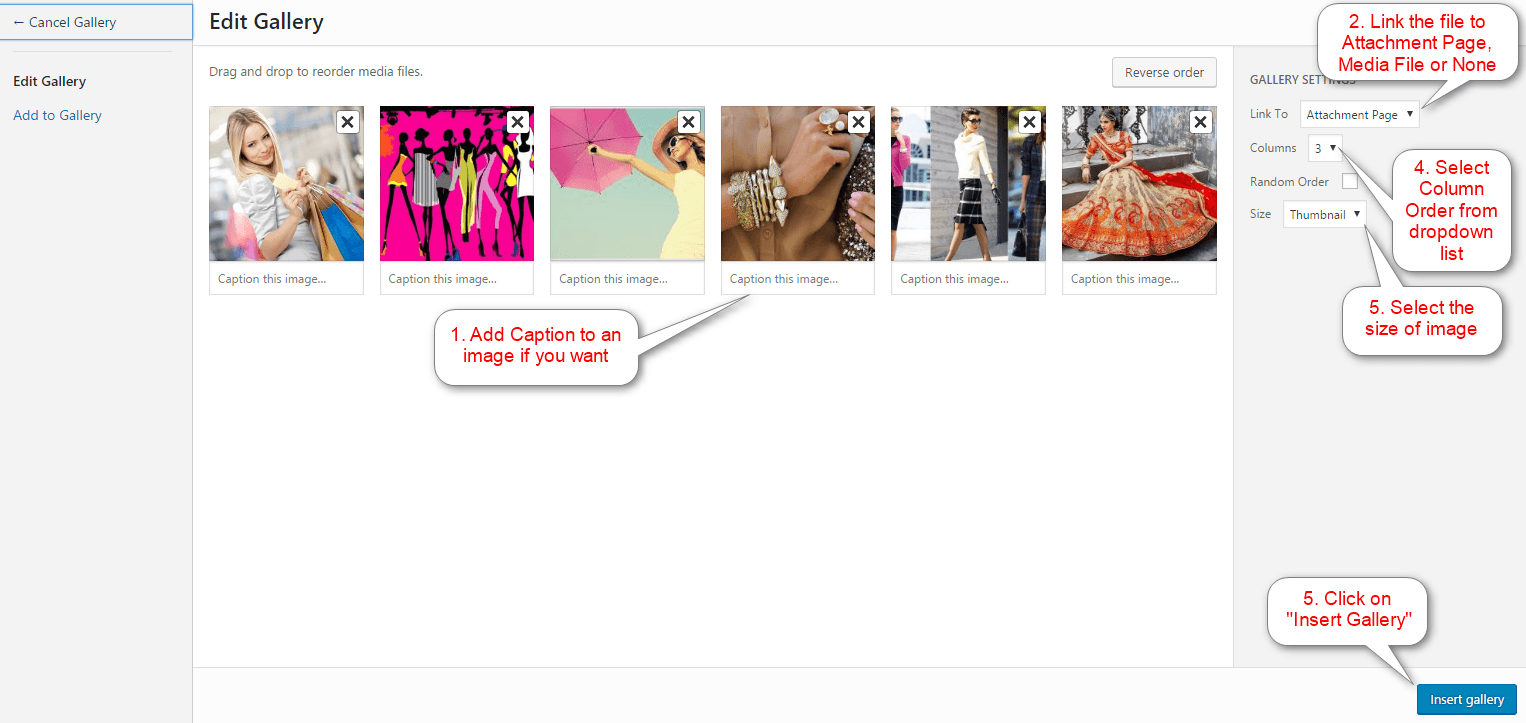
While making the Gallery Page, after clicking on “Add Media”, “Create Gallery” window will appear, this option will further help you to create gallery. Follow the process given below in the picture.
B. Blog Page –
Blog page showcase all your blog posts in a separate page. To create a blog page all you have to do is select the appropriate Blog Template from the Page Attributes.
Dashboard ➨ Pages ➨ Add New

15. Contact Page :-
For creating a Contact Page you simply have to go to “Pages”, click on “Add New” option and from the Page Attribute select the appropriate “Contact Page Template”.
Dashboard ➨ Pages ➨ Add New

16. Building Custom Menus :-
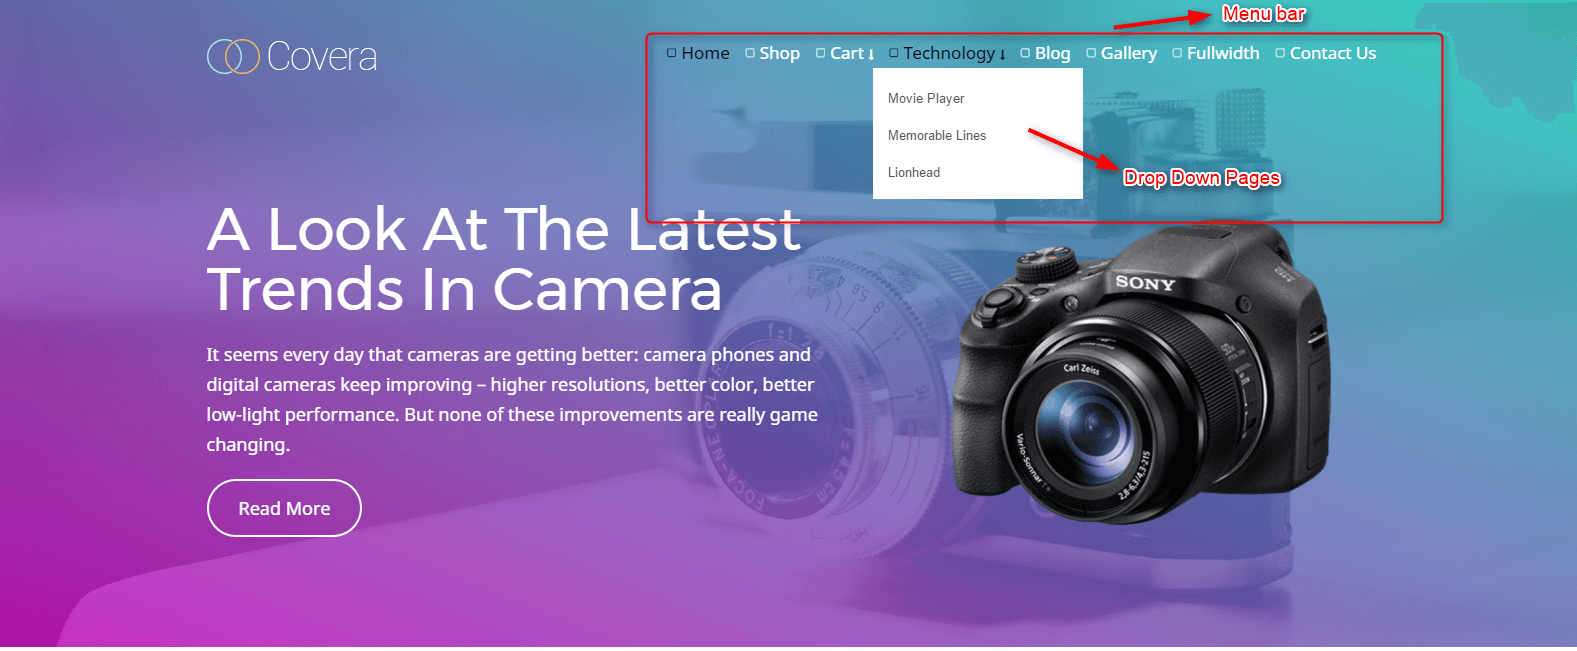
Covera PRO V2 Theme has an inbuilt feature of displaying all the pages in the menu. But it also entitles you to create a custom menu by using “Menu option” under “Appearance section”. Arrange the order of menus according to your requirement by simply “drag & drop” the menu items.
Dashboard ➨ Appearance ➨ Menus

17. Adding Widgets :
To make your website more informative and creative at the same time, Covera PRO V2 Theme provides you with “Widgets Option”. These can be used in the sidebar and in the footer as well.
Dashboard ➨ Appearance ➨ Widgets
A. How to add Widgets in Sidebar :
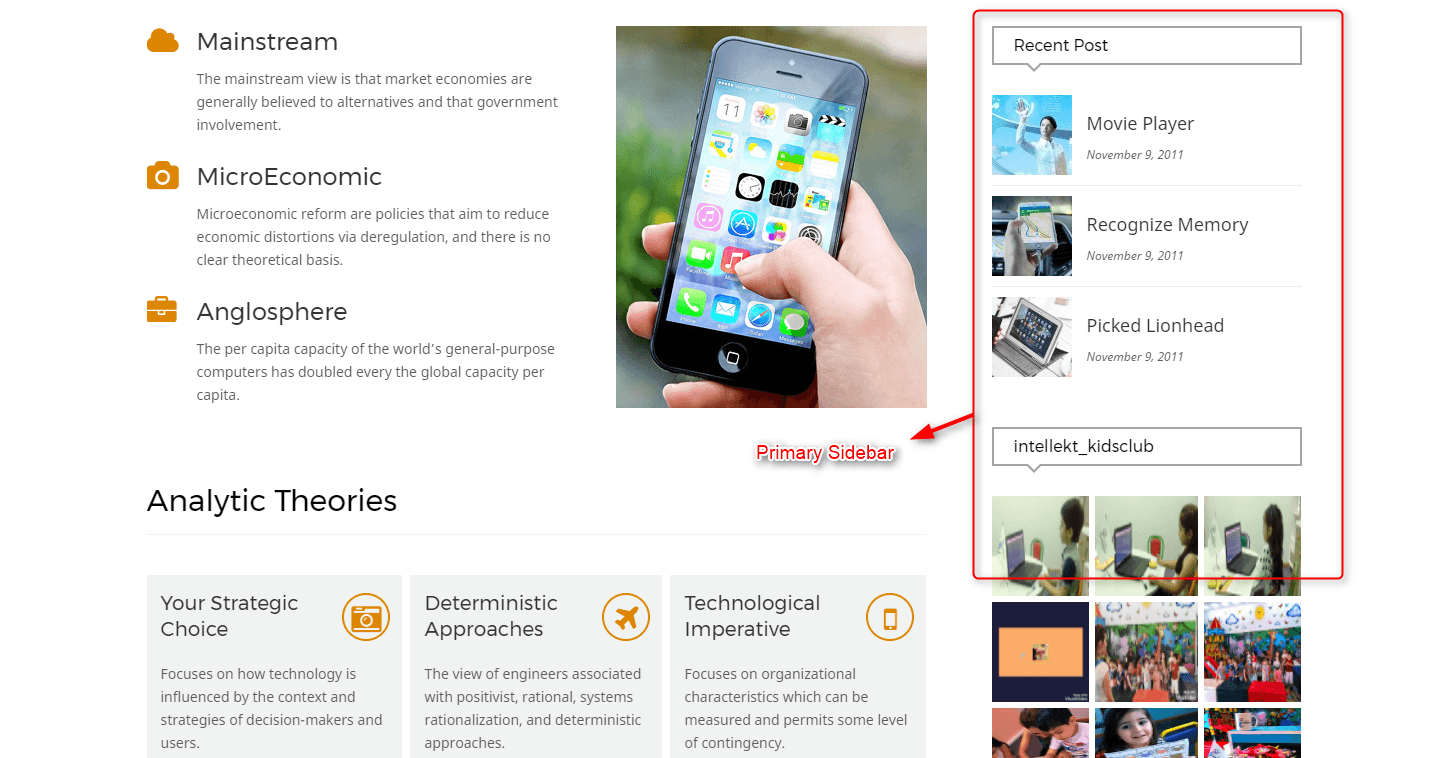
For adding “Widgets In Sidebar”, all you have to do is select Widgets option from Appearance panel then, “drag” widget of your need and “drop” it in the Primary Widgets Area. At the end, click “Save” button and your widgets are ready to use.

B. How to add Widgets in Footer :
For adding “Widgets In Footer”, same as sidebar widgets all you have to do is select Widgets option from Appearance panel then, “drag” the widget of your need and “drop” it in “first footer widget area, second footer widget area, third footer widget area” according to your requirement. At the end click save button and your widgets are ready.

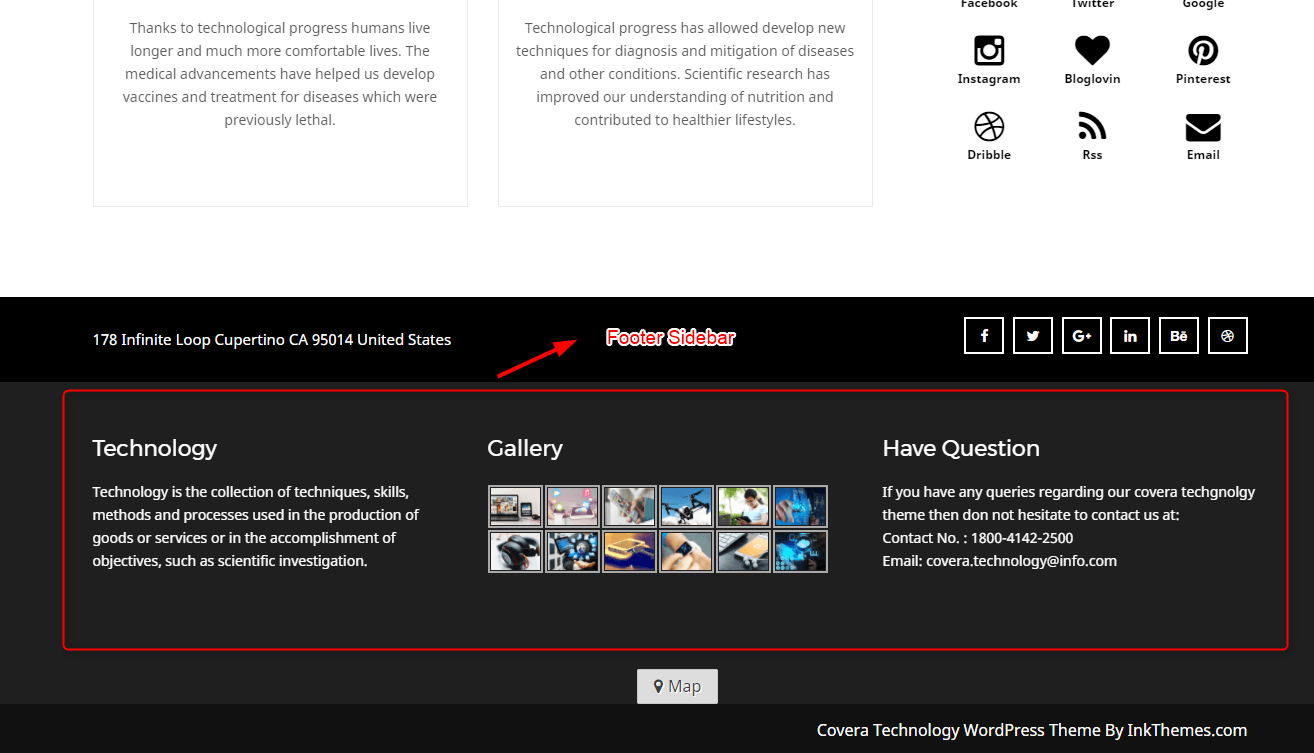
Under Covera PRO V2 Theme, you can show the desired Widget in the sidebar of your homepage.
Notes:
About WooCommerce Plugin:
WooCommerce is a powerful, extendable eCommerce plugin that helps you sell anything in a much more innovative form. First, you have to download the plugin through this link
https://wordpress.org/plugins/woocommerce/.
Then, go to Plugins -> Add new -> click on upload plugins and install it.
After installing you can learn about each and every menu option through WooCommerce documentation by visiting this link :https://docs.woocommerce.com/documentation/plugins/woocommerce/getting-started/
Thank You !
Once again, thank you so much for purchasing this theme. We’d be glad to help you if you have any questions relating to this theme. No guarantees, but we’ll do our best to assist. If you have a more general question relating to the themes on InkThemes, you might consider visiting the support forums and asking your question in the forum. If Required, You can also have the look at the Complete Video Documentation Available in the Members Area.


