Hunting for the mobile & user-friendly video template, if yes then you landed on the right page…
Nowadays video content marketing & trading are the new trends in the digital marketing and has gained tremendous popularity in the last few spans.
Start promoting & trading your videos work in the majority of your targeted audiences..
You can initiate this interesting video selling business with the innovative Subscribely Membership Theme, which is embedded with the powerful features and plugins by which you can showcase the creative work on the global level.
See how your video selling site will look like after a completion here
Firstly, you need to install the WordPress on your server. Here is a link provided below which helps you to know how to install WordPress.
Link- https://codex.wordpress.org/Installing_WordPress
After installing WordPress, “Dashboard” will appear consisting of various options which are actually a control panel of WordPress.
This Guide Covers The Following Sections:
1. Installing the Subscribely Membership Theme.
2. Installing the Ink Pricing Table plugin and InkMember plugin.
3. How to use Subscribely Membership Theme options?
4. How to use Ink Pricing Table plugin?
5. How to add a post?
6. How to building pages?
7. How to add Widgets?
8. How to build menus?
9. How to use InkMember plugin?
Installing Subscribely Membership Theme
After installing WordPress on a server, Subscribely Theme will take a minute for installation. You just need to select “Themes” from “Appearance” under the “Dashboard”. Just follow the simple process given below:
Dashboard ➤ Appearance ➤ Themes
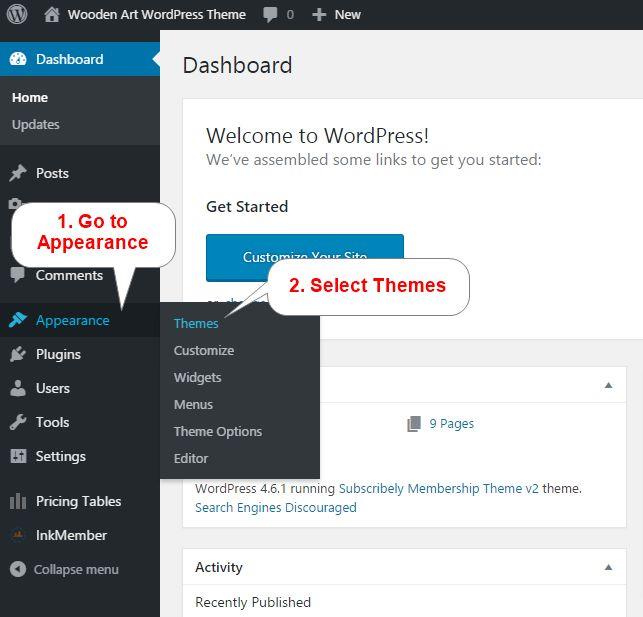
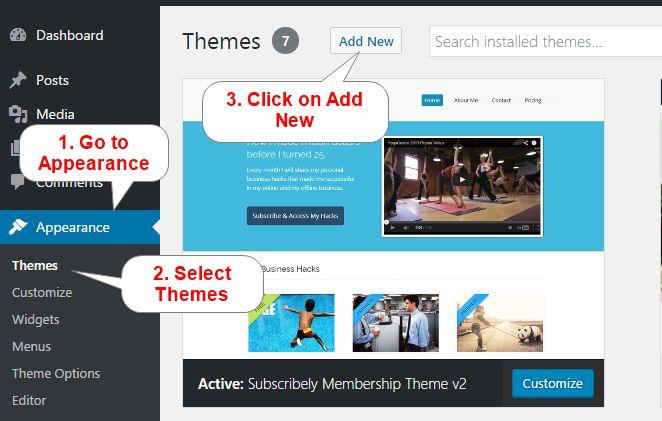
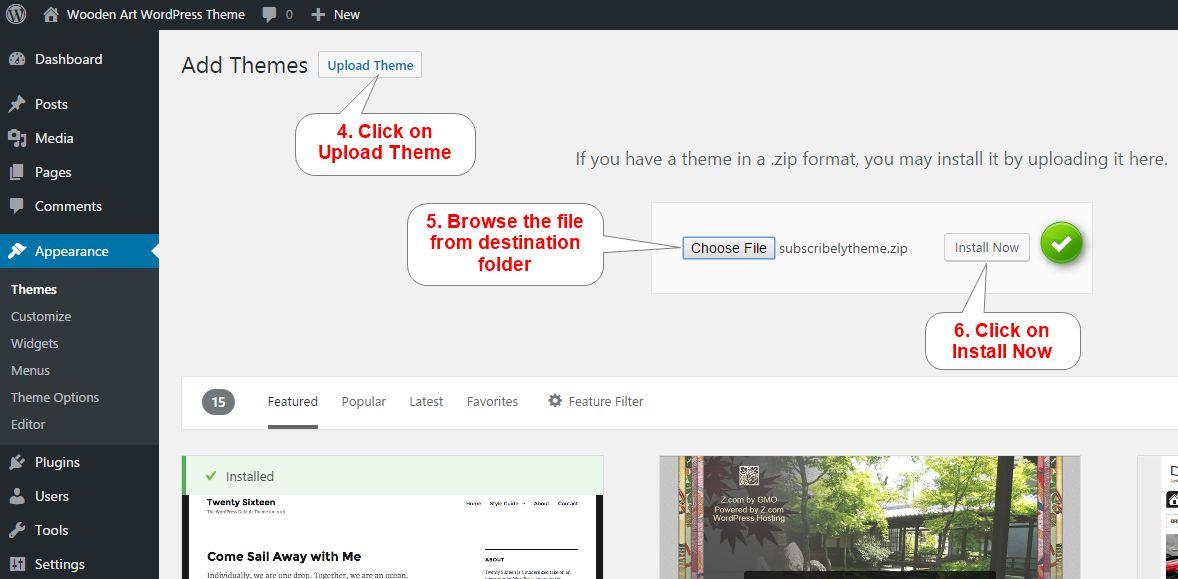
After selecting “Themes”, a new window will appear with some sample themes. From the same window, click on “Add New”, which leads to the next option “Upload Theme”. You can install the “Subscribely Theme” by uploading it from the destination folder and “Activate” it.
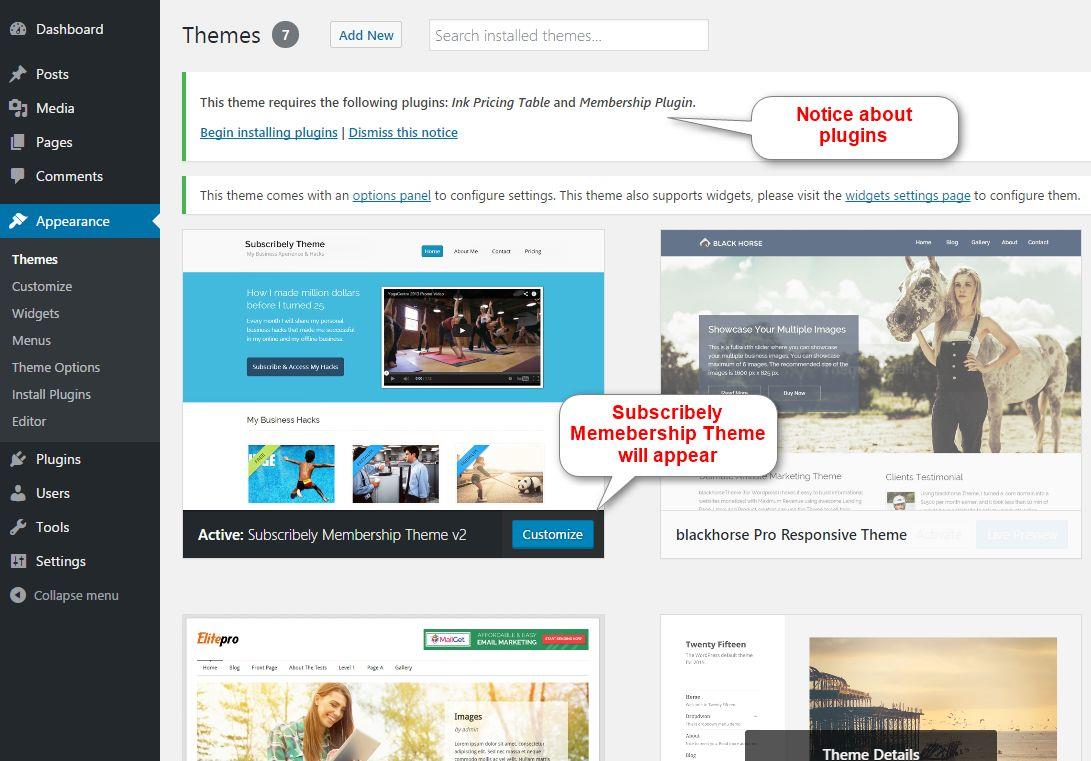
After installing the theme, the Subscribely theme will be added in the same Window. It will also notify you about the required plugins. So, don’t dismiss the notice because the Ink Pricing Table plugin and the InkMember plugin is a vital element for this theme.
Installing Ink Pricing Table Plugin and InkMember Plugin
This theme requires the Ink Pricing Table and the InkMember Plugin. You can install these plugins by clicking “ Begin installing plugins” from the “Theme window” panel. To install these plugins, follow the picture given below:
Dashboard ➤ Plugins ➤ Add New
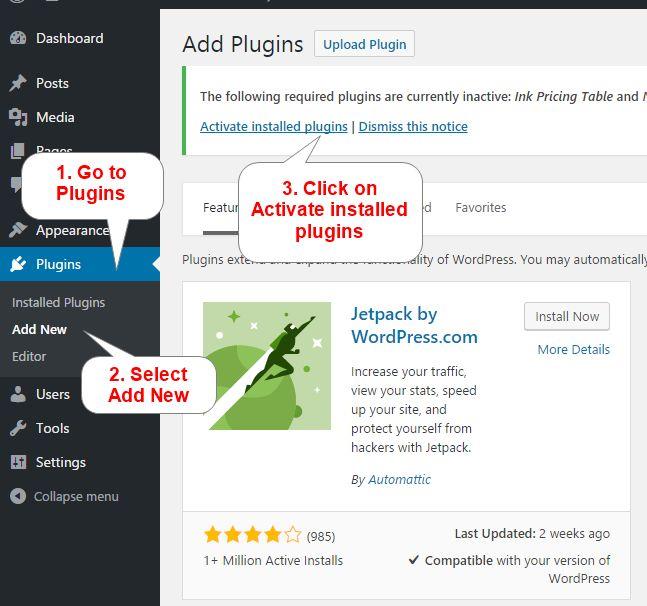
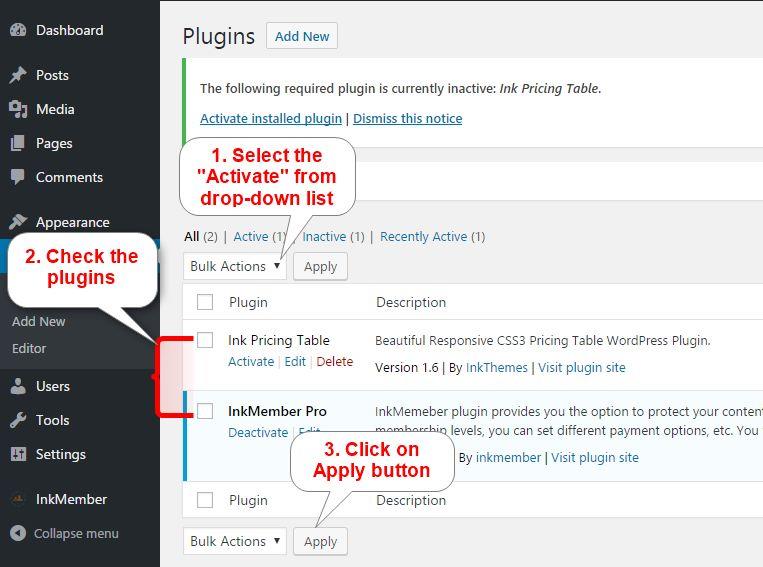
A New window “Install Required Plugins” will appear. You need to install and activate the plugins by checking them.
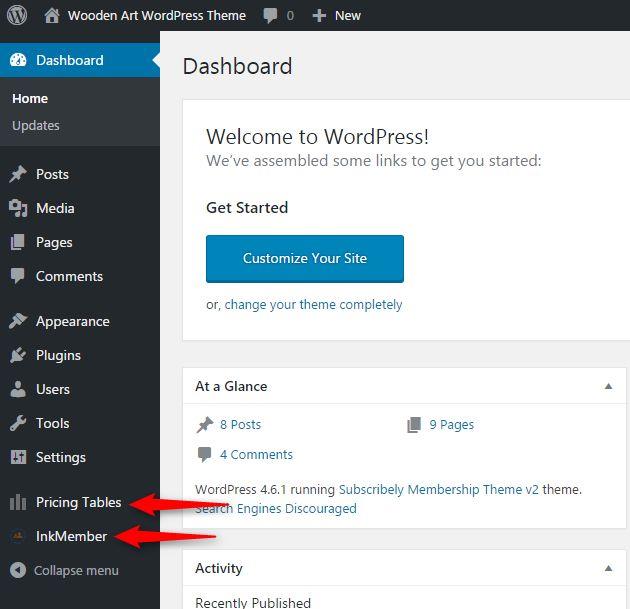
After installing plugins, the “Pricing Tables” option and “InkMember” option will appear at the bottom of the “Dashboard”.
Subscribely Membership Theme Options
Subscribely Membership Theme options panel allows you to change the General settings, Slider settings, Homepage settings, Styling, Footer settings etc. and also, provides you with the SEO options. To use Subscribely Membership options you need to select “Theme Options” from the “Appearance” section under “Dashboard”.
Dashboard ➤ Appearance ➤ Themes Options
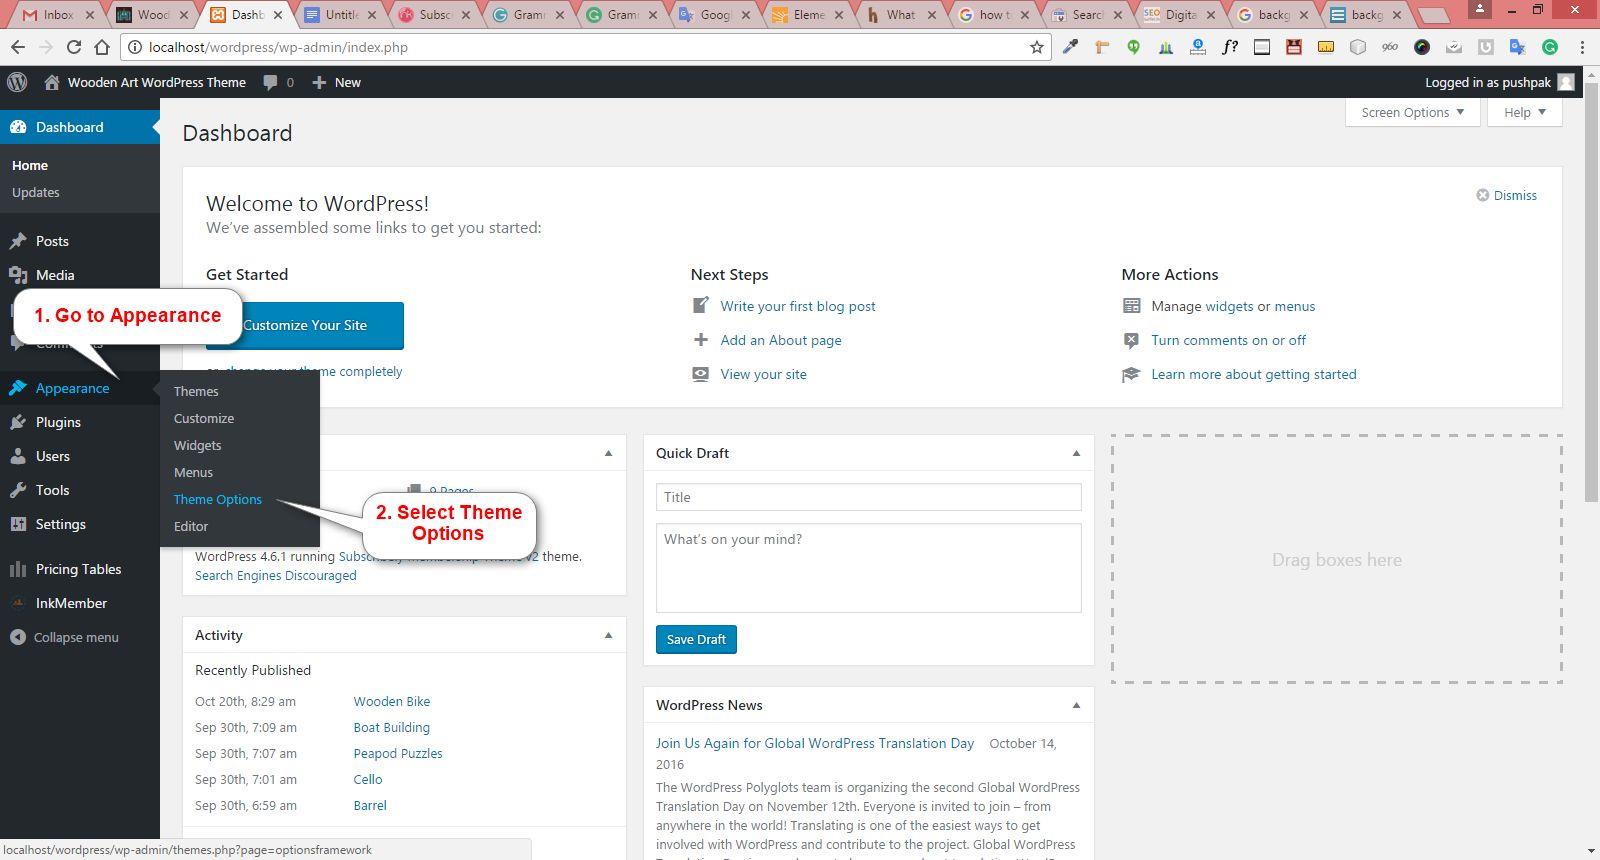
“Subscribely Membership Theme Options” window will appear.
- General Settings permit you to add a logo, banner image, favicon and background image simultaneously. You can add images by simple copy & paste the URL or by using the “Upload Image” button as well. After adding all the necessary images, click on “Save all changes” to see the results.
Moreover, with the “General Settings” you can also track your particular page by pasting “Google analytics (or other) tracking code” in a “tracking code field”. Follow the given process using General Settings:
Dashboard ➤ Appearance ➤ Themes Options ➤ General Settings
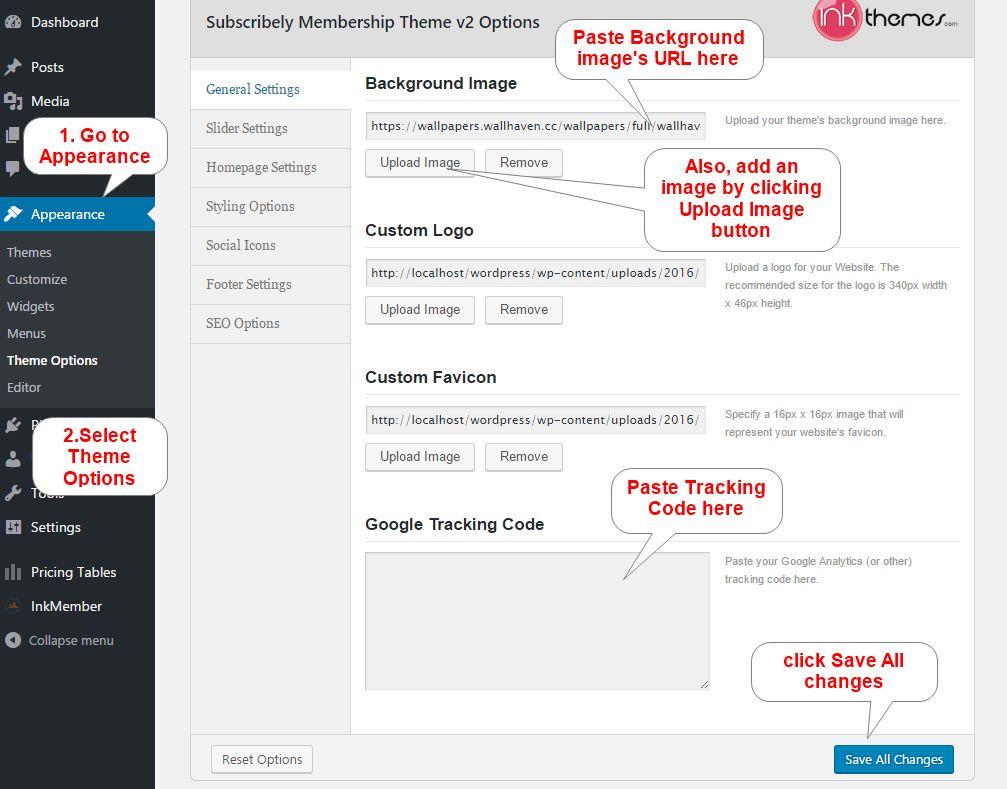
- Slider Settings: Subscribely Theme provides you five sliders to show the contents at the homepage. It requires the embed code in the “Slider Video Area” field for adding video in the sliders.
NOTE :-
How to get embed code: For an instance, you want to upload video from YouTube you will get the embed code from the “Share” option of the required video. Just copy the embed code and paste it in the “Slider Video Area” field of “Slider Settings”.
Dashboard ➤ Appearance ➤ Themes Options ➤ Slider Settings
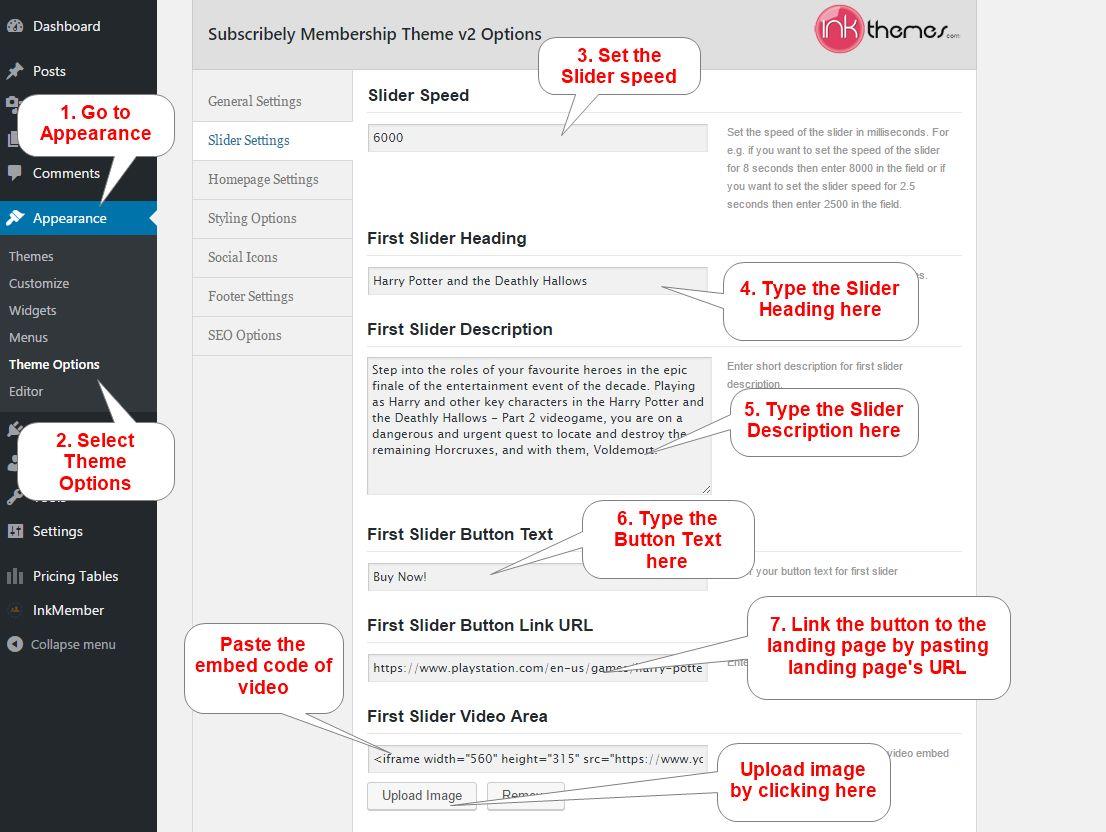
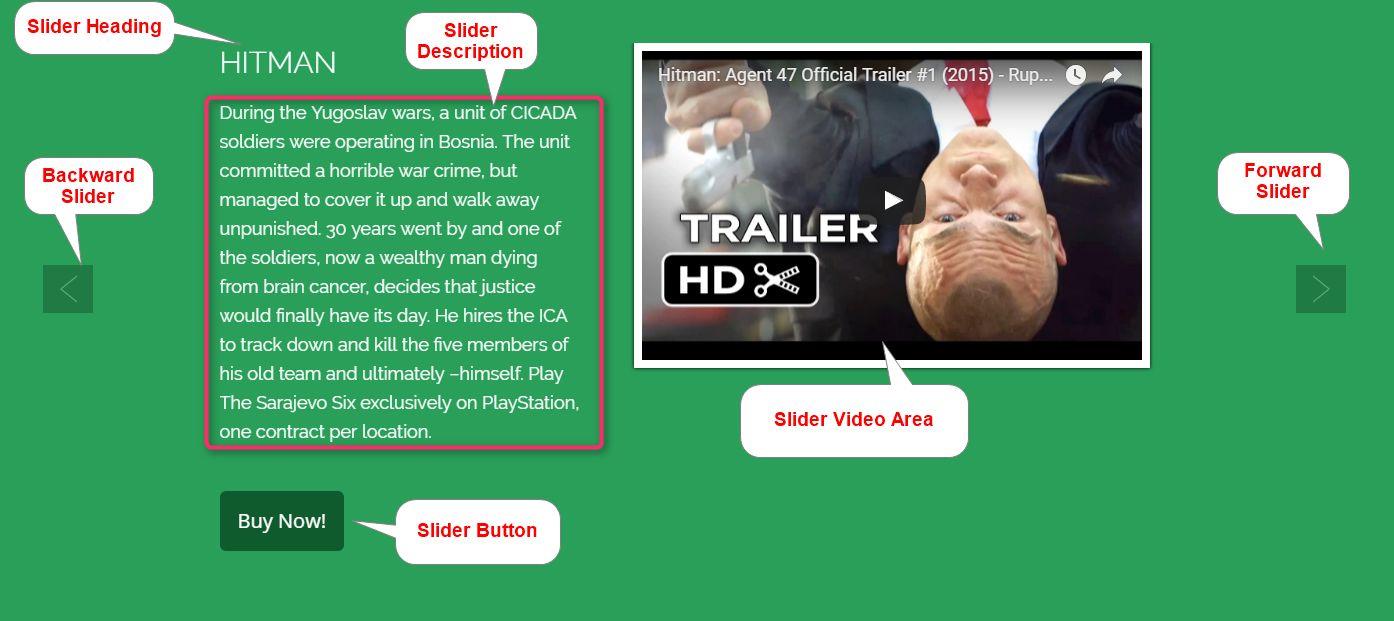
By the same process, you can make the rest of the sliders on the homepage. After adding all the necessary images, click on “Save All Changes” button. The display of front end with the changes shown below:
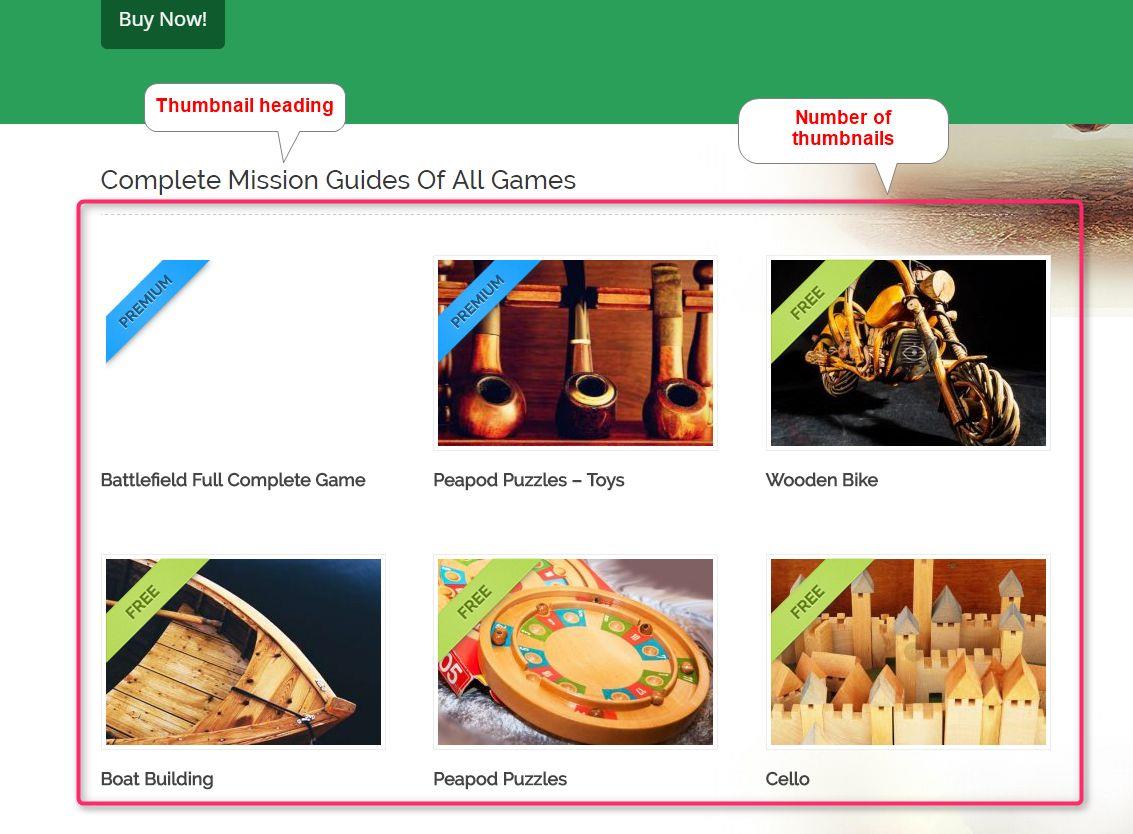
● Homepage Settings: Homepage settings will help you to customize the homepage of your website. You can add the thumbnail heading and set the number of thumbnails to be displayed on the website.
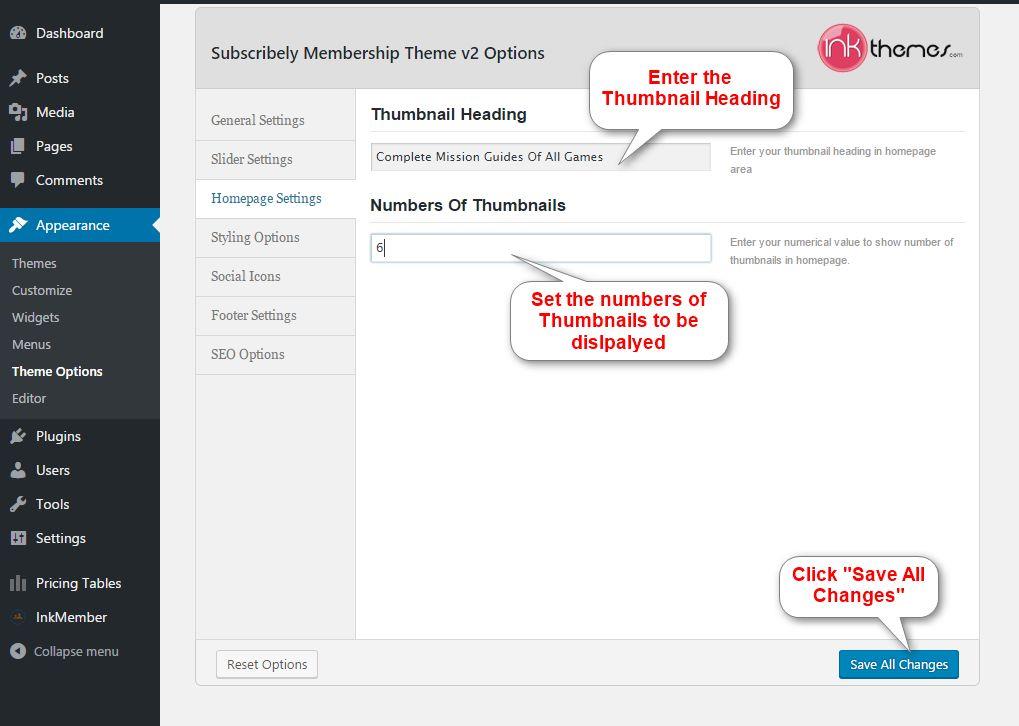
Your front end will appear like the picture given below:
- Styling Options: You can change the theme design of homepage with “Styling Options”. Subscribely theme provides 9 color options so that, you can choose any desired color. You can also add custom CSS to make a change in theme design.
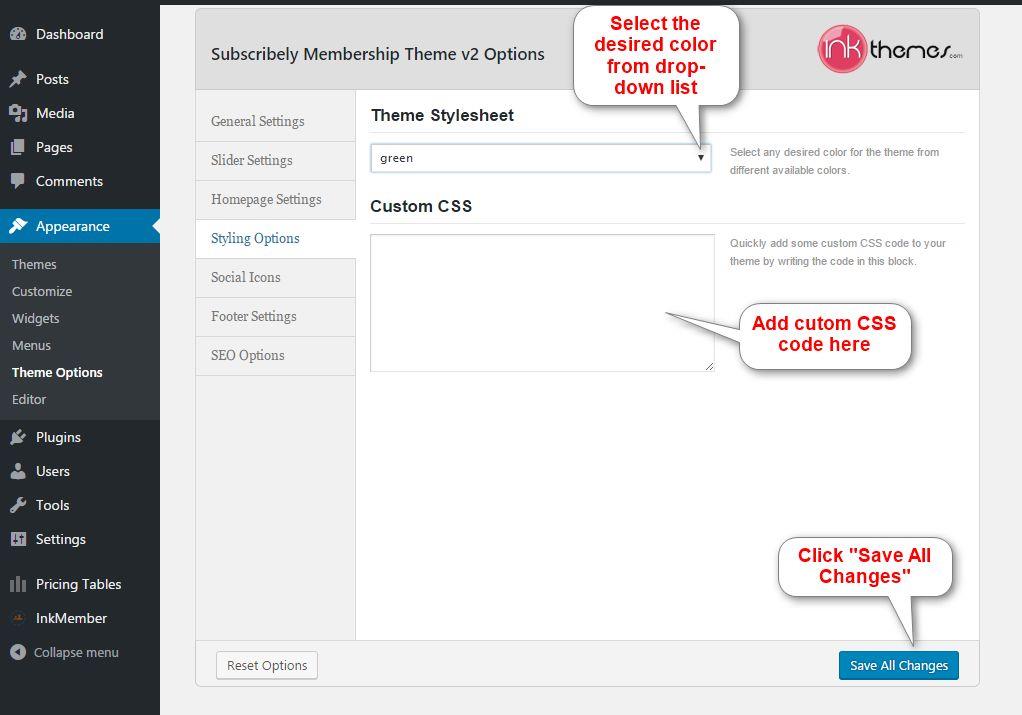
After making changes, click “Save All Changes” your linkable text will become in the selected color. It will also change the slider section in the selected color.
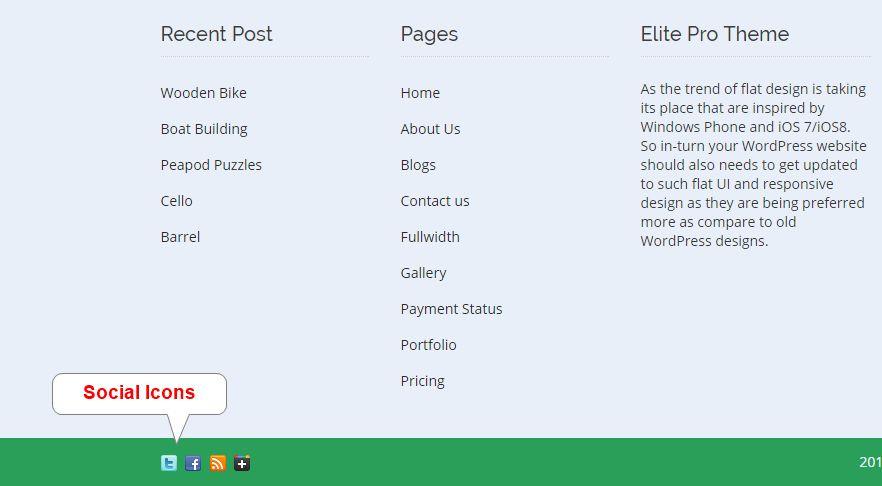
- Social Icons: You can give the links to your social contacts with the “Social Icons” option on your website. You can put the URL of your profile from Twitter, Facebook, RSS Feed and Google+ in the respective field and click “Save All Changes”.
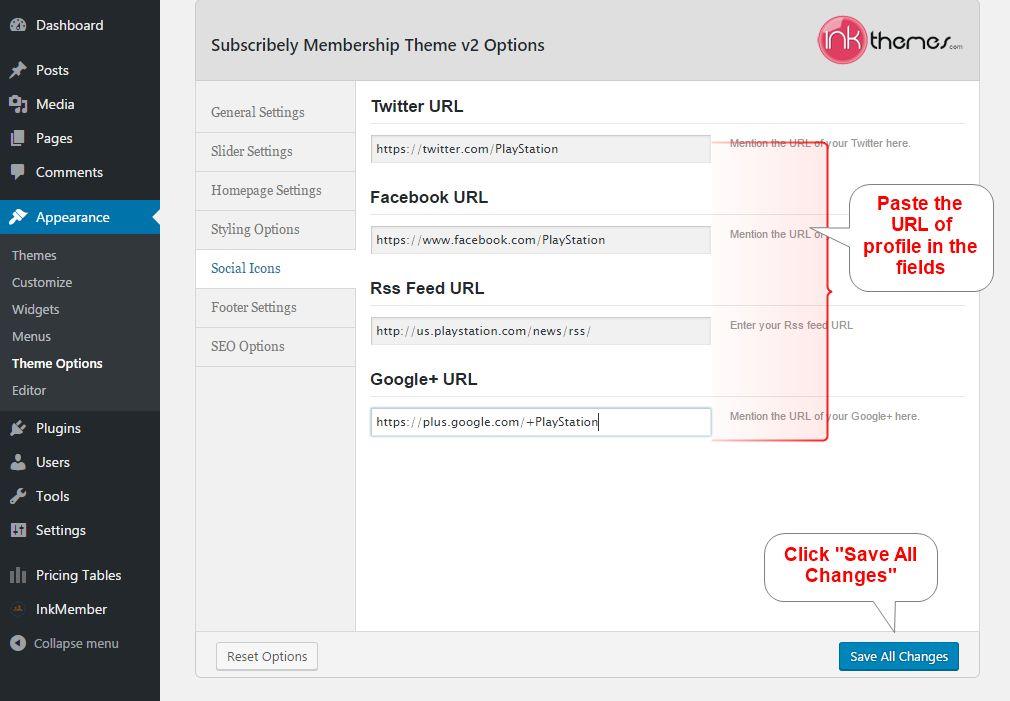
Social icons will appear at the bottom of the homepage. See Below:
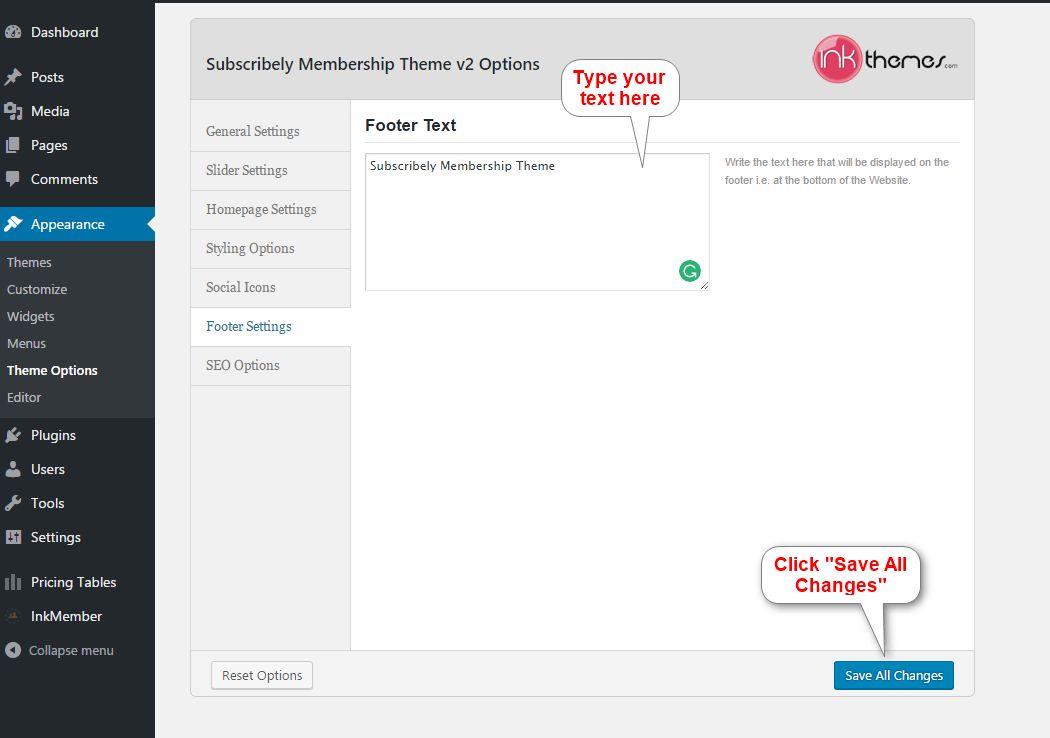
- Footer Settings: You can add text to the footer section of the website.
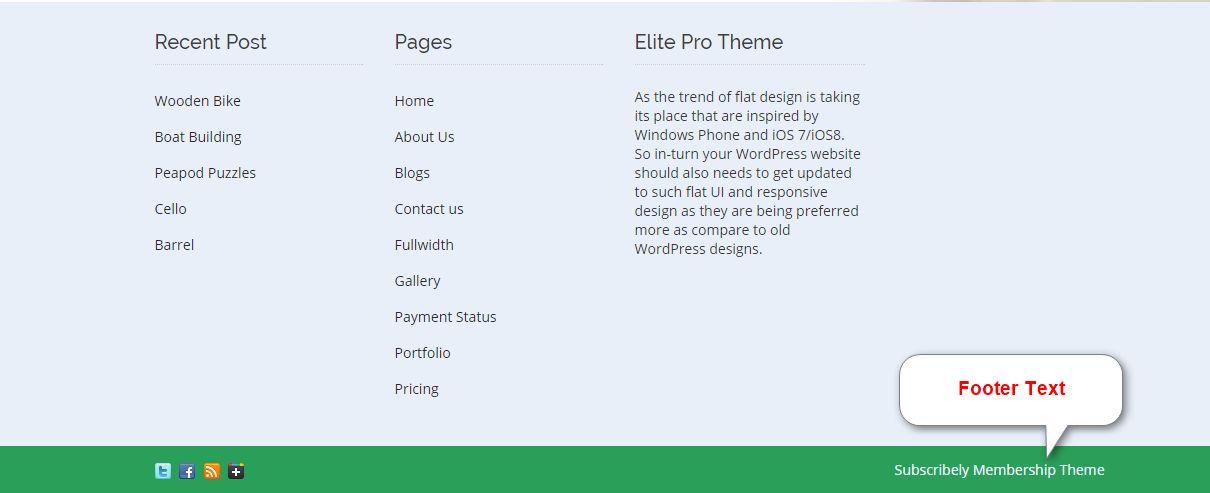
You can see the footer text at the front end.
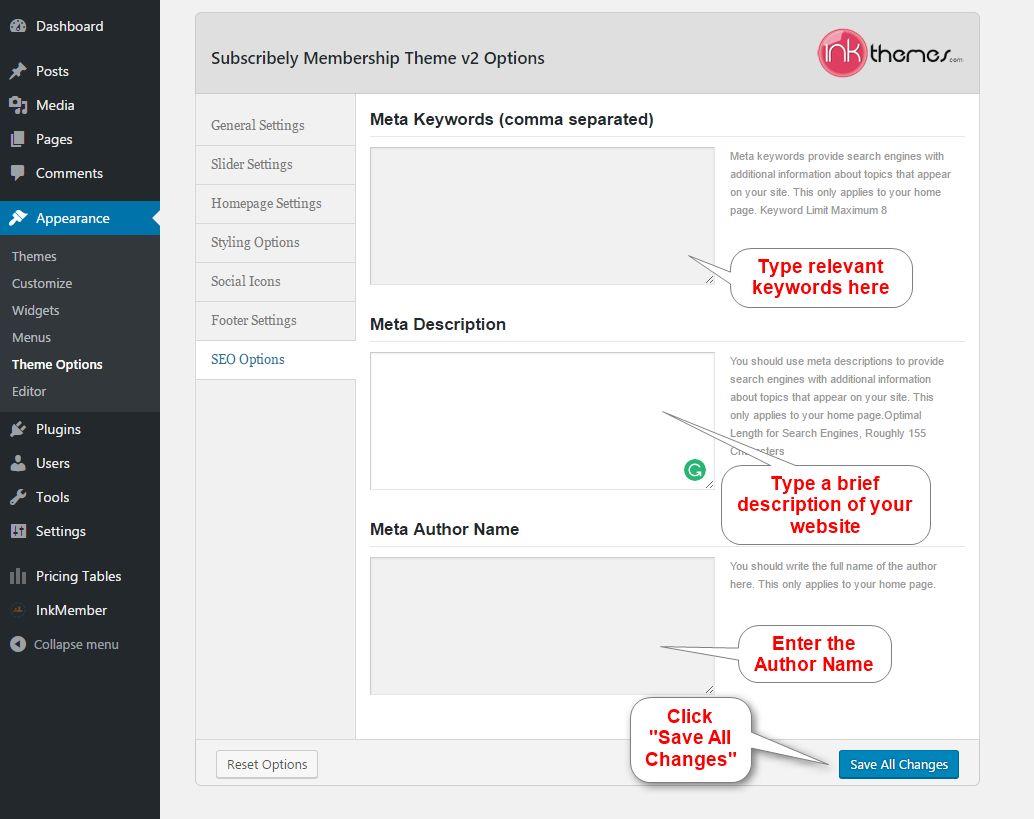
- SEO Options: Search Engine Optimization (SEO) is the tactics of getting your website to show up as a top result on Google and other search engines. SEO options of the Subscribely theme will aid you to increase the number of visitors to your website and give a high-ranking in the search result page of a search engine.
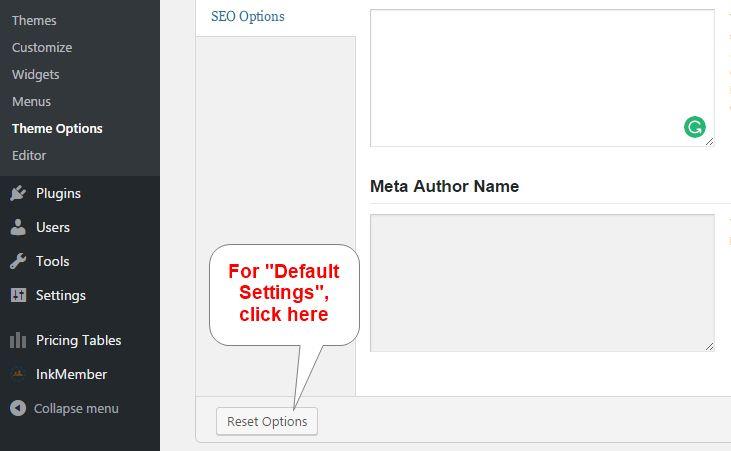
- Reset Options: By “Reset Option” of Subscribely Membership Theme, you can reset all the changes into the default settings which you made so far.
Ink Pricing Table Plugin
As we have already installed the Ink Pricing Table plugin above, so here, we are going to create the pricing table by following the process given below:
Dashboard ➤ Pricing Tables ➤ Add New
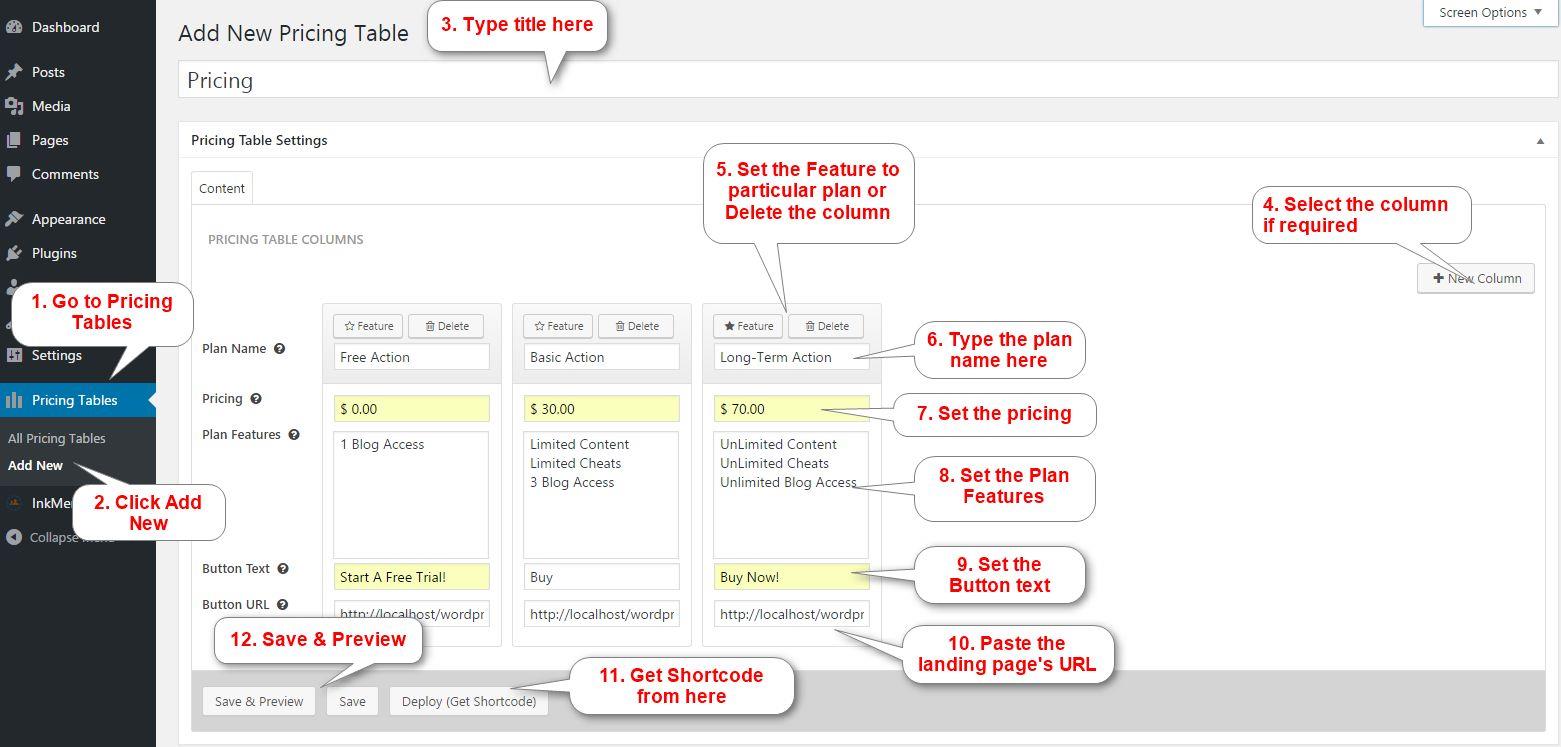
Note: You can get your shortcode from “Deploy (Get Shortcode)” button. The generated shortcode helps you to create a pricing page.
Adding Post
For creating a post, just go to “Posts” and click “Add New” from the “Dashboard” and fill the required fields.
Dashboard ➨ Posts ➨ Add New
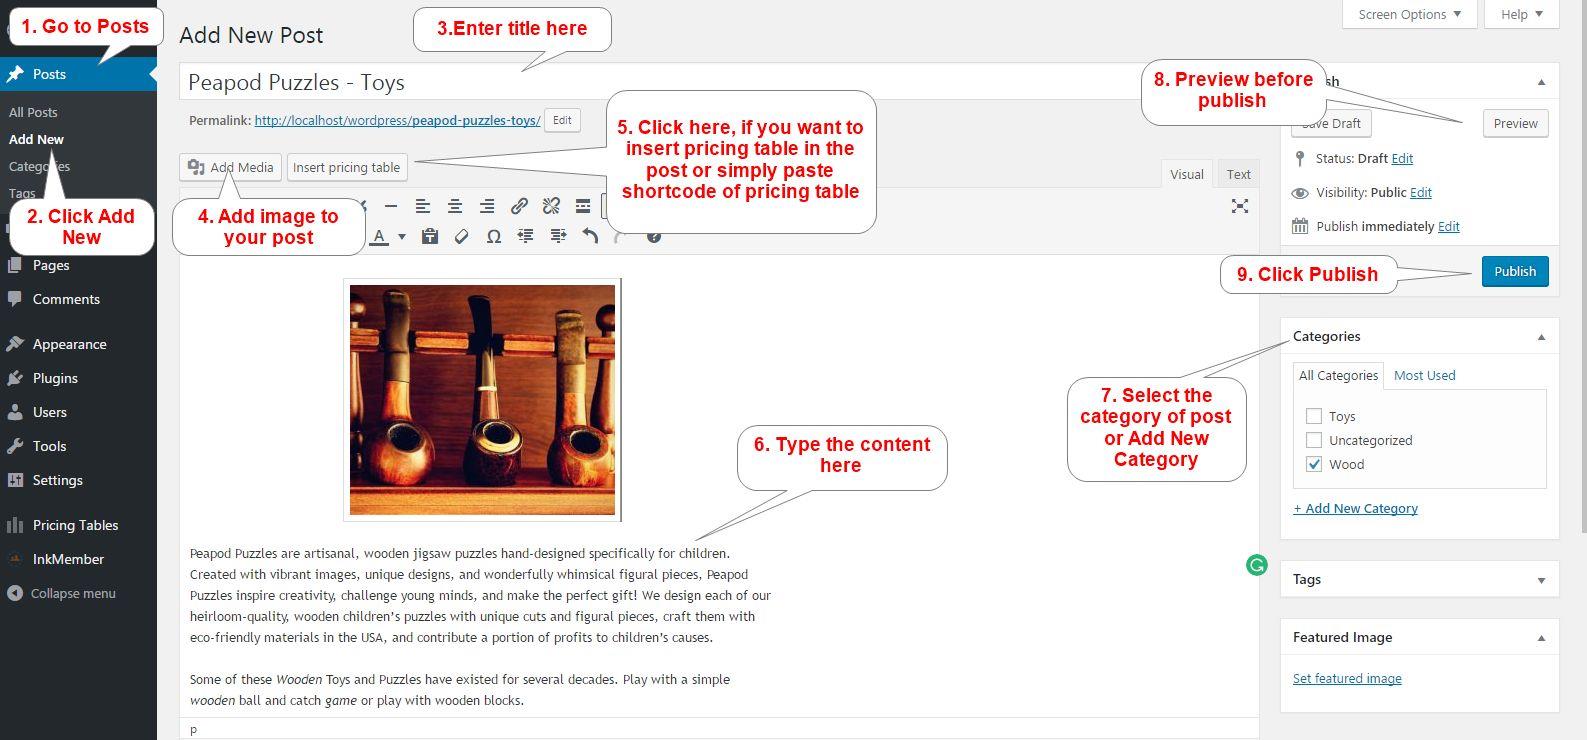
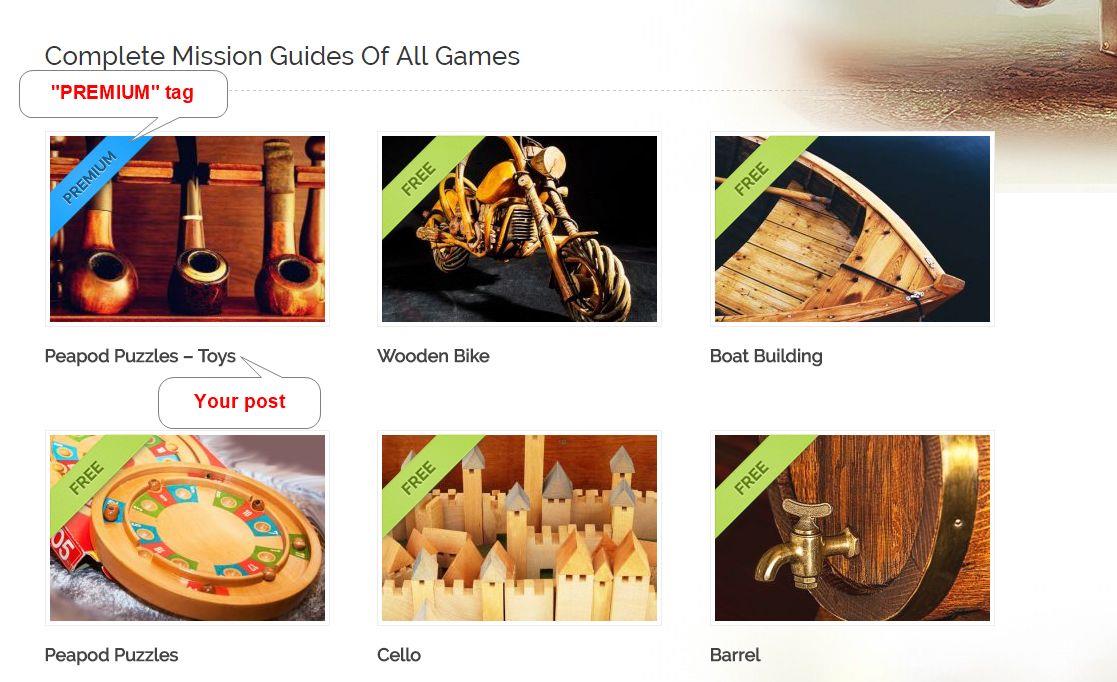
The picture given below shows you how to protect your content from free access. By selecting the checkbox of “InkMember Membership” section, it will put the “PREMIUM” tag to your post. So that, it will be accessible by paid subscriber only.

The post at the front end will appear like this:
Building Pages
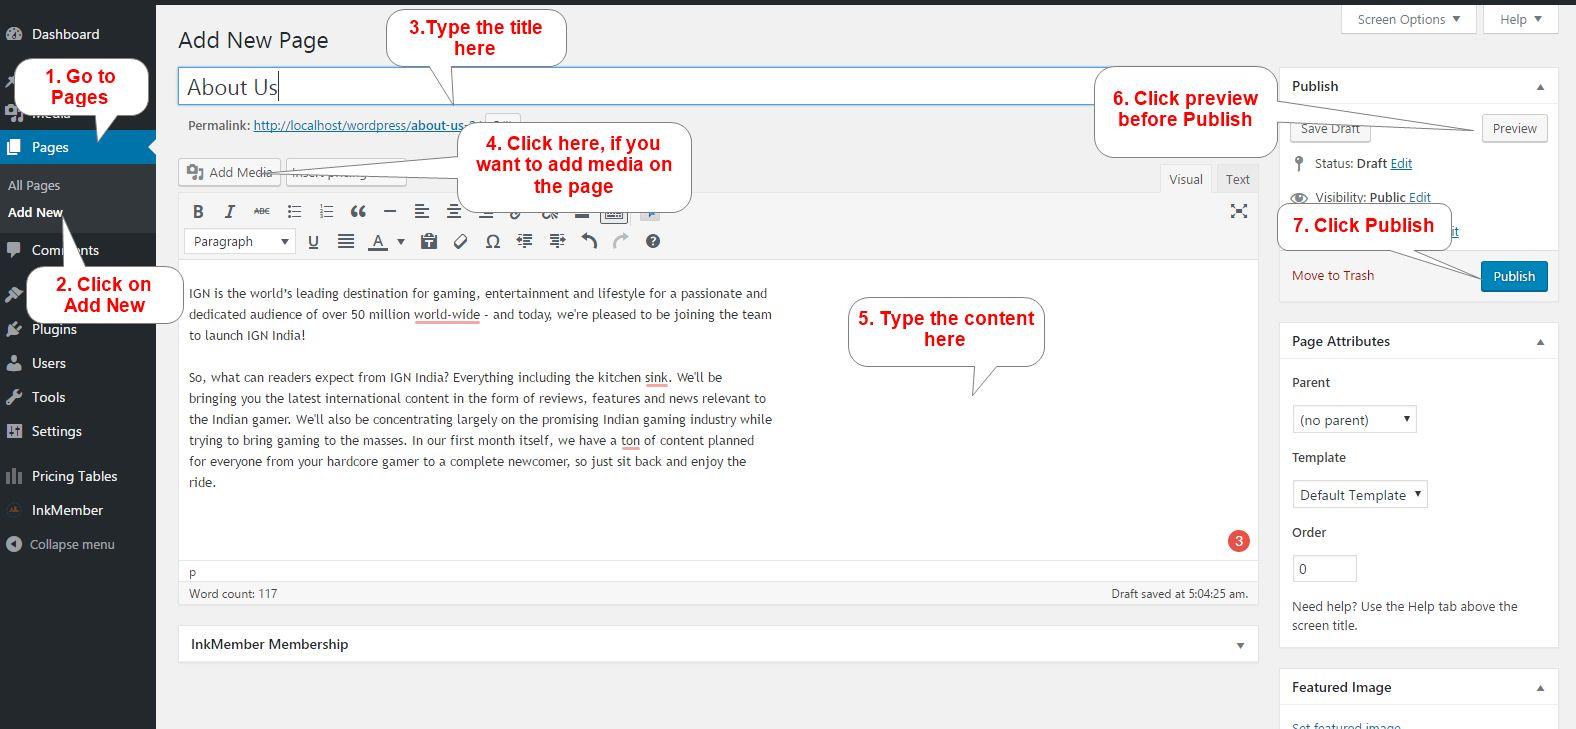
1. About Us – “About Us” page is the vital part of every website. This page gives the glimpse of the business, product, website, people, etc. It is usually a first page where visitors will click when arriving at a website. The process given below helps you to create a page:
Dashboard ➨ Pages ➨ Add New
2. Pricing page – Pricing page shows the pricing plan for the subscription to the users. You can show the “pricing table” which was created above in the “Pricing page” or in the desired page also by just clicking “Insert Pricing Table” button. The process of creating “Pricing page” is given below:
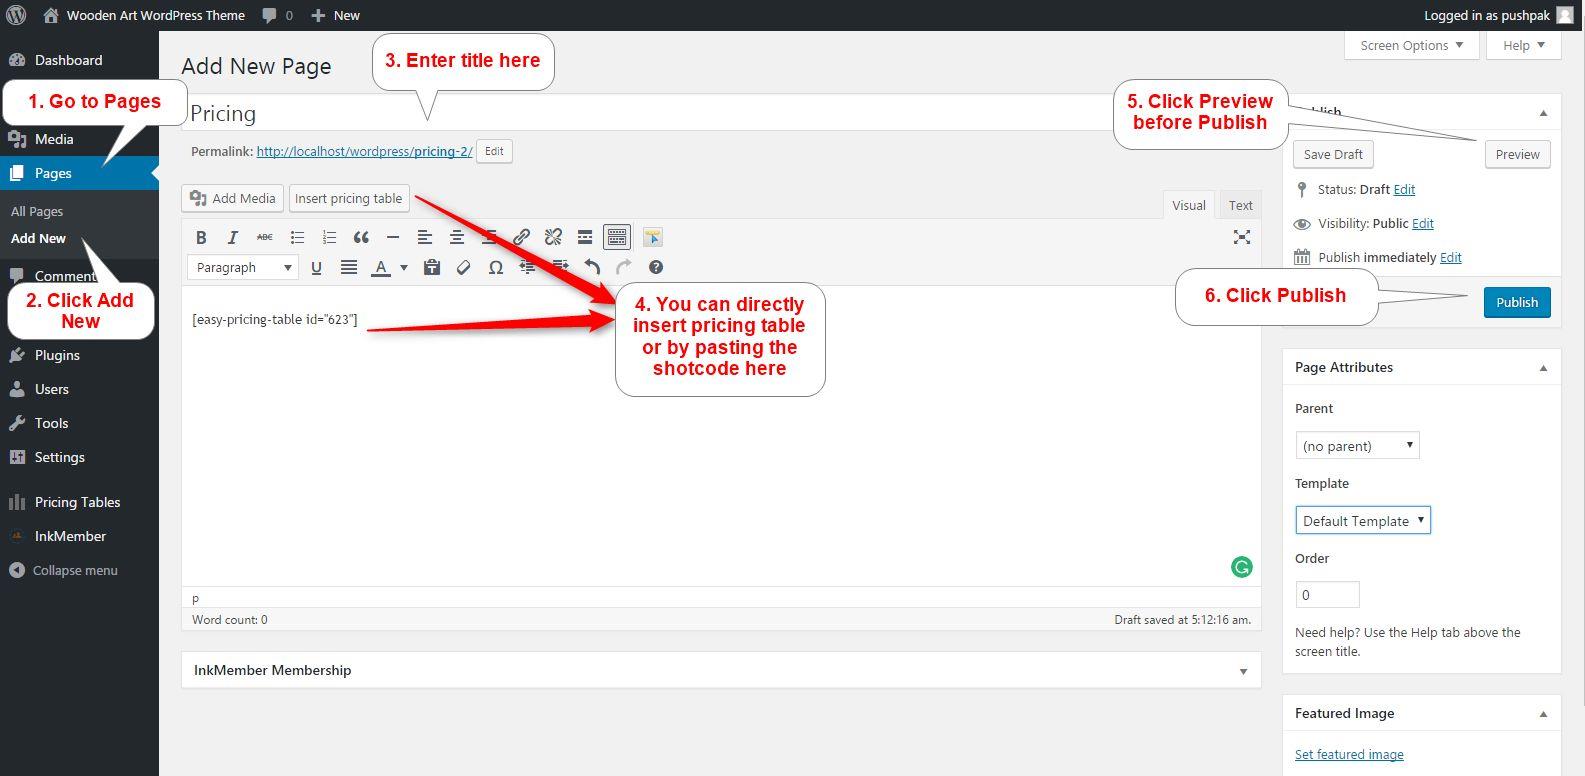
Dashboard ➨ Pages ➨ Add New
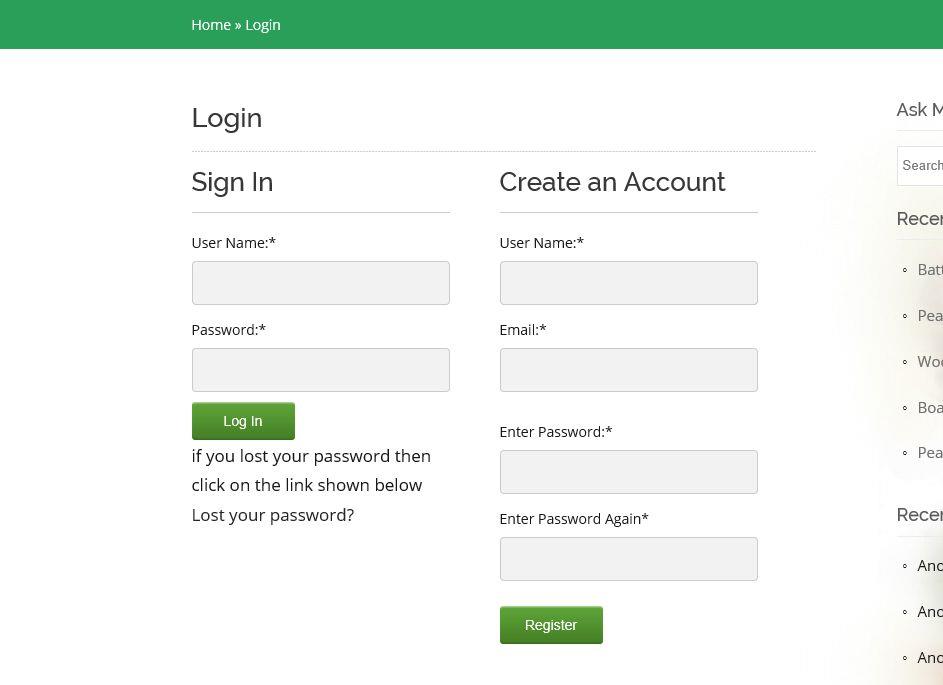
3. Login Page – Login page of the Subscribely Membership Theme asks you to “Create an Account”, if you are a new subscriber and “Sign In” if you are an existing subscriber. You can create a login page by following the simple steps:
Dashboard ➨ Pages ➨ Add New
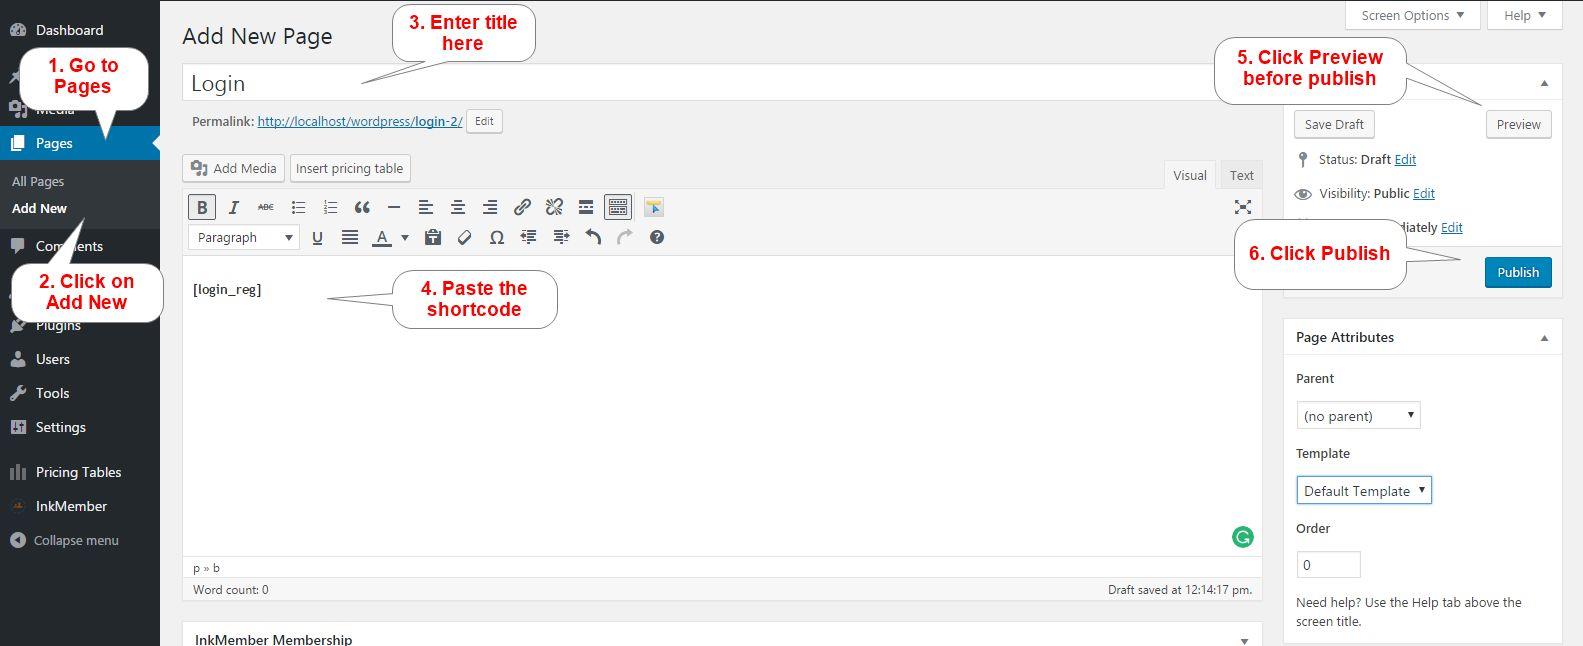
Note :
[login_reg] – This shortcode is used for creating login register page. You just paste this code while creating a login page for users. It will automatically create a login page.
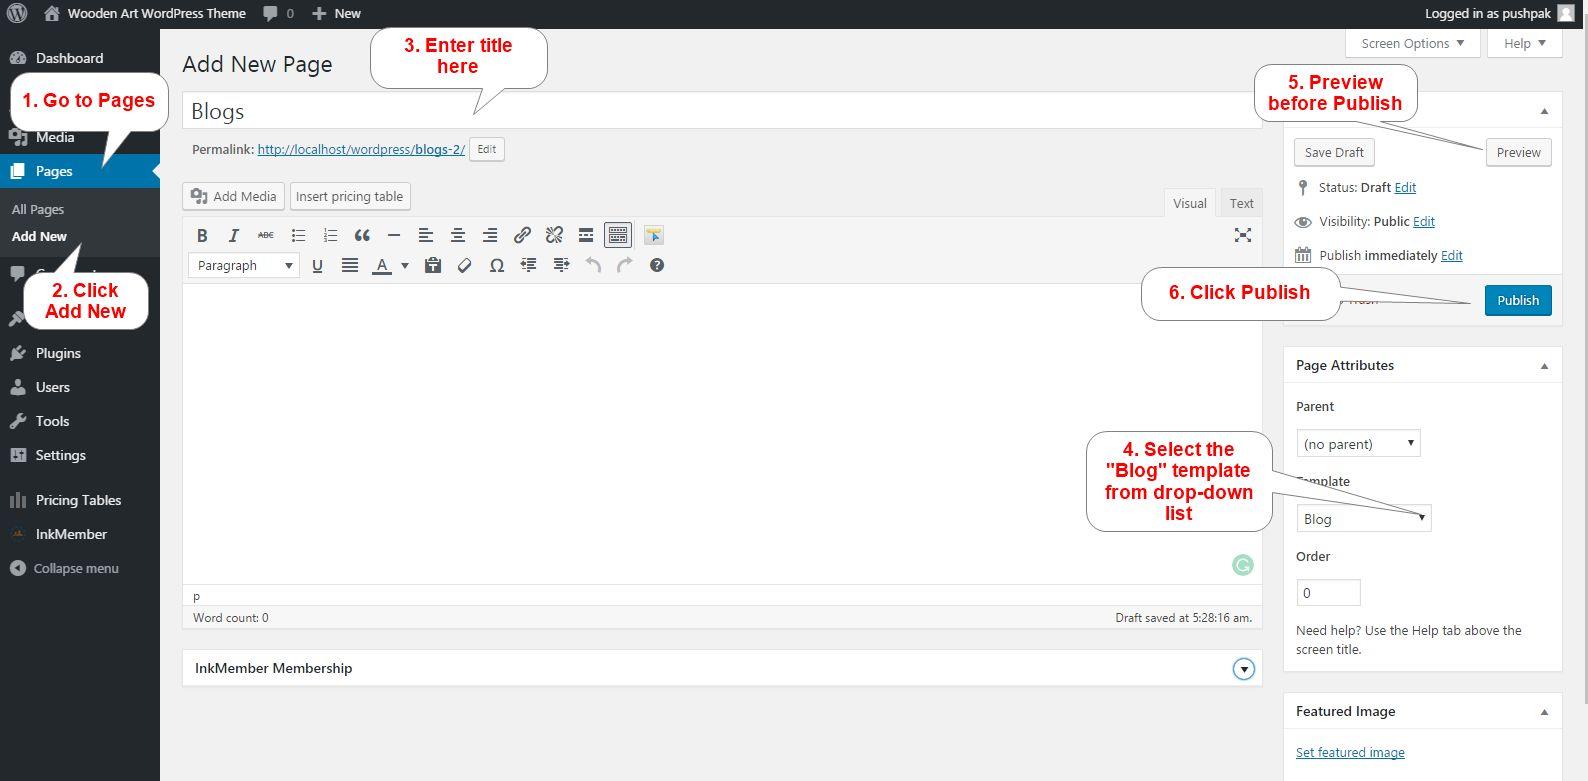
4. Blog Page – Blog page showcase all your blog posts on a separate page. For creating a blog page follow the simple steps given below:
Dashboard ➨ Pages ➨ Add New
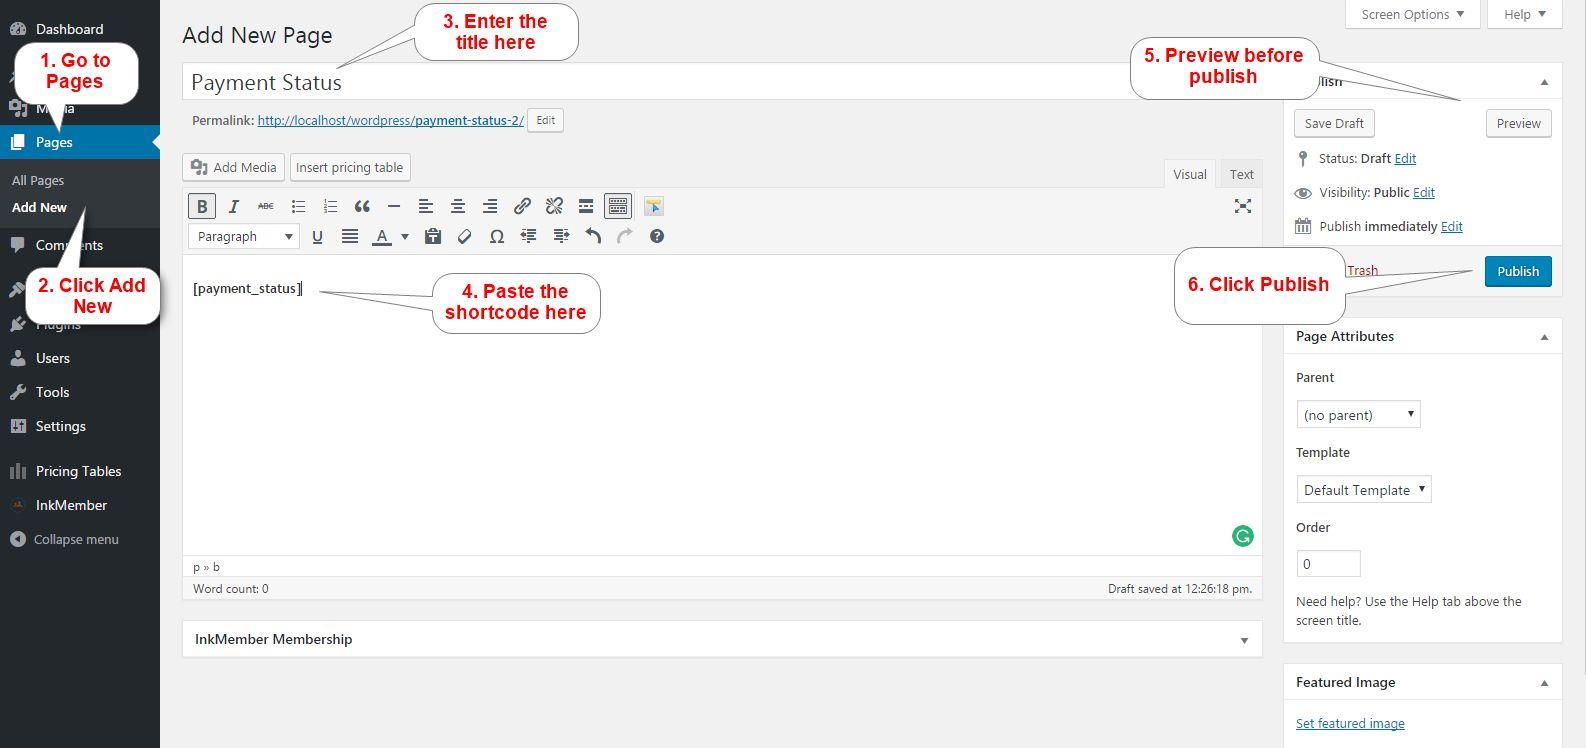
5. Payment Status – This page shows the status of the payment doing by the subscriber. The subscriber will reach to this page whenever he/she make a payment for the subscription so, it will be a hidden page. You can make this page by following the steps given below:
Dashboard ➨ Pages ➨ Add New
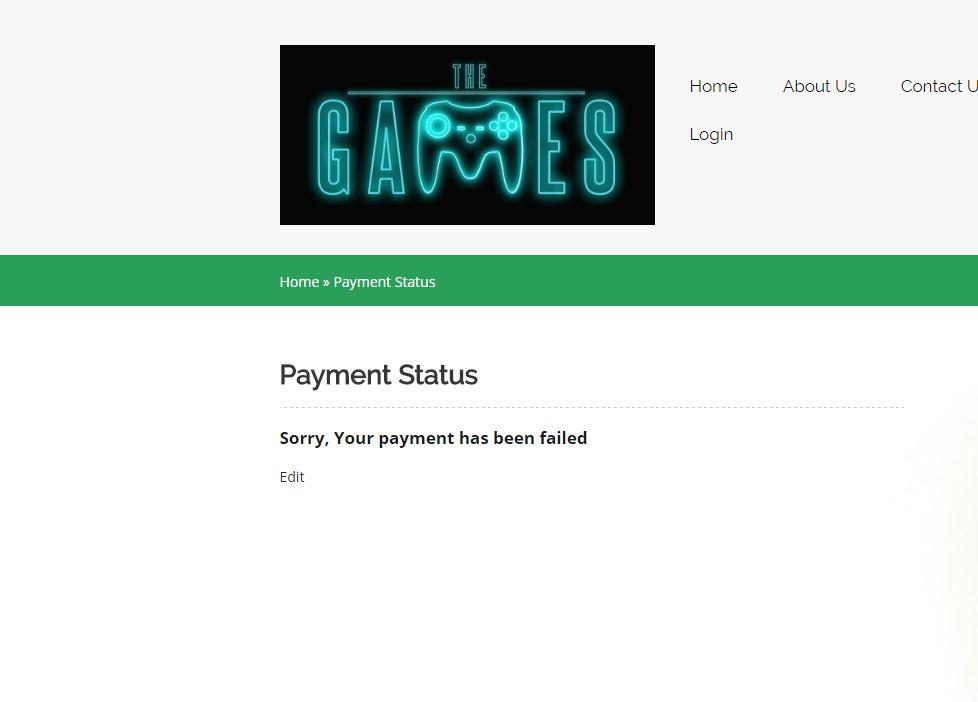
After making payment by the subscribers, this page will show the message about the status of payment. For instance, check below:
Note :
[payment_status]: This shortcode is used for creating payment status page. You need to paste this code while creating a payment status page. It will automatically create the page.
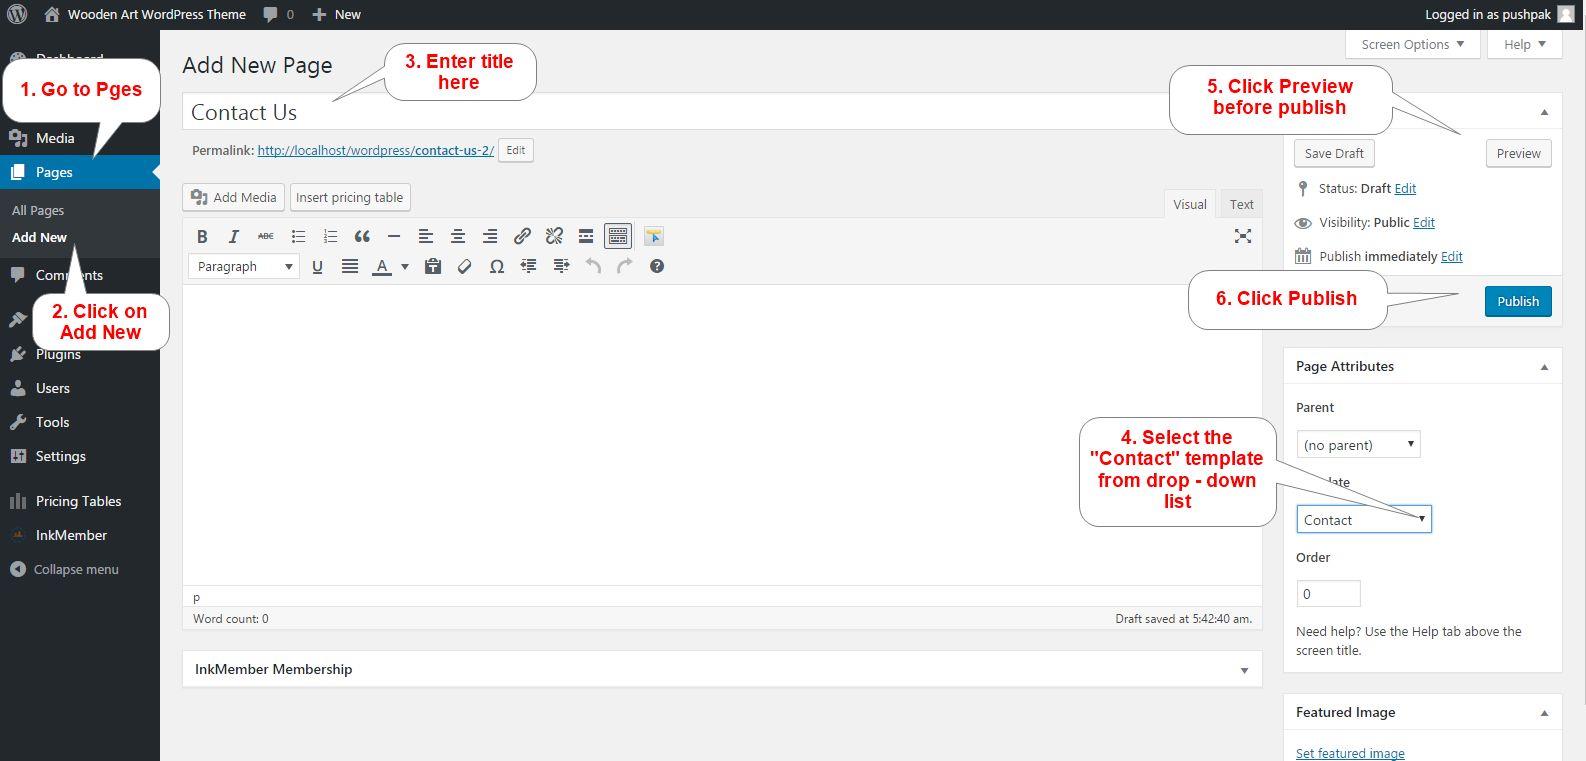
6. Contact Us – Contact us page enables visitors to communicate with you directly. This page has captcha security, for stop spamming. Steps for making “Contact Us” page given below:
Dashboard ➨ Pages ➨ Add New
Building Menus
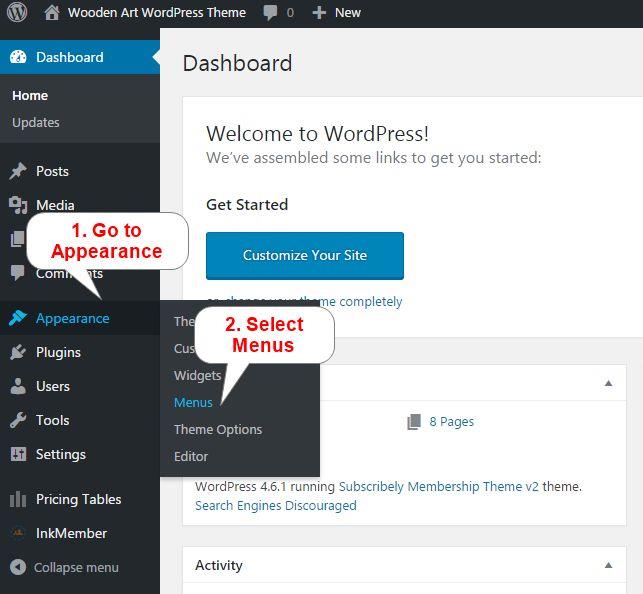
The Subscribely Membership Theme has an inbuilt feature of displaying the pages and subpages in the menu. But it also entitles you to create a custom menu by using “Menu option” under “Appearance section”.
Also, you can arrange the order of menus as well as create “sub-menus” according to your requirement by simply “Drag & Drop” the menu items.
Dashboard ➨ Appearance ➨ Menus
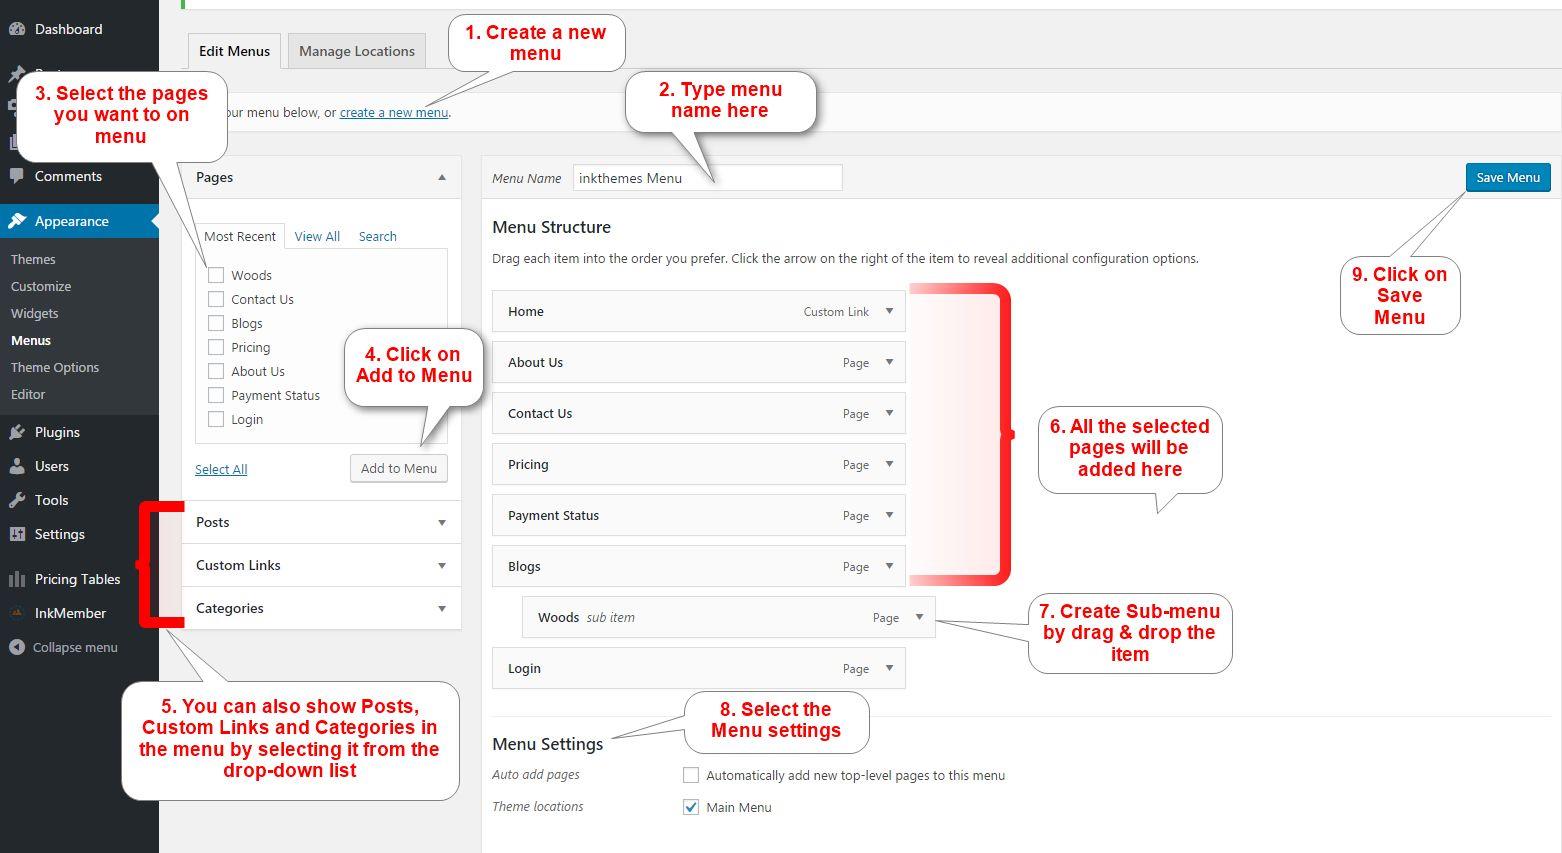
You can see all the selected pages will appear at the top of the homepage.
Adding Widgets
The widget is a small section that performs a specific function. You can add these widgets in sidebars as well as in footer section also.You can “Drag&Drop” it in primary widget area, secondary widget area, and footer widget area according to requirement.
Widgets in Sidebar: To add widgets in sidebar follow these steps:
Dashboard ➨ Appearance ➨ Widgets
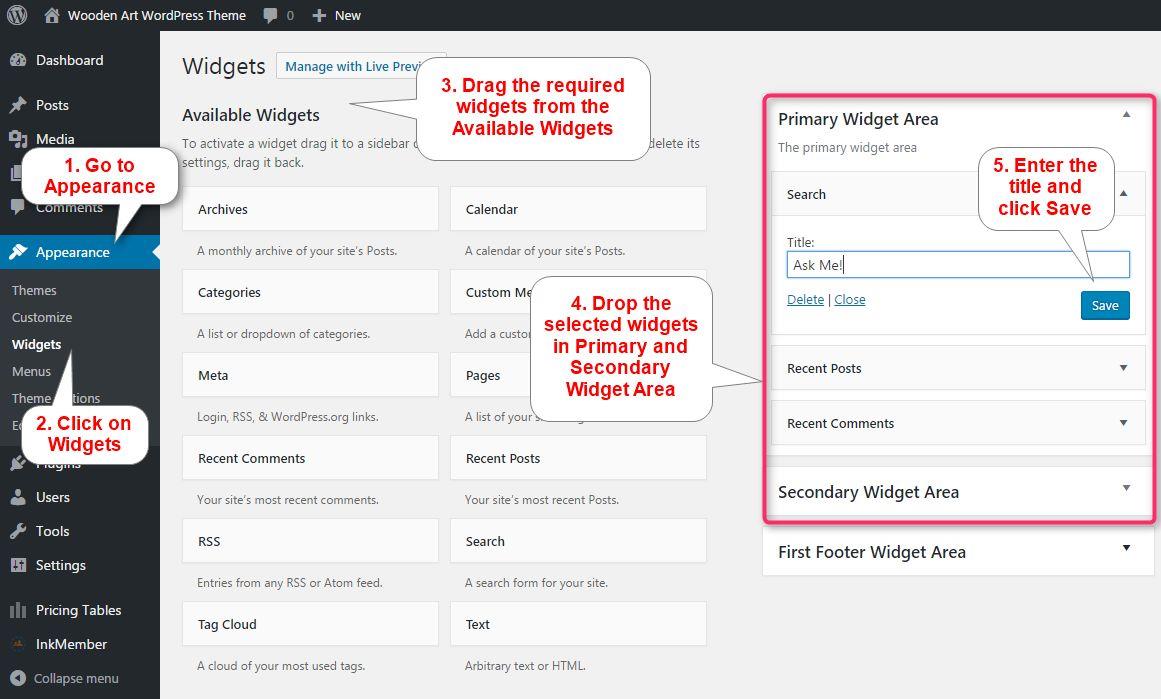
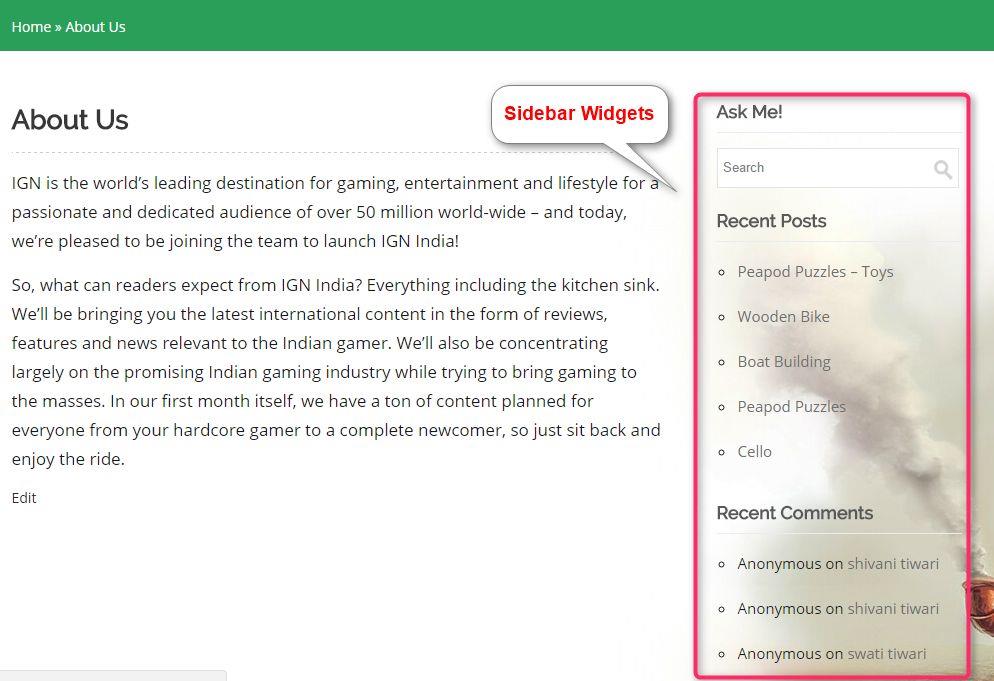
After making changes, the result will appear in the front end.
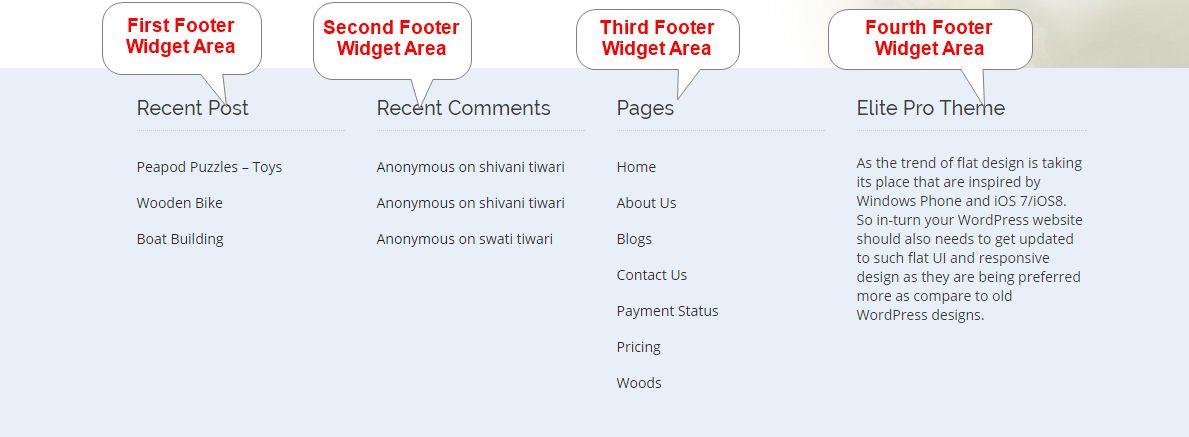
Widgets in Footer: Adding widgets in footer area is the same process as we have done for Sidebar widgets. Select the “Widgets” under “Appearance” section from “Dashboard” then, “Drag” the required widgets & “Drop” it in the first footer area, second footer area, third footer area & fourth widget area as per the requirement and click “Save”.
To add widgets in the footer follow these steps:
Dashboard ➨ Appearance ➨ Widgets
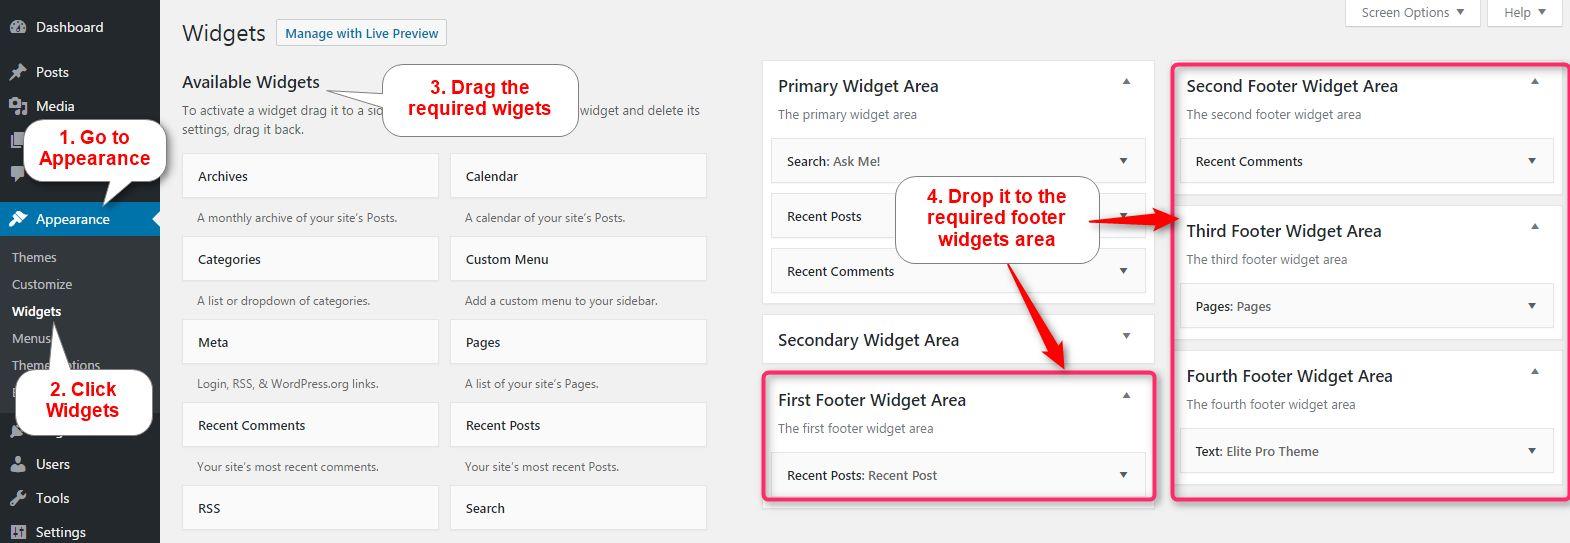
Widgets will appear at the footer of the homepage.
InkMember Plugin
InkMember is the membership plugin that enables you to exhibit or restrict and sell the digital content. You can use InkMember to sell your content as memberships. This includes selling content like posts, video, audio on your website. You will permit your users to access your informative content when they become a paid member of your website.
It is connected with the PayPal payment gateway which allows you to sell both one-time and recurring memberships.
InkMemebr Panel – As we already installed and activate the InkMember plugin above, so, let’s took a look at how to use InkMember plugin:
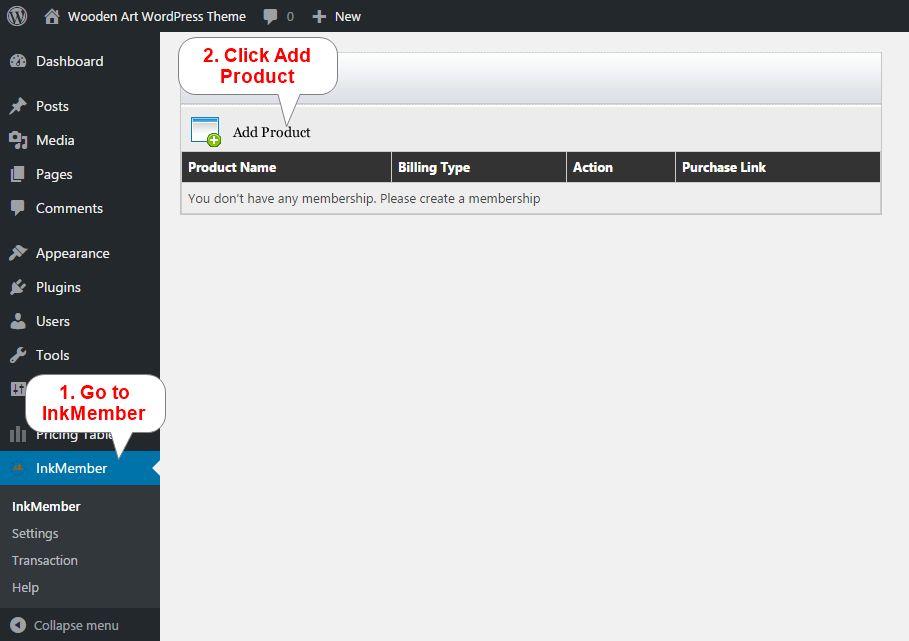
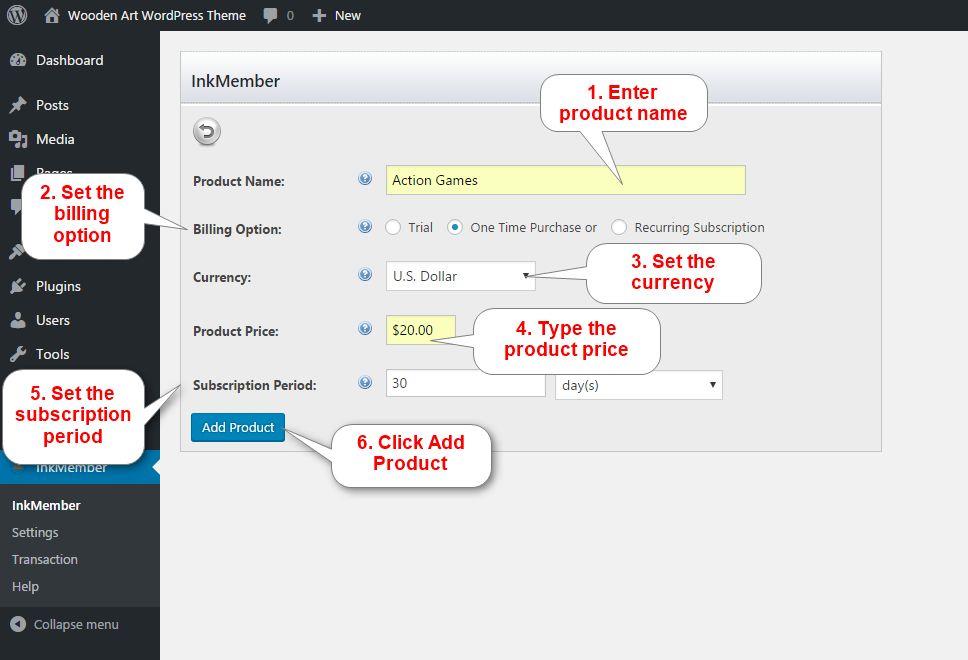
In the next step you can set the name of the product, billing option as a trial, one-time payment or recurring payment, type of currency, product price and subscription period.
Adding a product with one-time payment option:
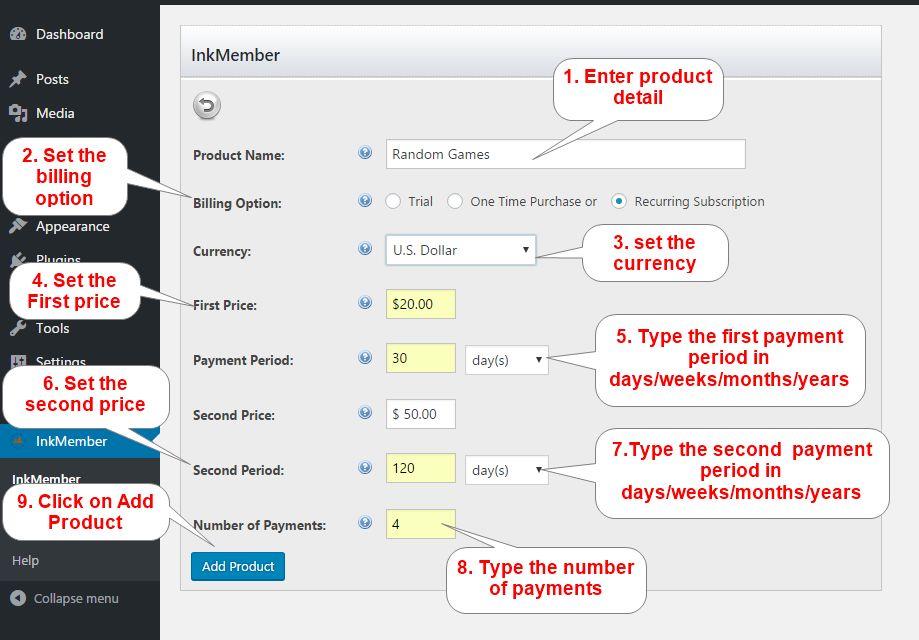
Adding a product with recurring payment option:
After adding all the desired products you will be able to see the list of products. InkMember plugin panel allows you to edit or delete the product listing as well.
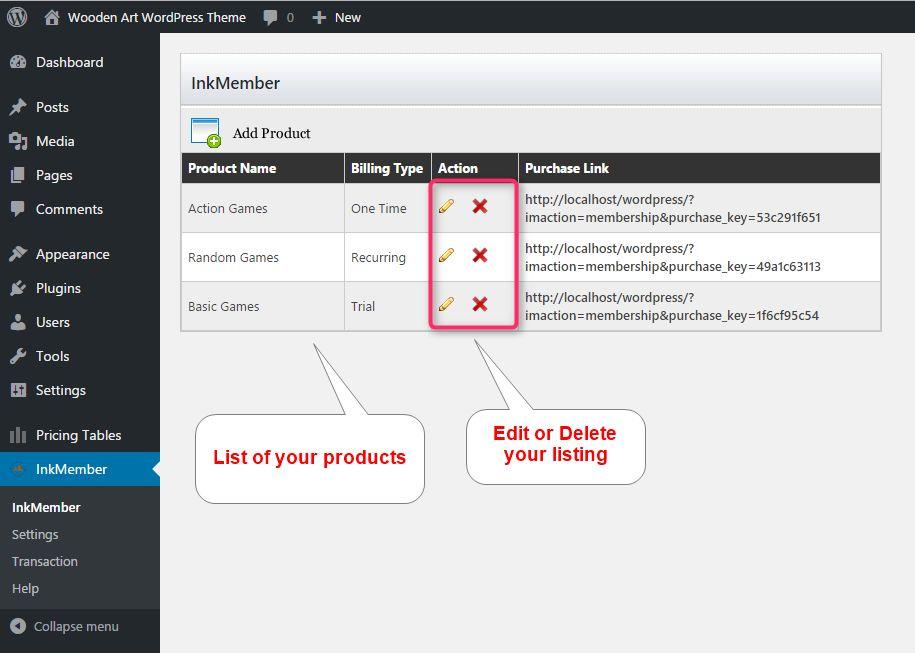
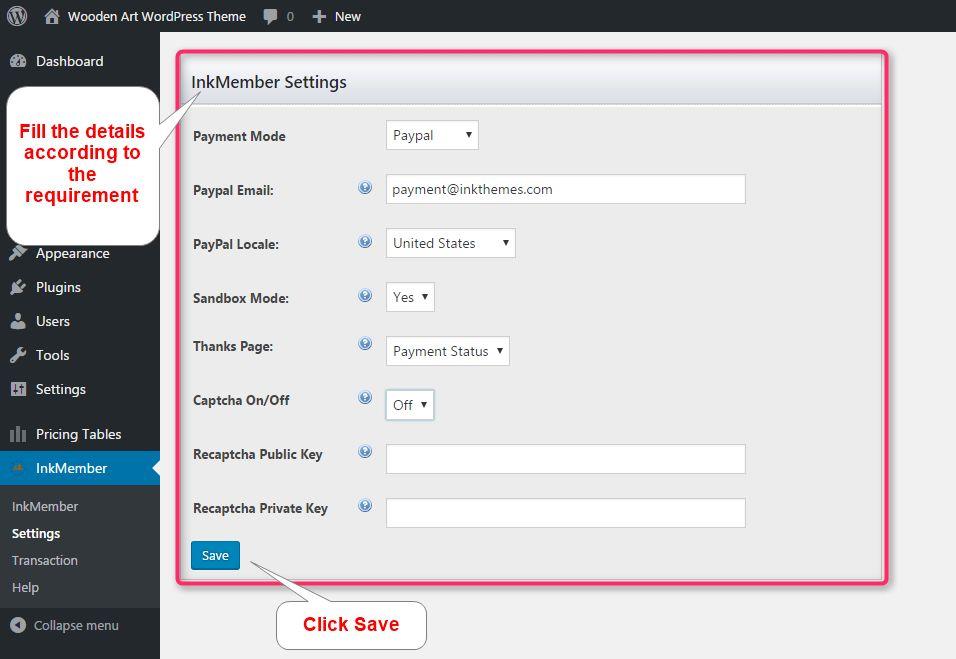
InkMember Settings – By this option, you can set the Payment mode, PayPal email for receiving payments, Thanks page, Captcha and Sandbox mode. By default, the Sandbox Mode is set to “No”. The Sandbox mode is given so that you can test whether the online transaction is working with PayPal or not. In order to test this, you can set the Sandbox mode to “Yes”.
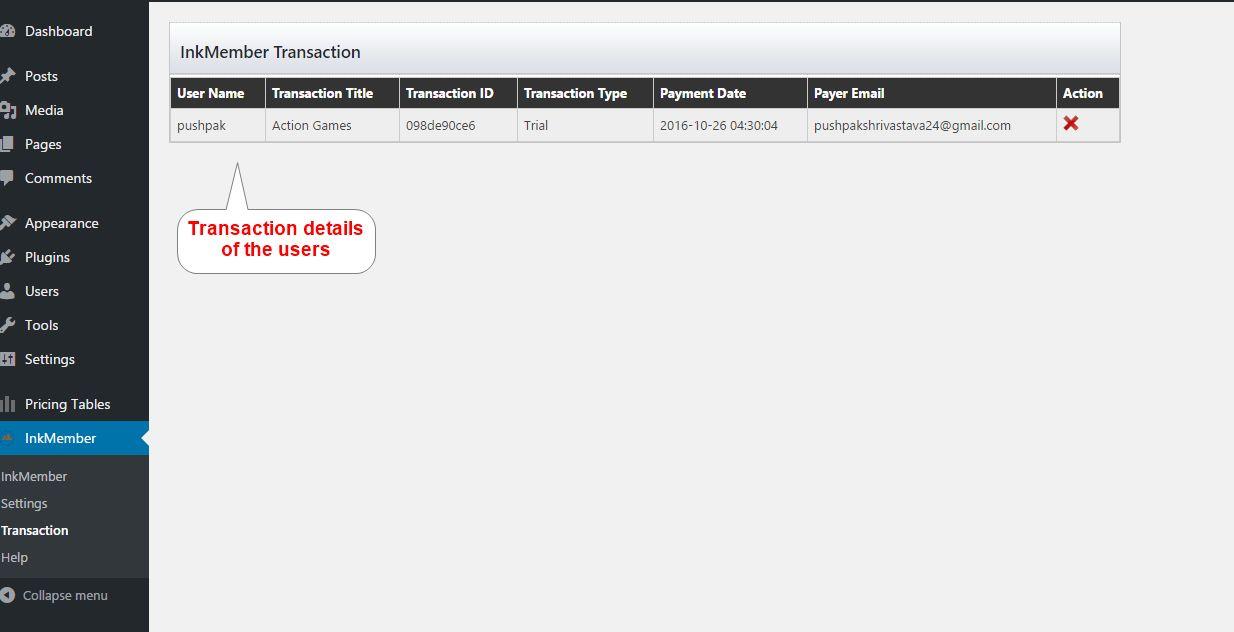
InkMember Transaction: Transaction option shows the transaction details of the subscribers. You can see the example below:
InkMember Help Option: Moreover you can use the Shortcodes while adding content to your website. You just need to put the code to protect your content. You can see all the shortcodes through the “Help option” under InkMember.

You can use these shortcodes on your page/posts by just copy & paste the shortcode or by click on the icon appears in the image given below:
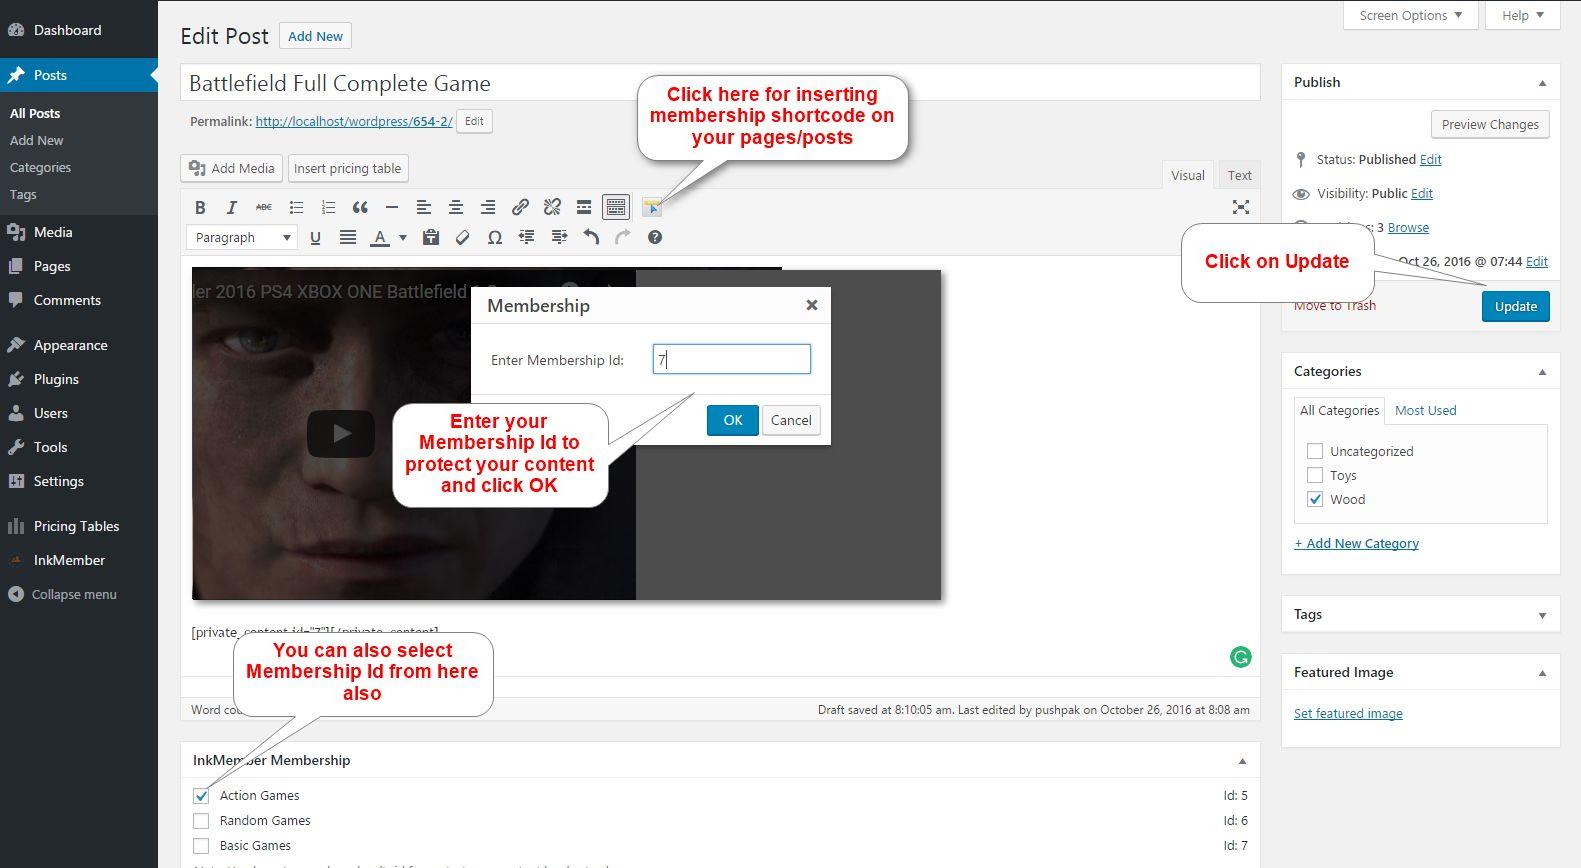
You can also checkmark any of the membership IDs to protect your content. If none of the ids are marked then the whole content will be public.
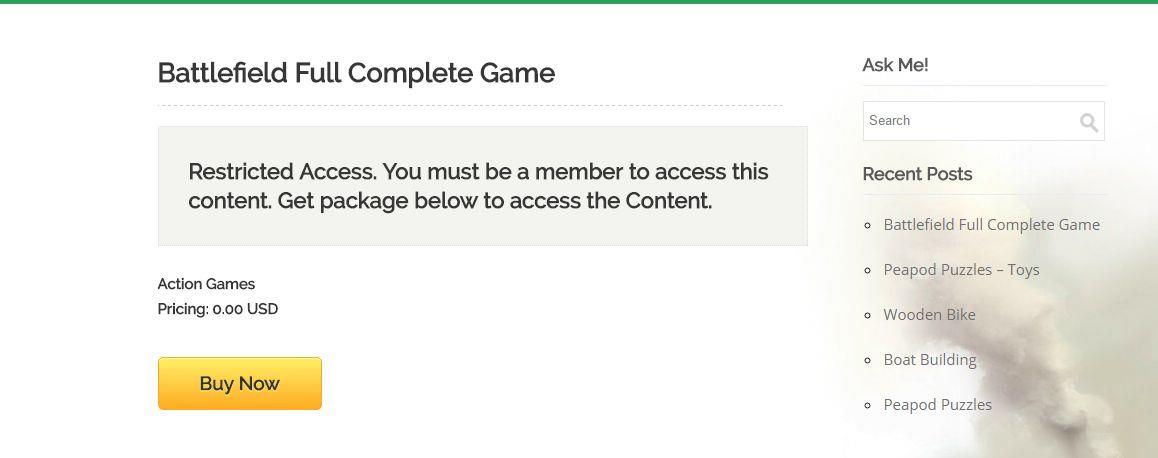
This is how your content will look to the visitor when he/she will be attempting to watch it.
So, hurry up grab this fully responsive theme for your video selling business Subscribely Membership Theme


