In the following article I have explained about the Easy Shorcode WordPress plugin. At the end of reading you will be able to understand the following:
1. What is Easy Shortcode?
2. How to install Easy Shortcode?
3. How to use Easy Shortcode?
What is Easy Shortcode?
Easy Shortcode is a WordPress plugin that allows you to create your own shortcodes for Google Maps, Columns, Tabbed bar, Toggle bar, Tool tip, Text highlighter, Slider & Button.
Easy Shortcode plugin contains all the exciting and useful features of a website. Also it adds multiple functionalities to the website. For more features regarding the Easy Shortcode plugin visit the website.
How to install Easy Shortcode?
- Make sure that you have purchased the plugin from the Flubers market.
- Now go to your Dashboard and download the plugin from the “Download Product” option. You will get a zip file once you download the plugin on your machine.
- Now open your WordPress website (where you want to activate this plugin) and click on Dashboard.
- Under the dashboard choose “Plugins” option.
- Click on “Add new” option.
- Next choose “Upload” option under the install plugins field.
- Now click on “Choose file” button and upload the zip file of the plugin.
- After uploading the file, click on “Install now” button.
- Click on “Activate plugin” option to activate the plugin on your website.
- After activating the plugin on your website you can configure it by creating a new page under the Page option. Although, after activating the plugin, its name will be shown under the dashboard. Click on it, a screenshot will be shown which will direct you for the further procedure.
How to use Easy Shortcode?
There are various options available under Easy Shortcode plugin which can be handy for the website. They are
1. Add Button
2. Image Slider
3. Easy Highlight
4. Notification Boxes
5. Easy Tooltips
6. Tabbed Content
7. Toggled Content
8. Column Partition
9. Google Map
Try SHORTCODE SUMO – WordPress Shortcode Plugin
Let’s understand each of them one by one:-
1. Adding a Button to the website
Follow the steps given below and add a button on your website:
- Create a new page.
- Add the title and context of the page.
- Click on “Add Button” icon as shown below:
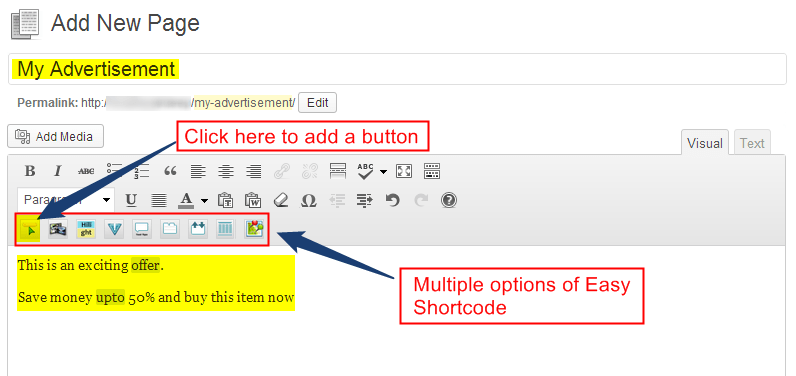
- A window will open of Insert Button.
- Under the window, choose the type of button which you want to use in your website. Three buttons are available like small button, big button & icon button with different styling and options as shown below:
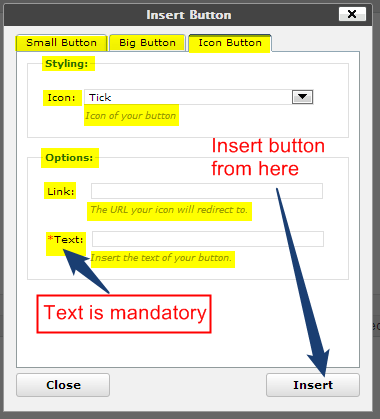
- After configuring the format, click on “Insert” button. This will add the button to the website.
2. Creating an Image Slider for the website
Follow the steps given below and add an image slider on your website
- Depends on your choice whether you want to add an image slider on the previous page you created or create a new page.
- Click on “Image Slider” icon as shown below:

- A window will open of Image Slider.
- Under the window an example is also given how to add multiple images.
- Click on “Insert” button.
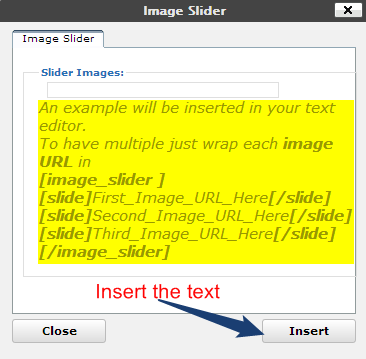
- This will add the code to the page.
- Now paste the URL of the images in between the code which you want to show on your website as shown below:
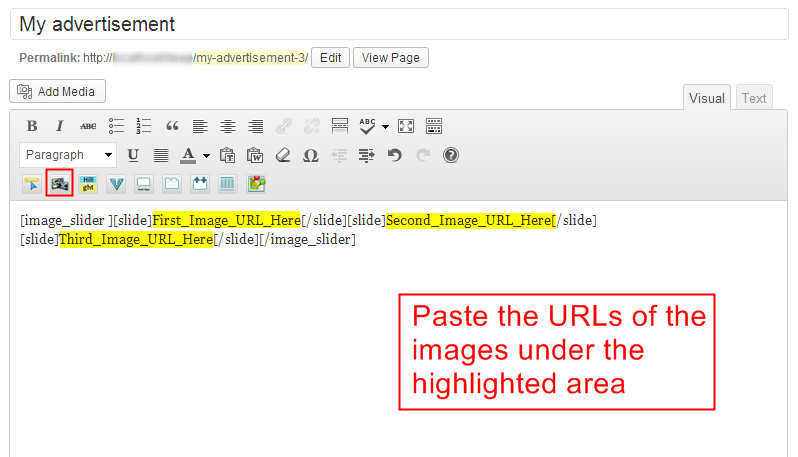
Note: Do not give any spaces or enter in between the codes.
3. Highlighting the text in the Website
Follow the steps given below and highlight the text on your website
- Click on “Easy Highlight” icon as shown below:

- A window will open of Insert Highlight Text.
- Choose the color which you want to highlight the text and write the text as well.
- At last click on “Insert” button as shown below:
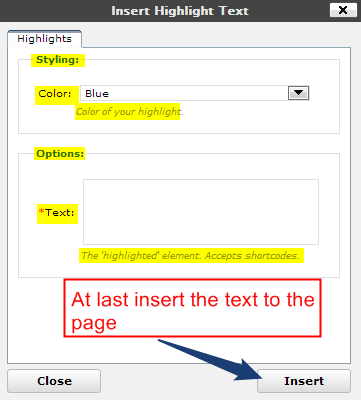
- This will add the text to the page within the code. Click on “Publish” button and visit your website.
4. Adding a Notification box on the website
Follow the steps given below and add a notification box on your website
- Click on “Notification Boxes” icon as shown below:

- A window will open of Insert Notification Box.
- Choose the type of notification and write the text for the same.
- At last click on “Insert” button.
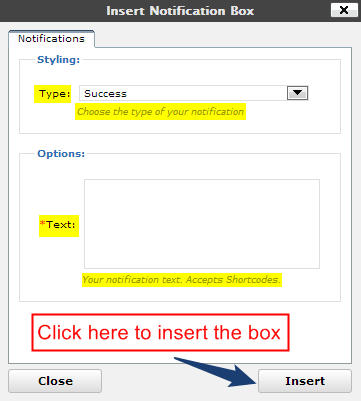
- Click on “Publish” or “Update” button and visit your website.
5. Using Tooltips on the website
Follow the steps given below and use tool tips on your website
- Click on “Easy Tooltips” icon as shown below:

- A window will open of Insert Tooltip.
- Write the tooltip text, heading and description
- At last click on “Insert” button. This will add the code to the page.
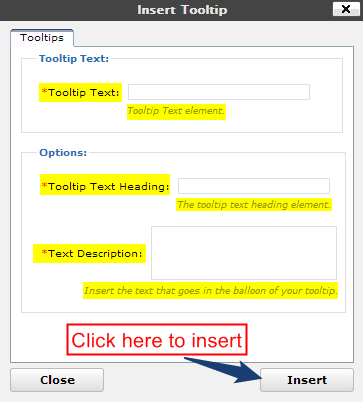
- Click on “Publish” or “Update” button.
6. Adding the Tabbed Content on the website
Follow the steps given below and use tool tips on your website
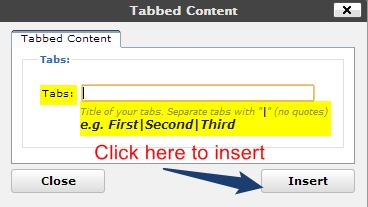
- Click on “Tabbed Content” icon as shown below:

- A window will open of Tabbed Content.
- Mention the name of the tabs separated by “|”.
- At last click on “Insert” button. This will add the code to the page.
- Visit your website.
7. Adding the Toggled Content
Follow the steps given below and add toggled content on your website
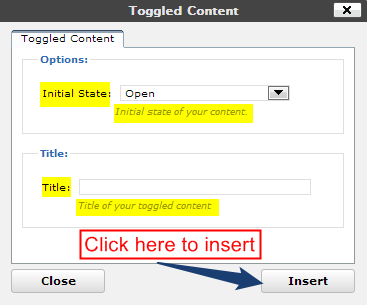
- Click on “Tabbed Content” icon as shown below:

- A window will open of Toggled Content.
- Set the initial state of the content either as Open or Closed and mention the text of your content.
- At last click on “Insert” button. This will add the code to the page.
- Visit your website.
8. Selecting the Column Partition
Follow the steps given below and add column partition on your website
- Click on “Column Partition” icon as shown below:

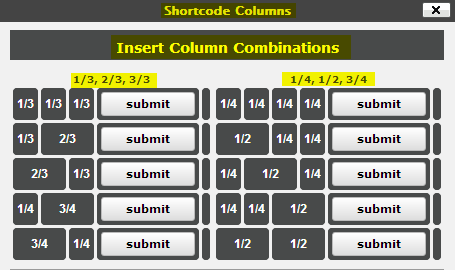
- A window will open of Shortcode Columns.
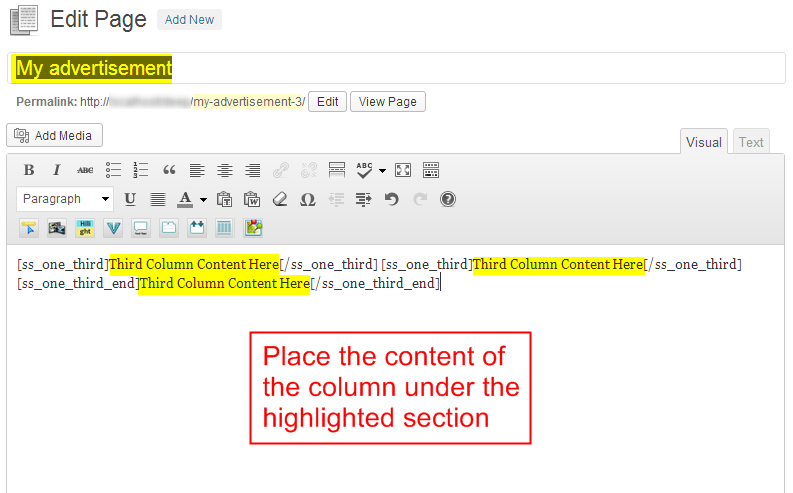
- Now under the “Insert Column Combinations” various options of column categories are available. Choose the one which suits you the best.
- Click on “Insert” button. This will add the code to the page.
- Now write the content of the column in between the codes as shown below:
9. Inserting the Google Map on the website
Follow the steps given below and add a Google map of the location on your website
- Click on “Google Map” icon as shown below:
![]()
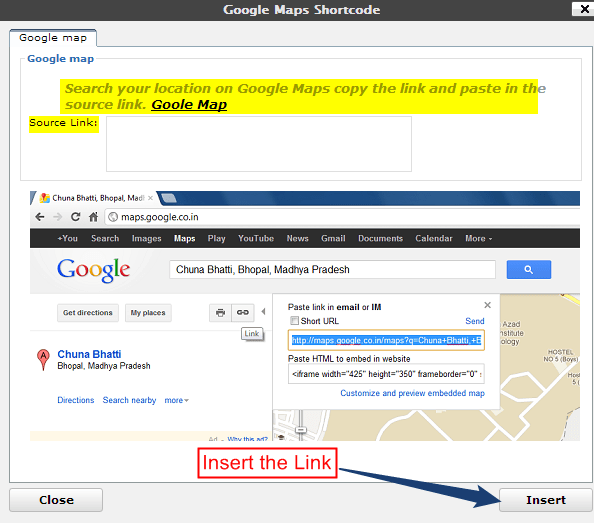
- A window will open of Google Map Shortcode.
- Search the location on the Google Map, copy the link & paste the same link under the “Source Link” field.
- At last click on “Insert Button”
- Visit your website.
I hope this article will let you understand the features of the plugin. Share your thoughts regarding the plugin and post your comments if you like this one.

