Get ZugoTopia WordPress Theme and create your own multi vendor eCommerce website Now!
So, it’s a one stop solution for you to build an eCommerce store website where multiple vendors can sell their products online and you, on the other hand can earn a commission on each frequent sales..
Isn’t a great idea to launch a new business for you as well as other vendors?
So, take a tour on how to Create a multi-Vendor eCommerce Website With WordPress.
Other items of your interest –
Introduction of ZugoTopia Multivendor WordPress Theme
ZugoTopia is a fully-customizable & animated multi vendor WordPress Theme, packed with features that help you to devise an excellent marketplace for multiple businesses within no time. It’s the first to let you build WP multi-seller stores.. with hundreds of best products out there. You can build multi-seller website like Amazon, eBay, Alibaba, etc and create a passive income stream for yourself.
How To Install ZugoTopia
Before moving forward just make sure WordPress is installed on your webserver. Now download the theme from your members area.
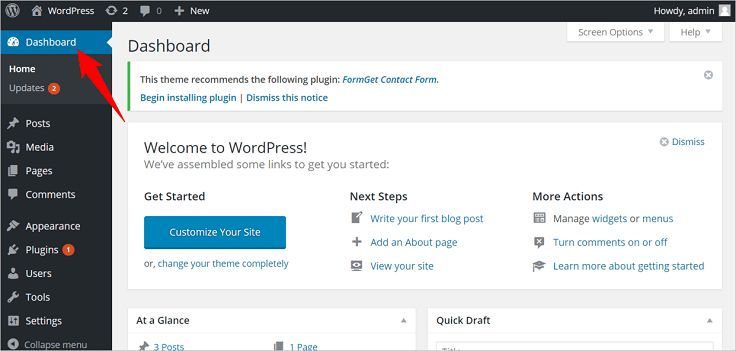
STEP#1 – Go to WordPress dashboard
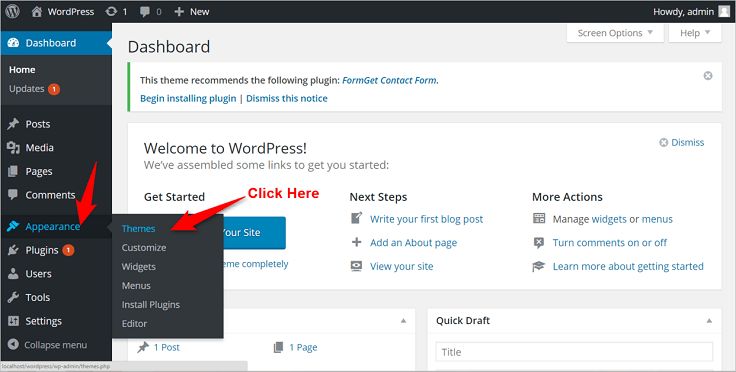
STEP#2 – Going onto Appearance tab, a new sidebar will appear. Then, Click on Themes tab and you will be redirected to the theme managing section.
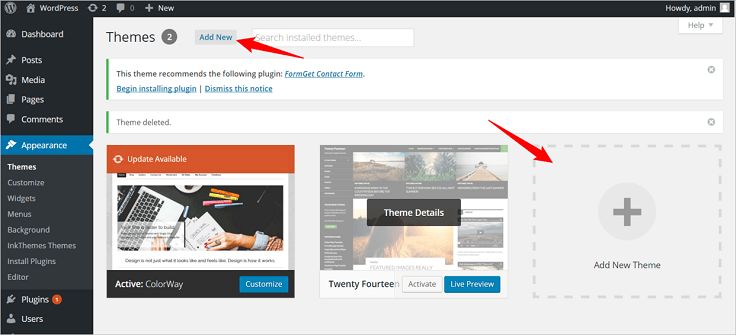
STEP#3 – Then click on “Add New” option upload the quick online shop theme zip file, which you’ve downloaded. Then click on “Install Now”.
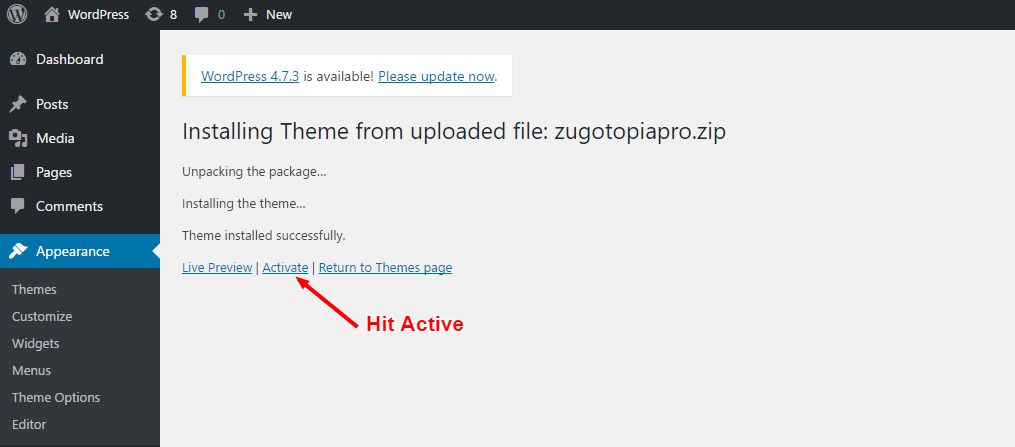
STEP#4 – Once the theme installed successfully, click on the “Activate” button and you’re all ready with your new website layout.
How To Install Plugin –
To add woocommerce and multivendor functionality on the theme, you need to install the 2 plugins i.e. Woocommerce plugin and InkMultivendor plugin. Download the Woocommerce plugin from WordPress.org and InkMultivendor plugin from your’s member area.
Now Follow the below mention steps to install the plugins: –
- Go to your Dashboard.
- Under the Dashboard choose “ Plugins ” option. Dashboard->Plugins->Add New. A page will appear with the heading ” Install Plugins ” option.
- Go to “ Upload ” below Install Plugins heading and click on it. You will see a page with content
“ Install a plugin in .zip format ”.
- Click on “ Choose File ”.
A window will appear to select the zipped file of the woocommerce or multivendor plugin and upload it.
- After uploading the file, click on “Install now” button. Now you have installed the plugin on your website.
- Click on “Activate plugin” option to activate the plugin on your website.
WooCommerce Setup Wizard
As soon as you activate the WooCommerce plugin you will see a welcome message with a button “Run the Setup Wizard”. Click that button.

You will navigate to Woocommerce welcome window, and at the bottom you will find button “Let’s Go” click that.
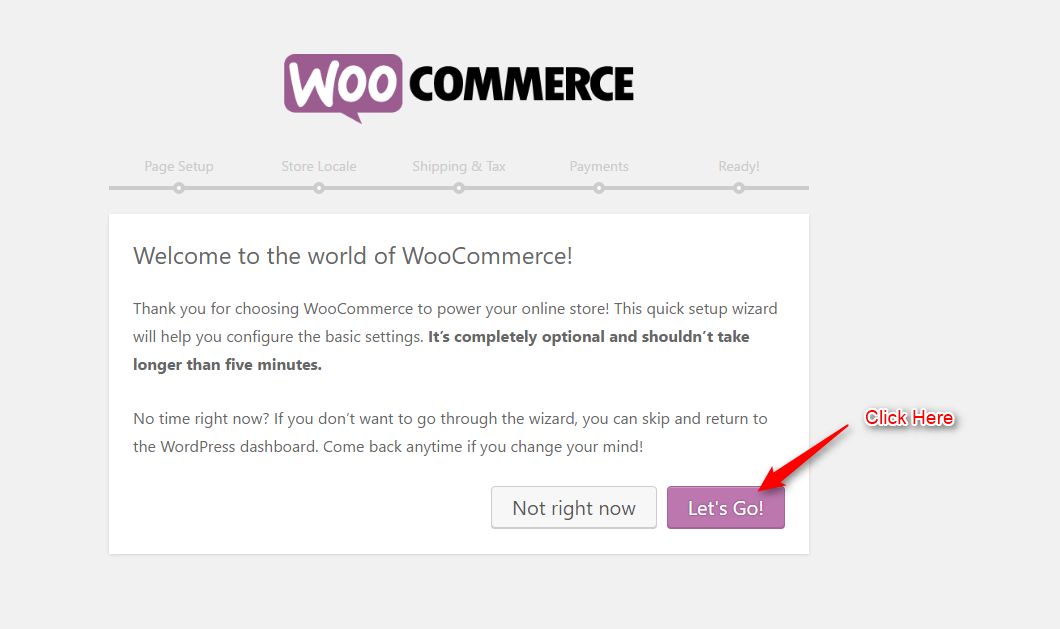
Which will take you to page setup window, click “Continue”. This will automatically create Shop, Account, Cart and Checkout page.
Moving forward you will find Store Locale setup – here you have to select the country where you store is based and the currency. And also choose the applicable unit and dimension for your products. Once you’re done hit “Continue” button at the bottom.
Now you will be redirected to Shipping and Tax setup page here you can select the option according to your requirement. If you will charging sales and shipping physical products you can check both.
This is optional and can be changed later. Plus this option is applicable if you wish to sell your own items along with amazon products. Now click “Continue” and move forward.
Now coming to Payments page here you can select multiple payment mode that you want to offer your customer. Woocommerce can accept online and offline payment both. Just enter the required information and click Continue.
Again this option is useful if you sell your own items from your website. And if you want to create affiliate store only you can skip this setup.
Now you’re done, just click on Return to the WordPress Dashboard.
Multi-Vendor Plugin Setup
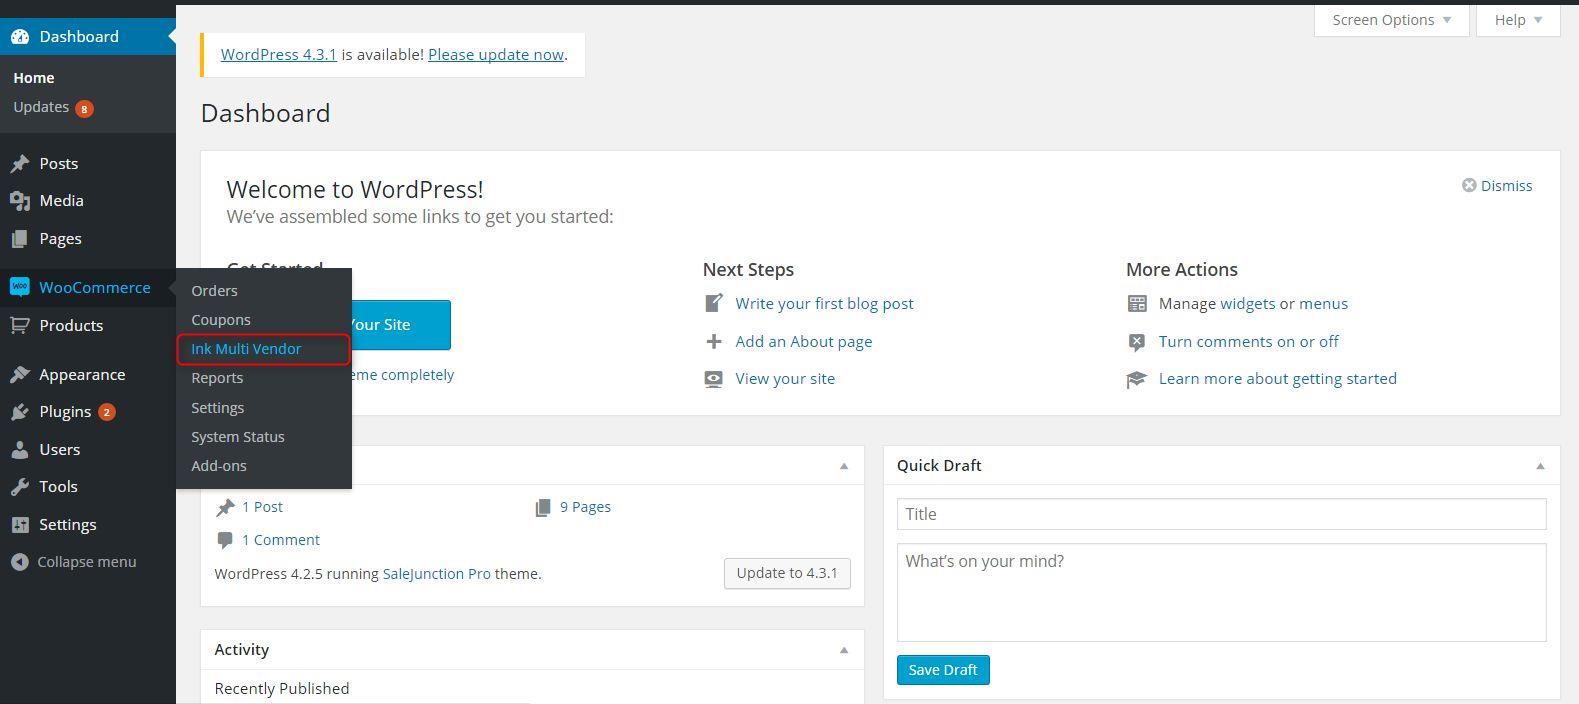
To add multi-vendor functionality on the theme activate the InkMultivendor plugin and configure it by visiting (WooCommerce -> Ink Multi Vendor) from your dashboard.
How To Use InkMulti Vendor?
There is a very simple process involved in it.
After you have successfully installed and activated it, you can see the plugin has started displaying in your WordPress dashboard.
Now you just have to go and configure the settings that’ll hardly take a couple of minutes.
First, you have to set up pages: –
- For Vendor Sales and Commission
- For Submitting Vendor Application from Frontend
- For Tracking Vendor Application
- For Sale details in Order Status Email
- For Getting Application Status in Email
- For Getting Product Status in Email
- For Getting Title of the Product in Email
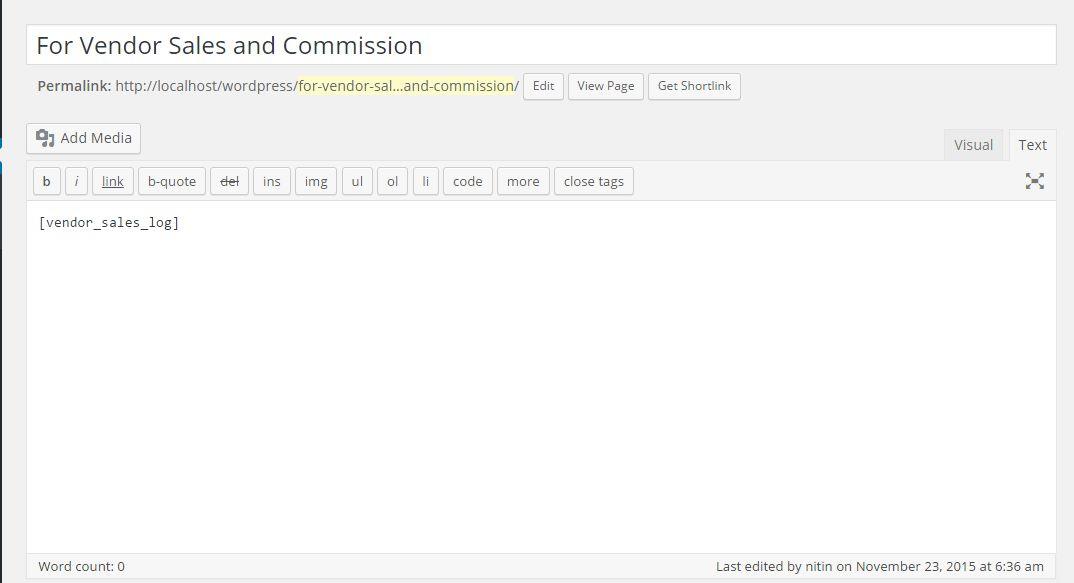
This can be done by just implementing the shortcodes from the SHORTCODE section. Just copy and paste the shortcode in the pages.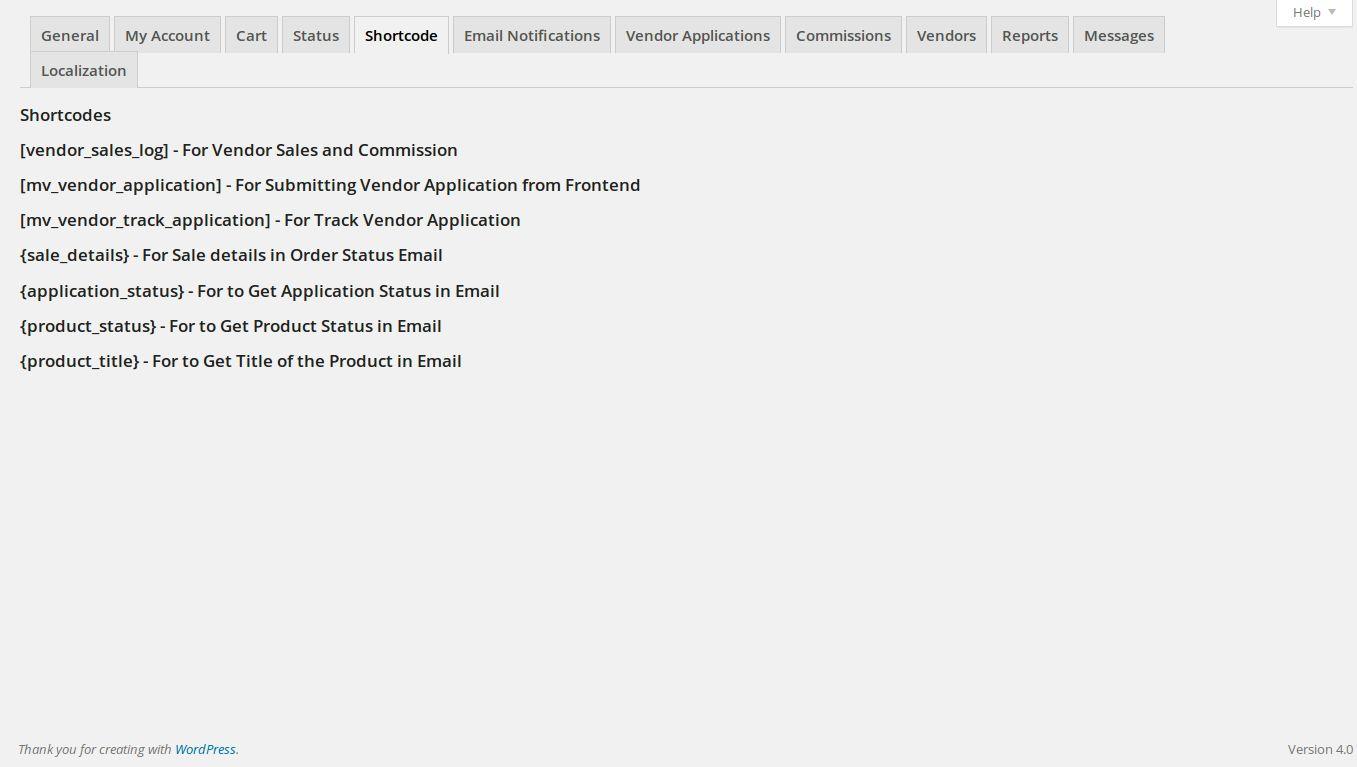
Applying To Become A Vendor
Just go to the page where you have added the shortcode for Submitting Vendor Application from Frontend and fill in the required details as shown under.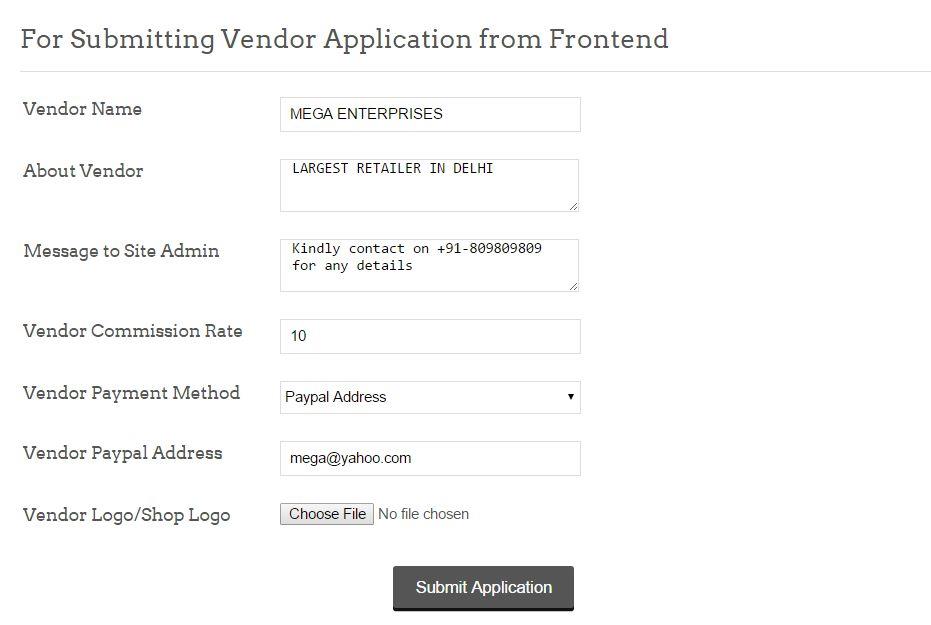
As soon as the vendor clicks on “Submit Application“, the request is reflected in the dashboard of the admin under the “Vendor Applications” tab.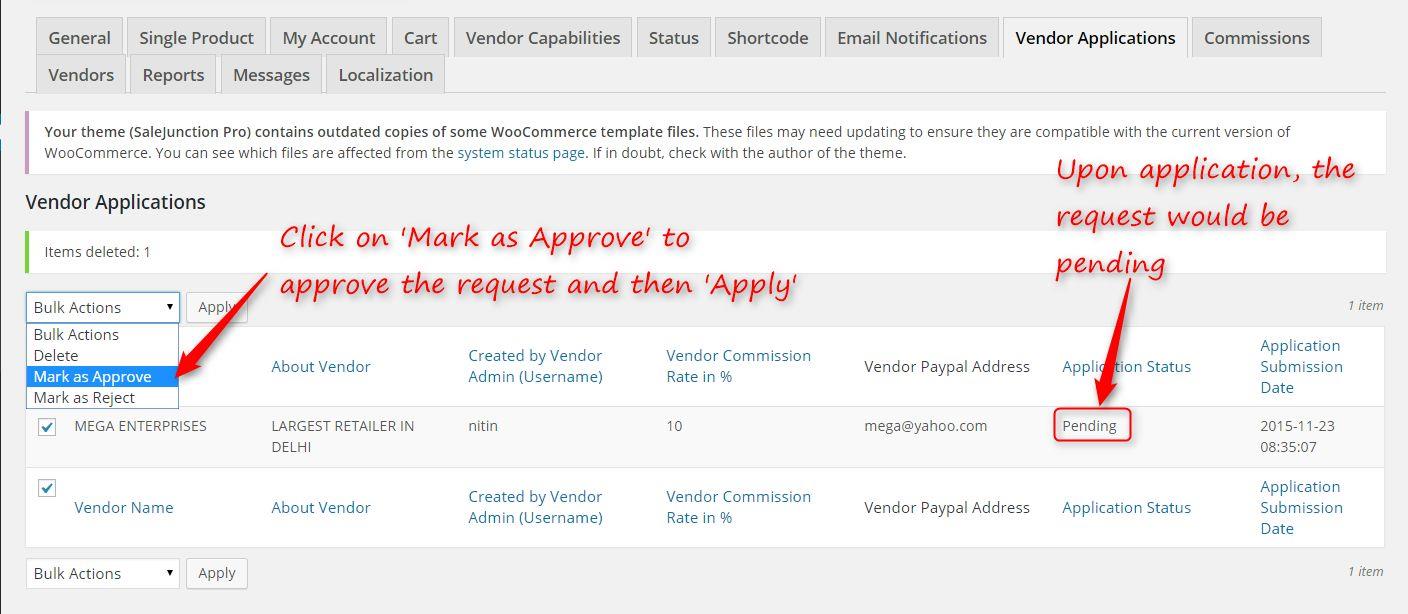
Upon Approval, you can see the same screen as below on the page where you have added the shortcode for Track Vendor Application.
Now you have to click on “Add Product” and fill in the required details.
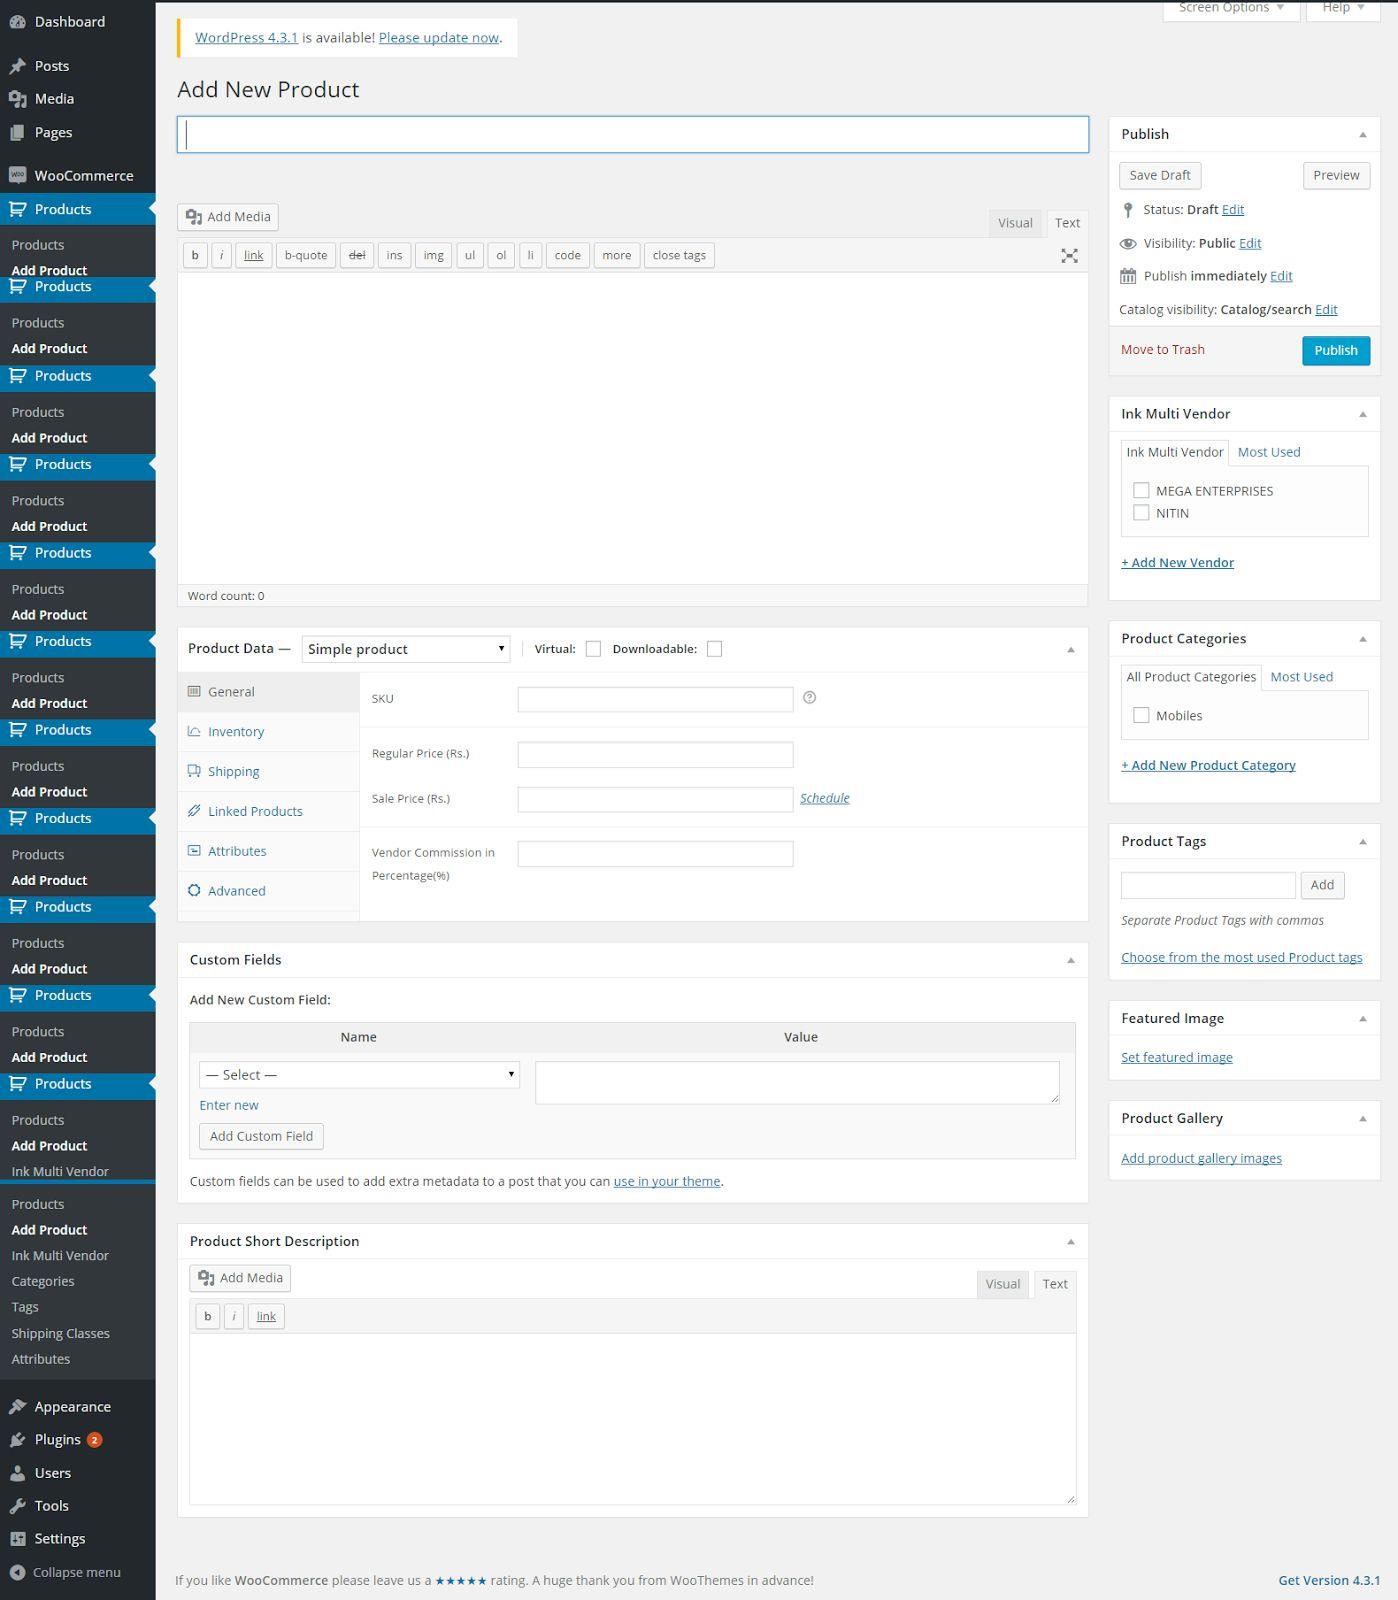
Now click on “Publish”. These products will be displayed with all the listings of other products. You must add any number of products in the same way.
GENERAL Tab
Under this tab, you can set various options such as the Commission for the vendor, specify it how to calculate the commission based on Regular Price or Sale Price. The user can also customize the Frontend Application form and the settings for export CSV for mass payment.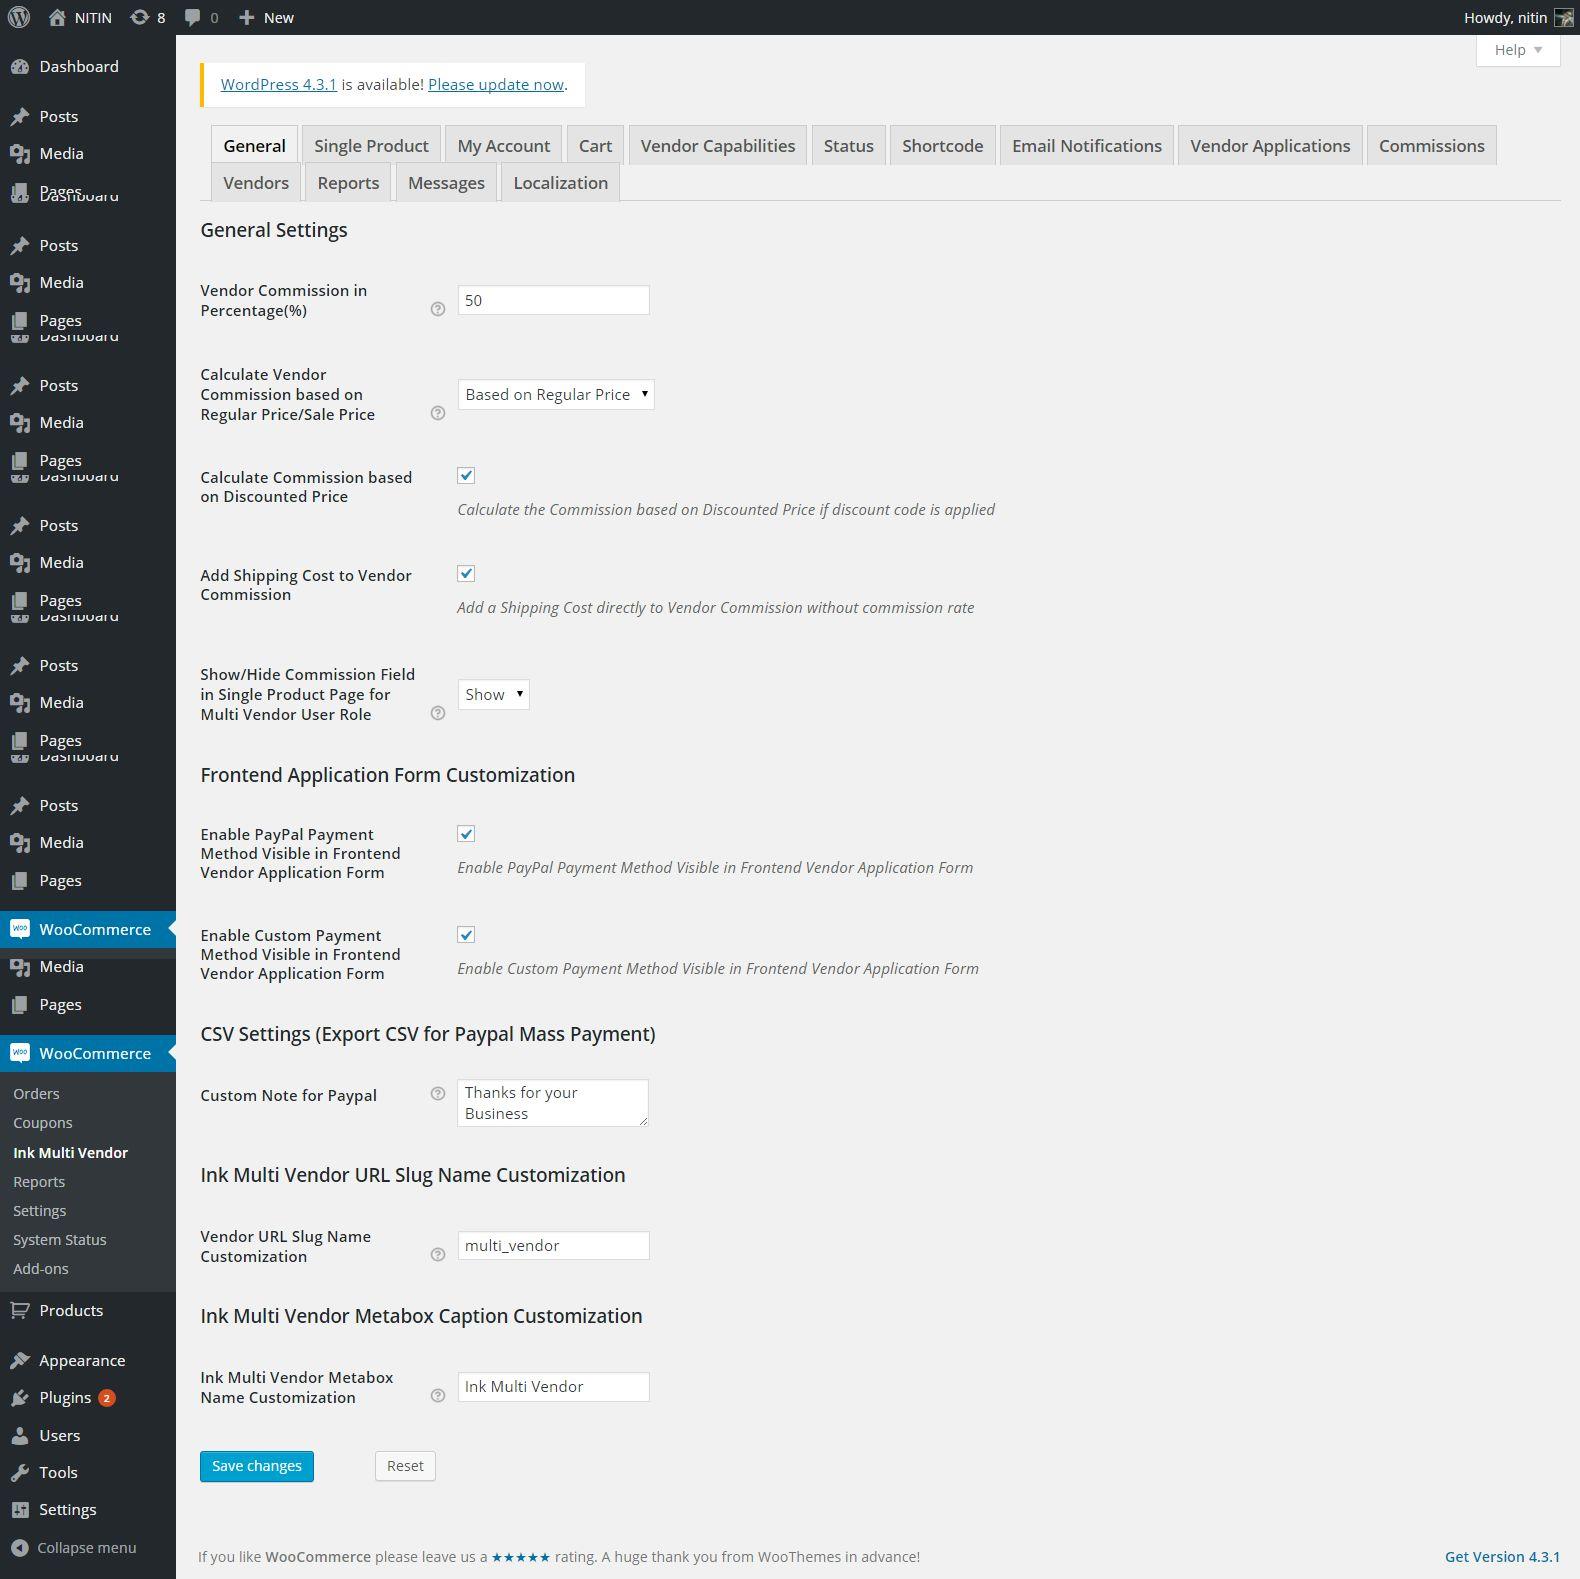
Any changes made will be reflected in the respective areas.
Single Product Tab
Under this tab, you can select whether to display the Seller information on single product pages and you can also customize the tab name.
My Account Tab
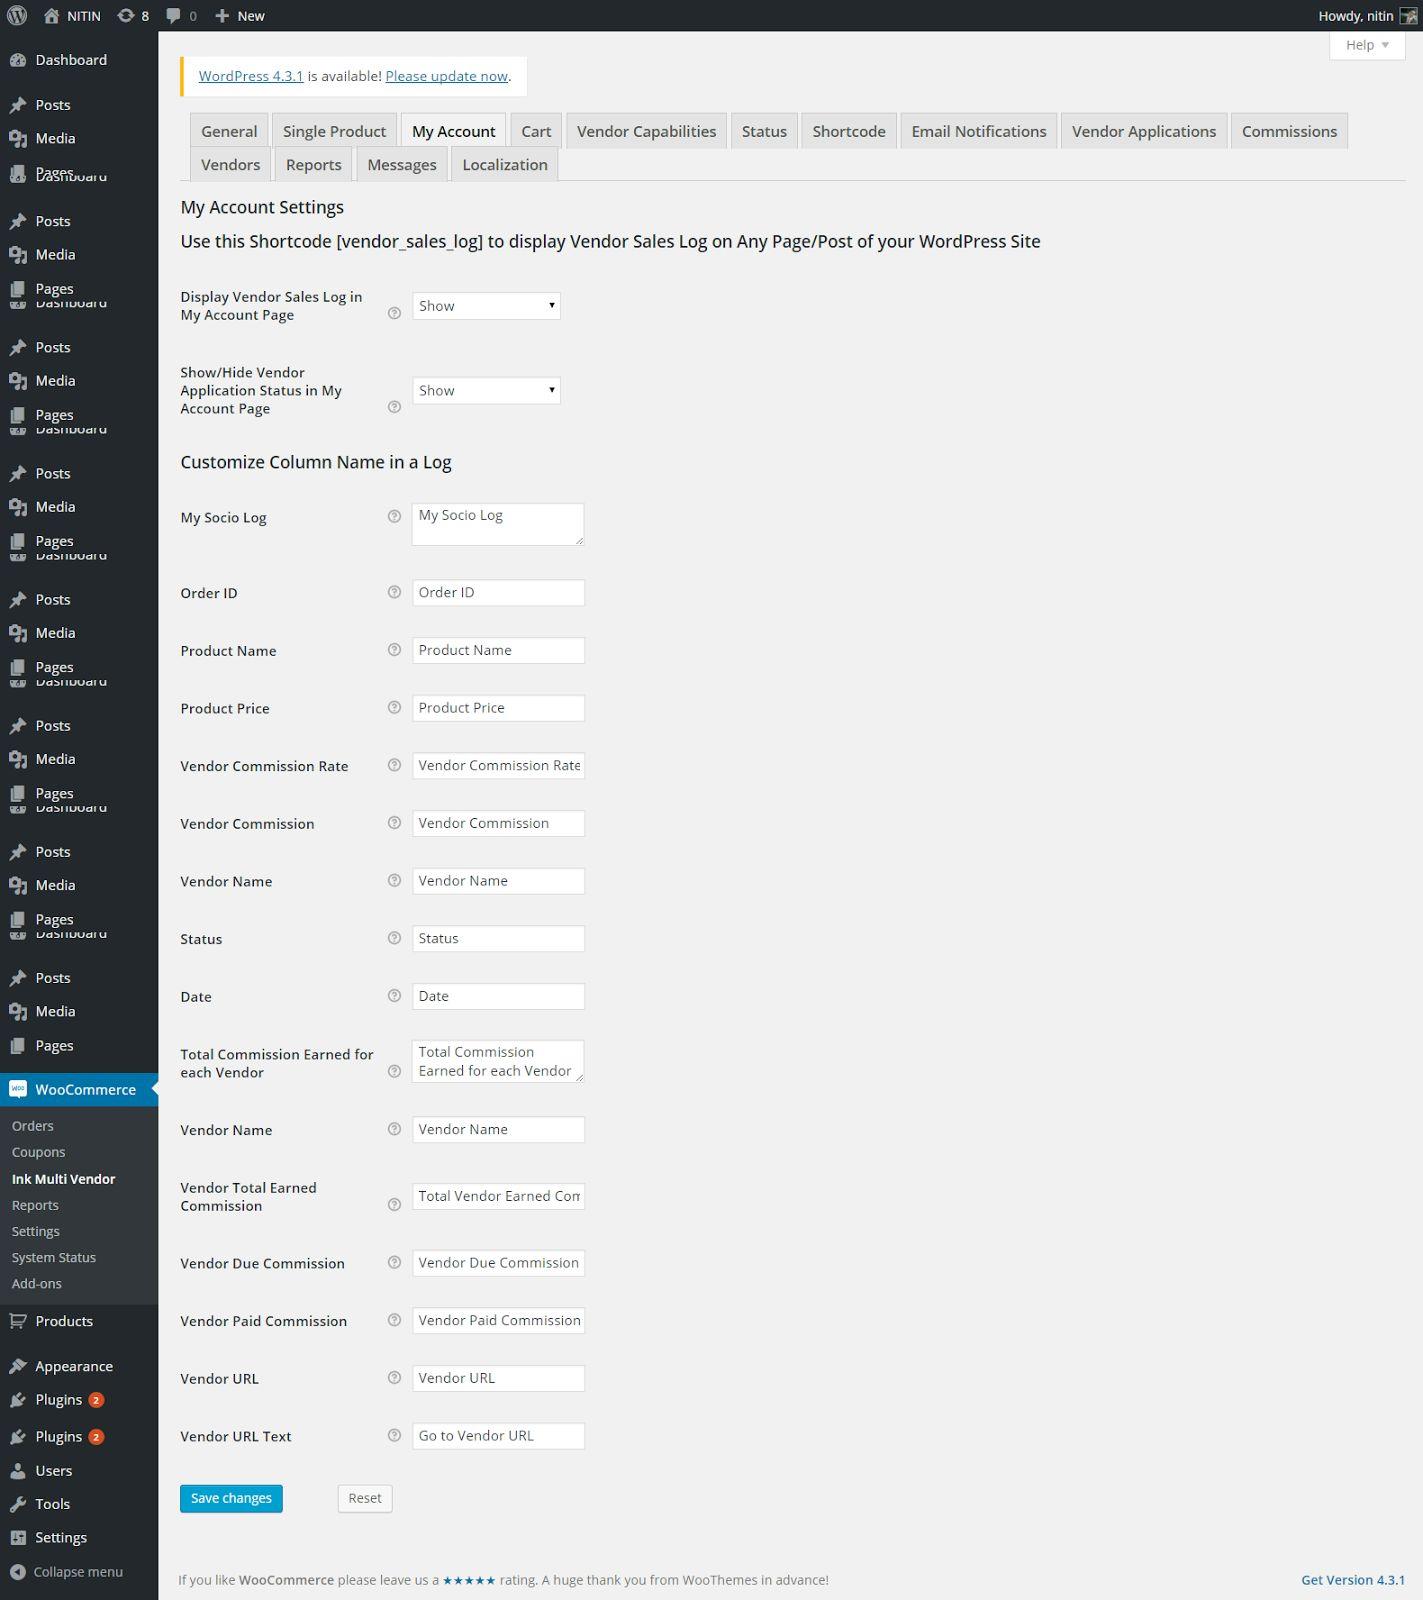
This tab not only displays the simple details about the vendor but also contains all the vendor logs such as: -
- My Socio Log
- Order ID
- Product Name
- Product Price
- Vendor Commission Rate
- Vendor Commission
- Vendor Name
- Status
- Date
- Total Commission Earned for each Vendor
- Vendor Name
- Vendor Total Earned Commission
- Vendor Due Commission
- Vendor Paid Commission
- Vendor URL
- Vendor URL Text
Cart Tab

Vendor Capabilities Tab
This enables a vendor to set all the attributes according to his capabilities/rights. All the important function of managing the application and the approval stages are defined and controlled from here.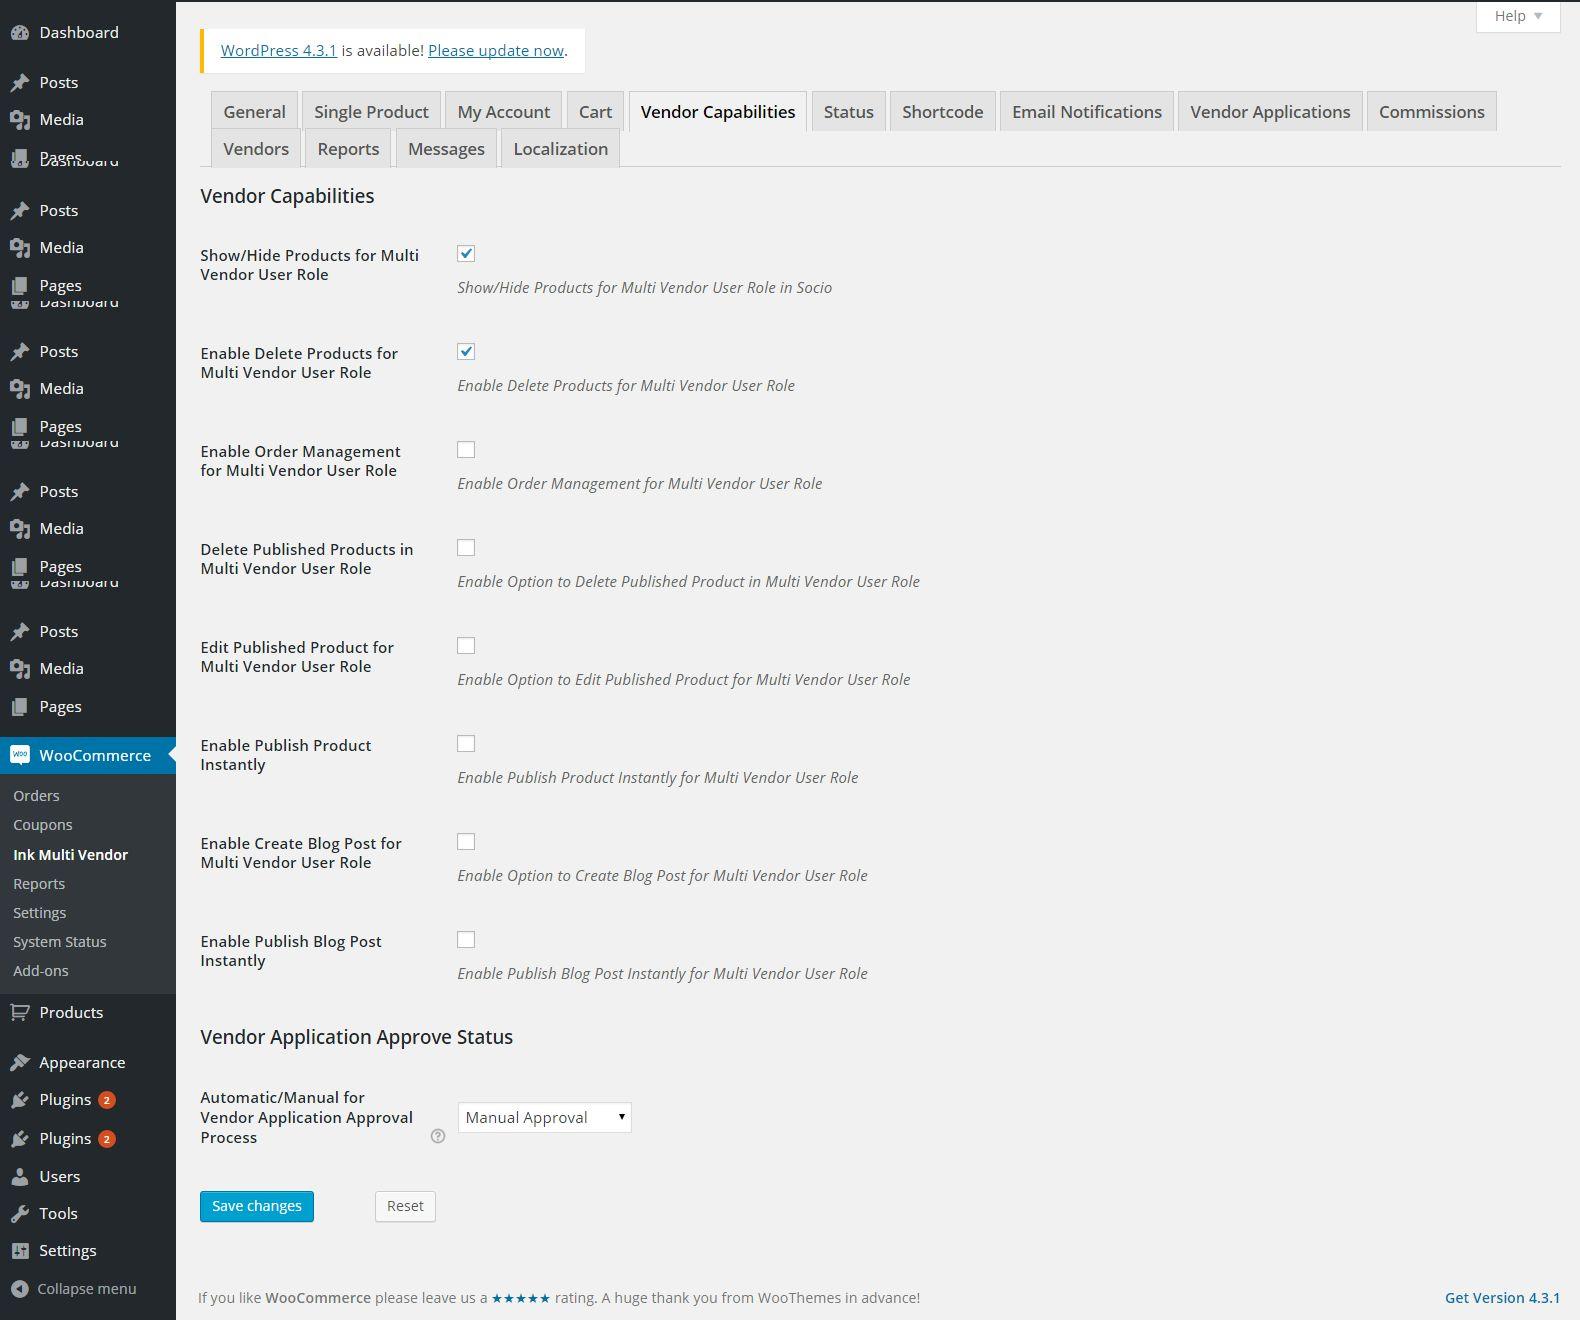
Status Tab
This tab contains all the information depending on the status of order. The user can set value and save the changes accordingly.
Shortcode Tab
All the necessary shortcodes for the required pages are available here.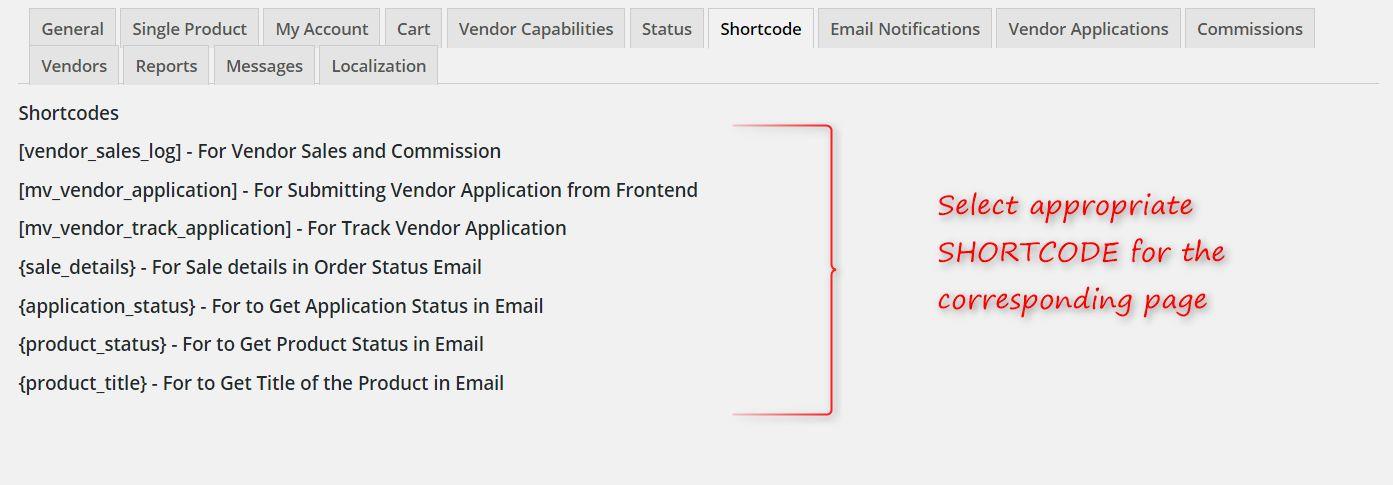
Email Notifications Tab
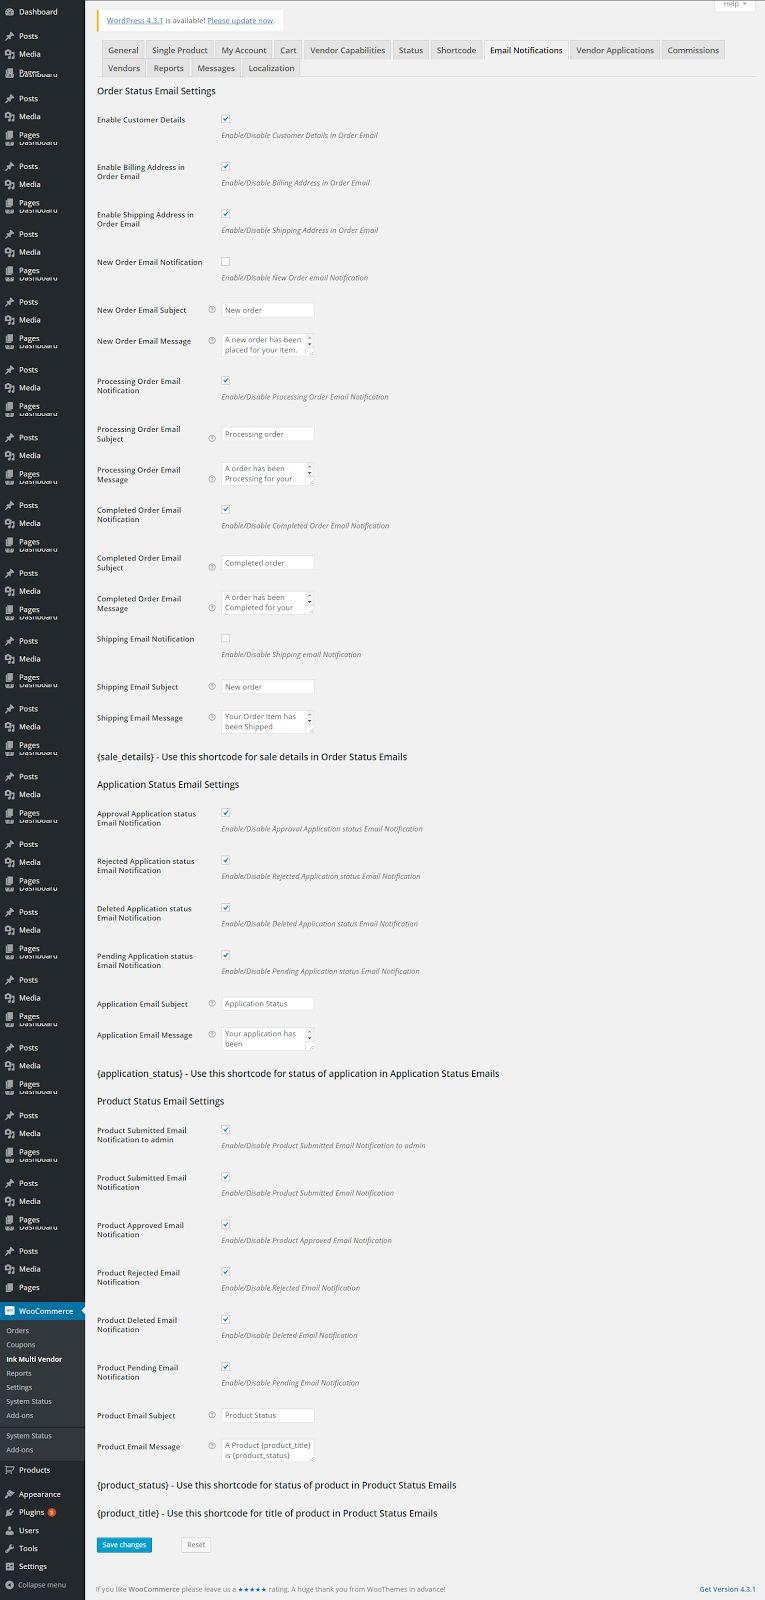
It displays all the notifications such as
- Enable Customer Details
- Enable Billing Address in Order Email
- Enable Shipping Address in Order Email
- New Order Email Notification
- New Order
- Enable/Disable Processing Order Email Notification
- Processing order
- Completed order
- Shipping Email Message
- Application Status Email Settings
- Approval Application status Email Notification
- Rejected Application status Email Notification
- Deleted Application status Email Notification
- Pending Application status Email Notification
- Application Email Subject
- Application Status
- Application Email Message
- Product Status Email Settings
- Product Approved Email Notification
- Product Status
- Product Email Message
Vendor Applications Tab
Whenever a seller applies to become a vendor, his notification of displayed under this tab. Upon the request, the application is either approved or rejected.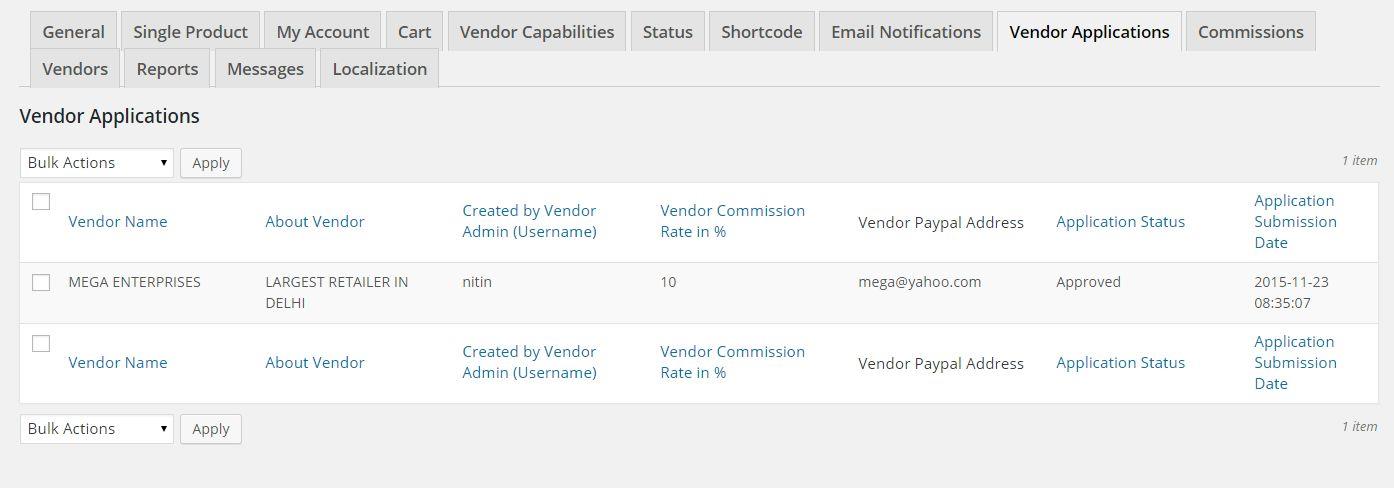
Commissions Tab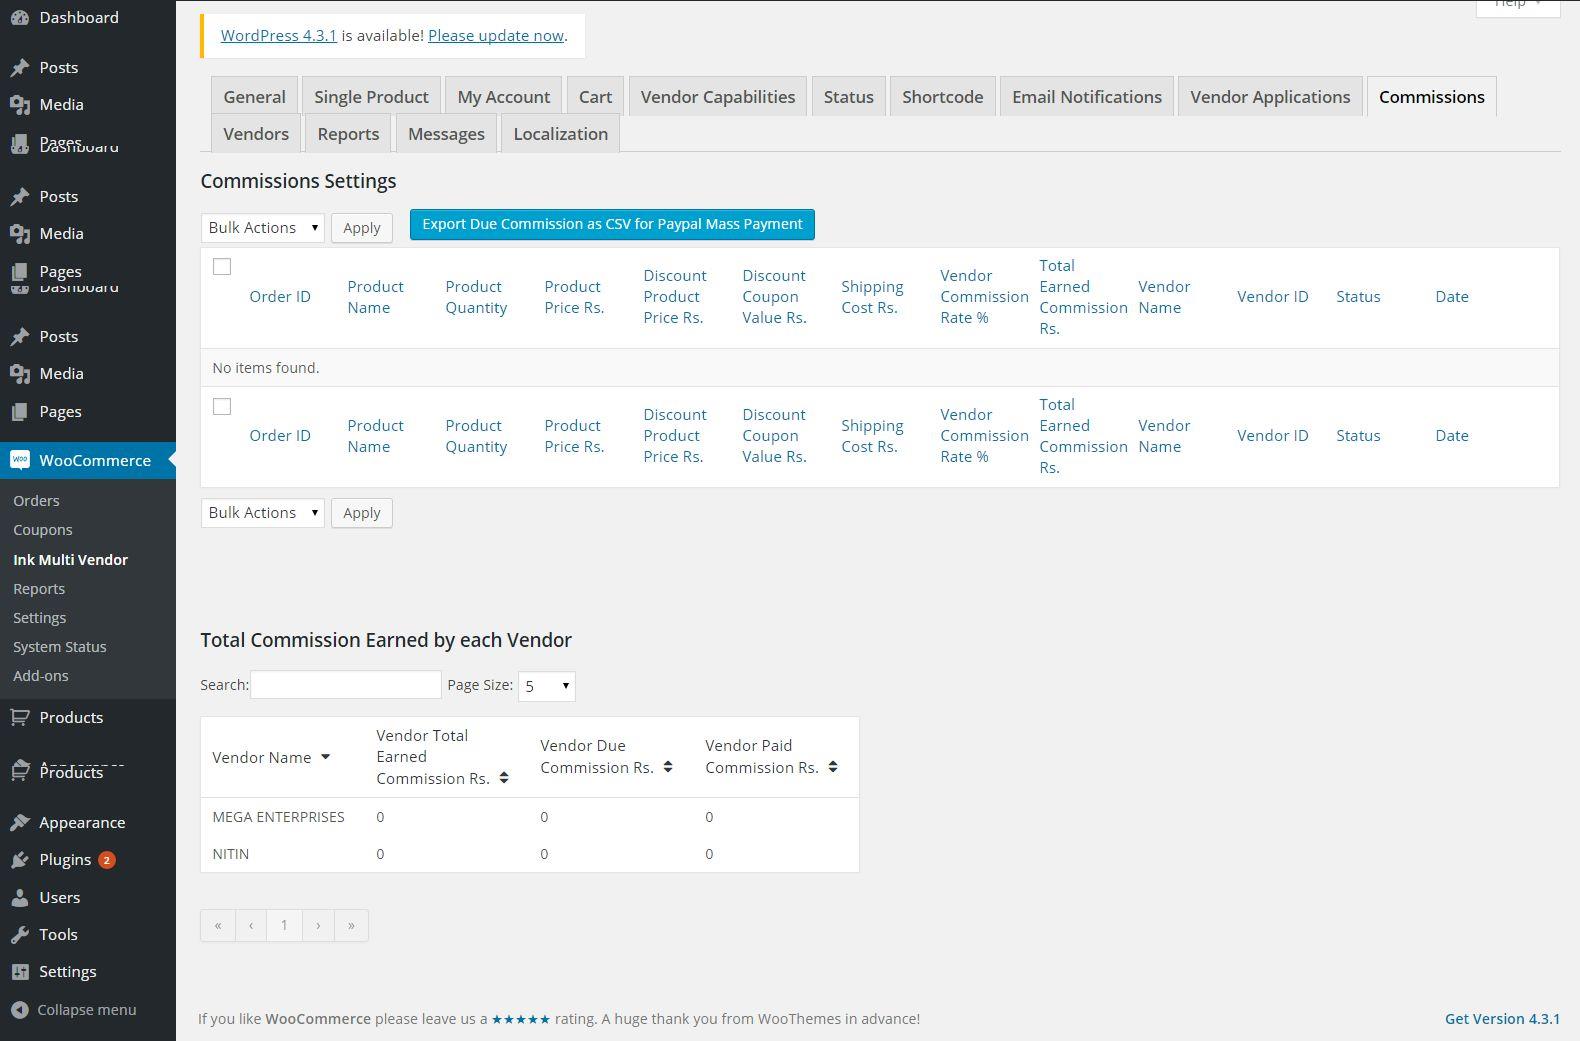
Vendors Tab
The vendor tab displays all the data of the vendor. Clicking on View vendor data will display all the data of the vendors.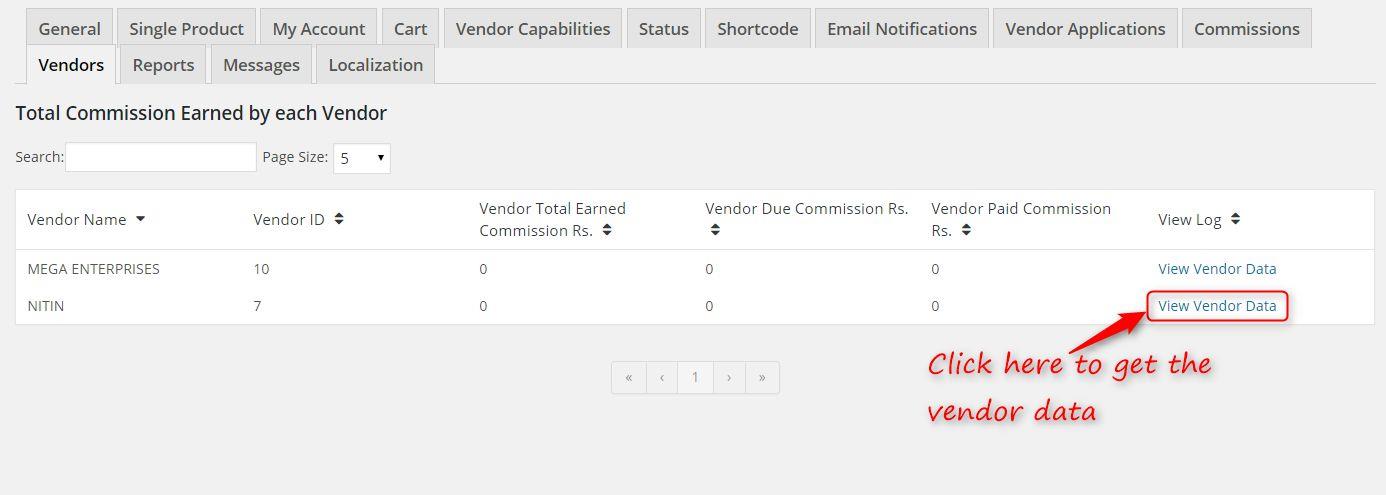
Reports Tab
Exporting the data as CSV is done from here
Messages Tab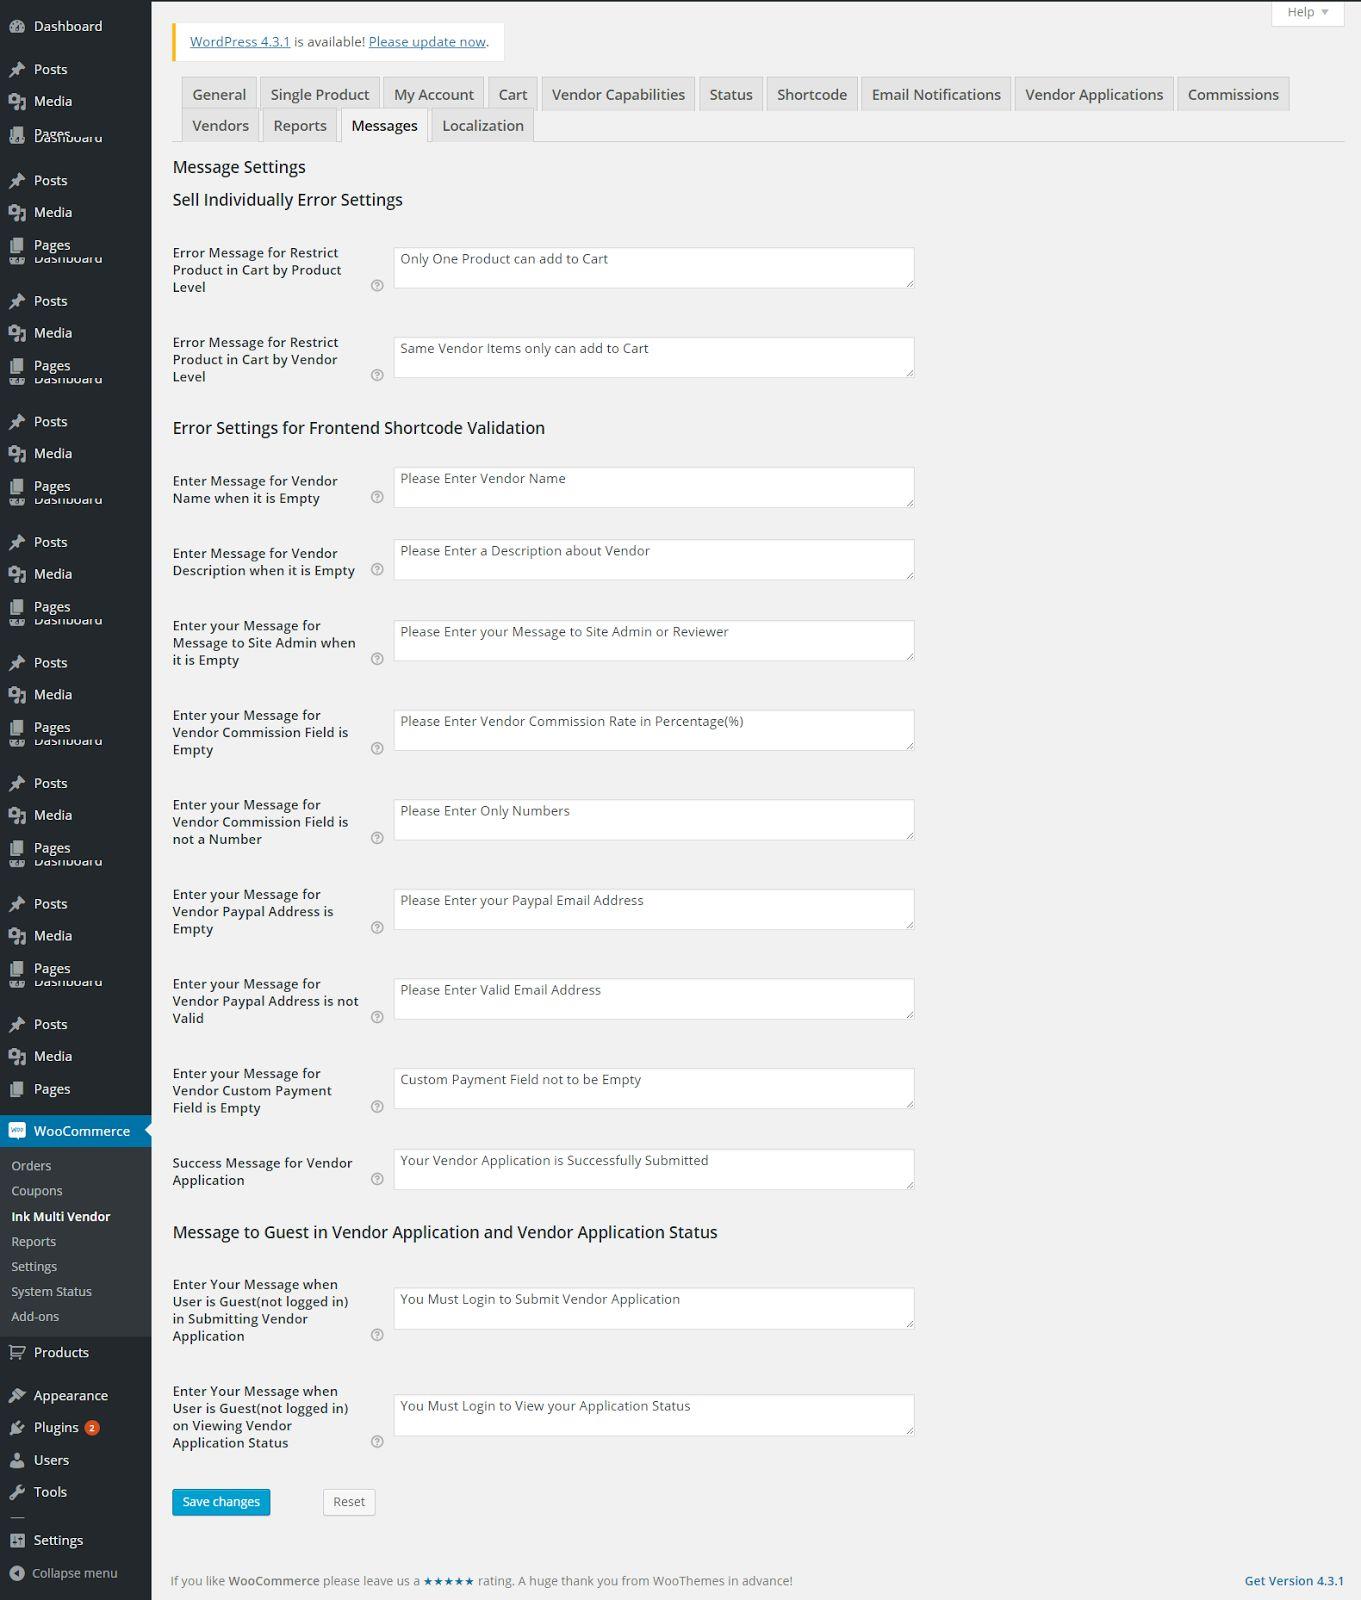
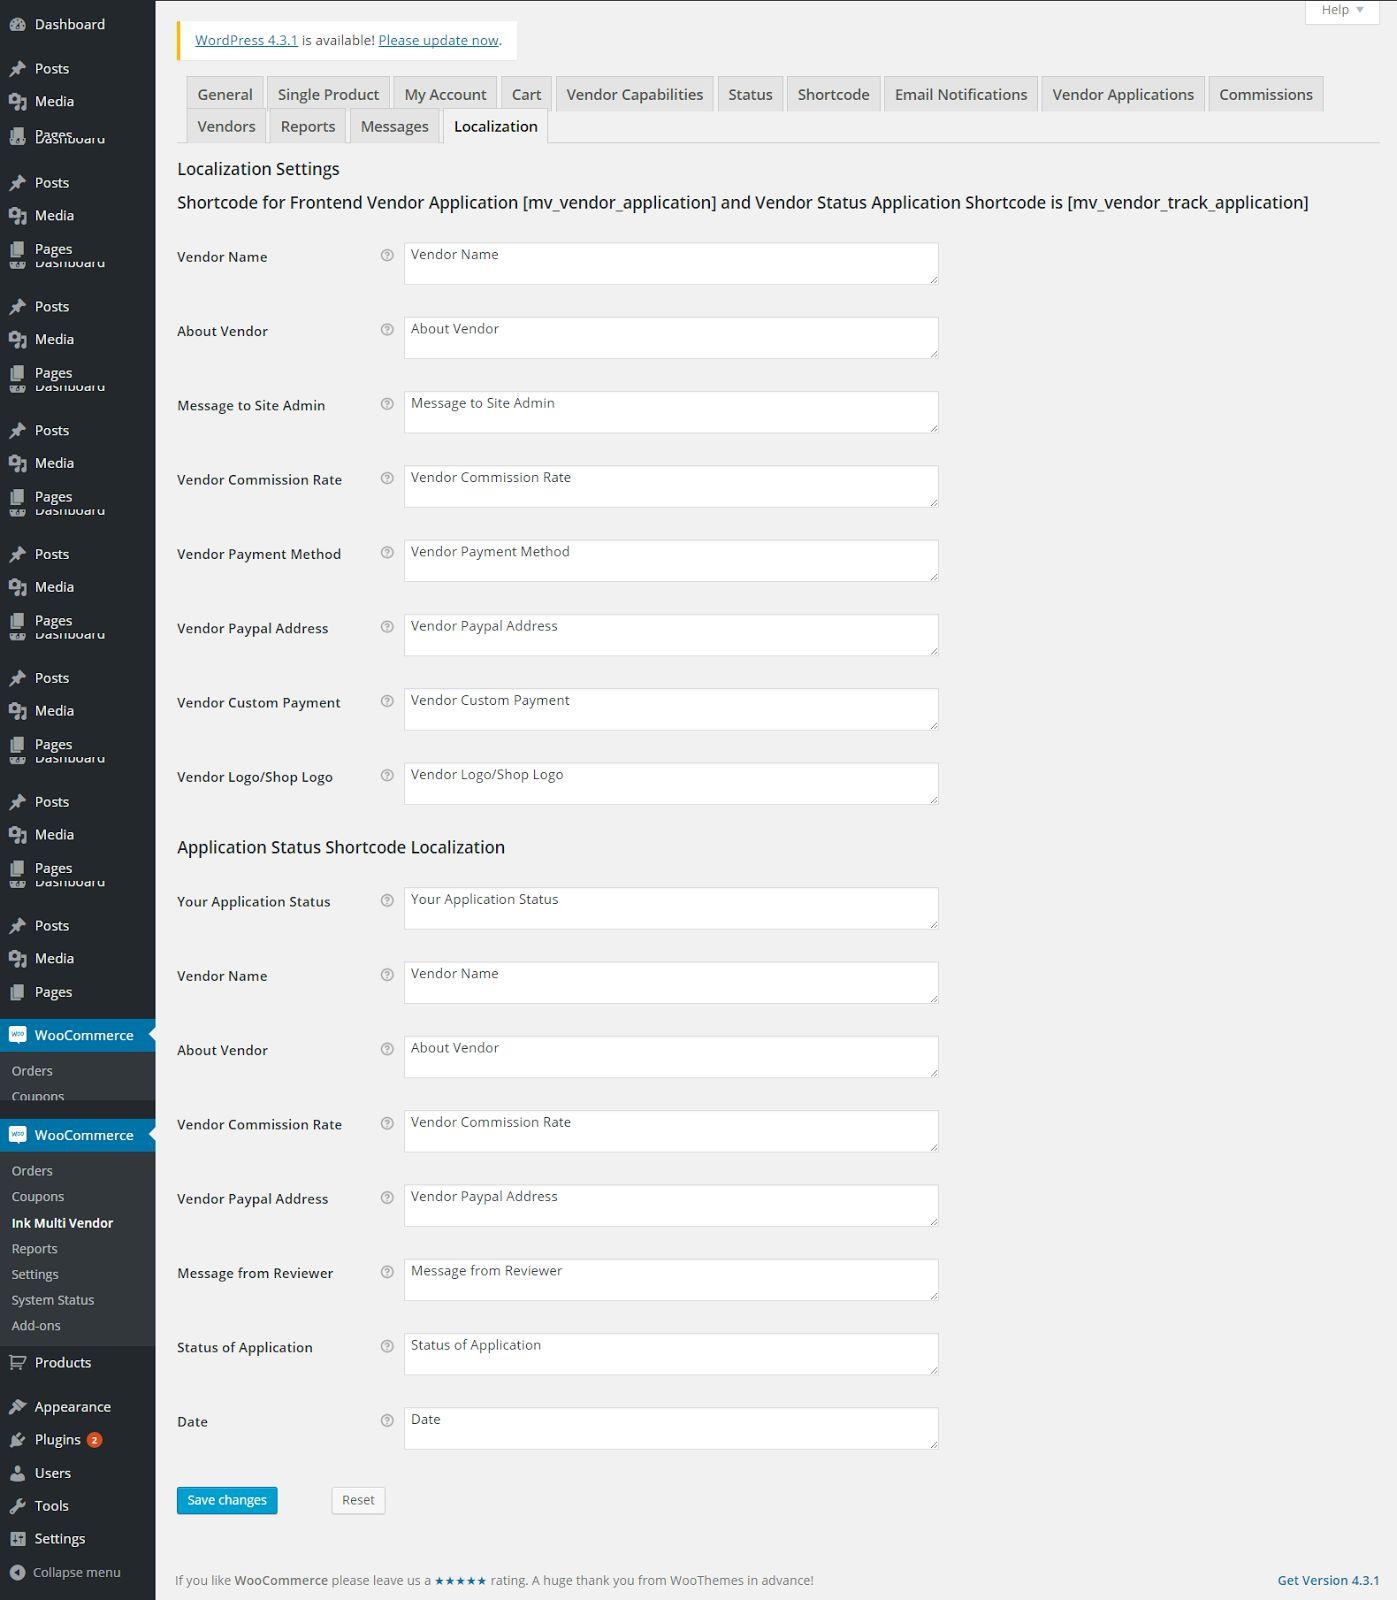
Localization Tab
This tab contains all the information related to the vendor such as
- Vendor Name
- About Vendor
- Message to Site Admin
- Vendor Commission Rate
- Vendor Payment Method
- Vendor Paypal Address
- Vendor Custom Payment
- Vendor Logo/Shop Logo
- Application Status
- Vendor Commission Rate
- Vendor Paypal Address
- Message from Reviewer
- Status of Application
- Date
Sample Data Installation
To make your WordPress website look like our live demo, please follow the instructions below. We also suggest you always have a backup .sql file exported from your database.
- You need to install import and export plugin. The InkThemes Import and Export Plugin takes json and xml file as input.
- Download the respective files from your members area that are named after your theme and can only be used to import settings and website content.
- Upload both the xml and jason file to its particular field and click “Import”.
- Dashboard >> InkThemes Import Export >> Upload files >> Hit “Import” button
Now Import option allows you to automatically replicate this theme’s demonstration website to your WordPress installation. Now visit your website.
Demo contents are imported, now let’s setup the HomePage of your website according to your requirements.
Goto dashboard-> Appearance->customize , you will navigate to customizing Panel.
There you’ll find the multiple settings option listed, you can configure whichever section you want to get displayed on your homepage. Let’s navigate one by one.
General Setting – Here you can enter Google Analytic code to track the traffic of your website and Google map api key and hit “Save & Publish” button present at the top.
Header Setting – In this section is used to brand your website. You can upload your own logo and turn on/off the sticky header. By default it is turned on which means that your header visible at all times. The header will stick to the top of the viewport, but so that it doesn’t interfere with the content and if you don’t want that you can turn it off.
Section Sorting – You can sort your homepage sections according to your need. All you have to do is just drag and drop that section label and hit “Save & Publish button” to reflect the changes. You can uncheck the section if you don’t want it.
SEO Section – This section helps you optimize your website according to search engine. Enter meta keyword, meta description, and author name.
Site Identity – In Site Identity segment, you can set the website Title, Tagline, and Icon elements. These elements appear when your mouse pointer moves over the Title bar of the website site. The below figure will help you in understanding this segment.
Menu – By default, the menus will fallback to Pages. That means just after activation of the theme, you will see all the pages as menus. The menu segment in the customizer allows you to replace the default menu with your menu. You can set up your own customized menu which could be combination of pages, post, link, categories and more defined by you. Hence, you could display only specific pages/menus as per your requirement.
You have the option of adding a new menu and then setting it up accordingly to be displayed in the menu bar section of your site.
- Menus -> Add a Menu -> Enter menu name -> Hit Create menu button
- Now click on Add Items button
- A new window will appear at the right side, select the required menus from different section.
- You can drag and drop the menu to rearrange in order. And to create drop down menu drag and drop the menu slightly right side.
- Check the main menu option and hit Save and Publish button.
Widget section – Here you can add widgets, multiple widget sections are listed out. Just click one by one and and customize it.
- Click the Widget menu in the Theme Customizer to access to the Widget Customize Screen.
- Click the widget section that you want to customize
- Click Add a Widget button at the bottom of sidebar. It shows the list of available widgets.
- Click a widget you want to add. The widgets should be added in the sidebar.
- Preview your site and you should see the content from your new Widget.
- To arrange the Widgets within the Sidebar, drag and drop the widgets in the order you want or click Reorder link and click up arrow and down allow of each widget and click Done after the arrange operation.
- To customize the Widget features, click the down arrow in the right to expand the Widget’s interface.
- To remove the widget, click Remove from Widget’s interface in above step.
Slider Section – Under this segment, you will get options to configure 6 sliders within the theme. Going to any image slider tab, you will find options for adding an image, heading, sub-heading, button text and button link. You can also add unlimited slider with the help of shortcode.
- Click the Slider Setting menu in the Theme Customizer to access to the Slider Customize Screen.
- Click the Slider that you want to customize
- Choose the animation effect for that slider from the listed effects.
- Now upload the slider image, for that click Select Image button and then upload your image or choose it from media. The optimal size is 442px wide and height 235px
- Enter the suitable heading for that slider.
- Enter the button text for that slider
- Insert the button link where you want to navigate your visitors.
- Choose the animation effect for the slide button
- Hit save and publish button present at the top.
Follow the above mention steps for the rest of the slider. You can also turn off and on the slider caption. By default it’s on but to turn it off click the option “Turn on & off slider caption” and select off.
If you want to add more sliders you can add it through unlimited slider section
Enter slider shortcode to add another slider.
Shortcode – [add_slider image=’SLIDER IMAGE’ heading=’SLIDER HEADING’ description=’SLIDER DESCRIPTION’ btn_url=’SLIDER BUTTON URL’ btn_text=’SLIDER BUTTON TEXT’] .
Well, you can also add multiple shortcodes separated by ‘,’ (comma) to generate more feature box. Make sure you enter all the values in single quotes in the shortcode or else it won’t work.
Feature Settings Section – Under this section, you will get the options to customize 4 column feature area present right below the slide section. You can also add unlimited feature column with the help of shortcode.
- Click the Slider Setting menu in the Theme Customizer to access to the Slider Customize Screen.
- Click the Feature Section Heading tab to change the main heading and subheading.
- Click the Feature Section Background Color to customize the background color, you can set any color you want with the help of colorpicker. Now hit save and publish.
- Now just like the above mentioned step you can set up the Feature Section Content color. Save your changes.
- Click the Feature Section Animation tab to set the animation effect of heading, subheading and feature content.
- Now click the Feature tab one by one to customize it
- Choose icon for your feature area. For that Go to Font Awesome. Search any icon. Say you want to search an icon for TV. You will find icon class like class=fa fa-television. You need to copy that code and paste it in given input field.
- Now enter the heading, content and link to respective input fields. And save all the changes. Same way you can customize the other feature columns.
If you want to add more feature column then, you can add it through unlimited feature section.
Enter following feature box shortcode to add another feature box.
shortcode: [add_feature_box link = ‘LINK OF THE FEATURE BOX’ icon = ‘ENTER ICON CLASS from Font Awesome ex: fa fa-television’ heading = ‘HEADING OF YOUR FEATURE’ description = ‘DESCRIPTION OF YOUR FEATURE’ ].
You can also add multiple shortcodes separated by ‘,’ (comma) to generate more feature box. Make sure you enter all the values in single quotes in the shortcode or else it wont work.
Shop Section – Under this section, you will get the options to customize shop area present right below the feature section. You can customize heading and the numbers products to be displayed.
- Click the Shop Setting menu in the Theme Customizer to access to the Shop Customize Screen.
- You can edit heading, colors and animation effects just the same way you did for feature section. Go to respective tabs and set the desired color and effects.
- Now click shop settings tab to choose the category. If you want to display products of particular category you can select the one you want, by default all the latest product will display.
- You can also enter the number of products to be displayed at the homepage. Just enter the numeric digit under number of products input fields.
- Hit save and publish button.
Blog Settings – In the blog section, you can modify the effects and color of blog posts. Latest blog posts will only appear on the front page.
- Click the Blog Setting menu in the Theme Customizer to access to the Blog Customize Screen.
- Click on the tab Blog Setting of odd Blog posts – here you can set the background and content color of odd blog posts.
- And by clicking Blog Setting of Even Blog posts you can set the color of even posts
- Now click on Blog Animation tab to set the animation effect from the given animation effects.
- Click Blog layout to set the layout.
- Click on Blog Image Shadow tab to turn on/off posts image shadow. At last, hit Save and Publish button to save all the changes.

Testimonial Settings – This segment allows you to add 6 testimonials on your website. On each testimonials section, you’ll get options for adding author’s content, image, and name. Along with it, you can change the color of the background, main heading and content also.
- Click the Testimonial Setting menu in the Theme Customizer to access to the Testimonial Customize Screen.
- You can edit heading, colors and animation effects just the same way you did for feature section. Go to respective tabs and set the desired color and effects.
- Now click Testimonial tabs to customize it one by one
- Upload the image of your customers.
- Enter the customer name, message, and designation in respective input fields.
- Set the background and content color.
- Don’t forget to hit save and publish button.
Team Settings – This segment allows you to showcase team members of your organization. You can add details of your team member like image, name, designation and post various social sharing links to get connected with them. And, yes you’ll have color setting tab also.
- Click the Team Setting menu in the Theme Customizer to access to the Team Customize Screen.
- You can edit heading, colors and animation effects just the same way you did for feature section. Go to respective tabs and set the desired color and effects.
- Now click Team member tabs to customize it one by one
- Upload the image of your team member.
- Enter their social profile links in respective input fields
- Now also enter the name and designation in their respective input fields
- Don’t forget to hit save and publish button.
Partner Settings – This segment allows you to showcase your clients. You can add logo image of your clients.
- Click the Partner Settings menu in the Theme Customizer to access to the Partner Customize Screen.
- You can edit heading, colors and animation effects just the same way you did before. Go to respective tabs and set the desired color and effects.
- Now click Our Partner Section tab to add the logo
- Upload the image of your clients and enter link in respective input fields.
- Then hit Save and Publish Button.
Footer Settings – The Footer Section allows you to edit the copyright information in the footer area. You also get a choice of displaying bottom footer, embedding brand logo, displaying of social sharing icon, etc.
- Click the Footer settings menu in the Theme Customizer to access to the footer Customize Screen.
- You can edit copyright text, click Copyright Text menu and enter your text in given input field.
- Now click Footer image tabs to upload logo for footer section.
- To set up social icon click on Social Icons tab and insert the link of your respective profile.
- Plus you can also choose the number of columns for your footer section
- At last hit Save and Publish button to save all the changes.
Now you’re done with the theme customization…
Blog Page And Posts
Now let’s create a separate page that shows all your blog posts in one go. To do so just follow the below mention steps…
- Go to Pages > Add New
- Enter the name of the page
- Now at right hand side under Page Attributes > Templates > select “Blog Page”
- Click “Publish” button
Menu Setup
By default, the menus will fallback to Pages. That means just after activation of the theme, you will see all the pages as menus. Create a custom Menu and assign a menu location to display your own Menu. If you want selective menus with combination of links, pages, categories then custom menu is what you should be looking for.
Set up Custom Menu
- Go to Appearance > Menus in the WordPress menu
- Click on Create a new menu link
- Now add the menu item, you can choose Pages, Custom links, Category etc.
- Check Theme Location
- Click Save Menu after adding required custom links in the menu
- Theme Location for Menu settings
Main Menu – Display the menu on the Header.
Footer Menu – Displays the menu on bottom right at the footer.
Now you know how to build a eCommerce store multi like this?


