Take a walkthrough with us on how to create a business website with WordPress theme. So, now you are a few minutes away from your own website.
We have handpicked Harrington theme for this tutorial because we know it’s the best amongst the stack! Harrington is squarely focused to elevate the functionalities and appearance of your corporate website.
If you have any theme in mind then, surely go can go forward with it. However, Harrington is worth a try! You can either download its free version to test or you can buy the premium version using the buttons below.
Get Free Version Of Harrington Buy Pro Version Of Harrington
Real-Time Preview of Harrington

Learn How To Create A Business Website With WordPress Theme
- Introduction to Harrington WordPress Theme
- Installation of WordPress Theme to Create a Business Website
- Homepage Customization Of The Website Using WordPress Theme
- Start Customization on Customizer Panel
-
-
-
- Logo
- Blog and Page Layout
- Background Image Settings
- Tap To Call Feature
- Elegant Typography
- Sliders On The Homepage
- Feature Area
- Homepage Blog Section
- Testimonial Section
- Homepage Map Integration
- Styling Options
- Social Icons
- Footer Settings
- Google Analytics Tracking Code
- Additional CSS
- Custom Posts
- Dropdown Menu
- Homepage gallery
-
-
-
1. Introduction To Harrington WordPress Theme
If you’ve got tired of fussy codes then Harrington can surely be a savior. It is meant to give a true appeal to your business in front of the web audience. And yes, it’s truly a multipurpose one!
You’ll find it filled with attractive sliders like parallax sliders, Ken burns slider and text sliders. Then, you will find the column-feature area, widgetized footer-sidebar area, blog featured area on the homepage.
This entire theme can be customized head to toe as per your taste and it will be a matter of few clicks. So, you can add your logo, sliders, additional styling with CSS and can do a lot more.
Tired Of Reading? Check Out A Quick Glance Of Harrington!
2. Installation of WordPress Theme to Create a Business Website
Installing the theme is very simple and easy. It will hardly take a minute. You simply need to follow the simple steps given below:
- Download the .zip file of Harrington WordPress theme.
- In the WordPress admin area, under Dashboard click on Appearance.
- Under Appearance, click on Theme and finally click on Add New.
Here’s the simple path to follow
Dashboard ->Appearance -> Themes -> Add New -> Upload Theme

Once, you click on Add Themes, you’ll see another button of Upload Theme.

As you click on Upload Theme, you’ll be prompted to upload the .zip format of the theme.

Once you follow all these steps, you’ll be taken to this screen. So, now kickstart your website with our installed theme.

Now, when we have successfully installed the theme, we will start its customization which we will begin with the in the next section.
3. Homepage Customization Of The Website Using WordPress Theme
The installation is done and now let’s start adding customization.
Under the WordPress Dashboard, you can find the option of Appearance. Once you click on it, a drop-down sub-menu appears with an option of Customize. TThis real-time customizer, we’ll lead to adding the sliders, logos and all various elements to the homepage.
Follow the path below:
Admin Dashboard→Appearance→Customize

So, the customization part is going to be more like a tutorial and an in-depth insight of Harrington WordPress Theme.
4. Start Customization on Customizer Panel:

This is the key to all the customization that you would want to apply.
It’s WordPress Customizer. You can also call it Front-End Customizer.
Here first, you’ll see Logo and Site Identity. Here you can set your logo and favicon for the website.
You’ll find the option for Blog & Page Layout along with Background Image Setting.
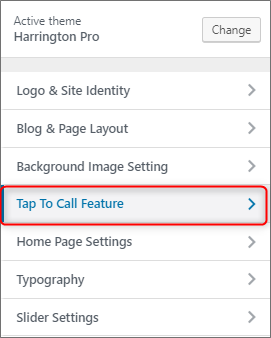
There are also Tap To Call Feature and Home Page Setting.
Of course, you will find Typography for elegant texts. Slider Setting to add slides and images.
The next in the row is going to be Featured Area Setting, and Blog Area Setting on the homepage.
Next, in Client Testimonial Section, you can simply showcase the testimonials of your clients.
Then Contact Page Map integrates a Map on the homepage. You will find Social Icons to add to your e-store website.
There is Bottom Footer Settings to design the footer with drag and drop of the element.
It also has Google Analytics Tracking Code, Captcha Setting, SEO Options.
Add Your Business Logo And Site Title To Your Website
Harrington allows you to add a custom logo and site identity. To upload you logo simply follow the given path.
Dashboard -> Appearance -> Customize -> Logo & Site Identity.
Here you can add the title to your website. Further, you can manually upload your uniques logo.


Blog And Page Layout To Create The Most Eyes Pleasing Homepage
In this particular section, you can choose the way you want the homepage to look like. In fact, you can also choose the way to display blog sidebar.
You can do this by following the simple path below:
Dashboard -> Appearance -> Customize -> Blog & Page Layout.


Upload Background Image To Make The Homepage More Appealing:
Instead of stereotype solid colors, you can add creative images to the background of your website. This will surely add a WOW element to the appearance.
Follow the path below to apply this to your website.
Dashboard -> Appearance -> Customize -> Background Image Setting


Add Tap To Call Feature For Instant Reach To The Visitors
This is one of the most noteworthy features for your business website. You can simply add a tap to call button. Whenever a site visitor clicks on this button, he’ll be able to place a call to you straight away.
To enable this you have to follow the simple path below:
Dashboard -> Appearance -> Customize ->Tap to call Feature

Add Elegant Typography To Your Webpage
Typography makes a difference. Elegant typography enhances the experience of a viewer. Hence, in Harrington, you can add up various fonts in your webpage.
To add various texts to your webpage follow this simple path:
Dashboard -> Appearance -> Customize -> Typography


Add Sliders On The Homepage To Create A Visual Treat For The Viewers
Before I show you how to implement slider settings, let me tell you something very interesting about the sliders in the theme.
In Harrington theme, sliders are designed with Kenburns effect. This is something like a magnetic effect. The images in the sliders will zoom and move. The overall feature gives a neat and attractive look.
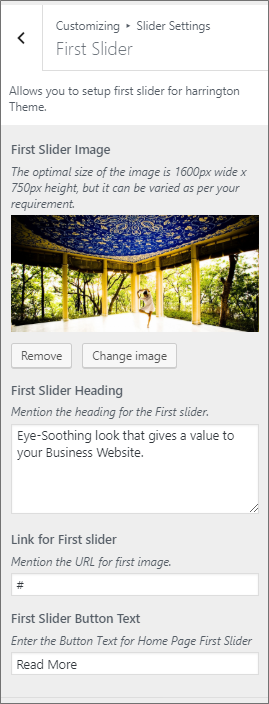
In the slider, you can show a maximum of 6 images, whereas minimum would be one. With each slider image, you can set the heading and short description according to you. Moreover, you can also give a link for slider images and its text.
Dashboard -> Appearance -> Customize -> Slider Settings


Slider Setting -> First Slider
Here you can add images, heading, and a small description. You can also add the link for the slider.
Slider Setting -> Slider Speed
After setting the First Slider, the next in the row is to set the slider speed. You can set the slider speed (in milliseconds) according to you.
- For e.g. If you want to set the slider speed as 5 seconds then enter 5000.


Slider Setting -> Slider Control
There is an option to show or hide the slider. Just check off the required radio button in the field Home Page Slider On/Off, either to show the slider or hide it. You can see in the image below.


Give Limelight To Your Services In The Feature Area
The homepage feature area consists of 2 feature sections. You can set feature circle image, heading with description and a link in each of the sections
You can follow this path to add amazing feature area to your webpage
Dashboard -> Appearance -> Customize -> Feature Area Home Page Settings

Feature Area Settings -> Main Heading Setting
If you have chosen to use feature area then, you can start from here. So, first give heading and write text in the feature area in the following section as shown below.
After setting the Home Page Main Heading and HomePage Sub Heading, click on Publish button on the topmost right side of the customizer panel to save the changes.

 .
.
Feature Area Home Page Settings -> Top Heading On/Off
You can either show the feature area or hide the feature area by check off the desired radio button in Home Page Top Heading Section On/Off.


Feature Area Settings -> Main Heading Setting
In this section, you can set the main heading for the three column feature area.


Feature Area Settings -> First Feature Area
Finally, add the first feature area along with an image, heading and text description along with a redirect link.


Feature Area Settings ->Homepage Three Column Feature Area On/Off
You can show or hide the feature area by selecting one of the radio buttons in this section. After finishing desire settings, click on Publish button.


- Click on Publish button to save the changes done.
Use Homepage Blog Area To Showcase The Best Of Your Blogs
The homepage blog feature consists of following sections- Home Page Blog Heading, Number Of Post In Home Page, Home Page Blog Post On/Off.
Use the simple path to access this blog area settings.
Dashboard -> Appearance -> Customize -> Blog Area Settings

Blog Area Settings -> Home Page Blog Heading Text
- In this section, you can set an appropriate heading and short description of the latest featured blogs.


- Click on Publish button to save all the changes done in
Blog Area Settings -> Homepage Number of Blogs
In this section, you can set the required number to display the latest post on the homepage.


In Home Page Blog Post On/Off, you can show or hide your blog post by selecting either On/ Off the radio button.


- Click on Publish button to save the changes done in Home Page Blog Post On/Off.
Use Homepage Testimonial Section To Increase The Credibility Of Your Website
You can present your client’s testimonial to your business website. These testimonials will surely be a factor of trust for the website’s viewers.
Dashboard -> Appearance -> Customize -> Client Testimonial Settings

Client Testimonial Settings-> Testimonial Section Main Heading
You can set the head for the testimonial section on the homepage.


Client Testimonial Settings-> First Testimonial Text
You can set the First Testimonial Text Section like this.


Client Testimonial Settings-> Homepage Testimonial On/Off
You can show or hide the testimonial with the following option as given below.


Integrate Contact Page Map On Your Website For Increased Visibility
You can show the map location of your business on the website by pasting the iframe code generated by Google map in this section and then click on Save All Changes.
Use this simple path:
Dashboard -> Appearance -> Customize -> Contact Page Map


- Click on the Publish button to save the changes done.
Style Up Your Website With Colors And Layout Using Styling Options
There are various styling options available in the theme. You can change the style of the theme through the following procedure.
Dashboard -> Appearance -> Customize -> Styling Options

Styling Options -> Theme Stylesheet
This option will let you set different colors on the website. In short, this will spice up your website!


Styling Options -> Theme Language
You can choose the way you would want your content to appear. This can be either rtl to ltr.


- Click on the Publish button to save the changes done.
Socialize Your Website By Adding Social Icons On The Website
Social icons are very useful for a website. There are various social icons available in the theme. The social icons will be displayed in the footer.
You can use them through the following procedure.
Dashboard -> Appearance -> Customizer -> Social Icons


- Click on the Publish button to save the changes done.
Add Elements To The Footer Of Your Website Using Footer Settings
You can add various widgets, you can make your footer 2, 3 or 4 column widegtized, all this by Footer Settings. You can do it through the following procedure.
Dashboard -> Appearance -> Customize -> Footer Settings

Footer Settings -> Footer Width Column On/Off
You can select the number of widegtized area that you would want in your footer section


Footer Settings -> Footer Widget On/Off
Harrington Theme allows you to either turn on the footer widgetized column or you can even turn it off. Here’ how you can do it.


Footer Settings -> Footer Contact Details
You can set your contact details on Footer which gets displayed on the bottom left corner.


Footer Settings -> Copyright Footer Text
You can easily add your copyright text stating the website or the business is solely your property. In fact, you can set any text to be displayed on the bottom of the website.


- Click on the Publish button to save the changes done.
Google Analytics Tracking Code To Get The Stats Of Your Website
You can use the Google Analytics Tracking Code in the following way:
Dashboard -> Appearance -> Customize -> Google Analytics Tracking Code


Add Aditional Styling With Custom CSS
You can use your own CSS code here for any customization to the theme through the following procedure.
Dashboard -> Appearance -> Customize -> Additional CSS

Create Posts On Your WordPress Website To Convey Your Ideas
You can easily create a post on your website by following steps given below:
Step1. Dashboard-> Posts-> Add New

Step2. Write the post name with relevant content as shown in the image given below:

Step3. You can select the category for the post or create a new category.

Step4. Set featured image of the post.
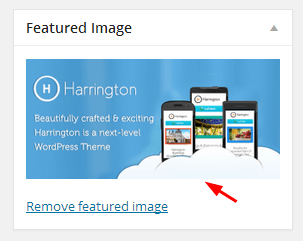
Step5. Save the changes and click on Publish.

Create A Dropdown Menu on Website For Better Navigation
You can easily customize the menu with the following steps:
Step1. Dashboard-> Appearance -> Menus

Step2. Give Menu Name (let’s say menu) and click on Create Menu.

Note: Don’t forget to save the menu before starting to create the menu structure.
Step3. Create a custom link of the home page of the website, for that, go to link tab, give Link Text and URL and click on Add to Menu.

The homepage is now added and listed on the menu.
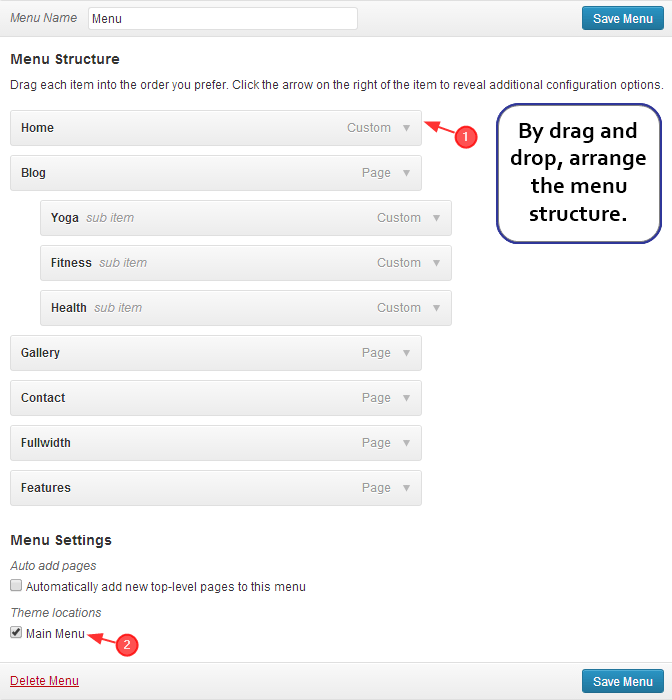
Step 4. Add other pages in the menu structure.
For that, select pages from the Most Recent option by check-marking and click on Add to Menu.

You can drop down pages according to your choice.
Step 5. Check mark on Main Menu and then click on Save Menu.
Create Gallery Page On The Website To Impress The Viewers
You can easily create a gallery page in the theme by following the steps given below:
Step 1. Dashboard -> Pages -> Add New

Step 2. Select the template as Fullwidth Page.

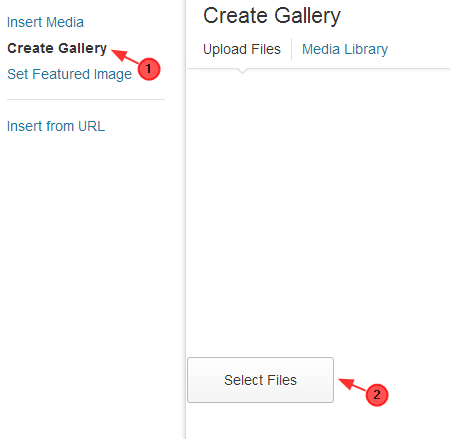
Step 3. Click on Add Media to create a gallery.

Step 4. Click on Create Gallery.

Step 5. Go to Upload Files-> Select Files
Step 6. Select the required images and upload them to the gallery.
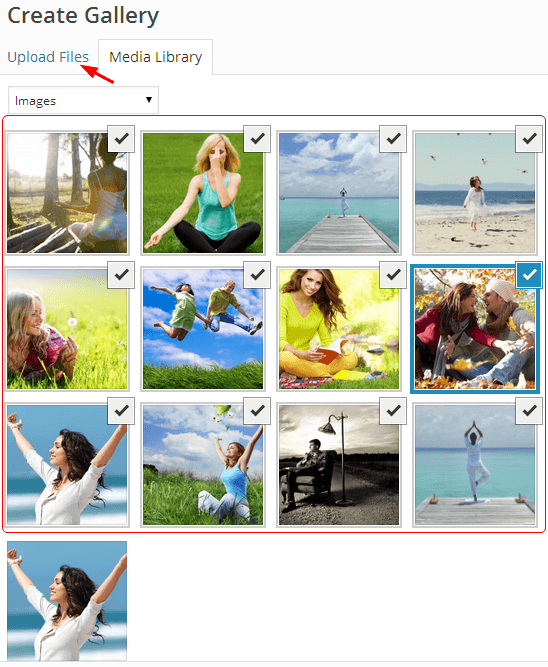
Step 7. Click on Create a new gallery button.
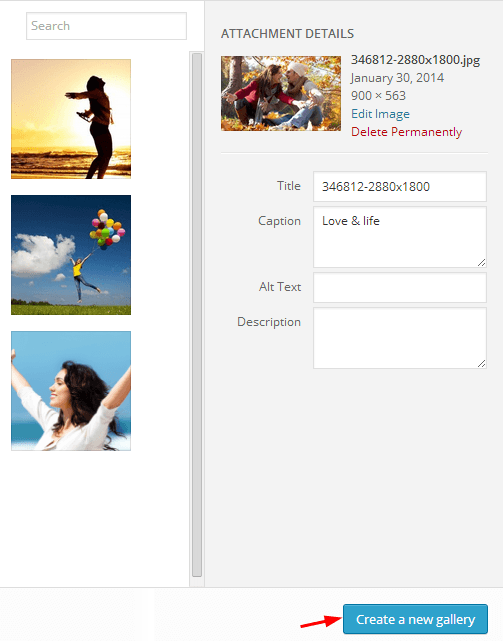
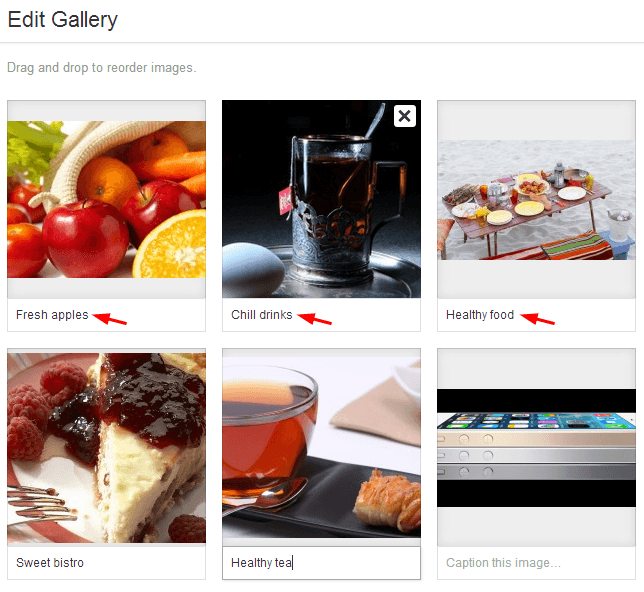
Step 8. You can write a caption for each image as shown below:
Step 9. Select Column number from the option.
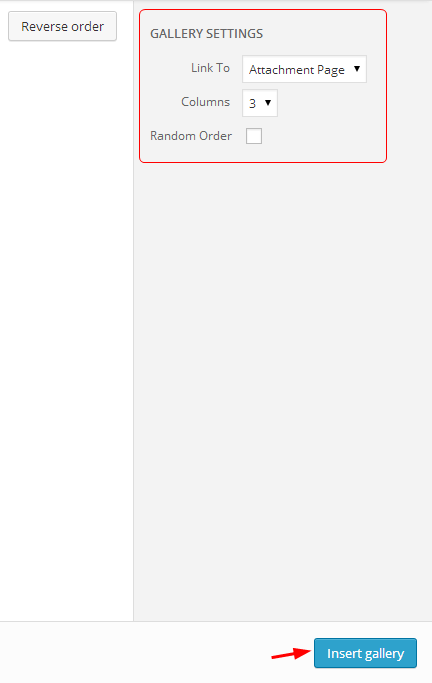
If you want to create a gallery of 3 column, select 3 in front of the columns.
Similarly, you can create a gallery of more 4 column or multiple columns by selecting the number from the drop-down.
Make sure that Link To field is set to Attachment Page.
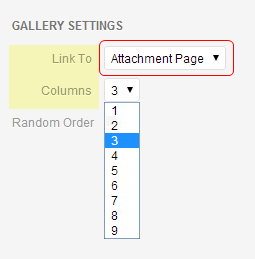
Step 10. Click on Insert gallery.
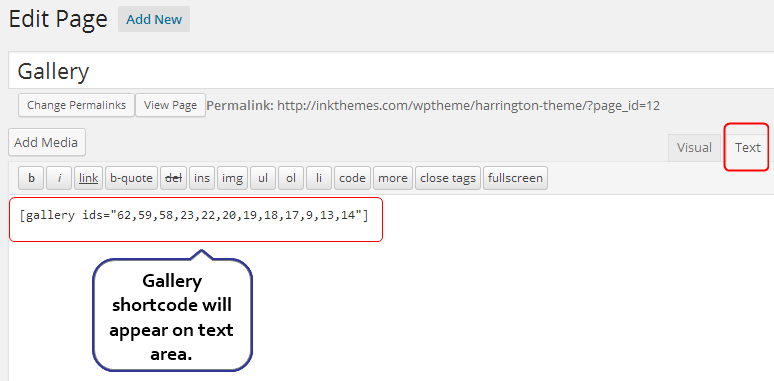
Once the gallery is created, you can see a gallery shortcode will automatically appear on the gallery page. See the below screenshot for the reference:
Step 11. Save the changes and click on the Publish button.
Once, you create the gallery, the final gallery will appear like this as given below:
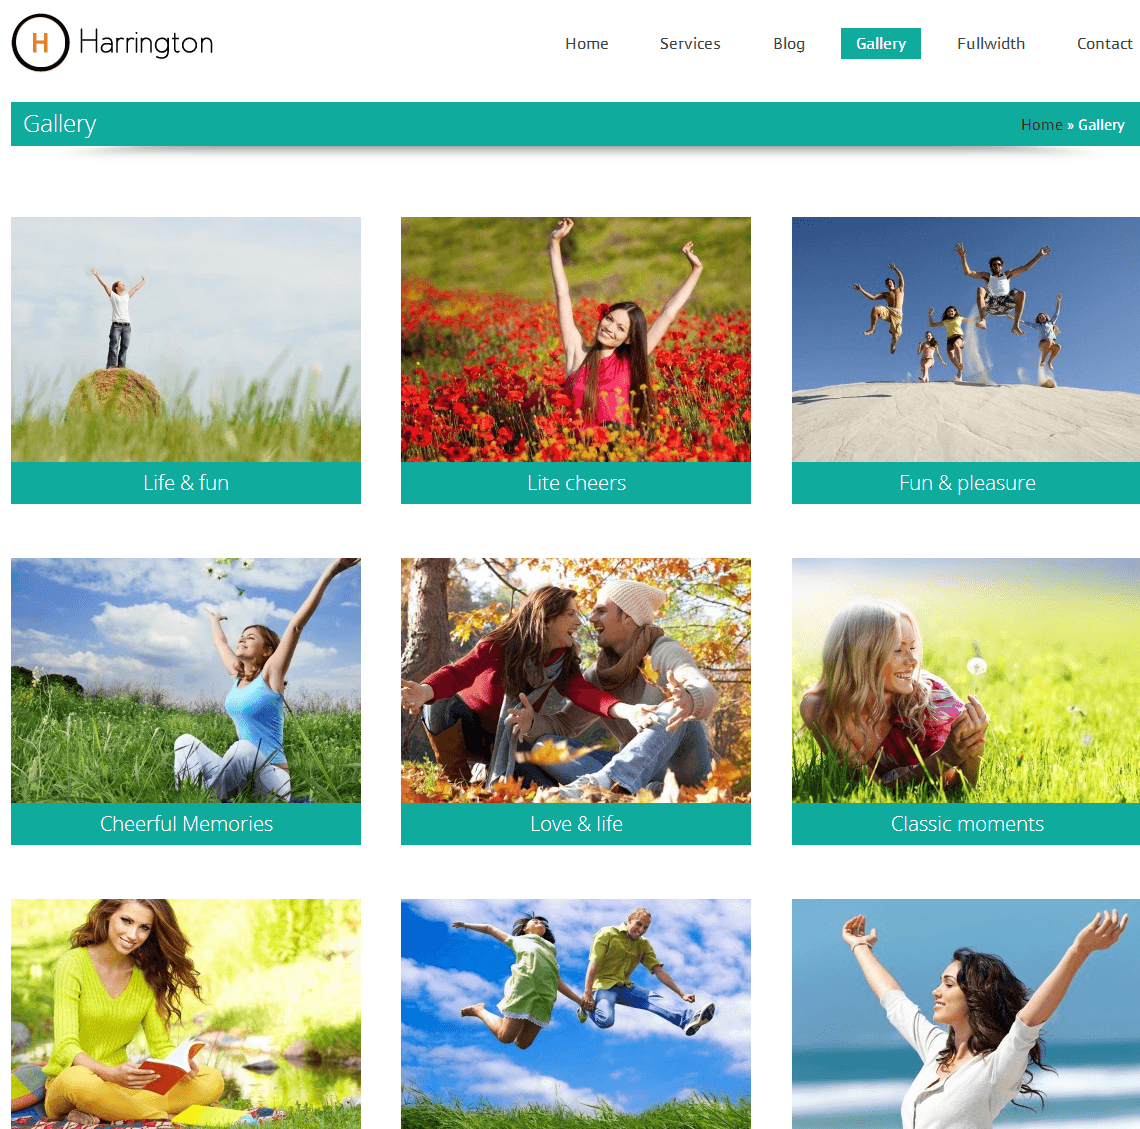
With this, you have completed creating the main features on your website’s homepage.
Besides, the theme has widgetized footer and sidebar. You can easily put widgets on sidebar and footer according to your requirement.
For more related information just go through the link-
Above, I have explained you, how you can create a business website with Harrington theme in simple steps.
If you face any problem while deploying your website with the theme, you can contact us.


