
Nowadays, everyone wants to run a website and I am sure you too are looking for the same. You need to require hosting to launch your website, So I am covering step by step process to host your website on Amazon AWS Server.
If you have made your website on WordPress, you may have difficulty to upload it to the server. You may search all the possible solutions for a step by step process to do so (as we did while hosting FormGet on Amazon), but you won’t find any.
We faced some issues while uploading FormGet website on the Amazon server and after solving all those hectic steps I thought it should be a subject of my upcoming post.
Here are few important topics that are related to WordPress:-
So, in this post, you will find a complete procedure (a step by step tutorial) of How you can upload WordPress on Amazon EC2.
Note: I assume that you have an account on Amazon Web Server (AWS). If you do not have an account on Amazon then create it first.
Step #1
Login to your AWS account.
Go to My Account / Console –> My Account

Step #2
Login to your AWS account by entering your email address and password.

Step #3
After successfully login,
Go to My Account / Console –> AWS Management Console

Step #4
Select EC2 from the list of Amazon Web Services.

Step #5
EC2 Dashboard appears on the screen. Now you need to create a new Instance. For that,
Go to Instance –> Launch Instance

Step #6
Select Classic Wizard for the instance and click on Continue.

Step #7
Choose Ubuntu Server 13.04 of 64-bit from the Amazon Machine Image (AMI) list and click on Select.

Step #8
Select Instance Type T1 Micro

Click to Continue
Step #9
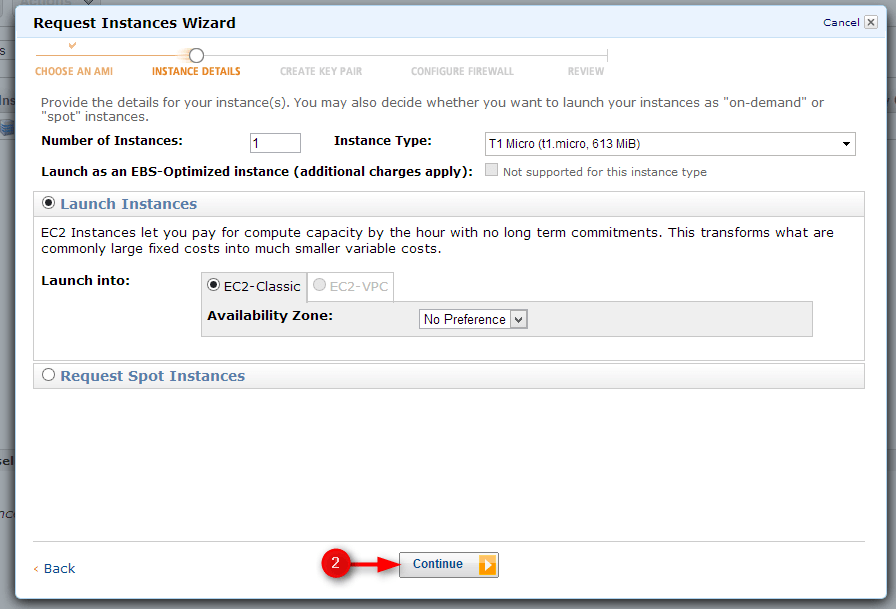
Continue with default Instance Details.

Again click to Continue
Step #10
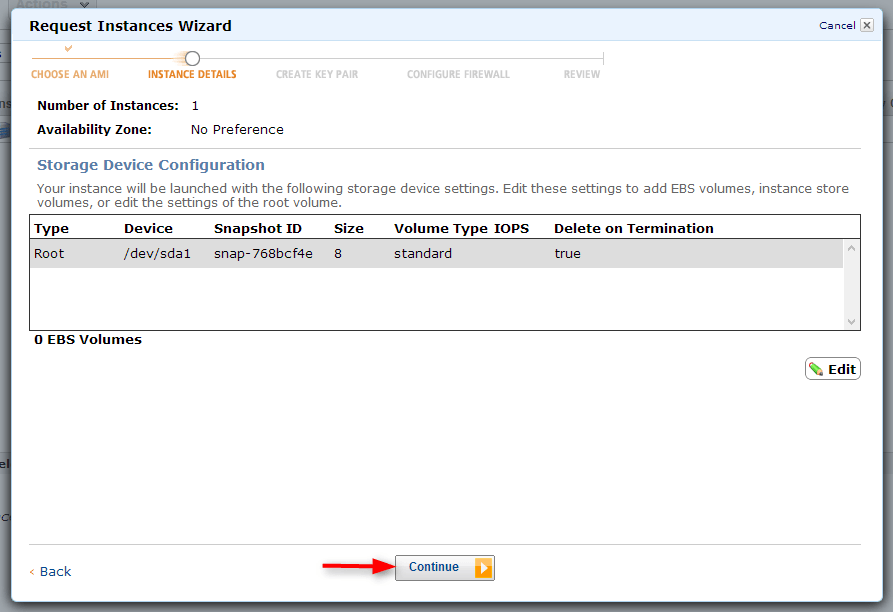
Add a tag to your Instance. For that create a Key-Value pair.
Enter Value to the Name key. Let’s give WordPress and go to Continue.

Step #11
Create a key pair to securely connect to your instance after it launches. For that,
Go to Create a new Key Pair –> Enter a name for your key pair (let’s give name wp-connect-file) –> click on Create & Download your Key Pair.

In just a click wp-connect-file.pem file downloaded into your computer.

Step #12
Create a security group which helps to determine whether the network port is open/blocked on your Instance. For that,
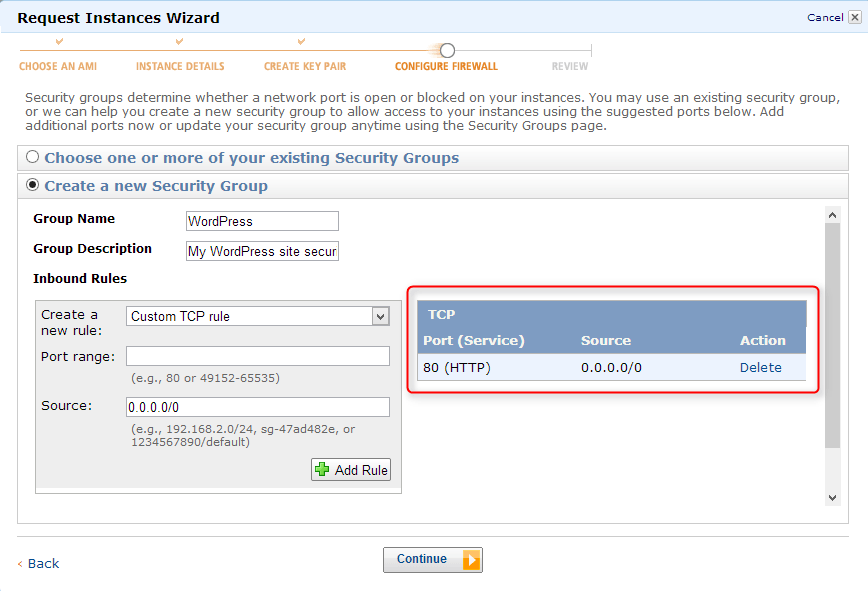
Go to Create a new Security Group –> Enter Group Name( lets give WordPress) –> Enter Group Description –> select HTTP rule from the inbound rules list.
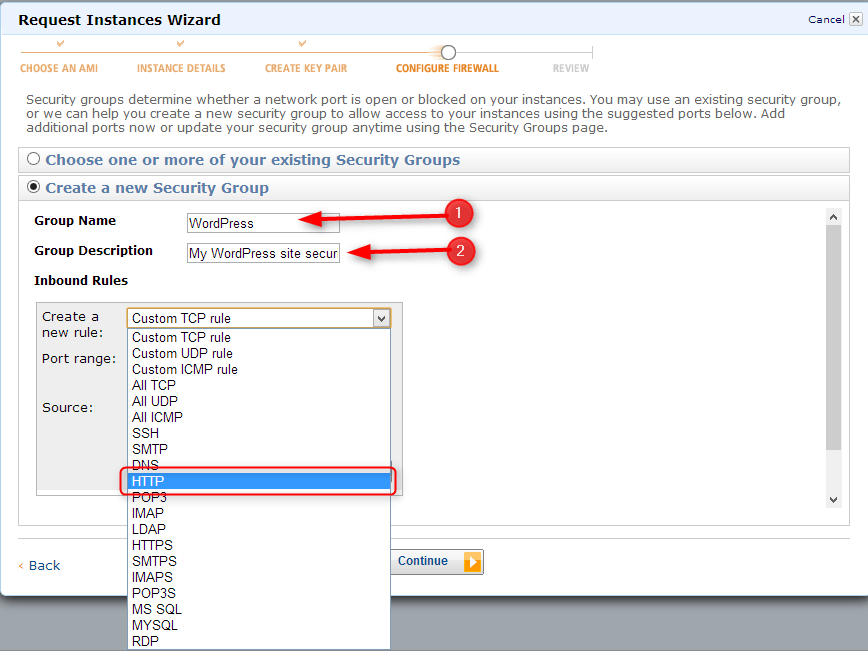
Click on Add Rule
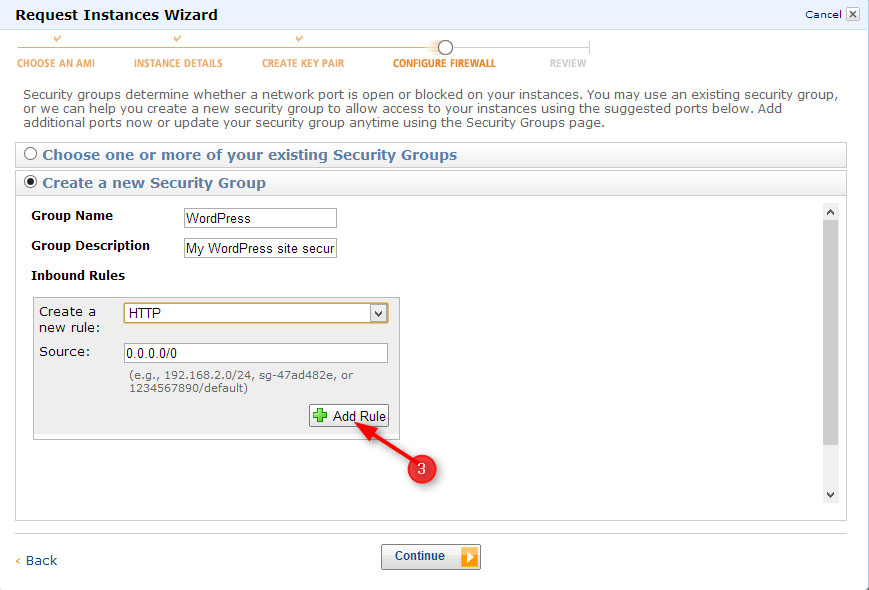
HTTP Service added to the group.
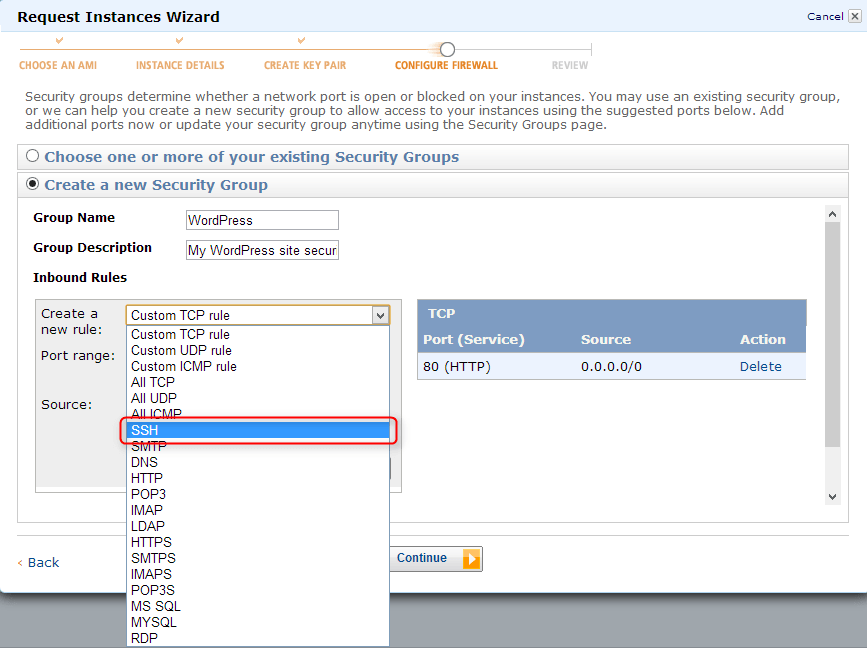
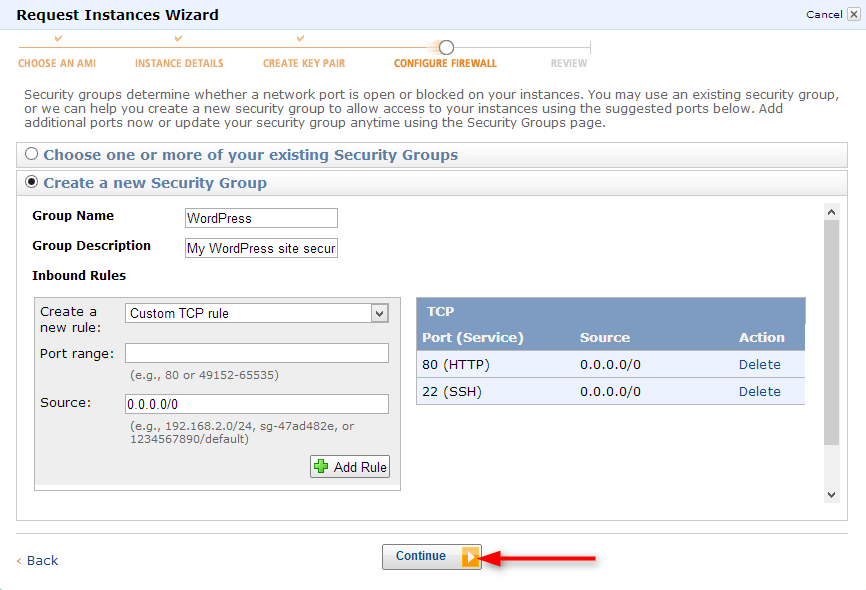
Similarly, select another rule SSH and added into the group
click to Continue
Step #13
Review the details and click on Launch

Step #14
If you want you can create status check alarms. Then click on Close.

Step #15
An instance is launched now and it is at running position.

Step #16
Put the check on the newly created Instance. Then go to Actions –> Connect

Step #17
Enter the Private key path ( location of your wp-connect-file.pem file which is stored on your machine)
Then click on Launch SSH Client.

Setup An Apache
Step #18
You can see here wp-connect-file.pem file is opened now.

Step #19
By default user logged in as ubuntu. Switch user to root by the following command.
sudo su

Step #20
Install Apache on your server by using a command.
apt-get install apache2

Step #21
After completion of Installation process.
Copy the Public DNS code.
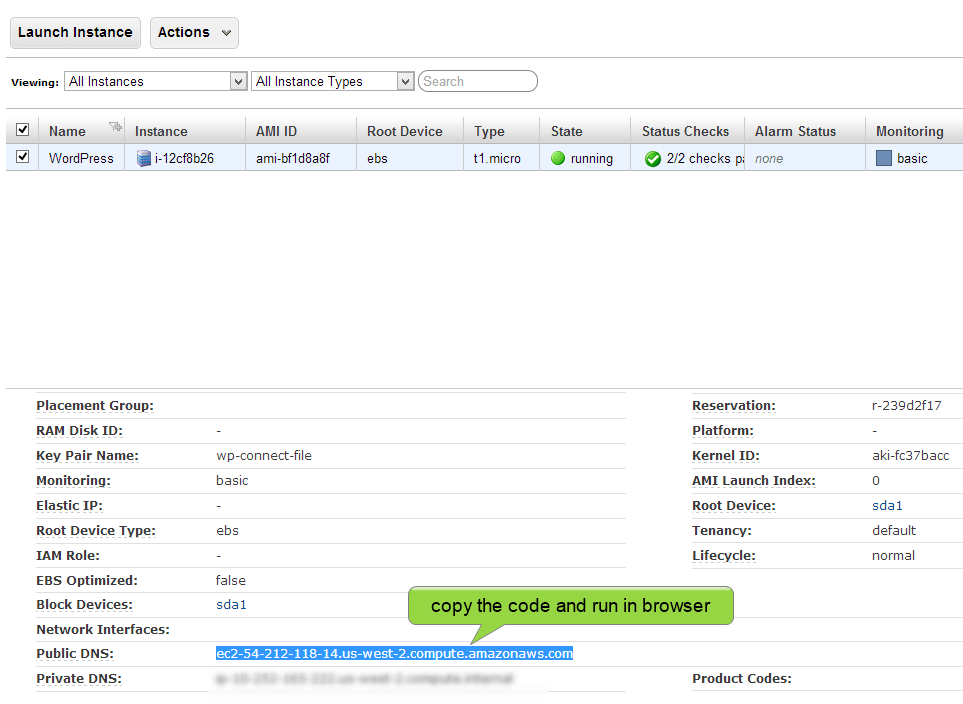
Now, paste the code in browser’s address bar. You will see the page like this.
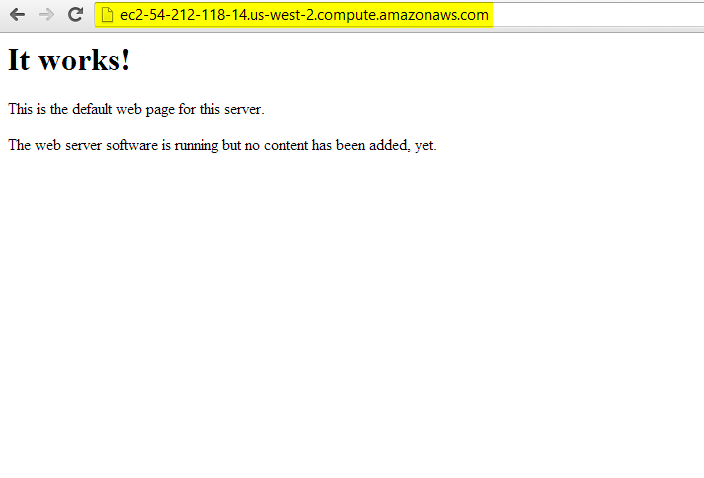
Above page shows that Amazon is working properly.
Install Php5 on Server
Step #22
Use the following command to install Php5 on the server.
Command #1
apt-get install php5

Command #2
apt-get install libapache2-mod-php5
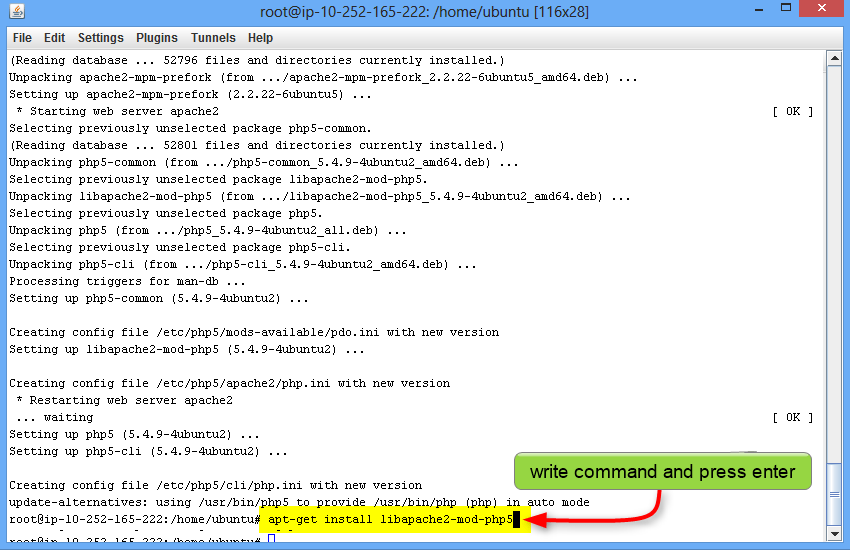
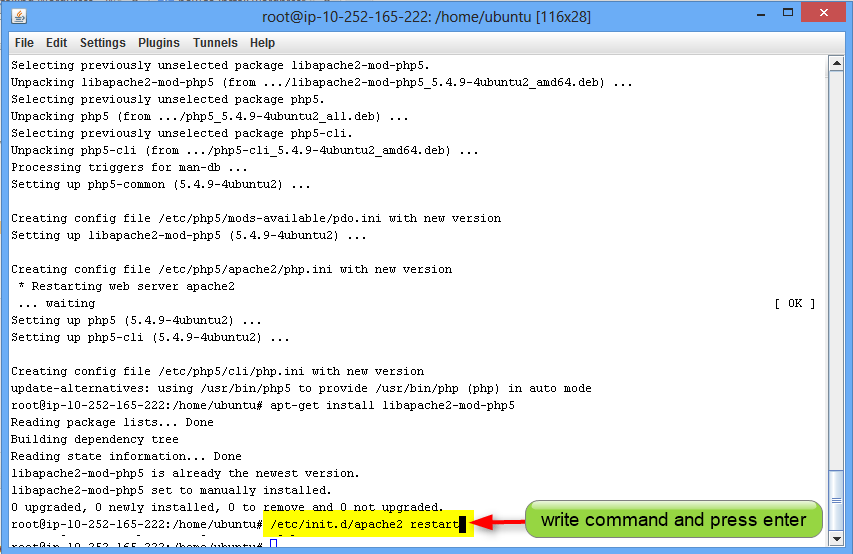
Command #3
/etc/init.d/apache2 restart
Note :
If your PHP installation fails with a message such as “Unable to fetch some archives…” then run the following command and repeat the above process.
apt-get update
Step #23
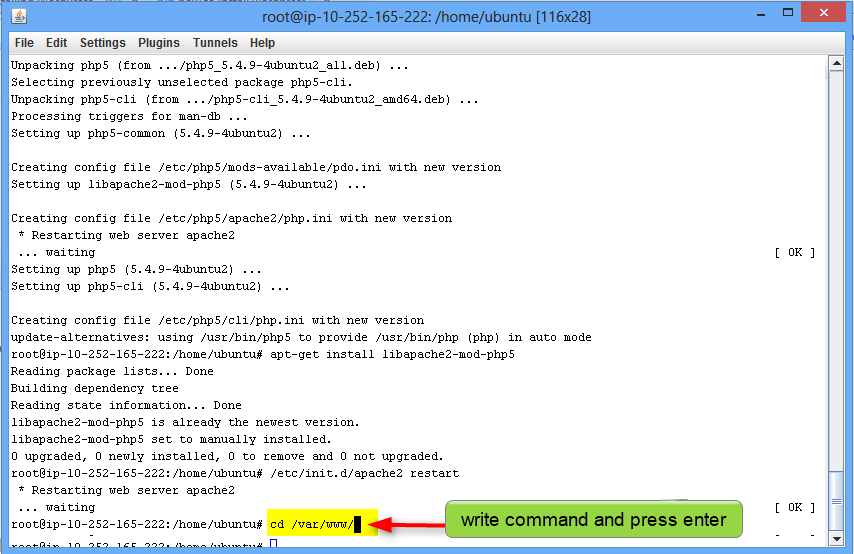
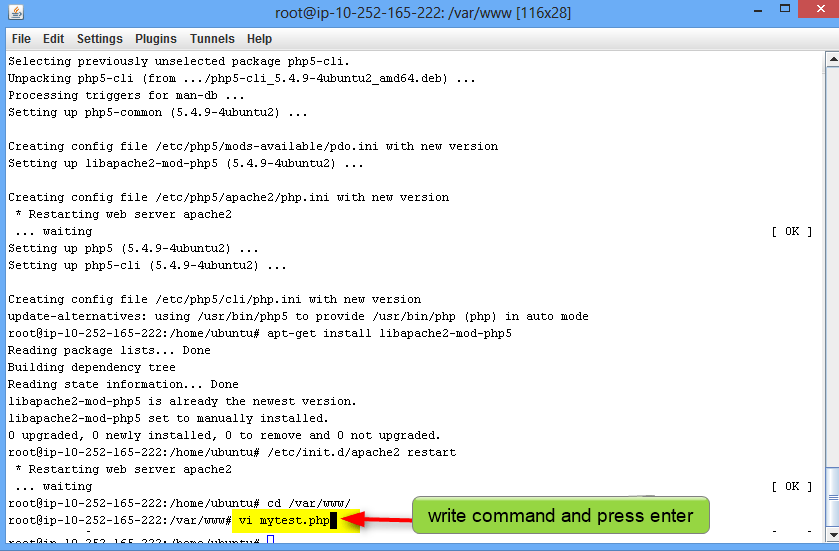
Create a PHP test file ( let say mytest.php) to test php5 is running properly or not. Use the following command to do so.
Command #1
cd /var/www/
Command #2
vi mytest.php
Step #24
Php test file is created. Now insert the content in the file by following sub-steps.
1. To switch into insert mode. Press i
2. Type <? php phpinfo() ?>
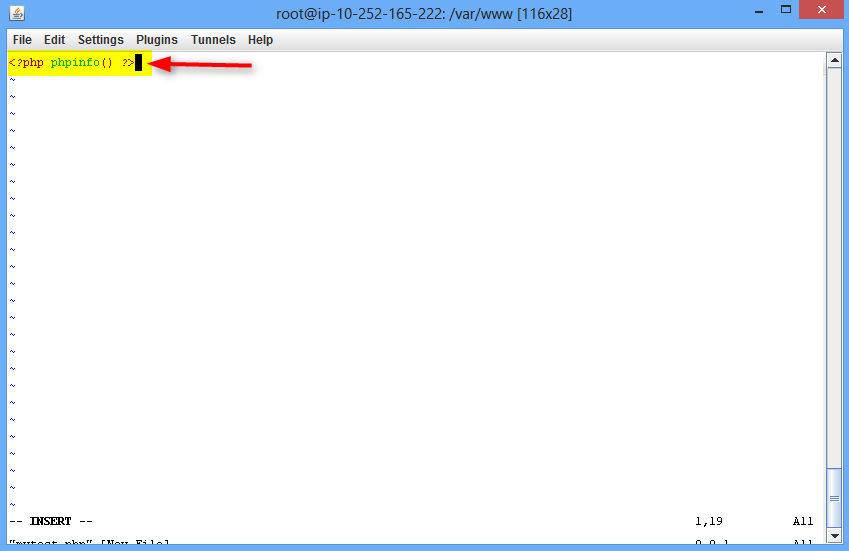
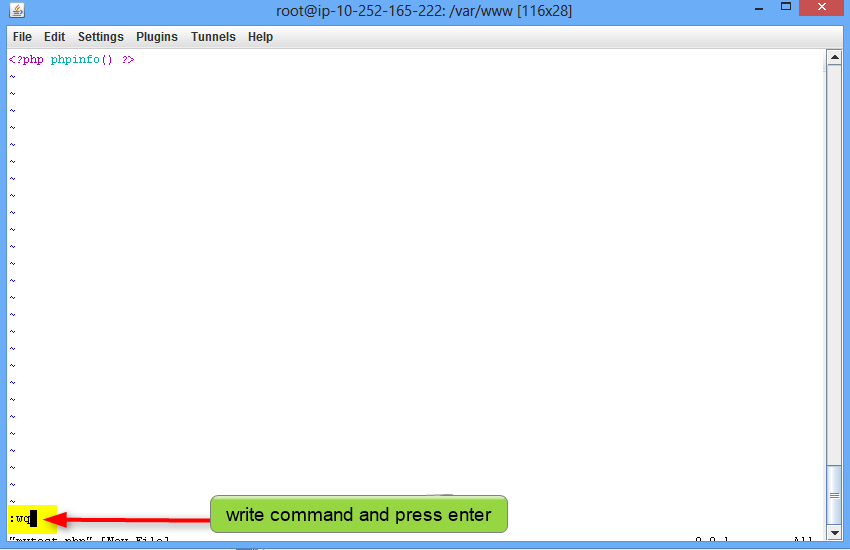
3. Press ESC key to escape from insert mode.
4. Type: wq to write content in the file and quit form the editor.
Step #25
Run the mytest.php file in your browser.
Use the address like this –> public DNS/mytest.php

The above page shows that PHP is running properly on your Apache.
Install MySQL
Step #26
Use the command to install MySQL server.
apt-get install MySQL-server

Step #27
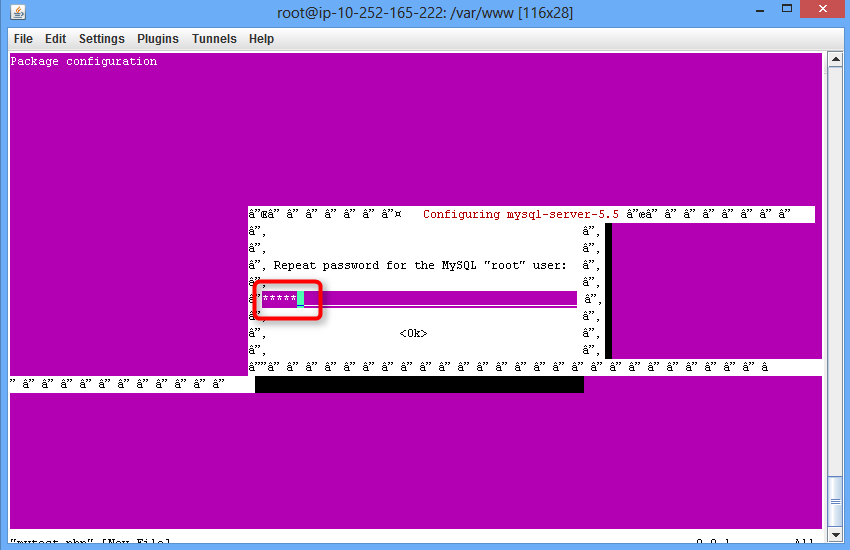
Enter a password for the MySQL root user in the respective field.
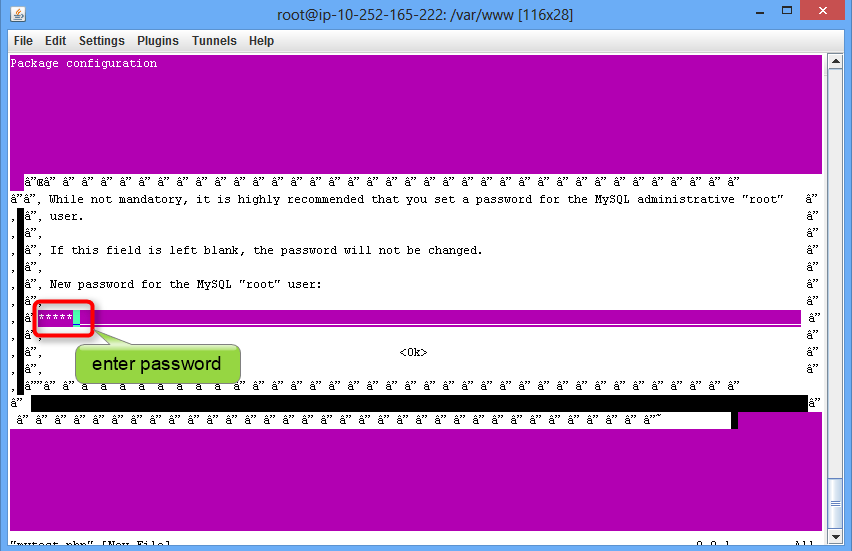
Re-enter the above password for confirmation.
Step #28
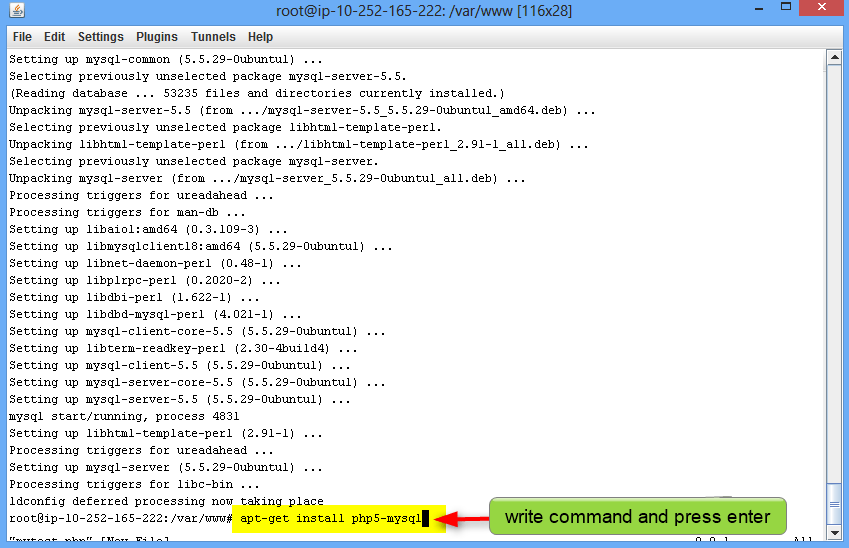
Command #1
To run Php5 with MYSQL use command.
apt-get install php5-MySQL
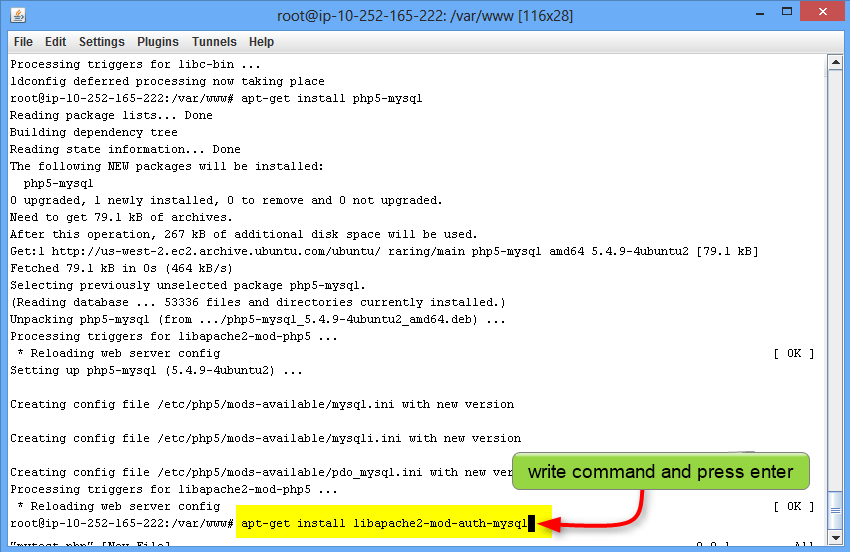
Command #2
Install PHP module for MYSQL by the following command.
apt-get install libapache2-mod-auth-MySQL
Install phpMyAdmin
Step #29
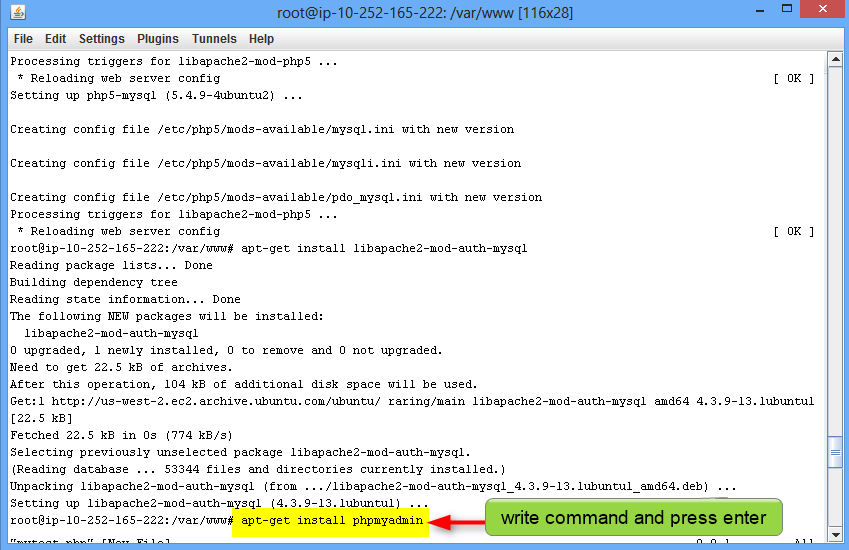
Use the following command to Install phpMyAdmin on your server.
apt-get install phpmyadmin
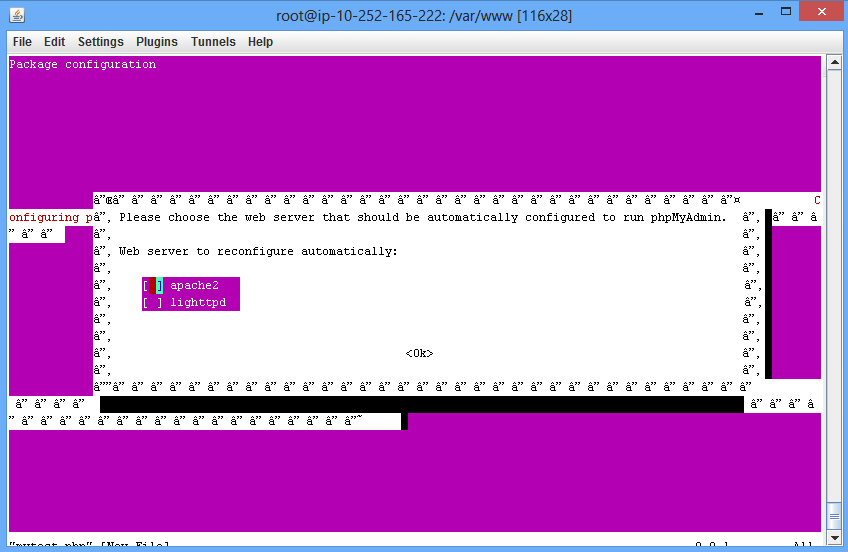
Select apache2 web server.
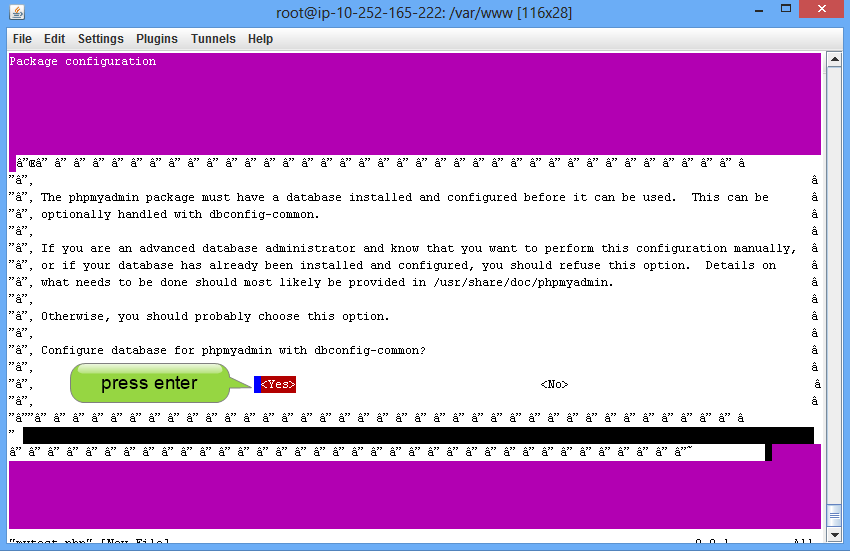
Go with Yes to configure a database for phpmyadmin.
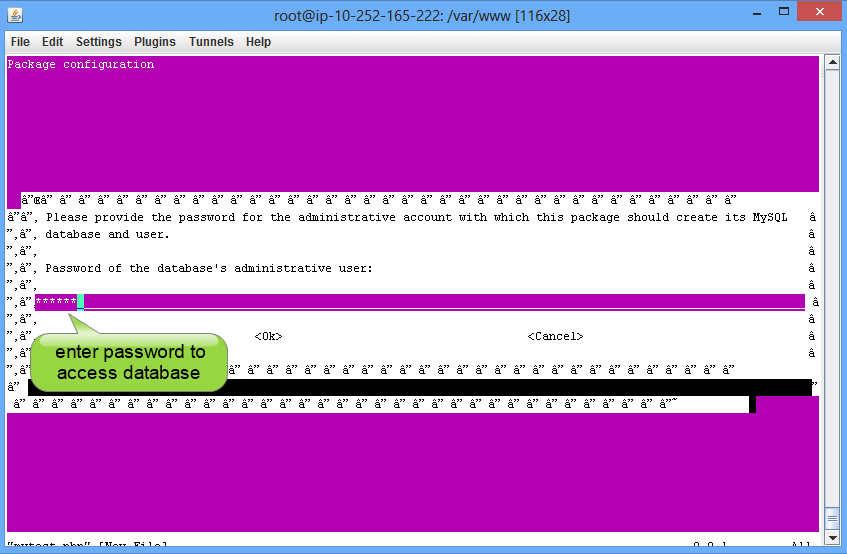
Enter a password for the user admin.
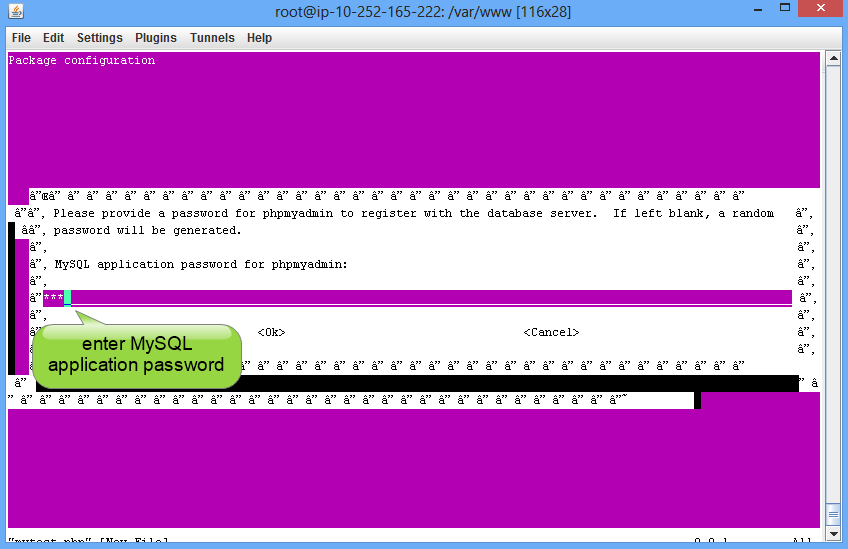
Enter MySQL Application password for phpmyadmin.
Confirm password.
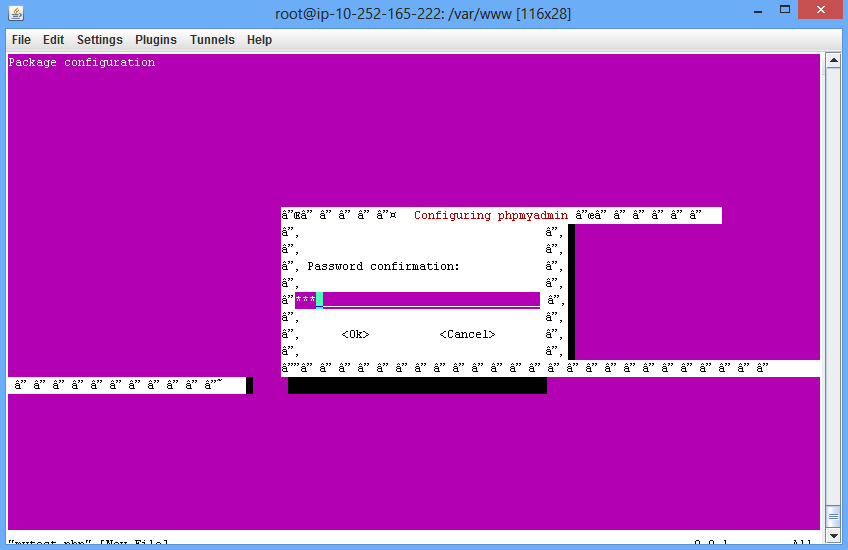
If error generates while installing database then choose to ignore to continue with the operation.

Configure Apache
You need to configure Apache to make phpmyadmin accessible via a browser.
Step #30
Use the following command to configure Apache.
Command #1
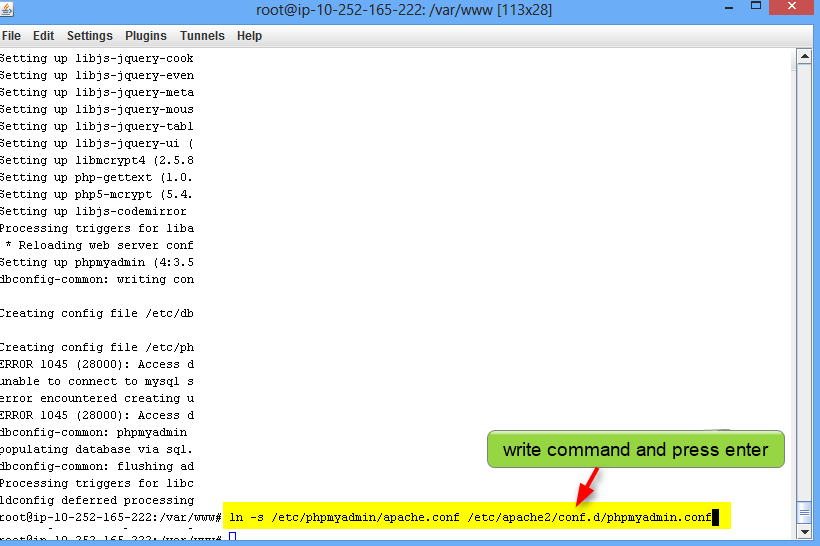
To make phpMyAdmin accessible via browser use the command
ln -s /etc/phpmyadmin/apache.conf /etc/apache2/conf.d/phpmyadmin.conf
Command #2
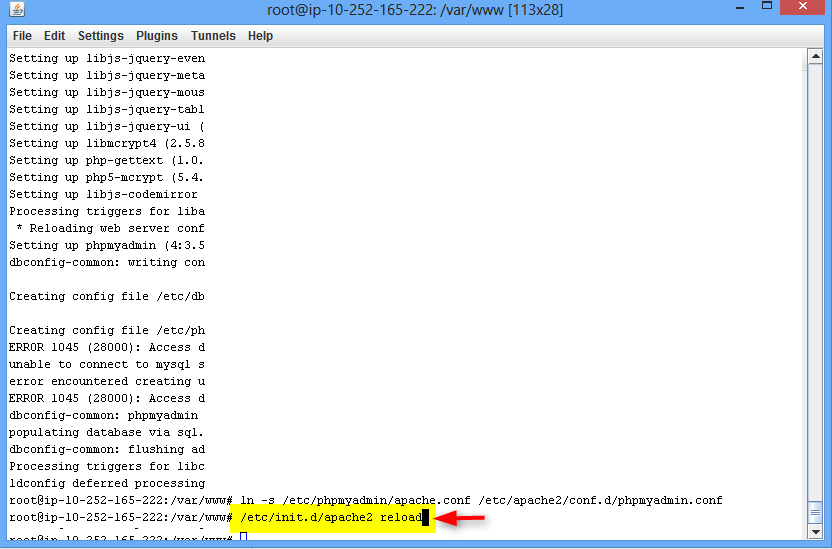
Restart Apache web server to pick up the changes by the following command.
/etc/init.d/apache2 reload
Step #31
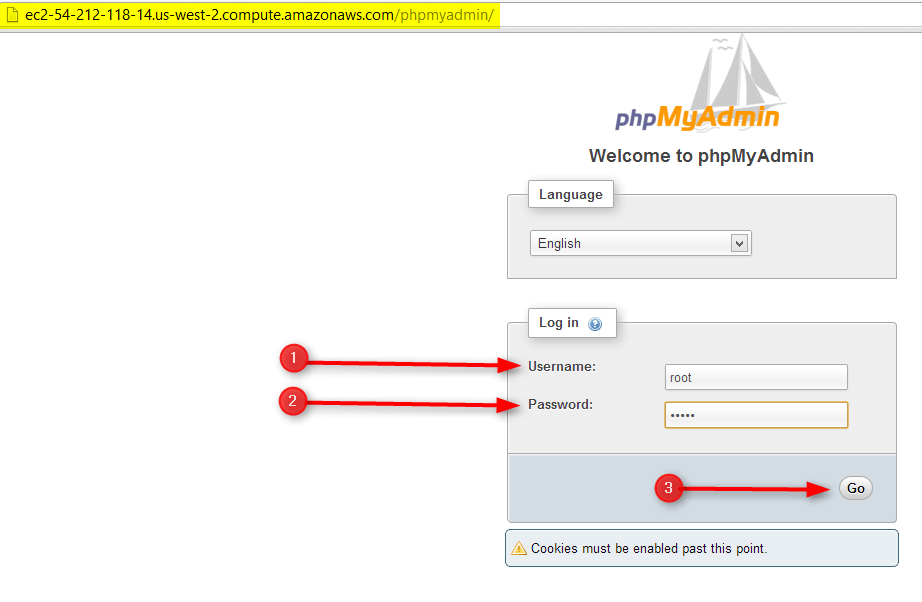
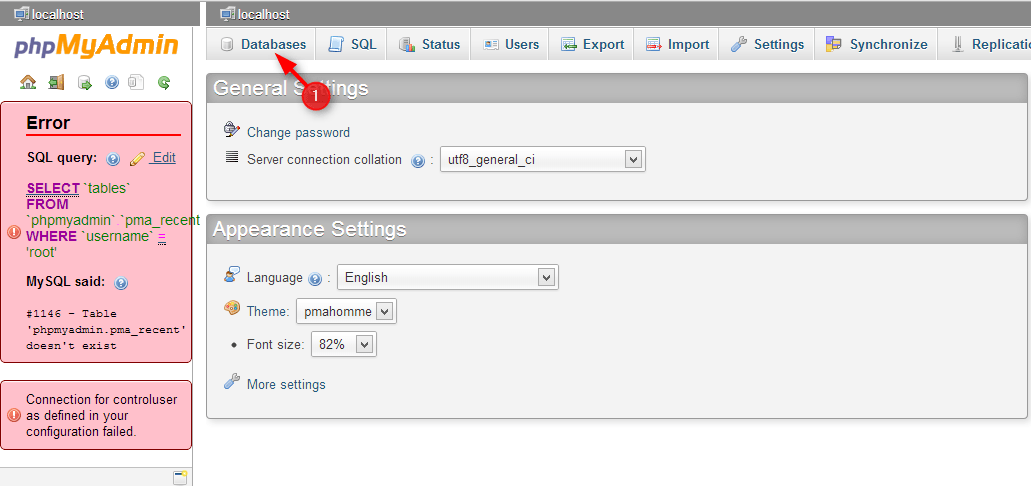
Now you can access phpmyadmin in your browser.
Use the address like this –> public DNS/phpmyadmin
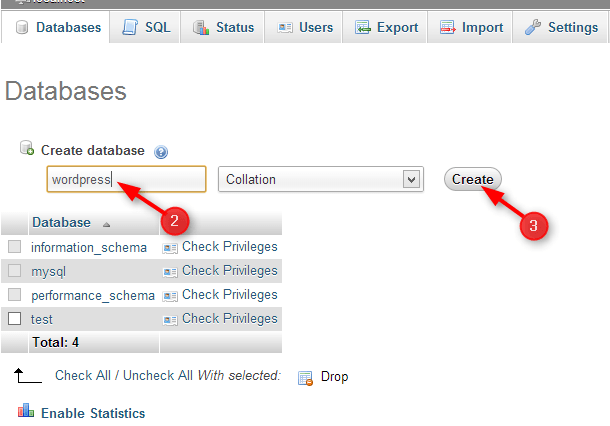
Go to Database for creation.
Create database (let’s say WordPress)
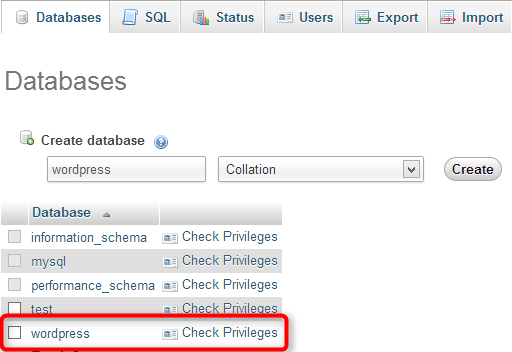
The database is created now as you can see in the image given below.
Installation of WordPress
Step #32
Command #1
Navigate to home directory of the server by using a command.
cd
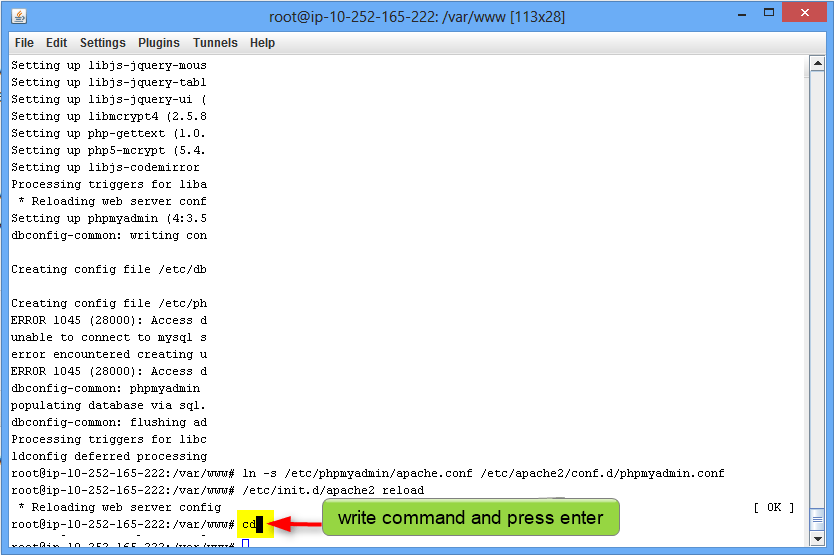
Command #2
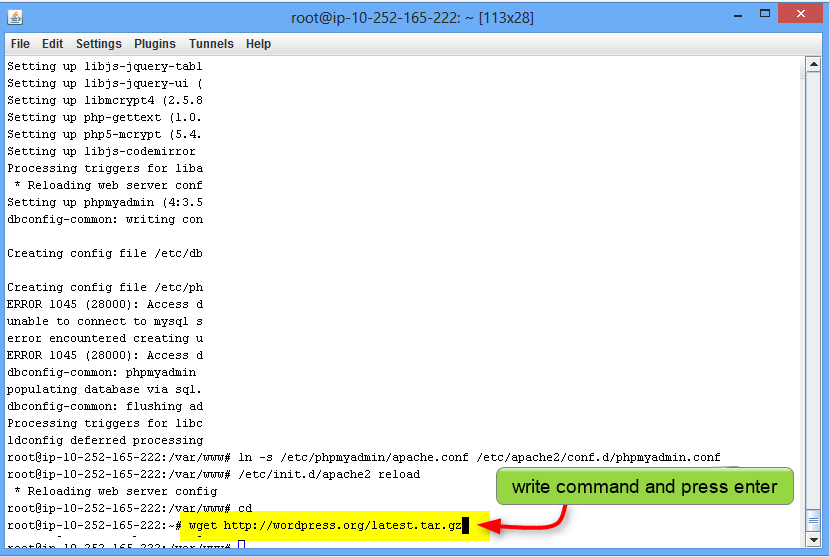
Download the latest copy of the WordPress by using the following command.
wget https://wordpress.org/latest.tar.gz
Command #3
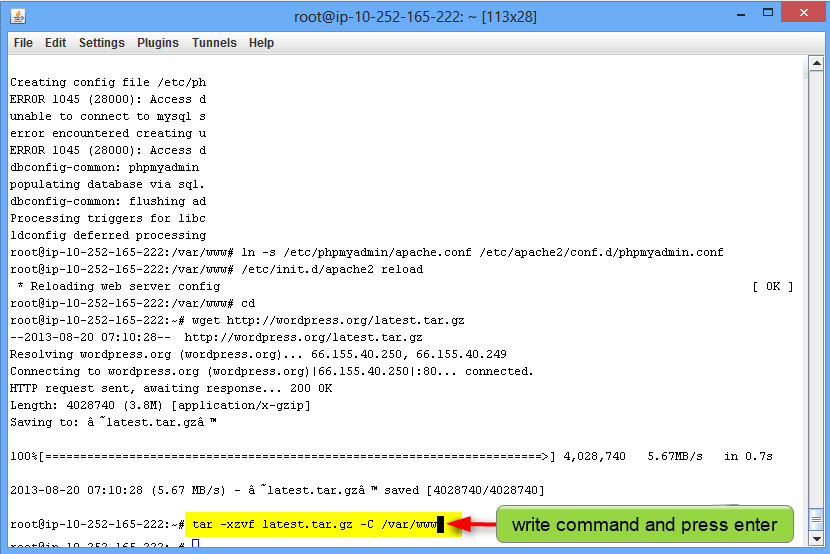
Extract it to the /var/www directory
tar -xzvf latest.tar.gz -C /var/www
Command #4
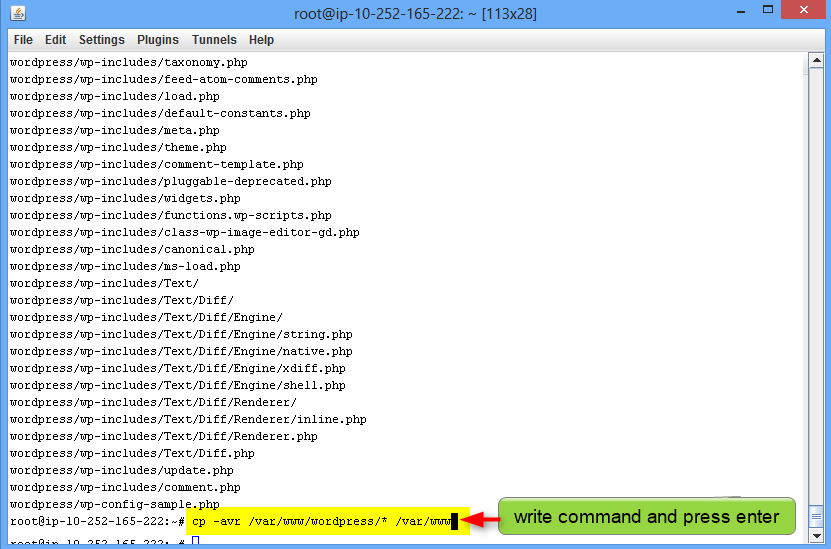
By default, all files will be extracted in a directory “WordPress”.
So to move the files to root of the web server by using the command given below.
cp -avr /var/www/wordpress/* /var/www
Command #5
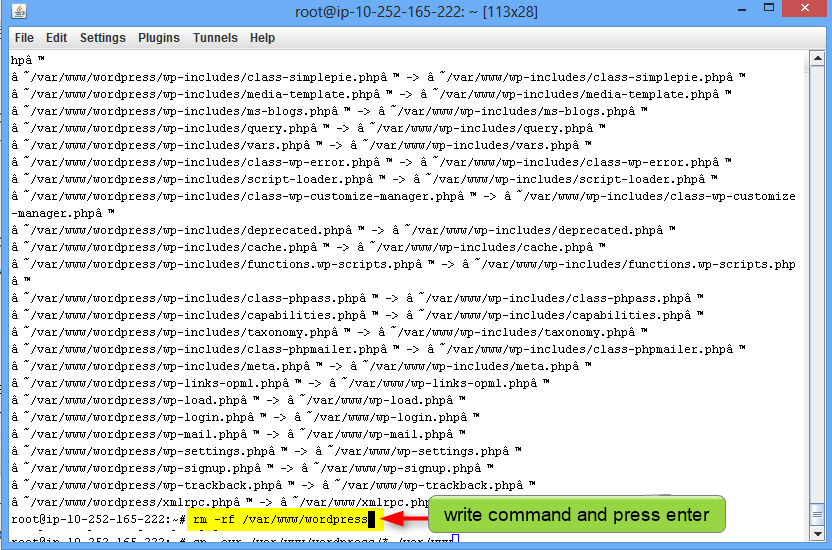
Now remove the “WordPress” directory by using a command.
rm -rf /var/www/WordPress
Mapping Domain Name With Instance IP
Before you install WordPress you need to map a domain name to the virtual server.
Step #33
Select the newly created instance and then click on Elastic IPs listed in EC2 Dashboard.
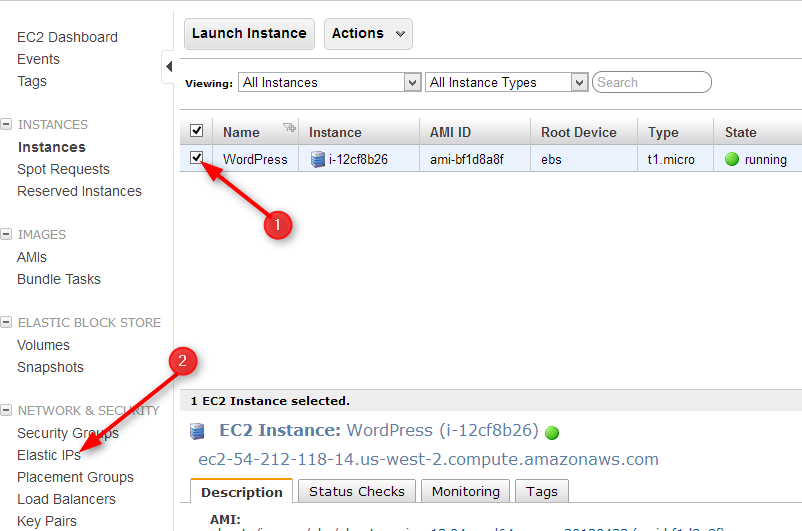
Click on Allocate New Address
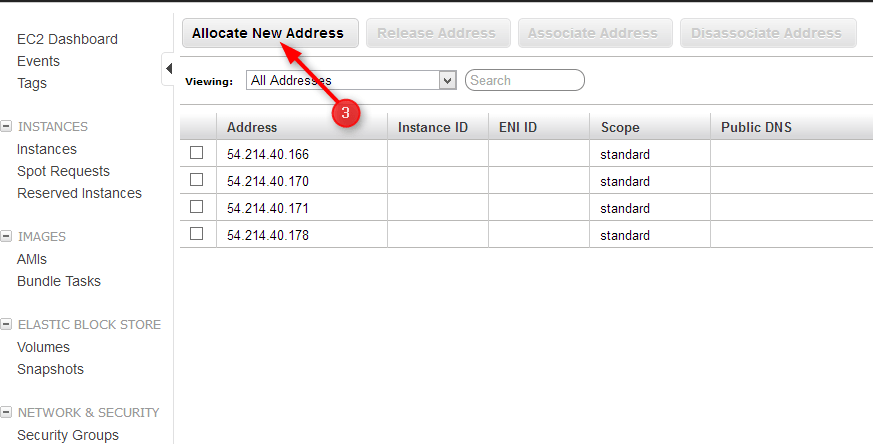
A window appears on the screen for Allocate New Address.
Click on Yes, Allocate.
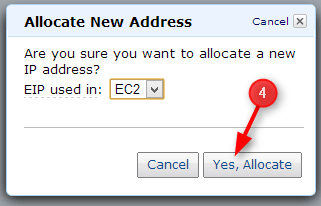
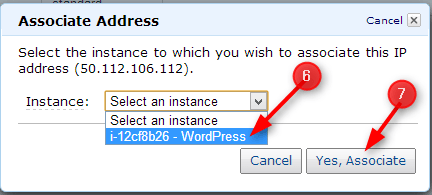
Now go to Associate Address.
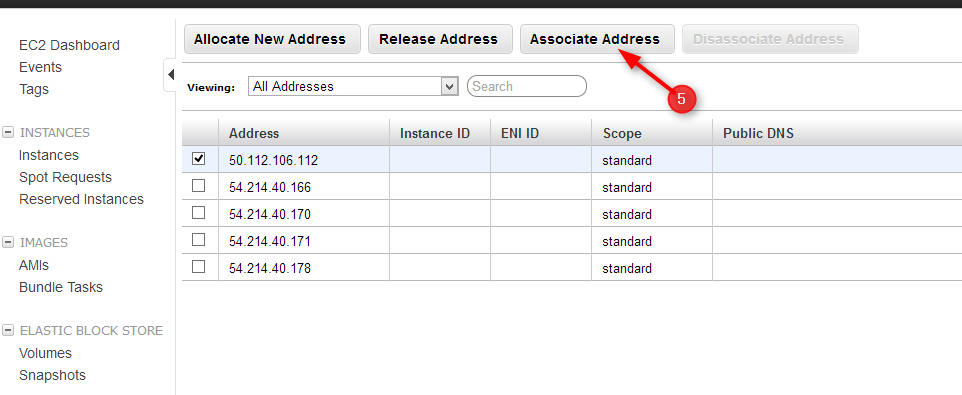
Select your Instance from the drop-down list and then click on Yes, Associate.
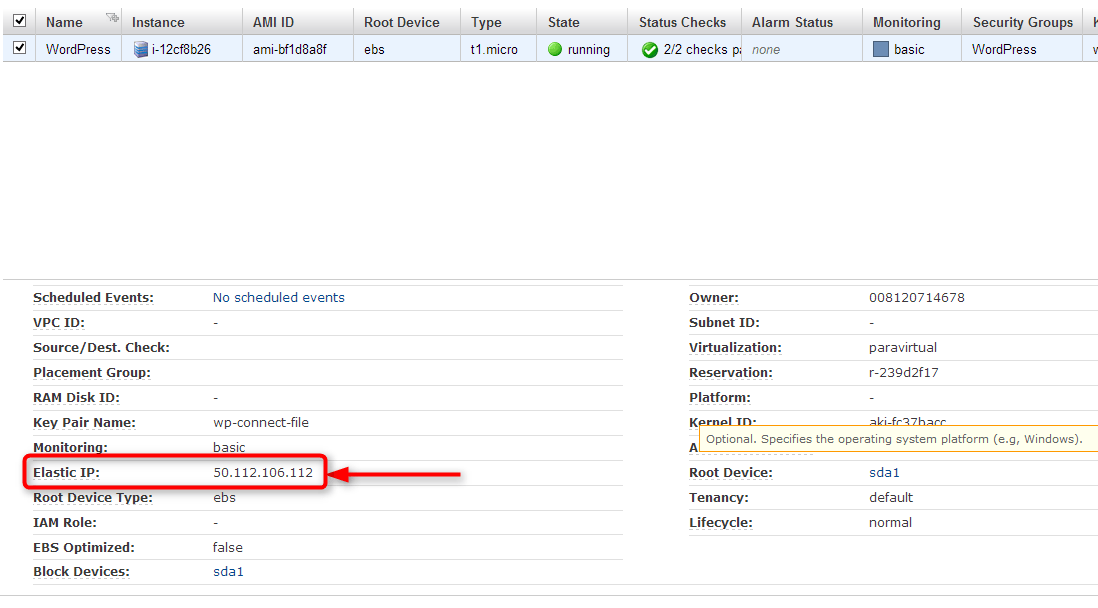
You can see here Elastic IP is now associated with your Instance.
Now run this Elastic IP in the address bar of your browser.
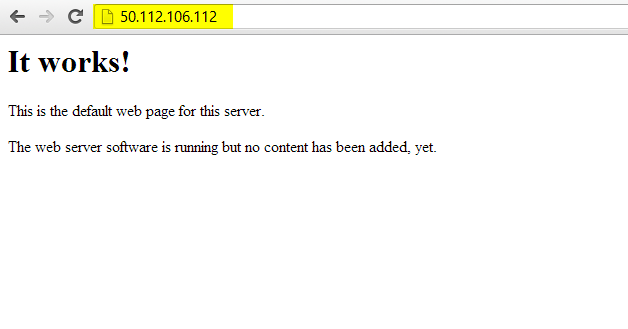
From the above image, it is clear that it will work perfectly.
Open WordPress Installation Page
Step #34
Enter the Elastic IP followed by index.php in the address bar of your browser.
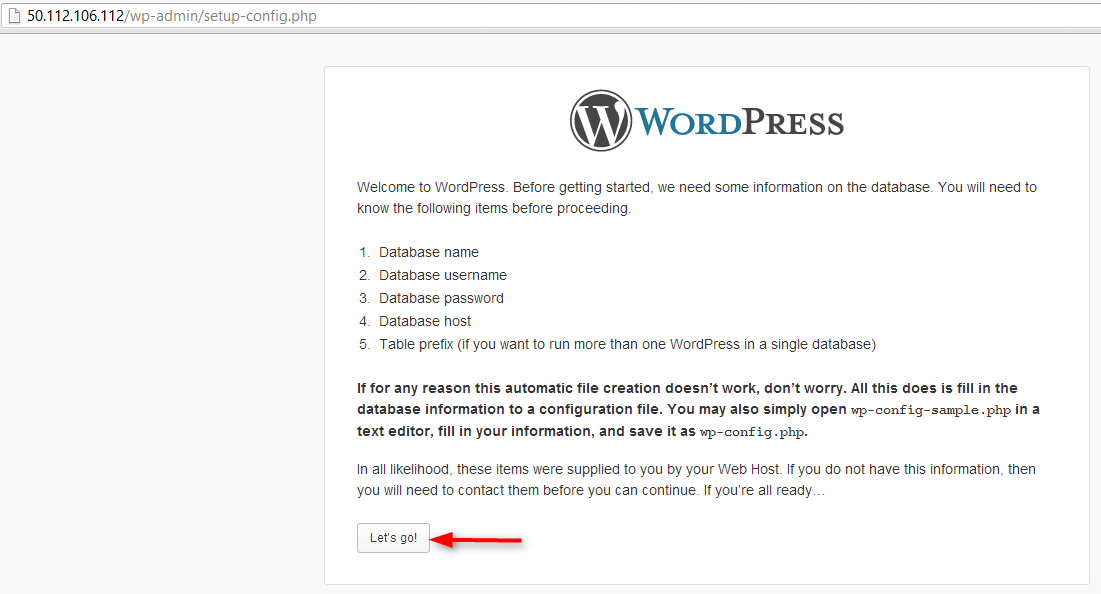
Click on Create a Configuration File.
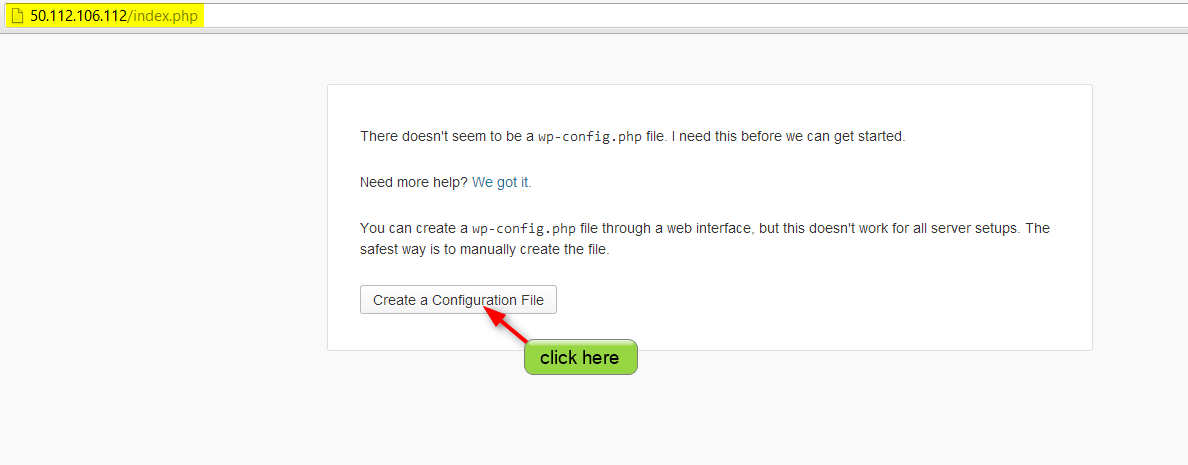
Continue to the next step by click on Let’s go!
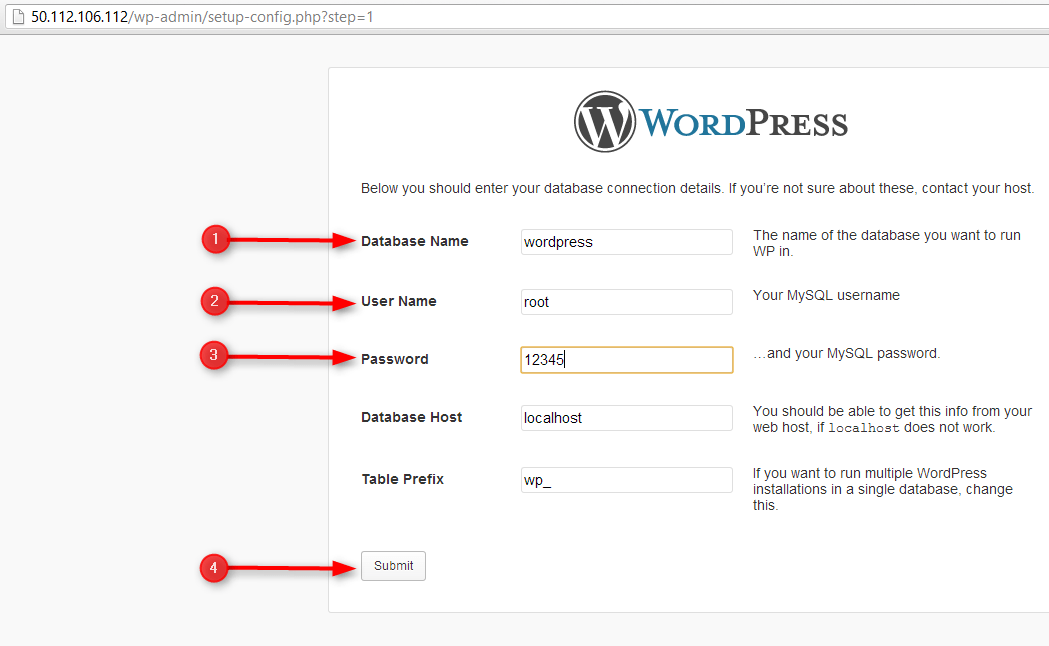
Enter the database connection details.
Setting FTP Access To Your Server
Step #35
Install FileZilla On Your Machine.
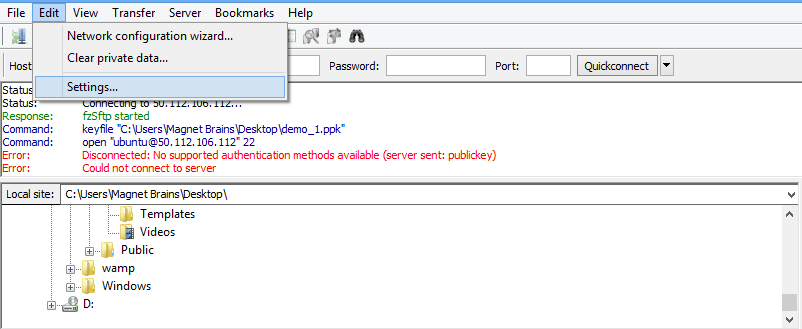
Now open FileZilla and then go to Edit –> Settings…
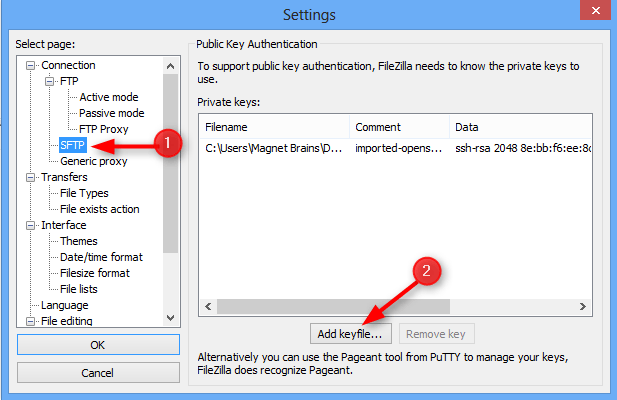
Under Settings select SFTP from the list and then click on Add key file…
Convert your wp-connect-file.pem in a format supported by FileZilla.
For this, click on Yes
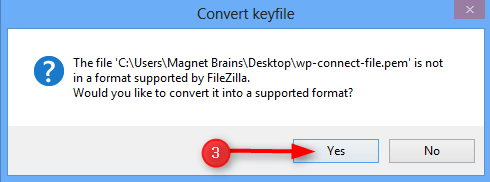
Now the above file is converted into wp-file-connect1.ppk format.
Establish Connection With Server
Step #35
Go to File –> Site Manager…
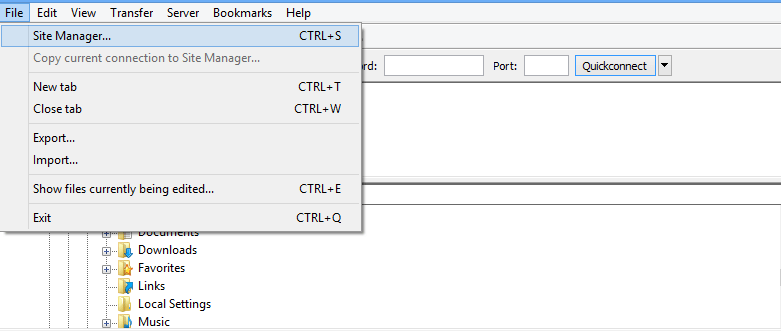
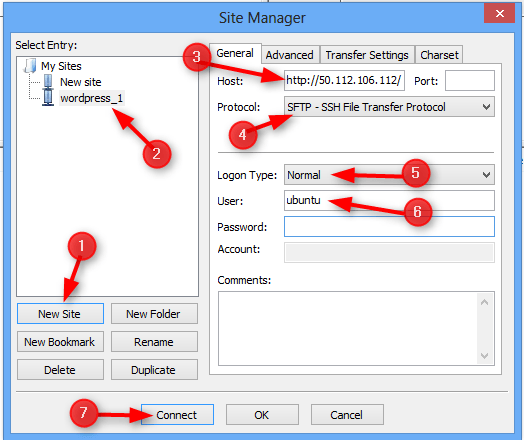
Under General Settings of Site Manager.
Create New Site (lets say wordpress_1)
Enter Elastic IP Address under Host field –> Select SFTP – SSH File Transfer Protocol –> Choose Logon Type as Normal —>Named user as ubuntu –> click on Connect.
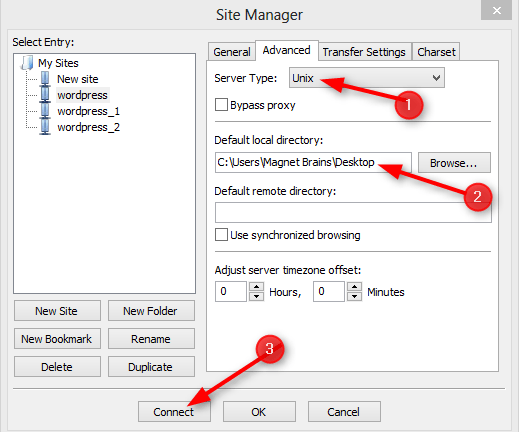
Under Advanced Settings of Site Manager.
Select Server Type Unix —> Enter the path of a local directory of your machine -> click on Connect.
A connection is established now.
Follow the path ( … –> var –> www –> index.html)
In order to execute WordPress perfectly on your browser you need to delete this index.html file.
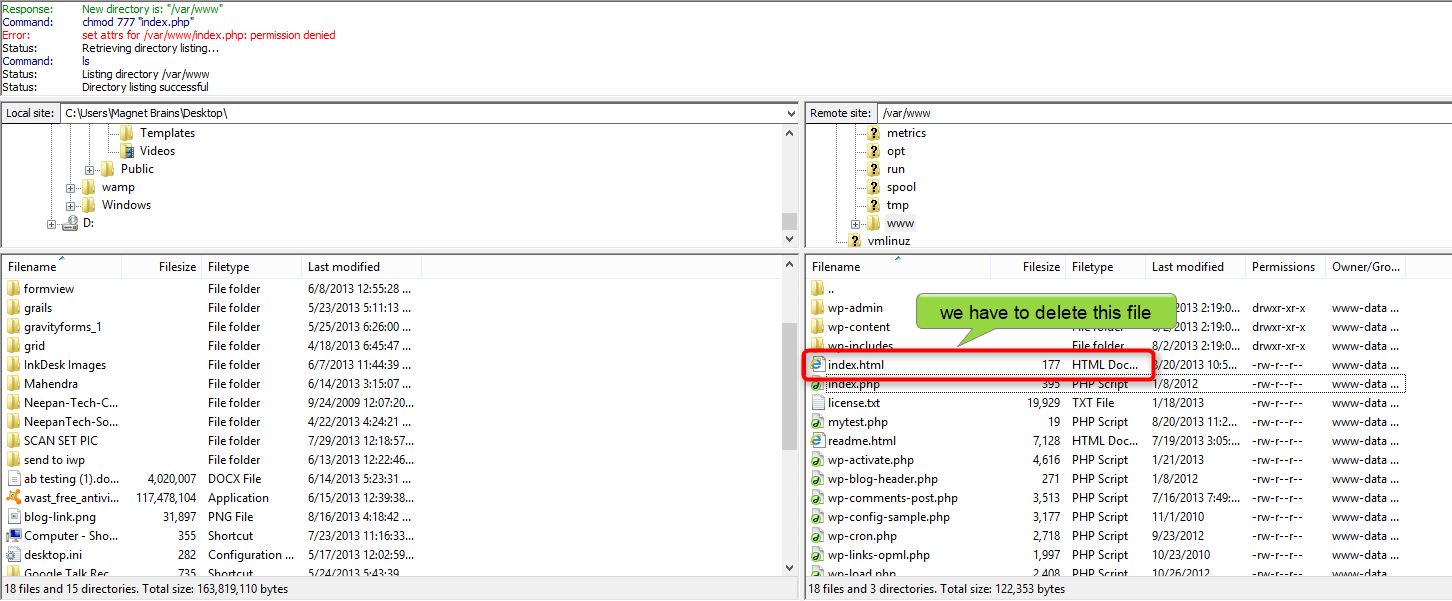
But, you are not allowed to delete the index.html file right now.
Before deleting index.html file do following steps
Step #37
Write the following command in the wp-connect-file.pem.
Command
Below command allow you to write access to /var/www
sudo chown -R www-data /var/www

Step #38
Follow the path ( … –> var –> www –> index.html)
Select index.html file –> do right click –> File permissions…
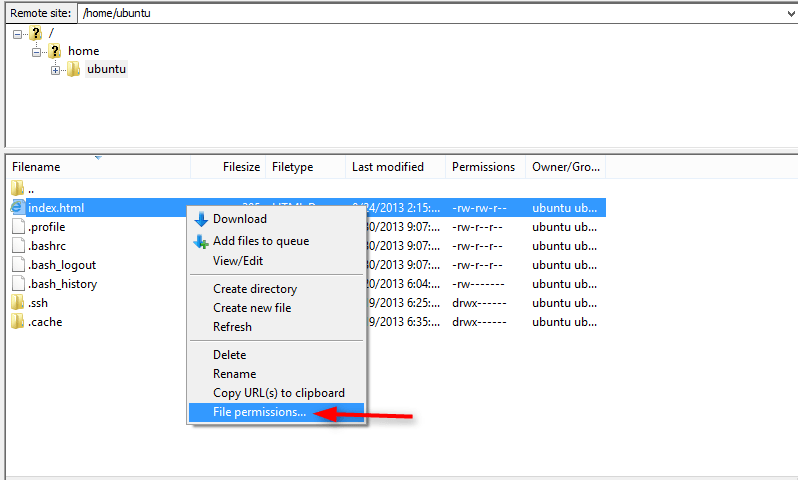
Change the permissions of the index.html file by put check on the highlighted Write and Execute fields appear in the image given below and then click on OK.
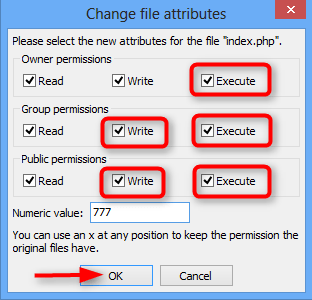
After making changes in file attributes.
Now delete this index.html file permanently.
Enable access and URL Rewrite
Step #39
You need to edit default Apache file by writing following code in the wp-connect-file.pem.
sudo vim /etc/apache2/sites-available/default

Step #40
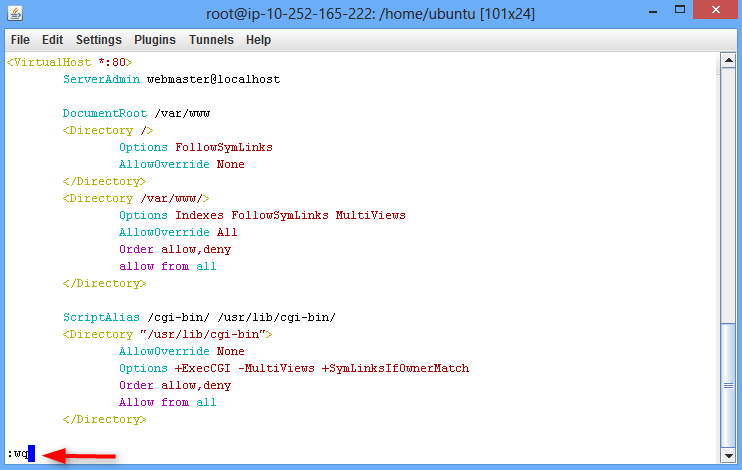
Press I to switch to insert mode.
Change the setting of AllowOverride from None to All
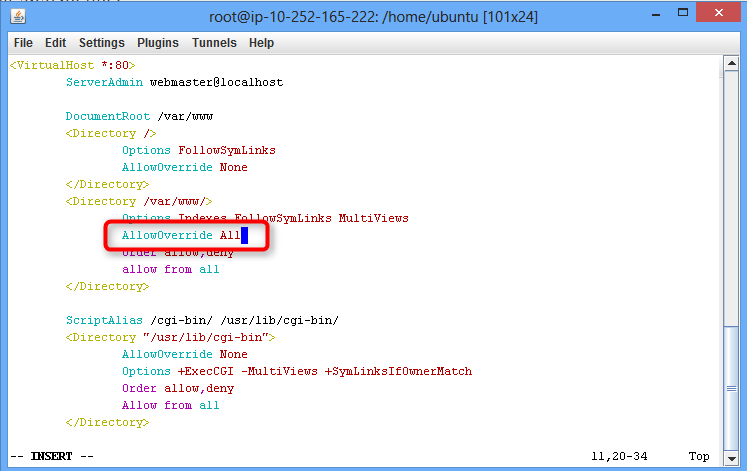
Now hit ESC key to escape from insert mode.
And write wq –> to write the changes in the file and exit from the editor.
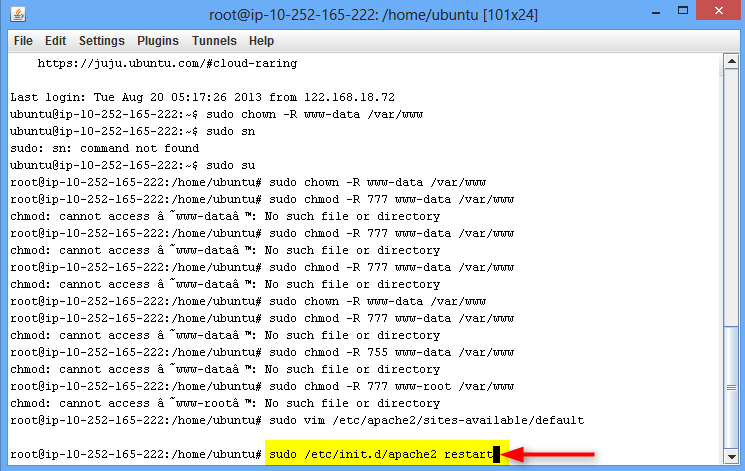
Restart the Apache web server for changes to take effect by writing following command.
sudo /etc/init.d/apache2 restart
Step #41
Now run the WordPress on Amazon EC2.
For that, paste Elastic IP / wp-admin in the address bar of the browser.
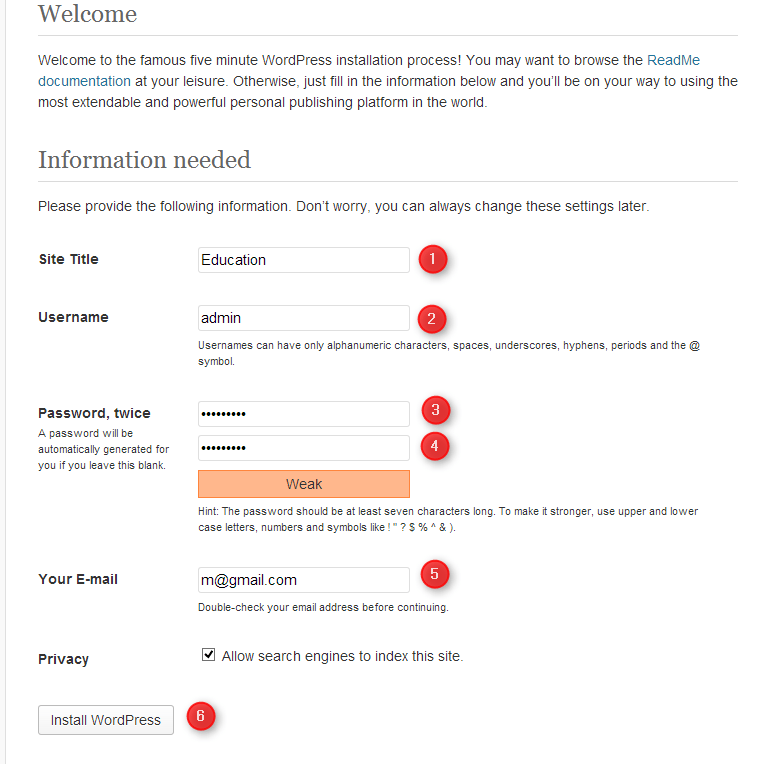
Click on Run the install.

Create your WordPress site.
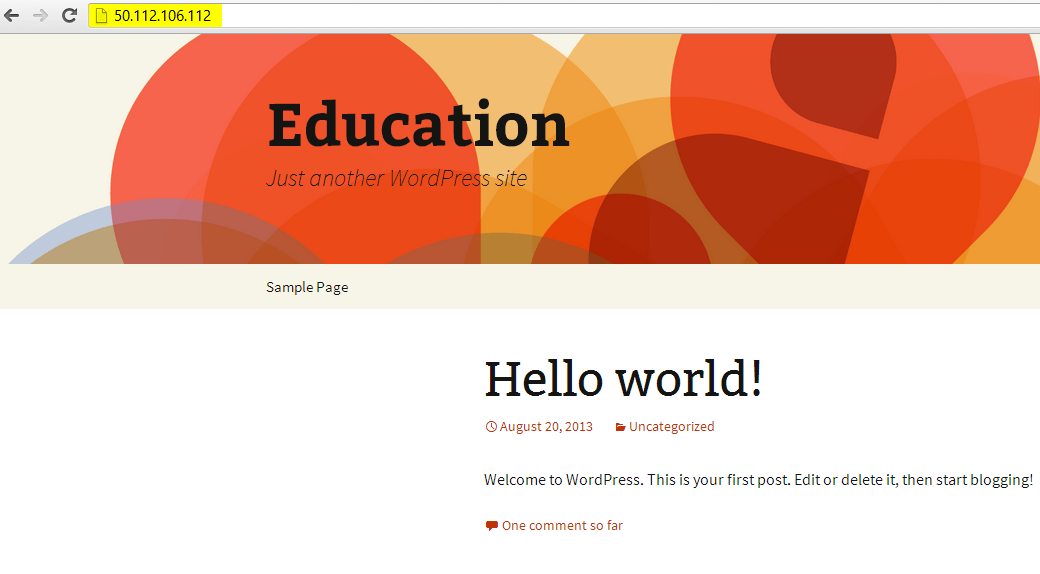
You can see in the image given below WordPress site execute perfectly on your browser.
Note: To map above elastic IP Address of Amazon EC2 with the domain name. You can follow this Tutorial.
Apache Extensions
There is 2 type of Apache extension exists.
1. Rewrite Module
This module enables custom permalink on WordPress.
To enable it to use following commands –
sudo a2enmod rewrite
sudo service apache2 restart
2. Curl Module
This module enables curl based function. Some premium themes and plugins use this curl for verifying activation key.
To enable it to use following commands –
sudo apt-get install php5-curl
sudo service apache2 restart
Hope this tutorial helps you to install WordPress on Amazon EC2 easily. If you find any difficulty in any of the above steps, let me know. I will definitely resolve your issues.
You might also be interested in:


