Email marketing service plays a vital role in any online business. It’s not only a source to tell customers about your latest products or services, but also encourage them to buy it.
There are a number of email marketing services available that best suits your needs like- MailChimp, Aweber, GetResponse, iContact and many more.
But, people find it difficult to use these email marketing services in WordPress plugin.
Also, read.
MailGet – Email Marketing Service affordable and highly reliable to send bulk emails. They have API to collect emails and send autoresponders.
Therefore, I come up with a tutorial that helps you to know how to use GetResponse API in WordPress plugin. You will learn how to fetch the campaign that you have already created in your GetResponse account, and how you can add subscriber in that campaign.
You might also be interested in:

[dlv dl_url=”https://www.inkthemes.com/wp-content/uploads/2014/05/GetResponse.zip” dl_text =”Download GetResponse Files”]
Note: I have already covered the use of MailChimp and Aweber in WordPress plugin in my last posts.
Steps To Follow
It is assumed that you have created an account on GetResponse.
Once the account is created, you will get a GetResponse API key, same as the below image.

This API key is used to identify your account so you need to keep it securely. Now, enter this API key in the below code.
You can also get your API key via this link- http://www.getresponse.com/my_api_key.html
[php]<?php
/**
*
* Demonstrates how to use GetResponse API in WordPress Plugin.
*
* Fetch the list of campaign.
* Add new contact to campaign.
*
* @author InkThemes
*
*/
# JSON-RPC module is required
# available at http://github.com/GetResponse/DevZone/blob/master/API/lib/jsonRPCClient.php
# alternate version available at http://jsonrpcphp.org/
require_once ‘jsonRPCClient.php’;
# your API key available at http://www.getresponse.com/my_api_key.html
$api_key = ‘Enter API key’; //Place API key here
$api_url = ‘http://api2.getresponse.com’;
?>
It is very important to include library for GetResponse API so you can either download it or directly use the below code.
As I have already downloaded and saved it under the file, named jsonRPCClient.php
[php]<?php
/**
* jsonRPCClient.php
*
* Written using the JSON RPC specification –
* http://json-rpc.org/wiki/specification
*
*/
class jsonRPCClient
{
protected $url = null, $is_notification = false, $is_debug = false;
// http errors – more can be found at
// http://en.wikipedia.org/wiki/List_of_HTTP_status_codes
public $http_errors = array
(
400 => ‘400 Bad Request’,
500 => ‘500 Internal Server Error’
);
/**
* Takes the connection parameter and checks for extentions
*
* @param string $url – url name like http://example.com/
* @return void
*/
public function __construct( $url )
{
$validateParams = array
(
false === extension_loaded(‘curl’) => ‘The curl extension must be loaded for using this class !’,
false === extension_loaded(‘json’) => ‘The json extension must be loaded for using this class !’
);
$this->checkForErrors( $validateParams );
// set an url to connect to
$this->url = $url;
}
/**
* Set debug mode
*
* @param boolean $is_debug
* @return void
*/
public function setDebug( $is_debug )
{
$this->is_debug = !empty($is_debug);
}
/**
* Set request to be a notification
*
* @param boolean $is_notification
* @return void
*/
public function setNotification( $is_notification )
{
$this->is_is_notification = !empty($is_notification);
}
/**
* Performs a request and gets the results
*
* @param string $method – A String containing the name of the method to be invoked.
* @param array $params – An Array of objects to pass as arguments to the method.
* @return array
*/
public function __call( $method, $params )
{
static $counter;
// check if given params are correct
$validateParams = array
(
false === is_scalar($method) => ‘Method name has no scalar value’,
false === is_array($params) => ‘Params must be given as array’
);
$this->checkForErrors( $validateParams );
// if this is_notification – JSON-RPC specification point 1.3
$requestId = true === $this->is_notification ? null : ++$counter;
// Request (method invocation) – JSON-RPC specification point 1.1
$request = json_encode( array ( ‘method’ => $method, ‘params’ => array_values($params), ‘id’ => $requestId ) );
// if is_debug mode is true then add request to is_debug
$this->debug( ‘Request: ‘ . $request . “rn”, false );
$response = $this->getResponse( $request );
// if is_debug mode is true then add response to is_debug and display it
$this->debug( ‘Response: ‘ . $response . “rn”, true );
// decode and create array ( can be object, just set to false )
$response = json_decode( utf8_encode($response), true );
// if this was just is_notification
if ( true === $this->is_notification )
{
return true;
}
// check if response is correct
$validateParams = array
(
!is_null($response[‘error’]) => ‘Request have return error: ‘ . $response[‘error’],
$response[‘id’] != $requestId => ‘Request id: ‘.$requestId.’is different from Response id: ‘ . $response[‘id’],
);
$this->checkForErrors( $validateParams );
return $response[‘result’];
}
/**
* When the method invocation completes, the service must reply with a response.
* The response is a single object serialized using JSON
*
* @param string $request
* @return string
*/
protected function & getResponse( & $request )
{
// do the actual connection
$ch = curl_init();
// set URL
curl_setopt($ch, CURLOPT_URL, $this->url);
curl_setopt($ch, CURLOPT_POST, 1);
curl_setopt($ch, CURLOPT_POSTFIELDS, $request);
curl_setopt($ch, CURLOPT_HEADER, ‘Content-type: application/json;’);
curl_setopt($ch, CURLOPT_ENCODING, ‘gzip,deflate’);
curl_setopt($ch, CURLOPT_RETURNTRANSFER, 1);
curl_setopt($ch, CURLOPT_FOLLOWLOCATION, 1);
// send the request
$response = curl_exec($ch);
// check http status code
$http_code = curl_getinfo($ch, CURLINFO_HTTP_CODE);
if ( isset($this->http_errors[$http_code]) )
{
throw new Exception(‘Response Http Error – ‘ . $this->http_errors[$http_code] );
}
// check for curl error
if ( 0 < curl_errno($ch) )
{
throw new Exception(‘Unable to connect to ‘.$this->url . ‘ Error: ‘ . curl_error($ch) );
}
// close the connection
curl_close($ch);
return $response;
}
/**
* Check for errors
*
* @param array $validateArray
* @return void
*/
protected function checkForErrors( & $validateArray )
{
foreach ( $validateArray as $test => $error )
{
if ( $test )
{
throw new Exception( $error );
}
}
}
/**
* For is_debug and performance stats
*
* @param string $add
* @param boolean $show
* @return void
*/
protected function debug( $add, $show = false )
{
static $debug, $startTime;
// is_debug off return
if ( false === $this->is_debug )
{
return;
}
// add
$debug .= $add;
// get starttime
$startTime = empty($startTime) ? array_sum(explode(‘ ‘, microtime())) : $startTime;
if ( true === $show and !empty($debug) )
{
// get endtime
$endTime = array_sum(explode(‘ ‘, microtime()));
// performance summary
$debug .= ‘Request time: ‘ . round($endTime – $startTime, 3) . ‘ s Memory usage: ‘ . round(memory_get_usage() / 1024) . ” kbrn”;
echo nl2br($debug);
// send output imidiately
flush();
// clean static
$debug = $startTime = null;
}
}
}
?>
Retrieve Campaign Name and Id
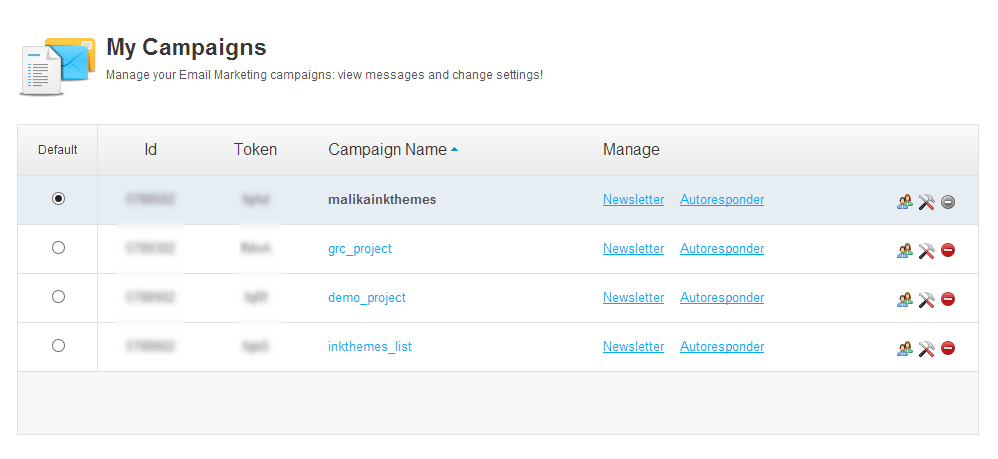
You can create as many campaigns you want, as you can see there are 4 campaigns listed below.

Now using below code, you can retrieve this campaign, i.e. its names and id’s.
[php]<?php
# initialize JSON-RPC client
$client = new jsonRPCClient($api_url);
try {
$name = array();
$result = $client->get_campaigns($api_key);
//Get Campaigns name and id.
foreach($result as $r){
$name = $r[‘name’];
print “List Name –> ” . $name; echo ‘ ’; echo ‘ ’; echo ‘ ’; echo ‘ ’; echo ‘ ’; echo ‘ ’; echo ‘ ’; echo ‘ ’;
$result2 = $client->get_campaigns(
$api_key,
array (
‘name’ => array ( ‘EQUALS’ => $name )
)
);
$res = array_keys($result2);
$CAMPAIGN_IDs = array_pop($res);
print “List ID –> ” . $CAMPAIGN_IDs;
echo “<br>”;
}
}
catch (Exception $e) {
echo $e->getMessage();
}
?>
When you execute the above piece of code, all the campaign with respective token id’s appear on the output screen.

Add Subscriber Name And Email Address In The Campaign
You can add as many subscribers you want in the campaign. As you can see in the below image, campaign inkthemes_list does not contain any subscriber in the list.

But, you can easily add subscriber in the campaign by providing respective token id, additionally, the subscriber name and email address in the below code.
[php]<?php
// Add contact to selected campaign id
try{
$result_contact = $client->add_contact(
$api_key,
array (
‘campaign’ => ‘Campaign Id’,
‘name’ => ‘ Subscriber Name’,
’email’ => ‘Subscriber email’
)
);
echo “<p style=’color: blue; font-size:24px;’> Contact Added </p>”;
}
catch (Exception $e) {
echo $e->getMessage();
}
?>
[/php]Once the contact is added, this is how the output window appears.

Moreover, a subscriber will receive a confirmation email for a subscription.

Now, after confirming it, below window appears.

Finally, subscriber listed under the particular campaign, same as the below image where new subscriber added in the inkhthemes_list campaign.

Conclusion
I hope this tutorial is clear to you. You will now easily use the GetResponse API in WordPress plugin. But in case if you do not understand any segment or have any query, then do let me know. I will definitely help you out. Also, share your thoughts about the post. 🙂
You might also be interested in:


